1996 PONTIAC GRAND-AM turn signal
[x] Cancel search: turn signalPage 7 of 356

For example,
these symbols
me used on an
original battery:
POSSIBLE A
CAUTION
INJURY
PROTECT EYES BY
SHIELDING
CAUSTIC
ACID COULD BAllERY
CAUSE
BURNS
AVOID
SPARKS OR FLAMES
FLAME
EXPLODE BAllERY
These symbols
are important
for you and
yorr passengers
whenever your
vehicle is
driven:
DOOR LOCK
UNLOCK
FASTEN SEAT
BELTS
Vehicle Symbols
These are some of the symbols you may find on your vehicle.
Op
AIR BAG p
These symbols
have
to do with
your lights:
SIGNALS e
TURN
PARKING
pf
LAMPS
RUNNING
' ' 0
DAYTIME *
LAMPS *
FOG LAMPS $0
These symbols
are
on some of
your controls:
WINDSHIELD
DEFROSTER
WINDOW
DEFOGGER
VENTILATING FAN
These symbols are used on
warning and
indicator lights:
ENGINE k
COOLANT - rd
TEMP -
BRAKE (0)
ENGINE OIL
PRESSURE
ANTI-LOCK
(e)
BRAKES
Here are some
other symbols
you may
see:
FUSE
LIGHTER
m
HORN )tr
SPEAKER
b
il'
FUEL
V
ProCarManuals.com
Page 87 of 356

Tilt Wheel (Option)
A tilt steering wheel allows you to adjust the steering
wheel before you drive.
You can also raise it to the highest level to give your
legs more room when
you exit and enter the vehicle.
To tilt the wheel, hold the steering wheel and pull the
lever. Move the steering wheel to a comfortable level,
then release the lever to lock the wheel in place.
Turn SignallMultifunction Lever
The lever on the left side of the steering column
includes your:
Turn Signal and Lane Change Indicator
0 Headlamp High/Low Beam Changer
0 Cruise Control (Option)
2-31
ProCarManuals.com
Page 88 of 356

Turn and Lane Change Signals
The turn signal has two upward (for right) and two
downward (for left) positions. These positions allow you
to signal a turn or a lane change.
To signal a %urn, move the lever all the way up or down.
When the
turn is finished, the lever will return
automatically.
Q
A green arrow on the
instrument panel
will flash
in the direction of the turn
or lane change.
To signal a lane change; just raise or lower the lever
until the mow starts to flash. Hold it there until you
complete your lane change. The lever will return by
itself when
you release it.
As you signal a turn or a lane change, if the arrows flash
at twice the normal rate, a signal bulb may be burned
out.
If a bulb is burned,out, replace it to help avoid an
accident. If the arrows don't go on at all when you
signal
a turn, check for burned-out bulbs and then check
the fuse (see
"Fuses and Circuit Breakers" in the Index).
Headlamp High/Low Beam
To change the headlamps
from low
bearn to high or
high to
low, pull the turn
signal lever all
the way
toward you. Then release it.
When the high beams are
on, this blue light on the
instrument panel also will
be on.
The headlamp highfiow beam indicator light may flash
if the Daytime Running Lights (Dm) system is
experiencing a problem or if a headlamp is
malfunctioning. ~
2-32
ProCarManuals.com
Page 95 of 356

Lamps
I
Headlamps
Rotate the band counterclockwise to the second position
to turn on:
Headlamps
0 Parking Lamps
Sidemarker Lamps
0 Taillamps
0 Instrument Panel Lights
Rotate the
band clockwise to OFF to turn all the lamps
The
band on the turn signal/multifunction lever controls
your vehicle’s lamps. to turn on:
0 Parking Lamps
0 Sidemarker Lamps
0 Taillamps
Instrument Panel
Lights
2-39
ProCarManuals.com
Page 107 of 356

Your instlument panel is designed to let you know at a
glance how your vehicle is running. You’ll know how
fast you’re going,
how much fuel you’re using, and
many other things you’ll need to drive safely and
economically.
The main components of your instrument panel are:
A. Fuse Panel
B. Vent
C. Turn Signal/Multifunction ,Lever
D. SRS - Supplemental Restraint System (Air Bag)
E. Hazard Warning Flashers Switch
E Instrument Cluster
G. Windshield Wipersmasher Stalk
H. Audio System
I. Side Window Defogger Vent
J. Glove Box
K. Climate Control System
L. Gear Shift Lever
M. Ashtray
N. Enhanced Traction System (ETS) Switch (Option)
0. Lighter
P. Ignition Switch
Q. Tilt Steering Wheel Lever (Option)
R. Fog Lamp Switch
S. Instrument Panel Intensity Control/ Interior Lamps
Switch
T. Hood Release Handle
2-51
ProCarManuals.com
Page 145 of 356

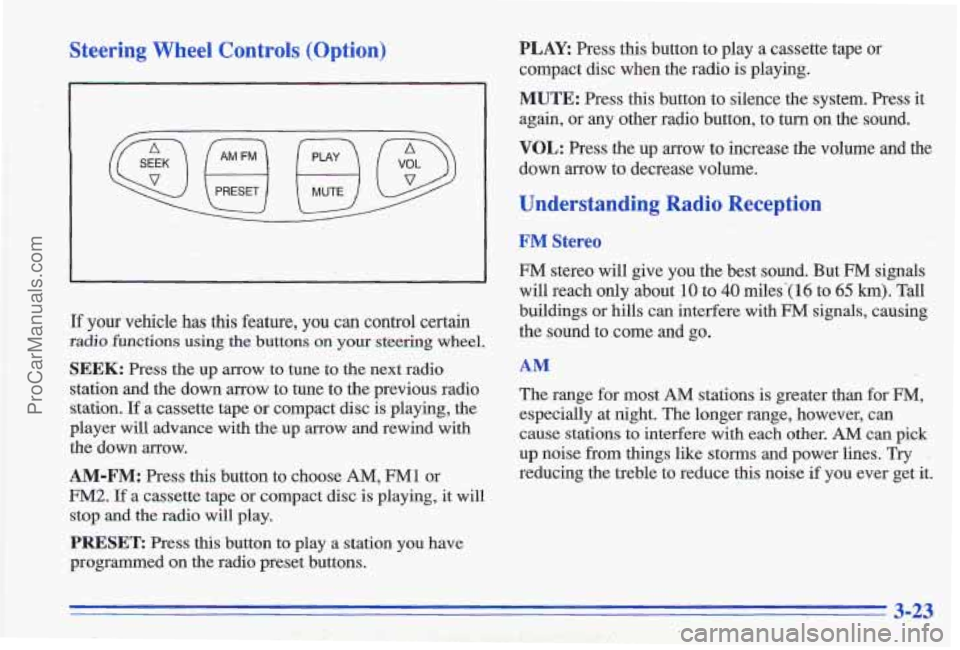
Steering Wheel Controls (Option)
.-
\u u/
If your vehicle has this feature, you can control certain
radio functions using the buttons on your steering wheel.
SEEK: Press the up arrow to tune to the next radio
station and the down
arrow to tune to the previous radio
station.
If a cassette tape or compact disc is playing, the
player will advance with the up arrow
and rewind with
the down arrow.
AM-FM: Press this button to choose AM, FM1 or
FM2. If a cassette tape or compact disc is playing, it will
stop and the radio will play.
PRESET Press this button to play a station you have
programmed on the radio preset buttons.
PLAY Press this button to play a cassette tape or
compact disc when the radio
is playing.
MUTE: Press this button to silence the system. Press it
again, or any other radio button, to turn on the sound.
VOL: Press the up arrow to increase the volume and the
down arrow to decrease volume.
Understanding Radio Reception
FM Stereo
FM stereo will give you the best sound. But FM signals
will reach only about
10 to 40 miles-( 16 to 65 km). Tall
buildings or hills can interfere with
FM signals, causing
the sound to come and
go.
AM
The range for most AM stations is greater than for FM,
especially at night. The longer range, however, can
cause stations to interfere with each other.
AM can pick
up noise from things like storms and power lines. Try
reducing the treble to reduce this noise
if you ever get it.
3-23,
ProCarManuals.com
Page 147 of 356

Care of Your Cassette Tape Player
A tape player that is not cleaned regularly can cause
reduced sound quality, ruined cassettes or a damaged
mechanism. Cassette tapes should be stored in their
cases away from contaminants, direct sunlight and
extreme heat.
If they aren’t, they may not operate
properly or may cause failure
of the tape player.
Your tape player should be cleaned regularly after every
50 hours of use. Your radio may display CLN to indicate
that you have used your tape player for
50 hours without
resetting the tape clean timer. If you notice a reduction in sound quality,
try a known good cassette to see if the tape
or the tape player is at fault. If this other cassette has no
improvement
in sound quality, clean the tape player.
Cleaning may
be done with a scrubbing action,
non-abrasive cleaning cassette with pads which scrub
the tape head
as the hubs of the cleaner cassette turn.
Follow these steps to prevent the cassette from being
ejected due to the CUT TAPE DETECTION feature:
1. Turn the radio off and the ignition on.
2. Press and hold the TAPEPLAY button for three
3. Insert the cleaner cassette.
The radio will default back
to CUT TAPE DETECTION
when the cleaner cassette is ejected.
seconds (tape indicator will flash
for two seconds).
You may also choose a non-scrubbing action, wet-type
cleaner which uses a cassette with a fabric belt to clean
the tape head.
It may not clean as thoroughly as the
scrubbing type cleaner.
Cassettes
are subject to wear and the sound quality may
degrade over time. Always make sure that the cassette
tape is
in good condition before you have your tape player serviced.
Care of Your Compact Discs
Handle discs carefully. Store them in their original cases
or other protective cases and away from direct sunlight
and dust.
If the surface of a disc is soiled, dampen a
clean, soft cloth in a mild, neutral detergent solution and
clean it, wiping from the center to the edge.
Be sure never to touch
the signal surface when handling
discs.
Pick up discs by grasping the outer edges or the
edge of the hole and the outer edge.
Fixed Mast Antenna
The fixed mast antenna cb withstand most car washes
without being damaged.
If the mast should ever become
slightly bent, you can straighten it out by hand.
If the mast is
badly bent, as it might be by vandals, you should replace it.
Check every once
in a while to be sure the mast is still
tightened to the fender.
3-25
ProCarManuals.com
Page 162 of 356

0
0
a
Check your mirrors, glance over your shoulder, and start your left lane change signal before moving out
of the right lane to pass. When you are far enough
ahead
of the passed vehicle to see its front in your
inside mirror, activate your right lane change signal and move back into the right lane. (Remember that
your right outside mirror
is convex. The vehicle you
just passed may seem
to be farther away from you
than it redly is.)
Try not to pass more than one vehicle at a time on
two-lane roads. Reconsider
before passing the next
vehicle.
Don’t overtake a slowly moving vehicle too rapidly.
Even though the brake lamps are not flashing, it may
be slowing down or starting to turn.
If you’re being passed, make it easy for the
following driver to get ahead of you. Perhaps you
can ease a little to the right.
In any emergency, don’t give up. Keep trying to steer
and constantly seek
an escape route or area of less
danger.
Skidding
In a skid, a driver can lose control of the vehicle.
Defensive drivers avoid most skids by
taking reasonable
care suited
to existing conditions, and by not
“overdriving” those conditions. But skids are always
possible.
The three types
of skids correspond to your Pontiac’s
three control systems. In the braking skid, your wheels
aren’t rolling. In the steering or cornering skid, too
much speed or steeiing
in a curve causes tires to slip and
lose cornering force. And
in the acceleration skid, too
much throttle causes the driving wheels to spin.
A cornering
skid is best handled by easing your foot off
the accelerator pedal.
If you have the Enhanced Traction System, remember: It
helps avoid only the acceleration skid.
If you do not have the Enhanced Traction System, or if
the system is off, then an acceleration skid is also best
handled by easing your foot
off the accelerator pedal.
Loss of Control
Let’s review what driving experts say about what
happens
when the three control systems (brakes, steering
and acceleration) don’t have enough friction where the
tires meet the road to do what the driver has asked.
4-14
ProCarManuals.com