1996 NISSAN SENTRA fan
[x] Cancel search: fanPage 64 of 191

CONTROLS
Fan control dial
This dial turns the fan on and off, and
controls fan speed.
Air flow control dial
This dial allows you to select the air flow
outlets.
Ð Air flows from center and side
ventilators.
Ð Air flows from center and side
ventilators and foot outlets.
Ð Air flows mainly from foot outlets.
Ð Air flows from defroster outlets
and foot outlets.
Ð Air flows mainly from defroster
outlets.
Temperature control dial
This dial allows you to adjust the tempera-
ture of the outlet air.
Air recirculation button
(If so equipped)
NOTE:
The air recirculation feature is available
only on those vehicles equipped with air
conditioning.
OFF position (Indicator light OFF):
Outside air is drawn into the passenger
compartment and distributed through the
selected outlets.
Use this position for normal heater or air
conditioner operation.
ON position (Indicator light ON):
Interior air is recirculated inside the vehicle.
Depress the air recirculation button to acti-
vate the recirculation function when driving
on a dusty road or to avoid traffic fumes.
The air recirculation function is also used to
improve A/C performance during extremely
hot or humid conditions.
AHA0604
HEATER AND AIR
CONDITIONER
3-3
ZX
Page 65 of 191

WARNING
Do not use the recirculation mode (if so
equipped) for long periods of time. It
may cause the interior air to become
stale and the windows to fog up.
Air conditioner button
This button is provided only on those ve-
hicles equipped with air conditioning.
Start the engine, move the fan control dial to
the desired (1 to 4) position, and push the
air conditioner button to turn on the air
conditioner. The indicator light comes on
when the air conditioner is on. To turn off the
air conditioner, push the button again.
The air conditioner cooling function op-
erates only when the engine is running.
WARNING
Positioning of the heating or air condi-
tioning controls should not be done
while driving, in order that full attention
may be given to the driving operation.
HEATER OPERATION
Heating
This mode is used to direct hot air mainly
from the floor outlets. A small amount of air
also flows from the defrost vents.
1. Push the air recirculation button (if so
equipped) to the OFF position for normal
heating.
2. Move the air control dial to the
po-
sition.
3. Move the fan control dial to the desired
position.
4. Move the temperature control dial to the
desired position between the middle and
the hot position.
Ventilation
This mode directs outside air from the side
and center vents.
1. Push the air recirculation button (if so
equipped) to the OFF position.
2. Move the air control dial to the
po-
sition.3. Move the fan control dial to the desired
position.
4. Move the temperature control dial to the
desired position.
Defrosting or defogging
This mode is used to defrost/defog the
windows.
1. Push the air recirculation button (if so
equipped) to the OFF position.
2. Move the air control dial to the
po-
sition.
3. Move the fan control dial to the desired
position.
4. Move the temperature control dial to the
desired position between the middle and
the hot position.
cIf it is difficult to defog the windshield
glass, turn the air conditioner on (if so
equipped). This helps dehumidify the air.
Outside air is drawn into the passenger
compartment to improve the defogging per-
formance.
3-4
ZX
Page 66 of 191

Bi-level heating
This mode directs cooler air from the side
and center vents and warmer air from the
floor outlets. When the temperature control
dial is moved to the full hot or full cool
position, the air between the vents and the
floor outlets is the same temperature.
1. Push the air recirculation button (if so
equipped) to the OFF position.
2. Move the air control dial to the
po-
sition.
3. Move the fan control dial to the desired
position.
4. Move the temperature control dial to the
the desired position.
Heating and defogging
This mode heats the interior and defogs the
windshield.
1. Push the air recirculation button (if so
equipped) to the OFF position.
2. Move the air control dial to the
po-
sition.
3. Move the fan control dial to the desired
position.4. Move the temperature control dial to the
desired position between the middle and
the hot position.
Operating tips
cClear snow and ice from the wiper
blades and air inlet in front of the
windshield. This improves heater op-
eration.
AIR CONDITIONER OPERATION
(If so equipped)
Start the engine, move the fan control dial to
the desired (1 to 4) position, and push in the
air conditioner button to activate the air
conditioner. When the air conditioner is on,
cooling and dehumidifying functions are
added to the heater operation.
The air conditioner cooling function op-
erates only when the engine is running.
Cooling
This mode is used to cool and dehumidify.
1. Push the air recirculation button to the
OFF position.
2. Move the air control dial to
posi-
tion.3. Move the fan control dial to the desired
position.
4. Push on the air conditioner button. The
indicator light comes on.
5. Move the temperature control dial to the
desired position.
cFor quick cooling when the outside tem-
perature is high, push the air recirculation
button (if so equipped) to the ON posi-
tion. Be sure to return the air recirculation
button to the OFF position for normal
cooling.
Dehumidified heating
This mode is used to heat and dehumidify
the air.
1. Push the air recirculation button to the
OFF position.
2. Move the air control dial to the
po-
sition.
3. Move the fan control dial to the desired
position.
4. Push on the air conditioner button. The
indicator light comes on.
3-5
ZX
Page 67 of 191

5. Move the temperature control dial to the
desired position.
Dehumidified defogging
This mode is used to defog the windows
and dehumidify.
1. Push the air recirculation button to the
OFF position.
2. Move the air control dial to the
po-
sition.
3. Move the fan control dial to the desired
position.
4. Push on the air conditioner button. The
indicator light comes on.
5. Move the temperature control dial to the
desired position.
Operating tips
cKeep windows and sun roof closed while
the air conditioner is in operation.
cAfter parking in the sun, drive for two or
three minutes with the windows open to
vent hot air from the passenger compart-
ment. Then, close the windows. This
allows the air conditioner to cool the
interior more quickly.cThe air conditioning system should be
operated for about ten minutes at
least once a month. This helps pre-
vent damage to the system due to lack
of lubrication.
cIf the engine coolant temperature
gauge indicates engine coolant tem-
perature over the normal range, turn
the air conditioner off. See ``If your
vehicle overheats'' in the ``In case of
emergency'' section for additional in-
formation.
AIR FLOW CHARTS
The following charts show the button and
dial positions forMAXIMUM AND QUICK
heating, cooling or defrosting.The air recir-
culation switch should always be in the
OFF position for heating and defrosting.
3-6
ZX
Page 81 of 191

WARNING
Do not leave children, unreliable
adults, or pets alone in your vehicle.
They could accidentally injure them-
selves or others through inadvertent
operation of the vehicle. Also, on hot,
sunny days, temperatures in a closed
vehicle could quickly become high
enough to cause severe or possibly
fatal injuries to people or animals.
EXHAUST GAS (Carbon monoxide)
WARNING
Do not breathe exhaust gases; they
contain colorless and odorless carbon
monoxide. Carbon monoxide is dan-
gerous. It can cause unconsciousness
or death.
cIf you suspect that exhaust fumes are
entering the vehicle, drive with all
windows fully open, and have the
vehicle inspected immediately.
cDo not run the engine in closed
spaces such as a garage for any
longer than is absolutely necessary.cDo not park the vehicle with the en-
gine running for any extended length
of time.
cKeep the trunk lid closed while driv-
ing, otherwise exhaust gases could
be drawn into the passenger com-
partment. If you must drive in this
manner for some reason, take the
following steps:
1. Open all the windows.
2. Set the air recirculate button (if so
equipped) ``OFF'' and the fan con-
trol dial to 4 (high) to circulate the
air.
cIf electrical wiring or other cable con-
nections must pass to a trailer
through the seal on the trunk lid or
the body, follow the manufacturer's
recommendation to prevent carbon
monoxide entry into the vehicle.
cThe exhaust system and body should
be inspected by a qualified mechanic
whenever:
a. The vehicle is raised for service.b. You suspect that exhaust fume-
sare entering into the passenger
compartment.
c. You notice a change in the sound
of the exhaust system.
d.
You have had an accident involv-
ing damage to the exhaust system,
underbody, or rear of the vehicle.
THREE WAY CATALYST
The three way catalyst is an emission control
device installed in the exhaust system. Ex-
haust gases in the converter are burned at
high temperatures to help reduce pollutants.
WARNING
cThe exhaust gas and the exhaust
system are very hot. While the engine
is running, keep people or flammable
materials away from the exhaust
pipe.
cDo not stop or park the vehicle over
flammable materials such as dry
grass, waste paper or rags, as they
may burn easily.
PRECAUTIONS WHEN
STARTING AND DRIVING
4-2
ZX
Page 108 of 191

If your vehicle is overheating (indicated by
an extremely high temperature gauge read-
ing), or if you feel a lack of engine power,
detect abnormal noise, etc., take the follow-
ing steps:
WARNING
To avoid the danger of being scalded,
never remove the radiator cap while the
engine is still hot. When the radiator
cap is removed, pressurized hot water
will spurt out, possibly causing serious
injury.
1. Move the vehicle safely off the road,
apply the parking brake and move the
gearshift lever to Neutral (automatic
transmission to P).
Do not stop the engine.
2. Turn off the air conditioning. Open all the
windows, move the heater or air condi-
tioner temperature control to maximum
hot and fan control to high speed.
3. Get out of the vehicle. Look and listen for
steam or coolant escaping from the ra-
diator before opening the hood. Wait until
no steam or coolant can be seen before
proceeding.4. Open the engine hood.
WARNING
If steam or water is coming from the
engine, stand clear to prevent getting
burned.
5. If engine overheating is caused by climb-
ing a long hill on a hot day, run the engine
at a fast idle (approximately 1,500 rpm)
until the temperature gauge indication
returns to normal.
6. Visually check drive belts for damage or
looseness. Also check if the cooling fan
is running. The radiator hoses and radia-
tor should not leak water.
WARNING
cBe careful not to allow your hands,
hair or clothing to come into contact
with, or to get caught in, the running
fan, belts, or fan motor. The fan motor
can start at any time when the cool-
ant temperature is high.
cIf coolant is leaking, the water pump
belt is missing or loose, or the cool-
ing fan does not run, stop the engine.7. After the engine cools down, check the
coolant level in the reservoir tank with the
engine running. Add coolant to the res-
ervoir tank if necessary. Have your ve-
hicle repaired at the nearest NISSAN
dealer.
IF YOUR VEHICLE
OVERHEATS
5-9
ZX
Page 119 of 191

When performing any inspection or mainte-
nance work on your vehicle, always take
care to prevent serious accidental injury to
yourself or damage to the vehicle. The
following are general precautions which
should be closely observed.
cPark the vehicle on a level surface,
apply the parking brake securely and
block the wheels to prevent the ve-
hicle from moving. Move the gearshift
control lever to Neutral (N).
cBe sure the ignition key is OFF when
performing any parts replacement or
repairs.
cDo not work under the hood while the
engine is hot. Turn the engine off and
wait until it cools down.
cBe sure to turn the ignition key to the
OFF or LOCK position.
When the ignition key is in the ON or
ACC position, the cooling fan may
start to operate suddenly even when
the engine is not running.
cIf you must work with the engine run-
ning, keep your hands, clothing, hair
and tools away from moving fans,
belts and any other moving parts.cIt is advisable to remove ties and any
jewelry, such as rings, watches, etc.,
before working on your vehicle.
cIf you must run the engine in an en-
closed space such as a garage, be
sure there is proper ventilation for
exhaust gases.
cNever get under the vehicle while it is
supported only by a jack. If it is nec-
essary to work under the vehicle, sup-
port it with safety stands.
cKeep smoking materials, flame and
sparks away from fuel and battery.
cNever connect or disconnect either
the battery or any transistorized com-
ponent connector while the ignition is
on.
cOn gasoline engine models with the
Multiport Fuel Injection (MFI) system,
the fuel filter or fuel lines should be
serviced by a NISSAN dealer because
the fuel lines are under high pressure
even when the engine is off.
cFailure to follow these or other com-
mon sense guidelines may lead to
serious injury or vehicle damage.cImproperly disposed motor oil and/or
other vehicle fluids can hurt the envi-
ronment. Always conform to local
regulations for disposal of vehicle
fluid. Avoid contact with used motor
oil.
This ``Do-it-yourself operations'' section
gives instructions regarding only those
items which are relatively easy for an owner
to perform.
You should be aware that incomplete or
improper servicing may result in operating
difficulties or excessive emissions, and
could affect your warranty coverage.If in
doubt about any servicing, have it done
by your NISSAN dealer.
MAINTENANCE
PRECAUTIONS
7-2
ZX
Page 128 of 191

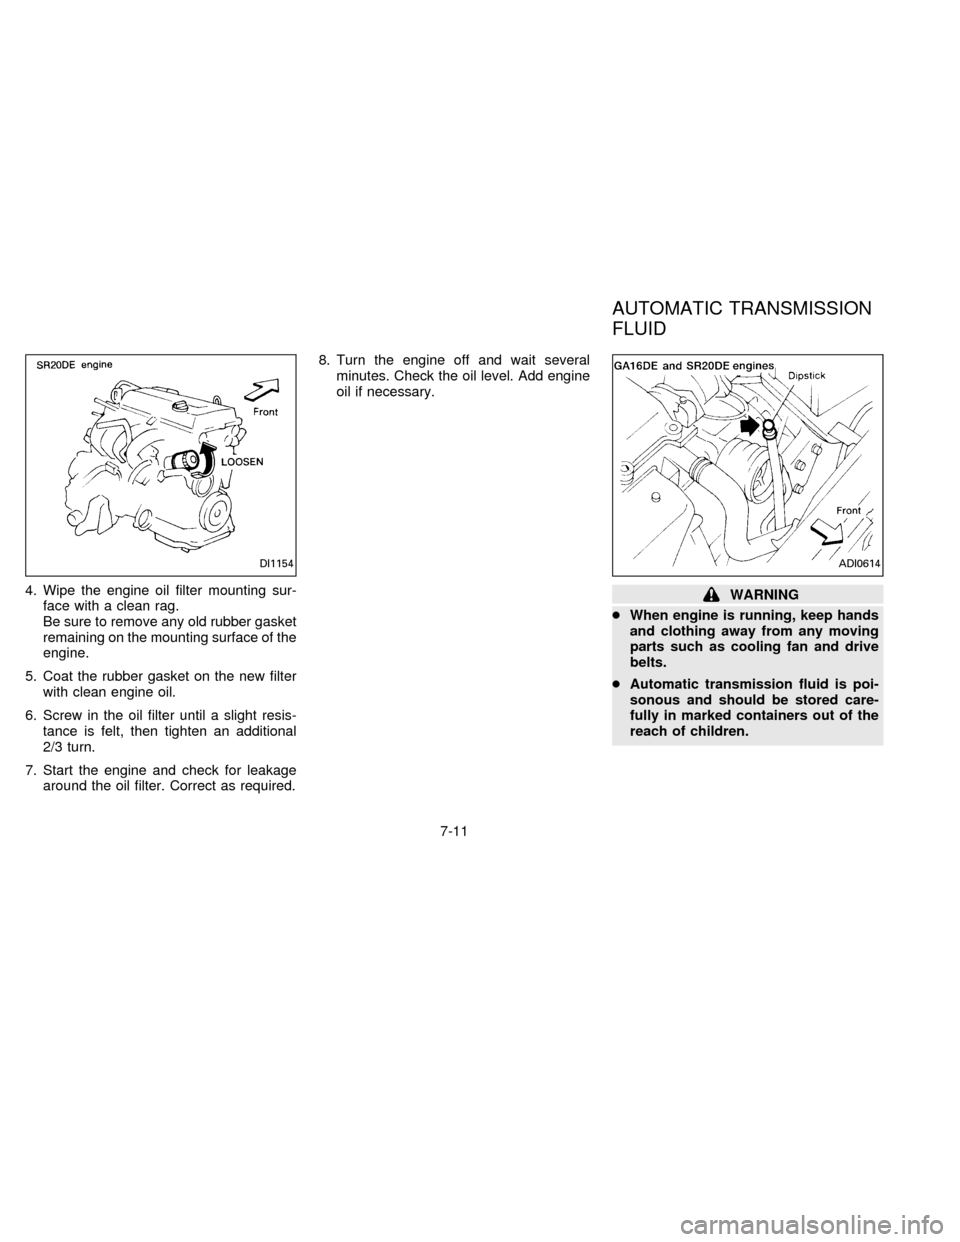
4. Wipe the engine oil filter mounting sur-
face with a clean rag.
Be sure to remove any old rubber gasket
remaining on the mounting surface of the
engine.
5. Coat the rubber gasket on the new filter
with clean engine oil.
6. Screw in the oil filter until a slight resis-
tance is felt, then tighten an additional
2/3 turn.
7. Start the engine and check for leakage
around the oil filter. Correct as required.8. Turn the engine off and wait several
minutes. Check the oil level. Add engine
oil if necessary.WARNING
cWhen engine is running, keep hands
and clothing away from any moving
parts such as cooling fan and drive
belts.
cAutomatic transmission fluid is poi-
sonous and should be stored care-
fully in marked containers out of the
reach of children.
DI1154ADI0614
AUTOMATIC TRANSMISSION
FLUID
7-11
ZX