1996 NISSAN SENTRA do it yourself
[x] Cancel search: do it yourselfPage 96 of 191

tuator is working, you may feel a pulsation in
the brake pedal and hear a noise or vibra-
tion from the actuator under the hood. This
is normal and indicates that the anti-lock
system is working properly. However, the
pulsation may indicate that road conditions
are hazardous and extra care is required
while driving.
Self-test feature
The anti-lock brake system consists of elec-
tronic sensors, electric pumps, and hydrau-
lic solenoids controlled by a computer. The
computer has a built-in diagnostic feature
that tests the system each time you start the
engine and move the vehicle at a low speed
in forward or reverse. When the ``self-test''
occurs, you may hear a ``clunk'' noise and/
or feel a ``pulsation'' in the brake pedal. This
is normal and is not an indication of any
malfunction. If the computer senses any
malfunction, it switches the anti-lock brake
system OFF and turns on the ABS brake
warning light in the dashboard. The brake
system then operates normally, but without
anti-lock assistance.
If the light comes on during the self check,
or while driving, take your vehicle to your
NISSAN dealer for repair at your earliest
convenience.
WARNING
The anti-lock brake system is a sophis-
ticated device, but it cannot prevent
accidents resulting from careless or
dangerous driving techniques. It can
help maintain vehicle control during
braking on slippery surfaces, but re-
member that the stopping distance on
slippery surfaces will be longer than on
normal surfaces, even with the anti-
lock system. Stopping distances may
also be longer on rough, gravel or
snow covered roads, or if you are using
tire chains. Always maintain a safe dis-
tance from the vehicle in front of you.
Ultimately, the responsibility for safety
of self and others rests in the hands of
the driver.
Tire type and condition may also affect
braking effectiveness.
cWhen replacing tires, install the
specified size of tires on all 4 wheels.
c
When installing a spare tire, make sure
it is the proper size and type as speci-
fied on the tire placard. For tire placard
location information, refer to ``Tire
placard'' in the Owner's Manual index.Refer to ``Wheels and tires'' in the ``Do-
it-yourself operations'' section of this
manual.
4-17
ZX
Page 97 of 191

Freeing a frozen door lock
To prevent a door lock from freezing, apply
de-icer or glycerin to it through the key hole.
If the lock becomes frozen, heat the key
before inserting it into the key hole.
Anti-freeze
In the winter when it is anticipated that the
temperature will drop below 32ÉF (0ÉC),
check the anti-freeze (ethylene glycol base)
to assure proper winter protection. For de-
tails, see ``Engine cooling system'' in the
``Do-it-yourself operations'' section.
Battery
If the battery is not fully charged during
extremely cold weather conditions, the bat-
tery fluid may freeze and damage the bat-
tery. To maintain maximum efficiency, the
battery should be checked regularly. For
details, see ``Battery'' in the ``Do-it-yourself
operations'' section.
Draining of coolant water
If the vehicle is to be left outside without
anti-freeze, drain the cooling system by
opening the drain valves located under the
radiator and on the engine block. Refillbefore operating the vehicle. See ``Chang-
ing Engine Coolant'' in the ``Do-it-yourself
operations'' section.
Tire equipment
1. The SUMMER tires are of a tread design
to provide superior performance on dry
pavement. However, the performance of
these tires will be substantially reduced
in snowy and icy conditions. If you oper-
ate your vehicle on snowy or icy roads,
NISSAN recommends the use of MUD &
SNOW or ALL SEASON TIRES on all
four wheels. Please consult your NIS-
SAN dealer for the tire type, size, speed
rating and availability information.
2. For additional traction on icy roads, stud-
ded tires may be used. However, some
provinces and states prohibit their use.
Check local, state and provincial laws
before installing studded tires.
Skid and traction capabilities of studded
snow tires on wet or dry surfaces may be
poorer than that of non-studded snow
tires.
3. Snow chains may be used if desired.
Make sure they are of proper size for the
tires on your vehicle and are installedaccording to the chain manufacturer's
suggestions.
Use of tire chains may be prohibited
according to location. Check the local
laws before installing tire chains. When
installing tire chains, make sure they are
of proper size for the tires on your vehicle
and are installed according to the chain
manufacturer's suggestions.Use only
SAE Class ªSº chains.Use chain ten-
sioners when recommended by the tire
chain manufacturer to ensure a tight fit.
Loose end links of the tire chain must be
secured or removed to prevent the pos-
sibility of whipping action damage to the
fenders or underbody. If possible, avoid
fully loading your vehicle when using tire
chains. In addition, drive at a reduced
speed, otherwise, your vehicle may be
damaged and/or vehicle handling and
performance may be adversely affected.
Never install tire chains on T-type and
small size spare tires. Do not use the
chains on dry roads.
Special winter equipment
It is recommended that the following items
be carried in the vehicle during winter:
COLD WEATHER DRIVING
CAUTIONS
4-18
ZX
Page 105 of 191

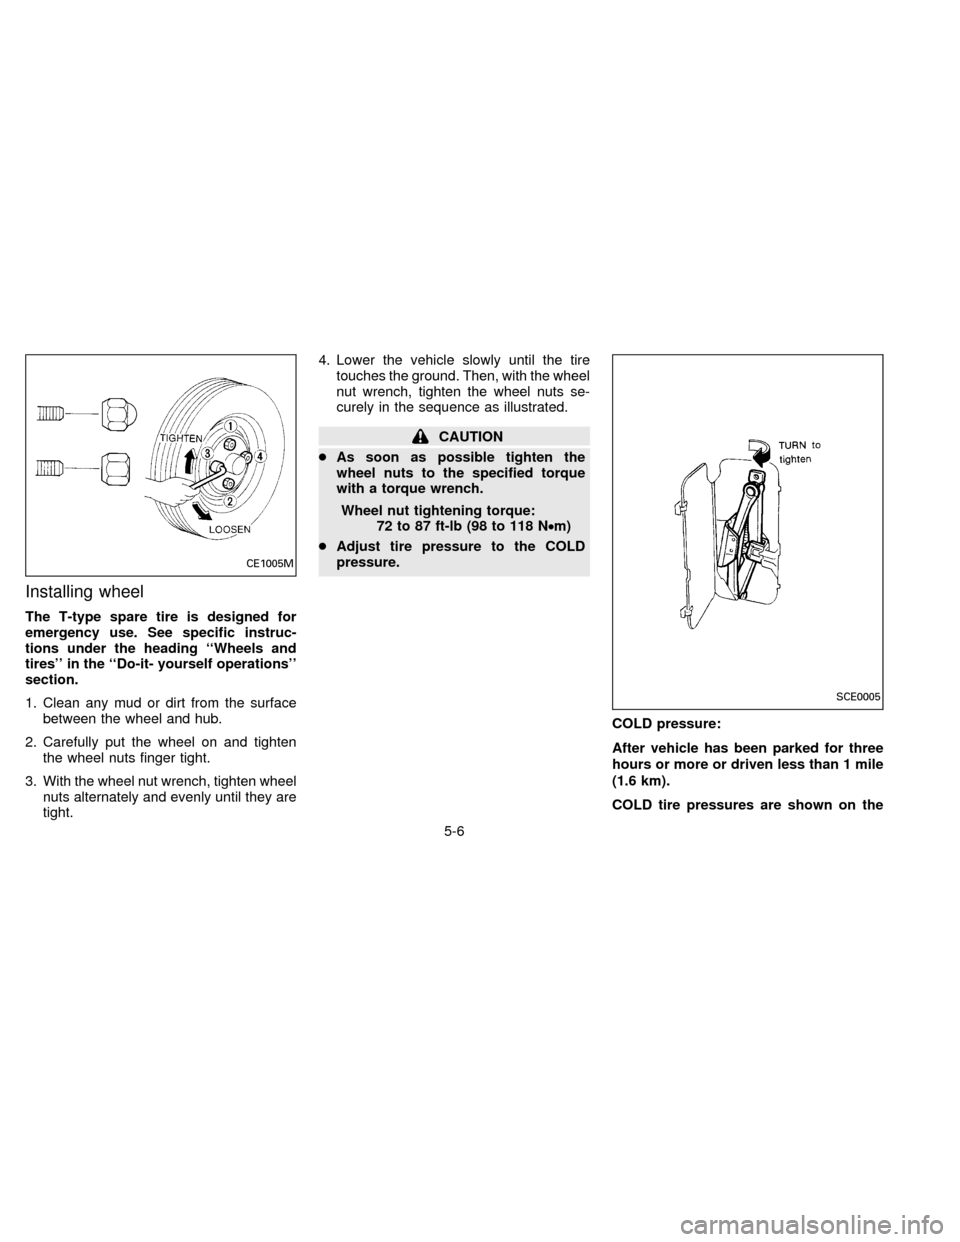
Installing wheel
The T-type spare tire is designed for
emergency use. See specific instruc-
tions under the heading ``Wheels and
tires'' in the ``Do-it- yourself operations''
section.
1. Clean any mud or dirt from the surface
between the wheel and hub.
2. Carefully put the wheel on and tighten
the wheel nuts finger tight.
3. With the wheel nut wrench, tighten wheel
nuts alternately and evenly until they are
tight.4. Lower the vehicle slowly until the tire
touches the ground. Then, with the wheel
nut wrench, tighten the wheel nuts se-
curely in the sequence as illustrated.
CAUTION
cAs soon as possible tighten the
wheel nuts to the specified torque
with a torque wrench.
Wheel nut tightening torque:
72 to 87 ft-lb (98 to 118 N²m)
cAdjust tire pressure to the COLD
pressure.
COLD pressure:
After vehicle has been parked for three
hours or more or driven less than 1 mile
(1.6 km).
COLD tire pressures are shown on the
CE1005M
SCE0005
5-6
ZX
Page 106 of 191

tire placard affixed to the driver side
center pillar.
cRetighten the wheel nuts when the
vehicle has been run for 600 miles
(1,000 km).
5. Securely store the spare tire and jacking
equipment in the vehicle.
WARNING
cAlways make sure that the spare tire
and jacking equipment are properly
secured after use. The jack rod may
be used to securely tighten the hold-
down bolts. Such items can become
dangerous projectiles in an accident
or sudden stop.
cThe T-type spare tire and small size
spare tire are designed for emer-
gency use. See specific instructions
under the heading ``Wheels and
tires'' in the ``Do-it-yourself opera-
tions'' section.To start your engine with a booster battery,
the instructions and precautions below must
be followed.
CAUTION
cIf done incorrectly, jump starting can
be hazardous.
cExplosive hydrogen gas is always
present in the vicinity of the battery.
Keep all sparks and flames away
from the battery.
c
Do not allow battery fluid to come into
contact with eyes, skin, cloth or painted
surfaces. Battery fluid is a corrosive
sulfuric acid solution which can cause
severe burns. If the fluid should come
into contact with anything, immediately
flush the contacted area with water.
cA battery rated at above 12 volts
should not be used for a booster.
cWhenever working on or near a bat-
tery, always wear suitable eye protec-
tors (e.g., goggles or industrial safety
spectacles) and remove rings, metal
bands, or any other metal jewelry.
c
Keep battery out of the reach of chil-
dren.
Always follow the instructions below.
Failure to do so could result in damage
to the charging system and cause per-
sonal injury.
1.
If the booster battery is in another vehicle,
position the two vehicles to bring their
batteries into close proximity to each other.
Do not allow the two vehicles to touch.
2. Apply the parking brake. Move the shift
lever to Neutral (On automatic transmis-
sion models, move the lever to P). Switch
off all unnecessary electrical systems
(lights, heater, air conditioner, etc.).
3. Remove vent caps on the battery (if so
equipped). Cover the battery with an old
cloth to reduce explosion hazard.
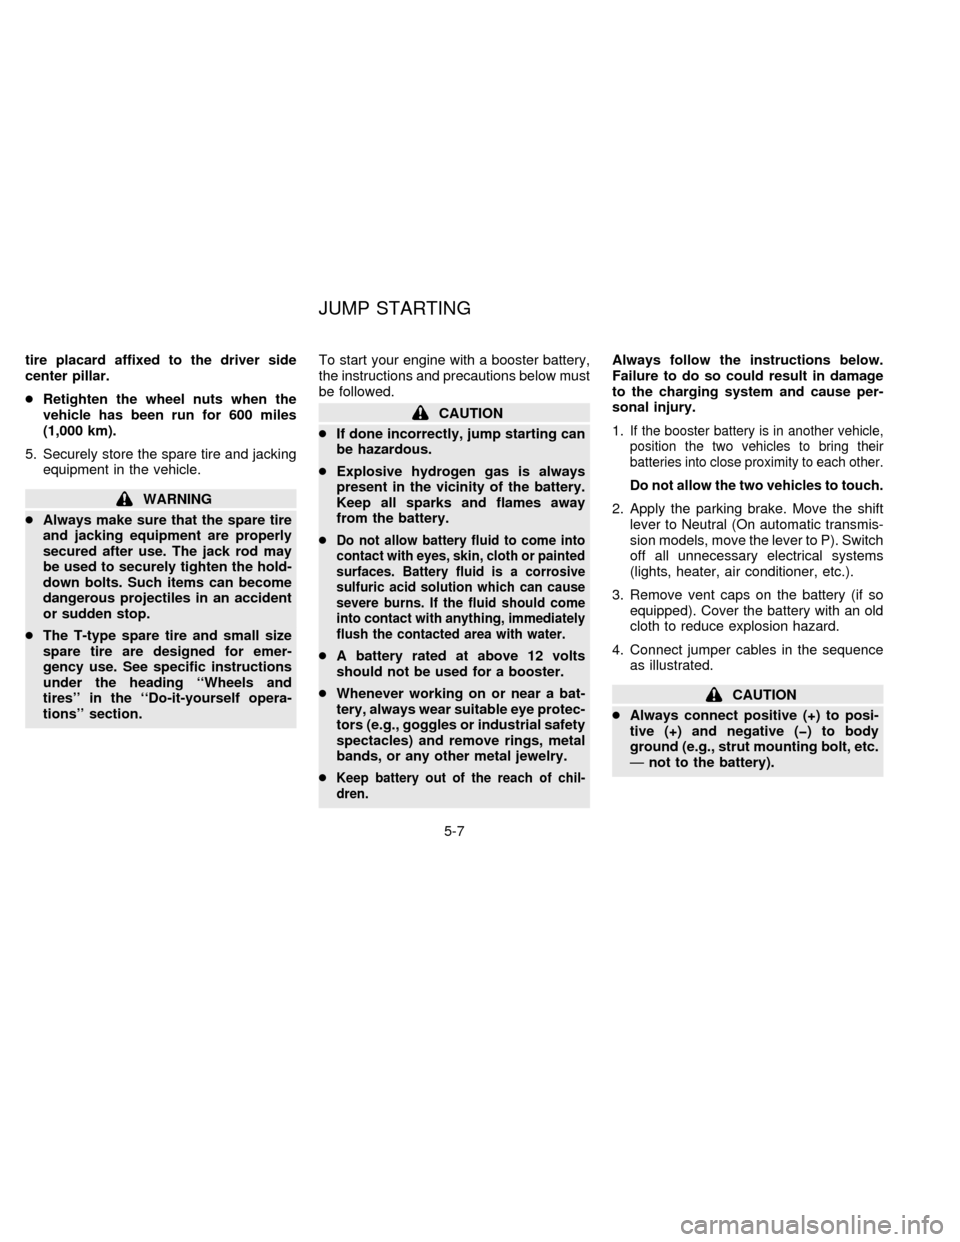
4. Connect jumper cables in the sequence
as illustrated.
CAUTION
cAlways connect positive (+) to posi-
tive (+) and negative (þ) to body
ground (e.g., strut mounting bolt, etc.
Ðnot to the battery).
JUMP STARTING
5-7
ZX
Page 118 of 191

7 Do-it-yourself operations
Maintenance precautions ..................................... 7-2
Engine compartment check locations .................. 7-3
Engine cooling system ......................................... 7-5
Engine oil ............................................................ 7-8
Automatic transmission fluid .............................. 7-11
Power steering fluid............................................ 7-13
Brake fluid .......................................................... 7-13
Window washer fluid .......................................... 7-14
Battery ................................................................ 7-15
Drive belts .......................................................... 7-17
Spark plug replacement ..................................... 7-18
Air cleaner housing filter .................................... 7-19Wiper blades ...................................................... 7-20
Parking brake check........................................... 7-21
Brake pedal ........................................................ 7-21
Brake booster ..................................................... 7-22
Clutch pedal ....................................................... 7-23
Fuses .................................................................. 7-23
Light bulbs .......................................................... 7-25
Headlight aiming adjustment .............................. 7-26
Bulb replacement ............................................... 7-26
Wheels and tires ................................................ 7-32
ZX
Page 119 of 191

When performing any inspection or mainte-
nance work on your vehicle, always take
care to prevent serious accidental injury to
yourself or damage to the vehicle. The
following are general precautions which
should be closely observed.
cPark the vehicle on a level surface,
apply the parking brake securely and
block the wheels to prevent the ve-
hicle from moving. Move the gearshift
control lever to Neutral (N).
cBe sure the ignition key is OFF when
performing any parts replacement or
repairs.
cDo not work under the hood while the
engine is hot. Turn the engine off and
wait until it cools down.
cBe sure to turn the ignition key to the
OFF or LOCK position.
When the ignition key is in the ON or
ACC position, the cooling fan may
start to operate suddenly even when
the engine is not running.
cIf you must work with the engine run-
ning, keep your hands, clothing, hair
and tools away from moving fans,
belts and any other moving parts.cIt is advisable to remove ties and any
jewelry, such as rings, watches, etc.,
before working on your vehicle.
cIf you must run the engine in an en-
closed space such as a garage, be
sure there is proper ventilation for
exhaust gases.
cNever get under the vehicle while it is
supported only by a jack. If it is nec-
essary to work under the vehicle, sup-
port it with safety stands.
cKeep smoking materials, flame and
sparks away from fuel and battery.
cNever connect or disconnect either
the battery or any transistorized com-
ponent connector while the ignition is
on.
cOn gasoline engine models with the
Multiport Fuel Injection (MFI) system,
the fuel filter or fuel lines should be
serviced by a NISSAN dealer because
the fuel lines are under high pressure
even when the engine is off.
cFailure to follow these or other com-
mon sense guidelines may lead to
serious injury or vehicle damage.cImproperly disposed motor oil and/or
other vehicle fluids can hurt the envi-
ronment. Always conform to local
regulations for disposal of vehicle
fluid. Avoid contact with used motor
oil.
This ``Do-it-yourself operations'' section
gives instructions regarding only those
items which are relatively easy for an owner
to perform.
You should be aware that incomplete or
improper servicing may result in operating
difficulties or excessive emissions, and
could affect your warranty coverage.If in
doubt about any servicing, have it done
by your NISSAN dealer.
MAINTENANCE
PRECAUTIONS
7-2
ZX
Page 127 of 191

WARNING
Be careful not to burn yourself, as the
engine oil is hot.
CAUTION
cWaste oil must be disposed of prop-
erly. Check your local regulations.
cAvoid direct contact with used en-
gine oil.
6. Clean and re-install the drain plug and
washer. Securely tighten the drain plug
with a wrench.Drain plug tightening torque:
22 to 29 ft-lb
(29 to 39 N²m)
Do not overtighten.
7. Refill engine with recommended oil and
install the cap securely.
See the ``Technical and consumer infor-
mation'' section for refill capacity.
8. Start the engine.
Check for leakage around the drain plug
and oil filter. Correct as required.
9. Turn the engine off and wait several
minutes. Check the oil level with the
dipstick. Add engine oil if necessary.
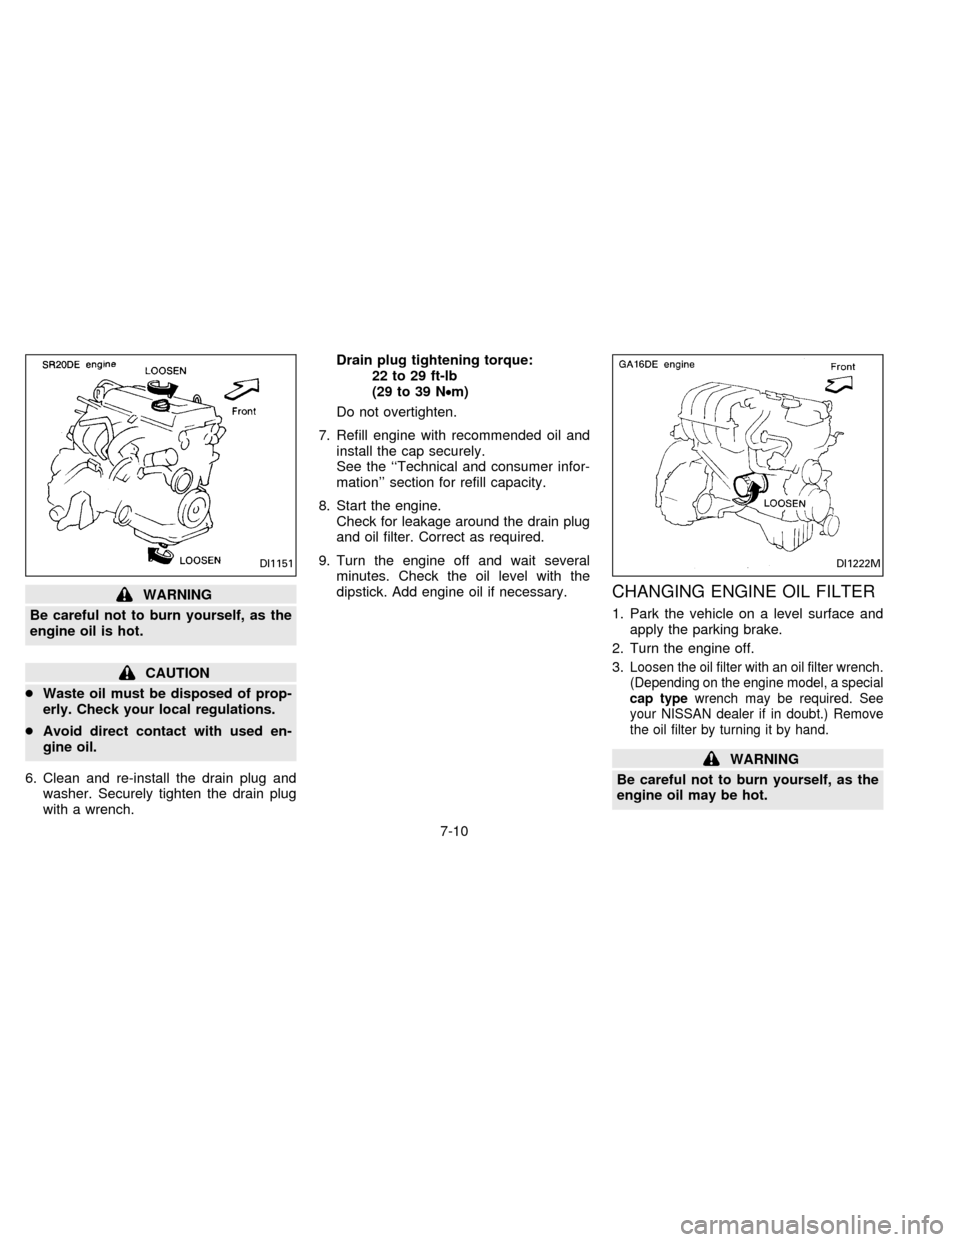
CHANGING ENGINE OIL FILTER
1. Park the vehicle on a level surface and
apply the parking brake.
2. Turn the engine off.
3.
Loosen the oil filter with an oil filter wrench.
(Depending on the engine model, a special
cap typewrench may be required. See
your NISSAN dealer if in doubt.) Remove
the oil filter by turning it by hand.
WARNING
Be careful not to burn yourself, as the
engine oil may be hot.
DI1151DI1222M
7-10
ZX
Page 155 of 191

Your new NISSAN has been designed to
have minimum maintenance requirements
with longer service intervals to save you
both time and money. However, some day-
to-day and regular maintenance is essential
to maintain your NISSAN's good mechani-
cal condition, as well as its emission and
engine performance.
It is the owner's responsibility to make sure
the specified periodic maintenance, as well
as general maintenance, is performed.
As the vehicle owner, you are the only one
who can ensure that your vehicle receives
the proper maintenance care. You are a
vital link in the maintenance chain.
General maintenance
General maintenance includes those items
which should be checked during normal
day-to-day operation of the vehicle. They
are essential if your vehicle is to continue to
operate properly. It is your responsibility to
perform these procedures regularly as
prescribed.
These checks or inspections can be done
by yourself, a qualified technician or, if you
prefer, your NISSAN dealer.
Periodic maintenance
The maintenance items listed in this part are
required to be serviced at regular intervals.
However, under severe driving conditions,
additional or more frequent maintenance is
required.
Where to go for service
If maintenance service is required or your
vehicle appears to malfunction, have the
systems checked and tuned by an autho-
rized NISSAN dealer.
NISSAN technicians are well-trained spe-
cialists and are kept up to date with the
latest service information through technical
bulletins, service tips, and in-dealership
training programs. They are completely
qualified to work on NISSAN's vehiclesbe-
forethey work on your vehicle, rather than
after they have worked on it.
You can be confident that your NISSAN
dealer's service department performs the
best job to meet the maintenance require-
ments on your vehicle Ð in a reliable and
economical way.
During the normal day-to-day operation of the
vehicle, general maintenance should be per-
formed regularly as prescribed in this section.
If you detect any unusual sounds, vibrations
or smells, be sure to check for the cause or
have your NISSAN dealer do it promptly. In
addition, you should notify your NISSAN
dealer if you think repairs are required.
When performing any checks or maintenance
work, closely observe the precautions in the
``Do-it-yourself operations'' section.
OUTSIDE THE VEHICLE
The maintenance items listed here should
be performed from time to time, unless
otherwise specified.
Additional information on the following
items with ``*'' is found in the ``Do-it-
yourself operations'' section.
Tires*Check the pressure with a gauge
periodically when at a service station, in-
cluding the spare, and adjust to the speci-
fied pressure if necessary. Check carefully
for damage, cuts or excessive wear.
Wheel nuts*When checking the tires,
make sure no nuts are missing, and check
for any loose nuts. Tighten if necessary.
GENERAL MAINTENANCE
8-2
ZX