1996 NISSAN QUEST window
[x] Cancel search: windowPage 62 of 235

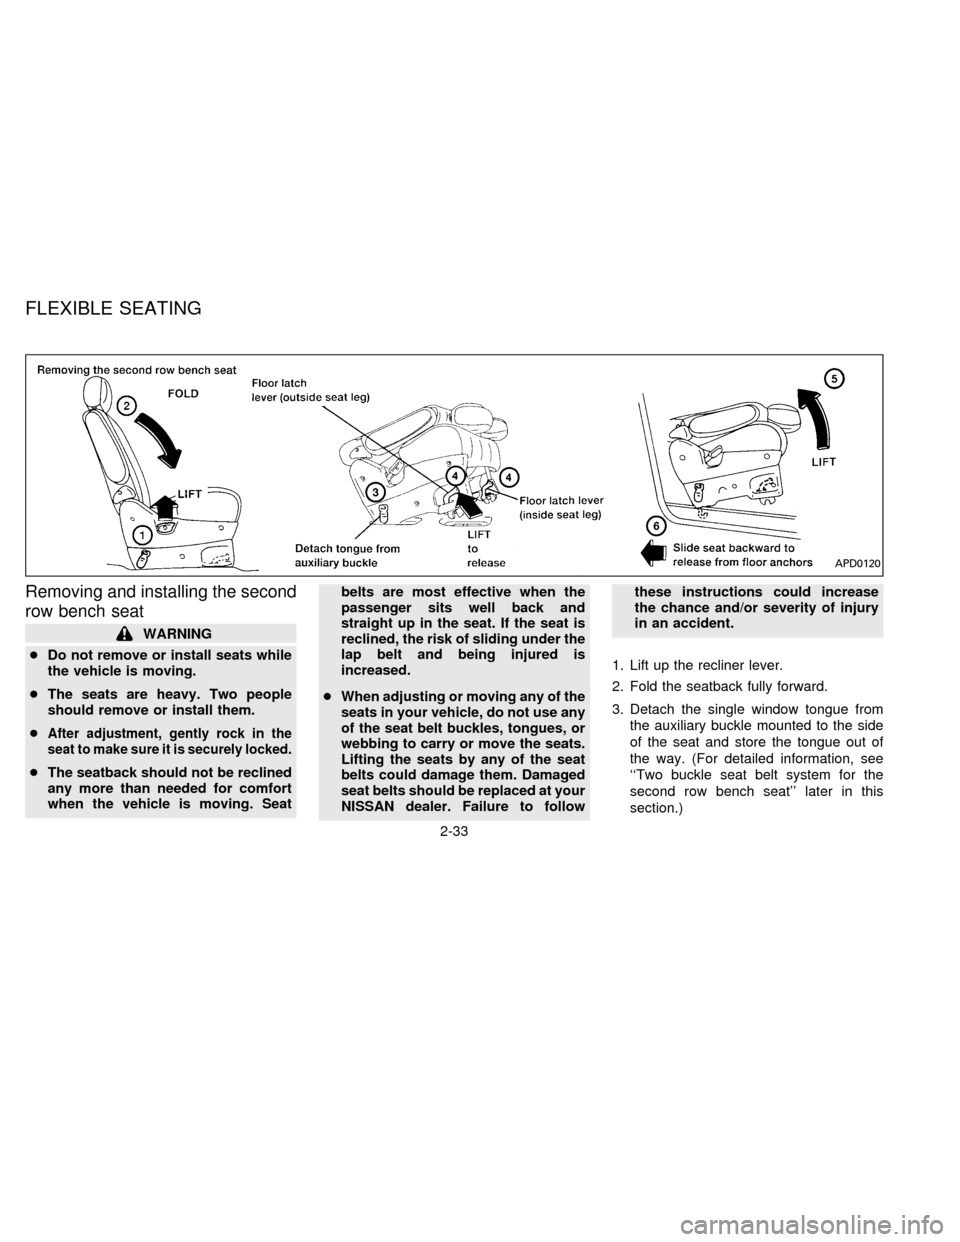
Removing and installing the second
row bench seat
WARNING
cDo not remove or install seats while
the vehicle is moving.
cThe seats are heavy. Two people
should remove or install them.
c
After adjustment, gently rock in the
seat to make sure it is securely locked.
cThe seatback should not be reclined
any more than needed for comfort
when the vehicle is moving. Seatbelts are most effective when the
passenger sits well back and
straight up in the seat. If the seat is
reclined, the risk of sliding under the
lap belt and being injured is
increased.
cWhen adjusting or moving any of the
seats in your vehicle, do not use any
of the seat belt buckles, tongues, or
webbing to carry or move the seats.
Lifting the seats by any of the seat
belts could damage them. Damaged
seat belts should be replaced at your
NISSAN dealer. Failure to followthese instructions could increase
the chance and/or severity of injury
in an accident.
1. Lift up the recliner lever.
2. Fold the seatback fully forward.
3. Detach the single window tongue from
the auxiliary buckle mounted to the side
of the seat and store the tongue out of
the way. (For detailed information, see
``Two buckle seat belt system for the
second row bench seat'' later in this
section.)
APD0120
FLEXIBLE SEATING
2-33
ZX
Page 63 of 235

4. Unlock the seat legs at the two front floor
latch levers.
5. Lift the front of the seat.
6. Slide it rearward off the rear anchor
positions.
WARNING
The seats are heavy. Two people
should remove or install them.
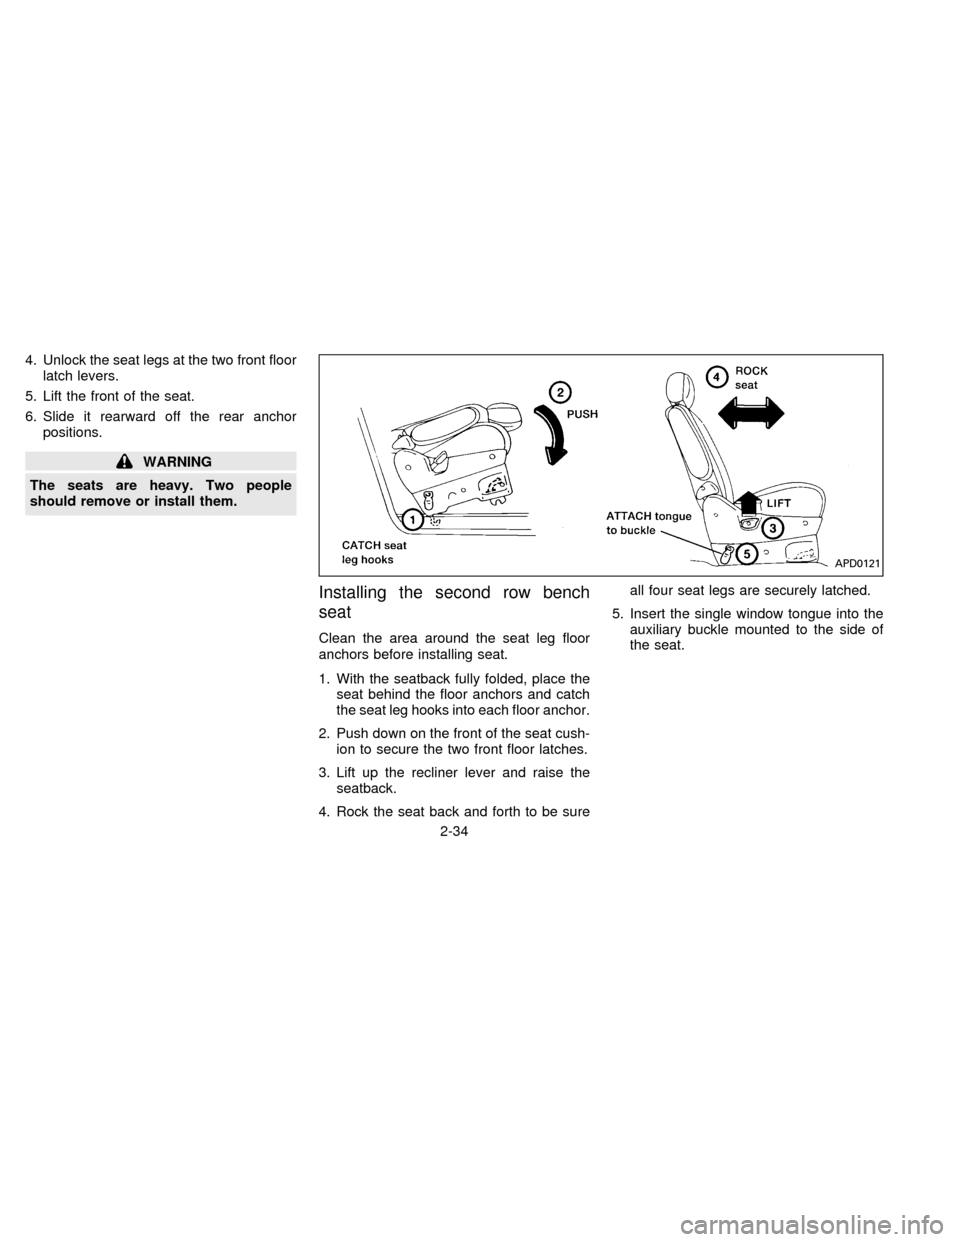
Installing the second row bench
seat
Clean the area around the seat leg floor
anchors before installing seat.
1. With the seatback fully folded, place the
seat behind the floor anchors and catch
the seat leg hooks into each floor anchor.
2. Push down on the front of the seat cush-
ion to secure the two front floor latches.
3. Lift up the recliner lever and raise the
seatback.
4. Rock the seat back and forth to be sureall four seat legs are securely latched.
5. Insert the single window tongue into the
auxiliary buckle mounted to the side of
the seat.
APD0121
2-34
ZX
Page 82 of 235

One of the seat belt tongues has two ``win-
dows'' (or holes) and the other has only one
``window''. The seat belt tongue with one
window attaches to the buckle mounted to
the side of the seat. The seat belt tongue
with two windows should be positionedproperly and fastened to the buckle
mounted in the location in the middle of the
seat.
When the two buckle seat belt system is not
in use, the webbing can be secured with the
seat belt clip. The seat belt clip should not
be used with a child seat or during seat belt
usage. The seat belt clip opening should
face the front of the vehicle.
A twisted belt may prevent the retractor
from working properly. If the two buckle seat
belt system is twisted, disengage the single
window tongue from the buckle on the side
of the seat, remove the twist and reinstall
the tongue into the buckle until you hear a
snap and feel the latch engage.
Both tongues must be attached to their
appropriate buckles whenever someone
is riding in that seating position. If the
tongue is released to allow a third row
passenger to enter or exit, the tongue
must be reattached.
When the two-passenger bench seat is re-
APD0123
APD0093
2-53
ZX
Page 83 of 235

moved from the vehicle, you must detach
the single window tongue from the auxiliary
buckle.
If the three-passenger bench seat is
moved up to the second row position,
the outside passenger (near the sliding
door) only needs to use the double win-
dow tongue and the standard buckle.
Because the third row seat is so much
wider and is closer to the sliding door,
the single window tongue and the auxil-
iary buckle are not necessary.
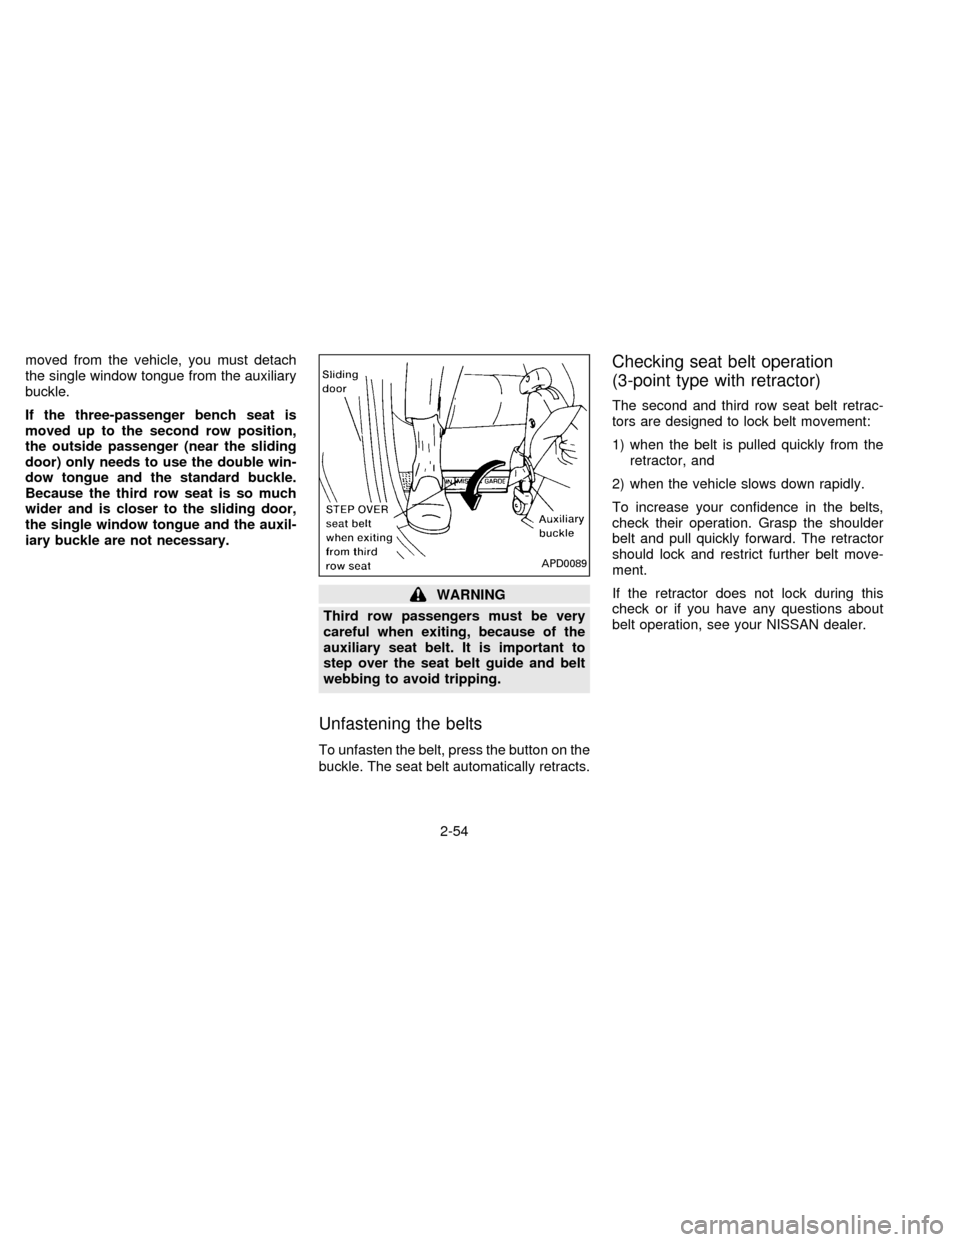
WARNING
Third row passengers must be very
careful when exiting, because of the
auxiliary seat belt. It is important to
step over the seat belt guide and belt
webbing to avoid tripping.
Unfastening the belts
To unfasten the belt, press the button on the
buckle. The seat belt automatically retracts.
Checking seat belt operation
(3-point type with retractor)
The second and third row seat belt retrac-
tors are designed to lock belt movement:
1) when the belt is pulled quickly from the
retractor, and
2) when the vehicle slows down rapidly.
To increase your confidence in the belts,
check their operation. Grasp the shoulder
belt and pull quickly forward. The retractor
should lock and restrict further belt move-
ment.
If the retractor does not lock during this
check or if you have any questions about
belt operation, see your NISSAN dealer.
APD0089
2-54
ZX
Page 104 of 235

Electric control type
The outside mirrors operate only when the
ignition switch is in the ACC or ON position.
Move the switch to select the right or left
side mirror, then adjust using the control
lever.
Objects viewed in the outside mirror on
the passenger side are closer than they
appear.
The electric control type outside mirrors can
be heated to defrost, defog, or de-ice for
improved visibility. Press the rear windowdefogger switch to activate the heating func-
tion. Press the switch again to deactivate, or
it automatically turns off in approximately 15
minutes.
Manual control type
The outside mirror can be moved in any
direction for a better rear view.
Objects viewed in the outside mirror on
the passenger side are closer than they
appear.
APD0808PD1183M
OUTSIDE MIRROR CONTROL
2-75
ZX
Page 109 of 235

indicator light comes on when the air condi-
tioner is on. To stop the air conditioner,
push the button again; the indicator light
goes off.
The air conditioner cooling function op-
erates only when the engine is running.
WARNING
Positioning of the heating or air condi-
tioning controls should not be done
while driving, in order that full attention
may be given to the driving operation.
HEATER OPERATION
Heating
This mode is used to direct most of the hot
air to the floor outlets.
The air recirculation button light shouldnot
be on for normal heating.
1. Push the
button in.
2. Turn the fan control dial to select speed.
3. Move the temperature control dial to the
desired position.
Ventilation
This mode directs air to the side and center
vents.
1. Push the
button in.
2. Turn the fan control dial to select speed.
3. Move the temperature control dial to the
desired position.
NOTE: The recirculate position can be
used.
Defrosting or defogging
This mode is used to defrost/defog the
windows.
1. Push the
button in.
2. Turn the fan control dial to select speed.
3. Move the temperature control dial to the
desired position.
When the
button is pushed, the air
conditioner automatically turns on to de-
fog the windshield. The recirculated air
mode automatically turns off to reduce
window fogging.
When
is selected, the air condi-
tioner indicator light does not illuminateunless illuminated in the previously se-
lected mode. However, the air condi-
tioner operates to dehumidify if the out-
side temperature is more than 40ÉF
(4ÉC), whether or not the A/C button has
been pressed. Manual selection and illu-
mination of the A/C button does not
override the automatic dehumidifying
which occurs when
is selected.
Operating Tips
Clear snow and ice from the wiper
blades and air inlet in front of the wind-
shield. This improves defrosting/-
defogging operation.
Bi-level heating/cooling
The bi-level mode directs air to the side and
center vents and to the floor outlets.
Bi-level is also a cooling mode when high
sun load conditions are present with cool
temperatures.
With the A/C system in operation, this mode
can be used to cool the passenger's or
driver's feet under high temperature condi-
tions.
With the A/C system in operation under high
3-4
ZX
Page 110 of 235

temperature conditions, improved cooling
can be obtained by pushing the recirculation
button to the on position.
Push the air recirculation button to the off
position when heating is required.
1. Push the
button in.
2. Turn the fan control dial to the desired
position.
3. Move the temperature control dial to the
desired position.
Heating and demisting
This mode heats the interior and demists
the windshield.
1. Push the
button in.
2. Turn the fan control dial to the desired
position.
3. Move the temperature control dial to the
desired position.
When the
button is pushed, the air
recirculate mode automatically turns off.
Outside air is drawn into the passenger
compartment to improve the defogging
performance.
Operating tips
cClear snow and ice from the wiper
blades and air inlet in front of the
windshield. This improves heater op-
eration.
cTo defog the side windows more effec-
tively when in bi-level or ventilation
mode, close the center vent and direct
the side vents toward the side windows.
cA slight delay may be experienced when
changing air control buttons. This is not a
problem, it is only the system motors and
solenoids switching from one outlet to
another.
AIR CONDITIONER OPERATION
Start the engine, move the fan control dial to
the desired (1 to 4) position, and select an
air control button before pushing in the air
conditioner button to activate the air condi-
tioner. When the air conditioner is on, cool-
ing and dehumidifying functions are added
to the system operation.
The air conditioner cooling function op-
erates only when the engine is running.
NOTE: When switching air flow outlets, the
A/C system remains activated unless theA/C button is pressed again to turn it off.
The indicator light on the A/C button re-
mains illuminated unless the button is
pressed to turn it off, or the OFF air control
button is pressed.
Cooling
This mode is used to cool and dehumidify.
1. Push the
button in.
2. Turn the fan control dial to select speed.
3. Push the air conditioner button. The indi-
cator light comes on.
4. Move the temperature control dial to the
desired position.
cFor quick cooling when the outside tem-
perature is high, move the air recircula-
tion button to the on position. Be sure to
return the air recirculation button to the
off position for normal cooling.
cOpening the windows helps to vent heat
buildup when parked in the sun.
Dehumidified heating
This mode is used to heat and dehumidify.
1. Push the air recirculation button to the off
position.
3-5
ZX
Page 111 of 235

2. Push thebutton in.
3. Turn the fan control dial to select speed.
4. Push on the air conditioner button. The
indicator light comes on.
5. Move the temperature control dial to the
desired position.
Dehumidified defogging
This mode is used to defog the windows
and dehumidify.
1. Push the
button in.
2. Turn the fan control dial to the desired
speed.
3. Move the temperature control dial to the
desired position.
When the
button is pushed, the air
conditioner automatically turns on to de-
fog the windshield, (however, the light
does not illuminate unless illuminated in
the previously selected mode) and the
recirculated air mode automatically turns
off.
Operating tips
cKeep windows and sun roof closed while
the air conditioner is in operation.cAfter parking in the sun, drive for two or
three minutes with the windows open to
vent hot air from the passenger compart-
ment. Then, close the windows. This
allows the air conditioner to cool the
interior more quickly.
cThe air conditioning system should be
operated for about ten minutes at
least once a month. This helps pre-
vent damage to the system due to lack
of lubrication.
cIf the coolant temperature gauge ex-
ceeds the H (hot) position, turn the air
conditioner off. See ``If your vehicle over-
heats'' in the ``In case of emergency''
section for additional information.
Servicing air conditioning
The air conditioning system in your NISSAN
vehicle is charged with a new refrigerant
designed with the environment in mind.
This new refrigerant does not harm the
earth's ozone layer.
Special charging equipment and lubricant
are required when servicing your NISSAN
air conditioner. Using improper refrigerants
or lubricants causes severe damage to yourair conditioning system. See ``Air condition-
ing system refrigerant and lubricant recom-
mendations'' in the ``Technical and con-
sumer information'' section of this manual.
Your NISSAN dealer is able to service your
environmentally ``friendly'' air conditioning
system.
3-6
ZX