1996 NISSAN QUEST clock
[x] Cancel search: clockPage 137 of 235

P (Park):
Use this selector position when the vehicle
is parked or when starting the engine. Al-
ways be sure the vehicle is at a complete
stop. For maximum safety, depress the
brake pedal, pull the lever toward you, and
move the lever to the P position. Apply the
parking brake. When parking on a hill, apply
the parking brake first, then shift the lever
into the P position.
Shifting from P (Park)
If the ignition switch is in the ON position
and the foot brake pedal is depressed, butthe shift lever still cannot be moved out of P
(Park), follow these instructions:
1. Shut the engine off and remove the key.
2. Apply the parking brake.
3. Reinsert the ignition key and turn it clock-
wise to the first position (ACC).
4. Depress the brake pedal, move the gear-
shift lever to N (Neutral) and start the
engine.
R (Reverse):
Use this position to back up. Always be sure
the vehicle is completely stopped. Depress
the brake pedal then pull the shift lever
toward you and move it to the R position.
N (Neutral):
Neither forward nor reverse gear is en-
gaged. The engine can be started in this
position. You may shift to N and restart a
stalled engine while the vehicle is moving.
D (Drive):
Use this position for all normal forward
driving.2 (Second gear):
Use for hill climbing or engine braking on
downhill grades.
Do not downshift into 2 at speeds over 63
MPH (100 km/h). Do not exceed 63 MPH
(100 km/h) in 2.
1 (Low gear):
Use 1 when climbing steep hills slowly or
driving slowly through deep snow, sand or
mud, or for maximum engine braking on
steep downhill grades.
Do not exceed 38 MPH (60 km/h) in 1.
Do not shift into 1 at speeds over 38 MPH
(60 km/h).
Accelerator downshift
Ð In D position Ð
For rapid passing or hill climbing, fully de-
press the accelerator pedal to the floor. This
shifts the transmission down into third gear,
second gear or first gear, depending on the
vehicle speed.
Fail-safe
When the Fail-safe operation occurs, the
next time the key is turned to the ON
ASD0552
4-6
ZX
Page 150 of 235

1. Remove the plastic hex nut cover in the
carpeting of the cargo area. The hex nut
is used to lower and raise the spare tire
located underneath the vehicle.
2. Place the lug wrench over the hex nut
and turn counterclockwise until the cable
extends completely. The spare tire hex
nut rachets when the cable is fully ex-
tended.3. Carefully slide the tire from under the
rear of the vehicle.4. Stand the tire up to easily remove the
retainer.
ACE0001ACE0006ACE0014
5-3
ZX
Page 152 of 235

Jacking up and removing wheel
To help avoid personal injury, carefully
read the caution label attached to the
jack body and the following instructions.
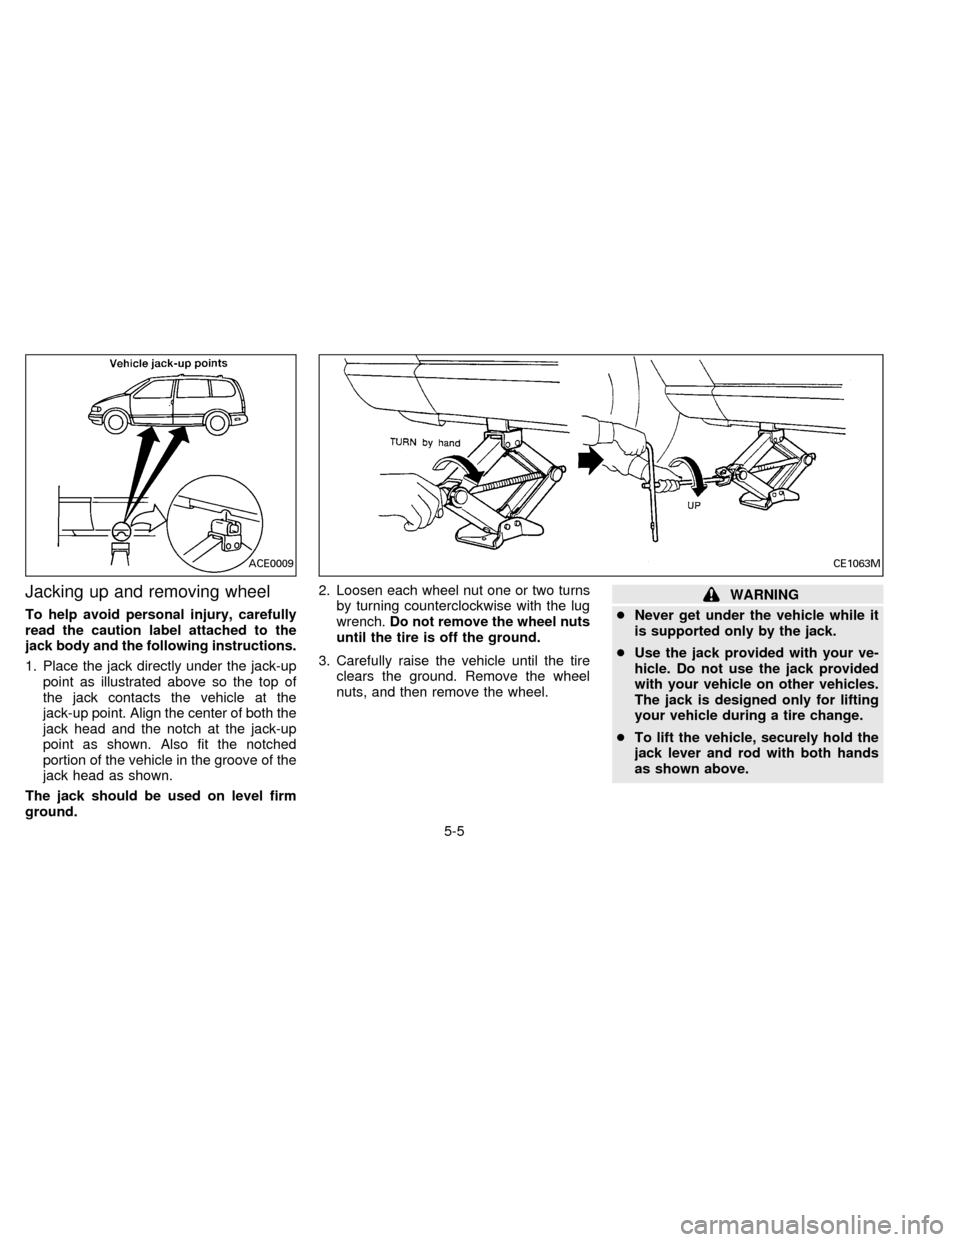
1. Place the jack directly under the jack-up
point as illustrated above so the top of
the jack contacts the vehicle at the
jack-up point. Align the center of both the
jack head and the notch at the jack-up
point as shown. Also fit the notched
portion of the vehicle in the groove of the
jack head as shown.
The jack should be used on level firm
ground.2. Loosen each wheel nut one or two turns
by turning counterclockwise with the lug
wrench.Do not remove the wheel nuts
until the tire is off the ground.
3. Carefully raise the vehicle until the tire
clears the ground. Remove the wheel
nuts, and then remove the wheel.
WARNING
cNever get under the vehicle while it
is supported only by the jack.
cUse the jack provided with your ve-
hicle. Do not use the jack provided
with your vehicle on other vehicles.
The jack is designed only for lifting
your vehicle during a tire change.
cTo lift the vehicle, securely hold the
jack lever and rod with both hands
as shown above.
ACE0009CE1063M
5-5
ZX
Page 154 of 235

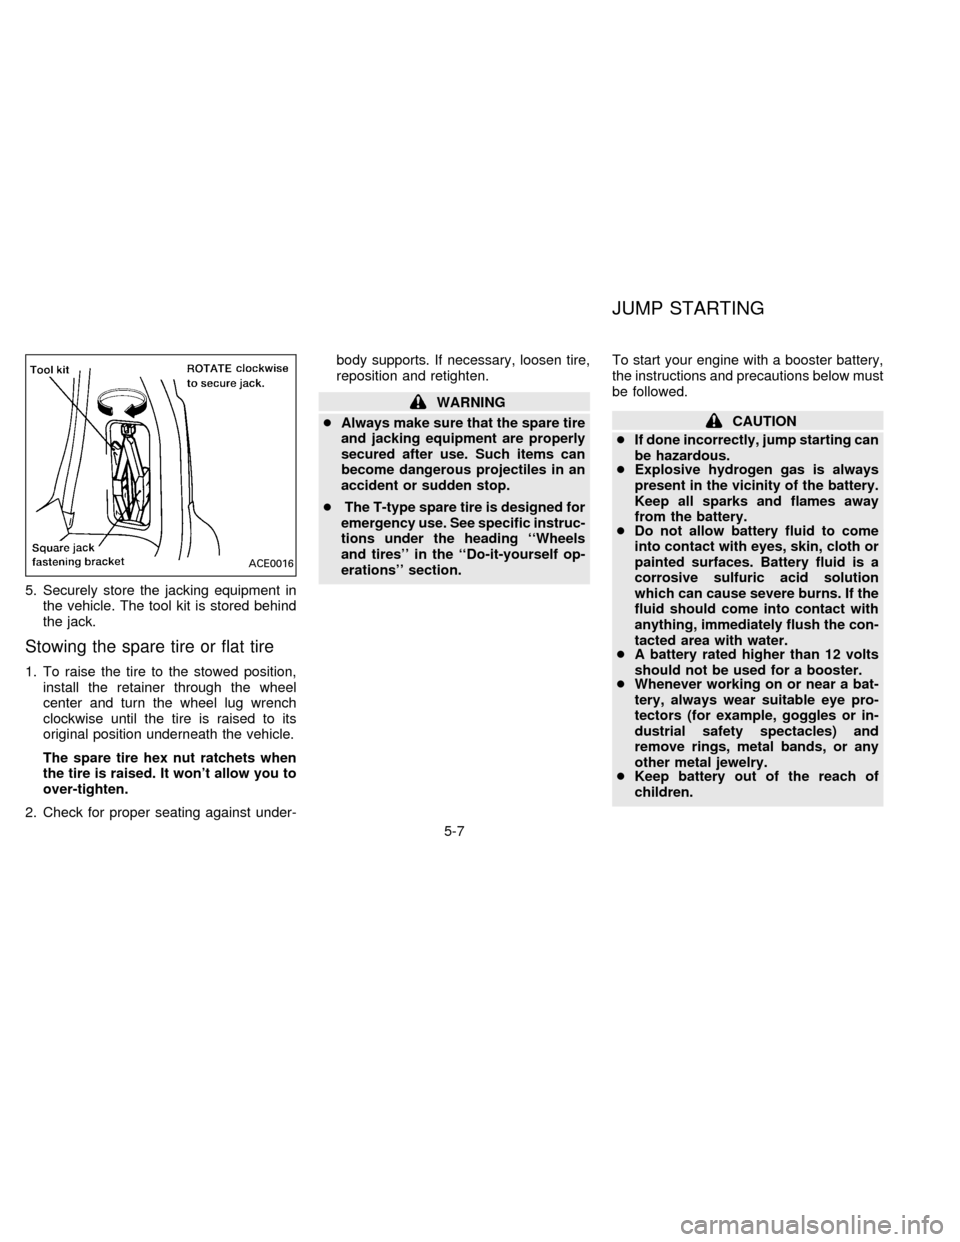
5. Securely store the jacking equipment in
the vehicle. The tool kit is stored behind
the jack.
Stowing the spare tire or flat tire
1. To raise the tire to the stowed position,
install the retainer through the wheel
center and turn the wheel lug wrench
clockwise until the tire is raised to its
original position underneath the vehicle.
The spare tire hex nut ratchets when
the tire is raised. It won't allow you to
over-tighten.
2. Check for proper seating against under-body supports. If necessary, loosen tire,
reposition and retighten.
WARNING
cAlways make sure that the spare tire
and jacking equipment are properly
secured after use. Such items can
become dangerous projectiles in an
accident or sudden stop.
cThe T-type spare tire is designed for
emergency use. See specific instruc-
tions under the heading ``Wheels
and tires'' in the ``Do-it-yourself op-
erations'' section.To start your engine with a booster battery,
the instructions and precautions below must
be followed.
CAUTION
cIf done incorrectly, jump starting can
be hazardous.
cExplosive hydrogen gas is always
present in the vicinity of the battery.
Keep all sparks and flames away
from the battery.
cDo not allow battery fluid to come
into contact with eyes, skin, cloth or
painted surfaces. Battery fluid is a
corrosive sulfuric acid solution
which can cause severe burns. If the
fluid should come into contact with
anything, immediately flush the con-
tacted area with water.
cA battery rated higher than 12 volts
should not be used for a booster.
cWhenever working on or near a bat-
tery, always wear suitable eye pro-
tectors (for example, goggles or in-
dustrial safety spectacles) and
remove rings, metal bands, or any
other metal jewelry.
cKeep battery out of the reach of
children.
ACE0016
JUMP STARTING
5-7
ZX
Page 187 of 235

Hold the plastic base when handling
the bulb. Never touch the glass enve-
lope.
Removing the headlight bulb
1. Disconnect the negative battery cable.
2. Disconnect the electrical connector from
the rear end of the bulb.
3. Turn the bulb retaining ring counterclock-
wise until it is free from the headlight
reflector, then remove it.
4. Remove the headlight bulb by pulling
straight rearward. Do not shake or rotate
the bulb when removing it.
Replacing the headlight bulb
1. Insert the bulb into the headlight reflector
with the flat side of the plastic base facing
upward.
2. Install the bulb retaining ring and turn it
clockwise until it stops.
3. Push the electrical connector into the
bulb plastic base until it snaps and stops.
CAUTION
DO NOT TOUCH THE BULB.
cUse the same number and wattage
as originally installed:
Wattage 55/65
Bulb no. 9007
cAiming is not necessary after replac-
ing the bulb. When aiming adjust-
ment is necessary, contact your NIS-
SAN dealer.
cDo not leave the bulb out of the
headlight reflector for a long period
of time as dust, moisture, and smoke
may enter the headlight body and
affect the performance of the head-
light.
7-20
ZB13-DX
Page 230 of 235

10 Index
A
After an accident........................................ 5-10
Air bag (See supplemental restraint system)
Air bag warning light .................................. 2-45
Air cleaner housing filter ............................ 7-13
Air conditioner
Air conditioner operation ........................ 3-5
Air conditioner service ............................ 3-6
Air conditioner specification label ......... 9-11
Air conditioning system refrigerant and
lubricant recommendations .................... 9-6
Air flow charts ......................................... 3-7
Heater and air conditioner (automatic)
(If so equipped) .................................... 3-11
Heater and air conditioner (manual)....... 3-3
Rear seat heater and air conditioner ... 3-14
Air conditioning system refrigerant and lubricant
recommendations ........................................ 9-6
Anchor point location ................................. 2-66
Antenna
Manual .................................................. 3-21
Power.................................................... 3-21
Anti-lock brake system .............................. 4-13
Armrests..................................................... 2-29
Ashtray (See cigarette lighter and ashtray)
Audio system
AM-FM radio with cassette player ........ 3-15Compact disc (CD) player .................... 3-22
Autolamp switch......................................... 1-13
Automatic
Automatic transmission fluid ................... 7-8
Driving with an automatic transmission .. 4-5
B
Battery........................................................ 7-11
Before starting the engine ........................... 4-5
Brake
Anti-lock brake system ......................... 4-13
Brake booster ....................................... 7-17
Brake fluid ..................................... 7-10, 9-2
Brake pedal .......................................... 7-16
Brake wear indicators ................... 1-9, 7-16
Parking brake check ............................. 7-16
Parking brake operation ......................... 4-8
Self-adjusting brakes ............................ 7-16
Break-in schedule ...................................... 4-11
Bulb check/instrument panel ....................... 1-6
Bulb replacement ....................................... 7-21
C
Capacities and recommended fuel/
lubricants...................................................... 9-2
Cargo net ................................................... 2-13Cassette player (See audio system)
CB radio or car phone ............................... 3-26
Child restraints for infants and
small children ............................................. 2-58
Child restraint with top tether strap ........... 2-62
Child safety sliding door lock....................... 2-4
Cigarette lighter and ashtray ..................... 1-17
Cleaning exterior and interior ...................... 6-2
Clock .......................................................... 1-22
Coin tray .................................................... 1-18
Cold weather driving cautions ................... 4-15
Compact disc (CD) player ......................... 3-22
Controls
Audio controls (rear) ............................. 3-25
Heater and air conditioner controls ........ 3-3
Rear seat heater and air conditioner
controls ................................................. 3-14
Coolant
Capacities and recommended fuel/
lubricants ................................................ 9-2
Changing engine coolant........................ 7-5
Checking engine coolant level ............... 7-4
Engine coolant temperature gauge ........ 1-4
Cornering light ........................................... 1-16
Corrosion protection .................................... 6-4
Cruise control............................................... 4-9
Cup holder ................................................. 2-31
ZX