1996 HONDA ODYSSEY lock
[x] Cancel search: lockPage 26 of 240

Child Safety
Securing a Child Seat with a Lap/
Shoulder Belt
The lap/shoulder belt retractors in the passenger seating positions havea built-in locking mechanism
intended to secure a child seat. If
you are placing a child seat in one of the outside seating positions, do the
following:
1. Place the child restraint in the
desired seating position. Route the
lap/shoulder belt through the seat
according to the seat manufac-
turer's instructions.
2. Insert the latch plate into the buckle. Make sure it is fully
latched.
3. Slowly pull the shoulder portion of the belt out of the retractor until it
stops.
4. Allow the belt to slowly feed back into the retractor. You should hear
a clicking noise that indicates the
locking mechanism has engaged.
5. After the belt has retracted fully, pull up on the shoulder portion to
remove any slack. 6. Push and pull on the child seat to
verify that it is held firmly in place.
If not, unlatch the seat belt, allow
it to retract fully, and repeat these
steps.
To unlatch the seat belt, push the red PRESS button on the buckle.Guide the belt across to the door
pillar. If the belt doesn't retract easily, pull it out and check for twists
or kinks.
Driver and Passenger SafetyProCarManuals.comMain Menu s t Table of Contents
Page 32 of 240

Instruments and Controls
This section gives information about the controls and displays thatcontribute to the daily operation of
your Honda. All the essential controls are within easy reach.
Control Locations............................ 32
Indicator Lights................................ 33
Gauges.............................................. 37
Speedometer................................ 37
Trip Meter.................................... 37
Odometer......................................
37
Temperature Gauge................... .
38
Fuel Gauge.................................. 38
Maintenanc
e Required
Indicator...................................
38
Controls Nea r
the Steering
Wheel........................................ 39
Headlights.................................... 40
Daytime Running Lights............. 40
Instrument Panel Brightness..... 41
Turn Signals................................. 41
Windshield Wipers...................... 42
Windshield Washers................... 42 Rear Window Wiper and Washer...................................... 43
Hazard Warning........................... 43
Rear Window Defogger.............. 43
Steering Wheel Adjustment....... 44
Steering Wheel Controls................ 46 Cruise Control.............................. 46
Keys and Locks................................ 49
Keys............................................... 49
Ignition Switch............................. 49
Power Door Locks....................... 50
Remote Transmitter.................... 51Childproof Door Locks............... 52
Tailgate......................................... 52
Glove Box..................................... 53
Seats.................................................. 54
Passenger Seating....................... 54
Seat Adjustments......................... 54
Driver's Seat Power Height Adjustment............................... 55
Head Restraints........................... 56 Third Seat Access........................ 56
Removing the Second Seats in the Six-Passenger Model.... 57
Folding the Second Seats in the Seven-Passenger
Model....................................
58
Reclining th e
Second Seat.......... 59
Folding the Third Seat
in All Models............................ 60
Power Windows............................... 62
Sunroof.............................................. 63
Mirrors.............................................. 64
Adjusting the Power Mirrors..... 64
Parking Brake..................................
65
Digital Clock.................................... .
66
Beverage Holder.............................. 66
Dashboard Compartment............... 68 Center Pocket.................................. 68
Vanity Mirror................................... 68 Cigarette Lighter............................. 69
Ashtrays............................................ 69 Interior Lights.................................. 70
Ceiling Lights............................... 70
Spotlights...................................... 70
Tailgate Light............................... 71 Courtesy Lights........................... 71
Instruments and ControlsProCarManuals.comMain Menu s t
Page 33 of 240

DOOR LOCK
SWITCH
(P.50)
POWER WINDO
W
SWITCH
(P.62)
FUEL FILL
DOOR RELEASE
(P.110)
HEATING/COOLIN
G
CONTROLS (P.74)
AUDIO SYSTEM
(P.83")
Control Locations
MIRROR
CONTROLS DIGITAL CLOCK
(P.66)
DOOR LOCK
SWITCH
(P.50)
POWER WINDO
W
SWITCH
(P.62)
FUEL FILL
DOOR RELEASE
(P.110)
HEATING/COOLIN
G
CONTROLS (P.74)
AUDIO SYSTEM
(P.83)
HOOD
RELEASE
HANDLE
(P.111)
Instruments and Controls
(P.64)
ProCarManuals.comMain Menu s t Table of Contents
Page 34 of 240
, a")
Indicator Lights
The instrument panel has many indicators to give you important
information about your car.
Lamp CheckMany of the indicator lights come on
when you turn the ignition switch ON (II), allowing you to see that they
are working. If an indicator does not
light during this test, it cannot alert
you if that system develops a prob-
lem. Have the dealer check your car
for burned-out bulbs or other
problems.
* The U.S. instrument panel is
shown. Differences for the Canadian
model are noted in the text.
Instruments and Controls
MALFUNCTION INDICATOR LAMP
DOOR AND BRAKE
LAMP MONITOR
HIGH BEAM
INDICATOR
PARKING BRAKE AND
BRAKE SYSTEM INDICATOR*
CRUISE CONTROL
INDICATOR
CHARGING
SYSTEM
INDICATOR
SEAT BELT
REMINDER
LIGHT
LOW OIL PRESSURE
INDICATOR
ANTI-LOCK BRAKE
SYSTEM INDICATOR
SUPPLEMENTAL
RESTRAINT
SYSTEM
INDICATOR
LOW FUEL
INDICATORProCarManuals.comMain Menu s t Table of Contents
Page 35 of 240
. It is a reminder
to you and your passengers to
protect yourselves by fastening theseat belts. A bee")
Indicator Lights
Seat Belt Reminder Light
This indicator lights when you turn the ignition ON (II). It is a reminder
to you and your passengers to
protect yourselves by fastening theseat belts. A beeper also sounds if
you have not fastened your seat belt.
If you do not fasten your seat belt,
the beeper will stop after a fewseconds but the light stays on until
you do. Both the light and the beeper stay off if you fasten your seat belt
before turning on the ignition.
See page 206. Malfunction Indicator
Lamp Low Oil Pressure
Indicator
The engine can be severely damaged if this light flashes or stays on when
the engine is running. For complete
information, see page 204.
Charging System
Indicator
If this light comes on when the engine is running, the battery is not
being charged. For complete
information, see page 205.
See page 16. Supplemental Restraint
System Indicator Parking Brake
and Brake
System
Indicator
This light has two functions:
1. It lights as a reminder that you have set the parking brake.
Driving with the parking brake set
can damage the brakes and tires,
and cause the Anti-lock brakesystem to turn off (see page 125).
2. It can indicate the brake fluid level is low if it remains lit after you
release the parking brake orcomes on while driving. This is
normally due to worn brake pads. Have your dealer check the
braking system for worn pads or
fluid leaks.
Instruments and Controls
S R S U.S.
Canada
BRAKE
ProCarManuals.comMain Menu s t Table of Contents
Page 36 of 240
 Indicator
Canada
Only on cars equipped with ABS (see
page 125)
This light normally comes on when you turn the ignition ON (II) andgoes off afte")
Indicator Lights
U.S.
Anti-lock Brake System
(ABS) Indicator
Canada
Only on cars equipped with ABS (see
page 125)
This light normally comes on when you turn the ignition ON (II) andgoes off after the engine starts. If itcomes on at any other time, there is
a problem in the ABS. If this happens,
take the car to your dealer to have it checked. With the light on, your car
still has normal braking ability but no
anti-lock.
Turn Signal and
Hazard WarningIndicators
The left or right turn signal light
blinks when you signal a lane change
or turn. If the light does not blink or
blinks rapidly, it usually means one
of the turn signal bulbs is burned out (see page 178). Replace the bulb as
soon as possible, since other drivers
cannot see that you are signalling.
When you turn on the Hazard
Warning switch, both turn signal lights blink. All turn signals on theoutside of the car should flash. Door and Brake Lamp Monitor
The appropriate light comes on in this display if the tailgate or any dooris not closed tightly. If a brake lightdoes not work, the BRAKE LAMP
indicator comes on when you push
the brake pedal with the ignition switch ON (II).
A burned out brake light is a hazard when drivers behind you cannot tell
you are braking. Have your brake lights repaired right away.
All the lights in the monitor display come on for a few seconds when you
turn the ignition switch ON (II).
Instruments and Controls
ABSProCarManuals.comMain Menu s t Table of Contents
Page 41 of 240

Controls Near the Steering Wheel
Headlights
The rotating switch on the left lever controls the lights. Turning this switch to the first position
turns on the parking lights, taillights, instrument panel lights, side-marker
lights, and rear license plate lights.
Turning the switch to the second position turns on the
headlights. If you leave the lights on with the
ignition switch in ACCESSORY (I)
or LOCK (0), you will hear a
reminder chime when you open the
driver's door.
To change between low beams and high beams, pull back on the turnsignal lever until you hear a click,
then let go. The blue high beam indicator will light (see page 36). To flash the high beams, pull back
and hold the turn signal lever.
Release the lever and the high
beams will go off.
The high beams will stay on for as long as you hold the lever, no matter
what position the headlight switch is
in.
Daytime Running Lights (Canadian Models)
With the headlight switch off, the high beam headlights come on with
reduced brightness when you turn
the ignition switch to ON (II) and release the parking brake. They
remain on until you turn the ignition
off, even if you set the parking brake
The headlights revert to normal operation when you turn them on
with the switch.
Instruments and ControlsProCarManuals.comMain Menu s t Table of Contents
Page 44 of 240
Controls Near the Steering Wheel
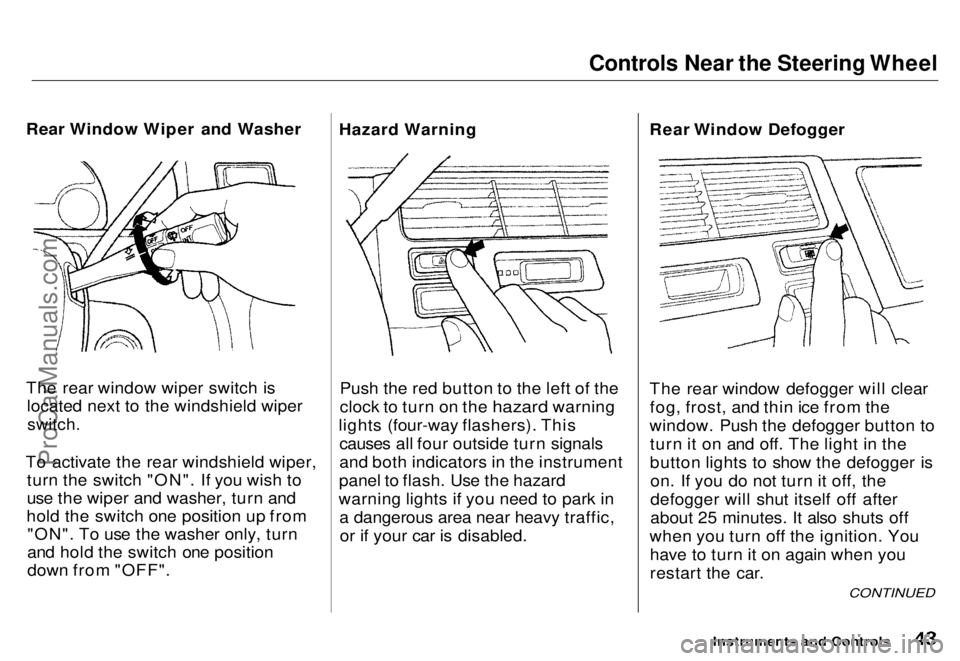
Rear Window Wiper and Washer
The rear window wiper switch is located next to the windshield wiper
switch.
To activate the rear windshield wiper, turn the switch "ON". If you wish to
use the wiper and washer, turn and
hold the switch one position up from "ON". To use the washer only, turn
and hold the switch one position
down from "OFF". Hazard Warning
Push the red button to the left of the
clock to turn on the hazard warning
lights (four-way flashers). This causes all four outside turn signals
and both indicators in the instrument
panel to flash. Use the hazard
warning lights if you need to park in a dangerous area near heavy traffic,or if your car is disabled. Rear Window Defogger
The rear window defogger will clear
fog, frost, and thin ice from the
window. Push the defogger button to turn it on and off. The light in the
button lights to show the defogger ison. If you do not turn it off, the
defogger will shut itself off after
about 25 minutes. It also shuts off
when you turn off the ignition. You have to turn it on again when you
restart the car.
Instruments and Controls
CONTINUED
ProCarManuals.comMain Menu s t Table of Contents