1996 CHRYSLER VOYAGER weight
[x] Cancel search: weightPage 1312 of 1938
INSTALLATION
(1) Position fuel tank on transmission jack. Con-
nect pressure relief/rollover valve hose. Connect fuel
filler tube vent hose and replace clamp.
(2) Raise tank into position and carefully work
filler tube into tank. A light coating of clean engine
oil on the tube end may be used to aid assembly.
(3) Feed filler vent line thru frame rail. Careful
not to cross lines.
(4) Tighten strap bolts to 54 N´m (40 ft. lbs.)
torque. Remove transmission jack.
(5) Tighten filler hose clamp to 3.3 N´m (30 in.
lbs.).
CAUTION: Ensure straps are not twisted or bent
before or after tightening strap nuts.
(6) Connect fuel pump/module electrical connector.
Place retainer in locked position.
(7) Lubricate the fuel supply line with clean 30
weight engine oil, install the quick connect fuel fit-
ting. Refer to Tube/Fitting Assembly in the Fuel
Delivery section of this Group.
(8) Attach filler line to filler tube. Pull on connec-
tor to make sure of connection.
(9) Fill fuel tank, replace cap, and connect battery
negative cable.
CAUTION: When using the ASD Fuel System Test,
the ASD relay and fuel pump relay remain energized
for 7 minutes or until the test is stopped, or until
the ignition switch is turned to the Off position.
(10) Use the DRB scan tool ASD Fuel System Test
to pressurize the fuel system. Check for leaks.
FUEL INJECTOR RAILÐ2.4L
REMOVAL
(1) Perform fuel system pressure release procedure
before servicing or starting repairs.Refer to
Fuel System Pressure Release Procedure in this sec-
tion.
(2) Disconnect negative cable from battery.
(3) Remove air cleaner inlet hose from throttle
body.
(4) Remove throttle cable and speed control cable
(if equipped) from throttle lever.
(5) Remove throttle cables from bracket by com-
pressing retaining tabs.
(6) Remove connector from throttle position sensor.
(7) Remove connector from idle air control motor.
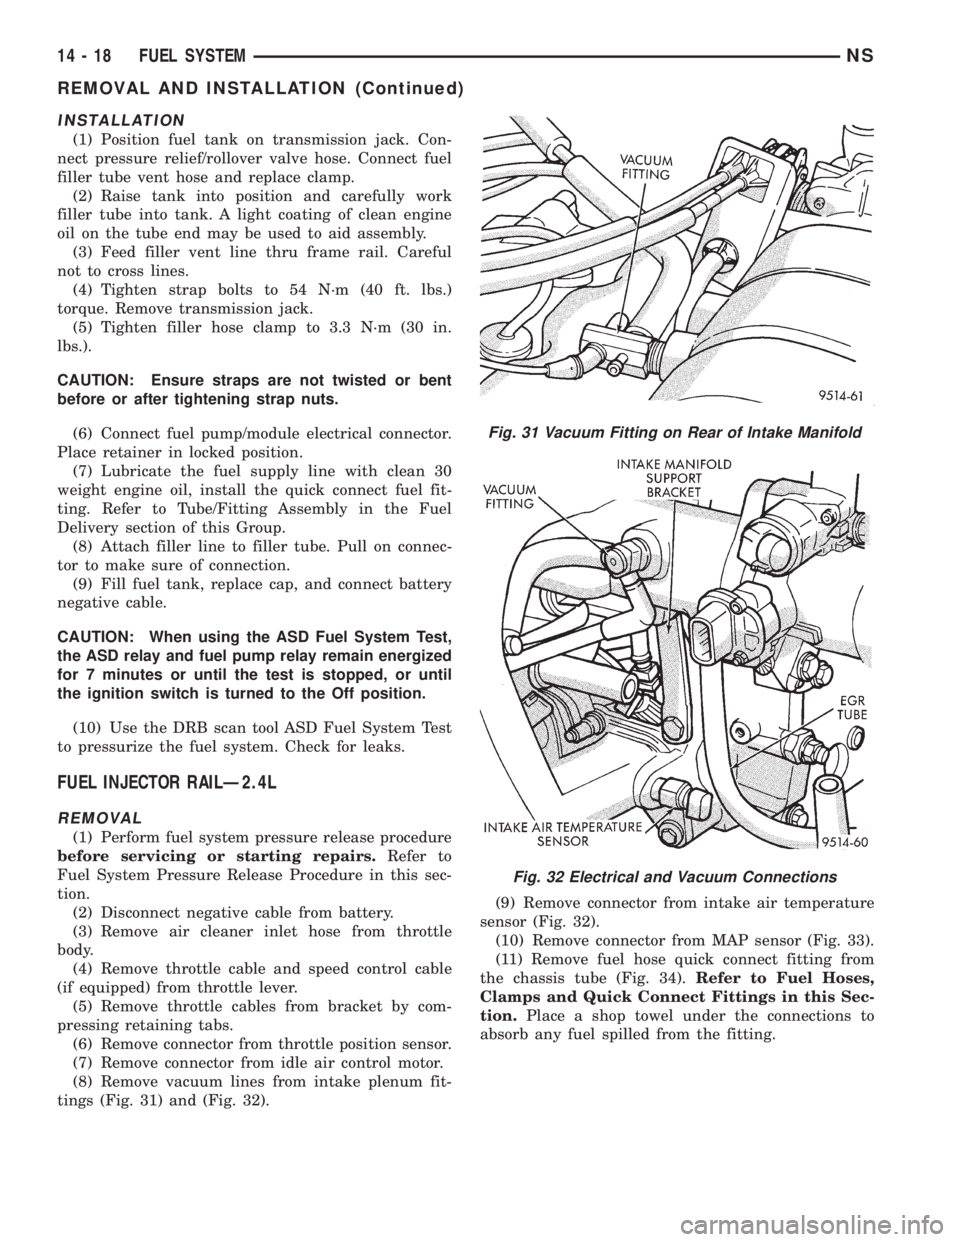
(8) Remove vacuum lines from intake plenum fit-
tings (Fig. 31) and (Fig. 32).(9) Remove connector from intake air temperature
sensor (Fig. 32).
(10) Remove connector from MAP sensor (Fig. 33).
(11) Remove fuel hose quick connect fitting from
the chassis tube (Fig. 34).Refer to Fuel Hoses,
Clamps and Quick Connect Fittings in this Sec-
tion.Place a shop towel under the connections to
absorb any fuel spilled from the fitting.
Fig. 31 Vacuum Fitting on Rear of Intake Manifold
Fig. 32 Electrical and Vacuum Connections
14 - 18 FUEL SYSTEMNS
REMOVAL AND INSTALLATION (Continued)
Page 1330 of 1938
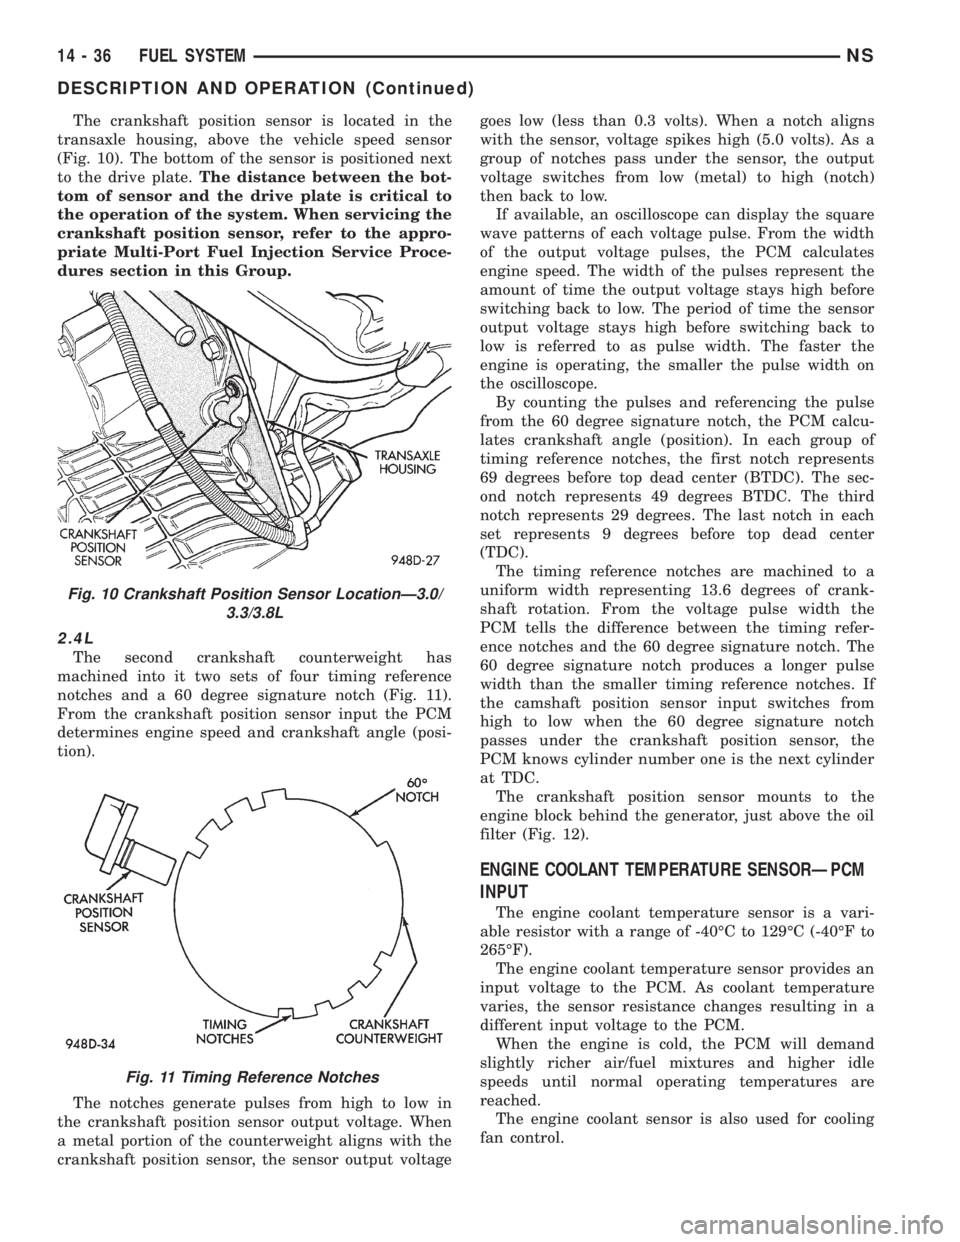
The crankshaft position sensor is located in the
transaxle housing, above the vehicle speed sensor
(Fig. 10). The bottom of the sensor is positioned next
to the drive plate.The distance between the bot-
tom of sensor and the drive plate is critical to
the operation of the system. When servicing the
crankshaft position sensor, refer to the appro-
priate Multi-Port Fuel Injection Service Proce-
dures section in this Group.
2.4L
The second crankshaft counterweight has
machined into it two sets of four timing reference
notches and a 60 degree signature notch (Fig. 11).
From the crankshaft position sensor input the PCM
determines engine speed and crankshaft angle (posi-
tion).
The notches generate pulses from high to low in
the crankshaft position sensor output voltage. When
a metal portion of the counterweight aligns with the
crankshaft position sensor, the sensor output voltagegoes low (less than 0.3 volts). When a notch aligns
with the sensor, voltage spikes high (5.0 volts). As a
group of notches pass under the sensor, the output
voltage switches from low (metal) to high (notch)
then back to low.
If available, an oscilloscope can display the square
wave patterns of each voltage pulse. From the width
of the output voltage pulses, the PCM calculates
engine speed. The width of the pulses represent the
amount of time the output voltage stays high before
switching back to low. The period of time the sensor
output voltage stays high before switching back to
low is referred to as pulse width. The faster the
engine is operating, the smaller the pulse width on
the oscilloscope.
By counting the pulses and referencing the pulse
from the 60 degree signature notch, the PCM calcu-
lates crankshaft angle (position). In each group of
timing reference notches, the first notch represents
69 degrees before top dead center (BTDC). The sec-
ond notch represents 49 degrees BTDC. The third
notch represents 29 degrees. The last notch in each
set represents 9 degrees before top dead center
(TDC).
The timing reference notches are machined to a
uniform width representing 13.6 degrees of crank-
shaft rotation. From the voltage pulse width the
PCM tells the difference between the timing refer-
ence notches and the 60 degree signature notch. The
60 degree signature notch produces a longer pulse
width than the smaller timing reference notches. If
the camshaft position sensor input switches from
high to low when the 60 degree signature notch
passes under the crankshaft position sensor, the
PCM knows cylinder number one is the next cylinder
at TDC.
The crankshaft position sensor mounts to the
engine block behind the generator, just above the oil
filter (Fig. 12).
ENGINE COOLANT TEMPERATURE SENSORÐPCM
INPUT
The engine coolant temperature sensor is a vari-
able resistor with a range of -40ÉC to 129ÉC (-40ÉF to
265ÉF).
The engine coolant temperature sensor provides an
input voltage to the PCM. As coolant temperature
varies, the sensor resistance changes resulting in a
different input voltage to the PCM.
When the engine is cold, the PCM will demand
slightly richer air/fuel mixtures and higher idle
speeds until normal operating temperatures are
reached.
The engine coolant sensor is also used for cooling
fan control.
Fig. 10 Crankshaft Position Sensor LocationÐ3.0/
3.3/3.8L
Fig. 11 Timing Reference Notches
14 - 36 FUEL SYSTEMNS
DESCRIPTION AND OPERATION (Continued)
Page 1392 of 1938
(4) Raise vehicle on hoist.
(5) Disconnect both the fuel fill and fuel vent rub-
ber hoses at the fuel tank.
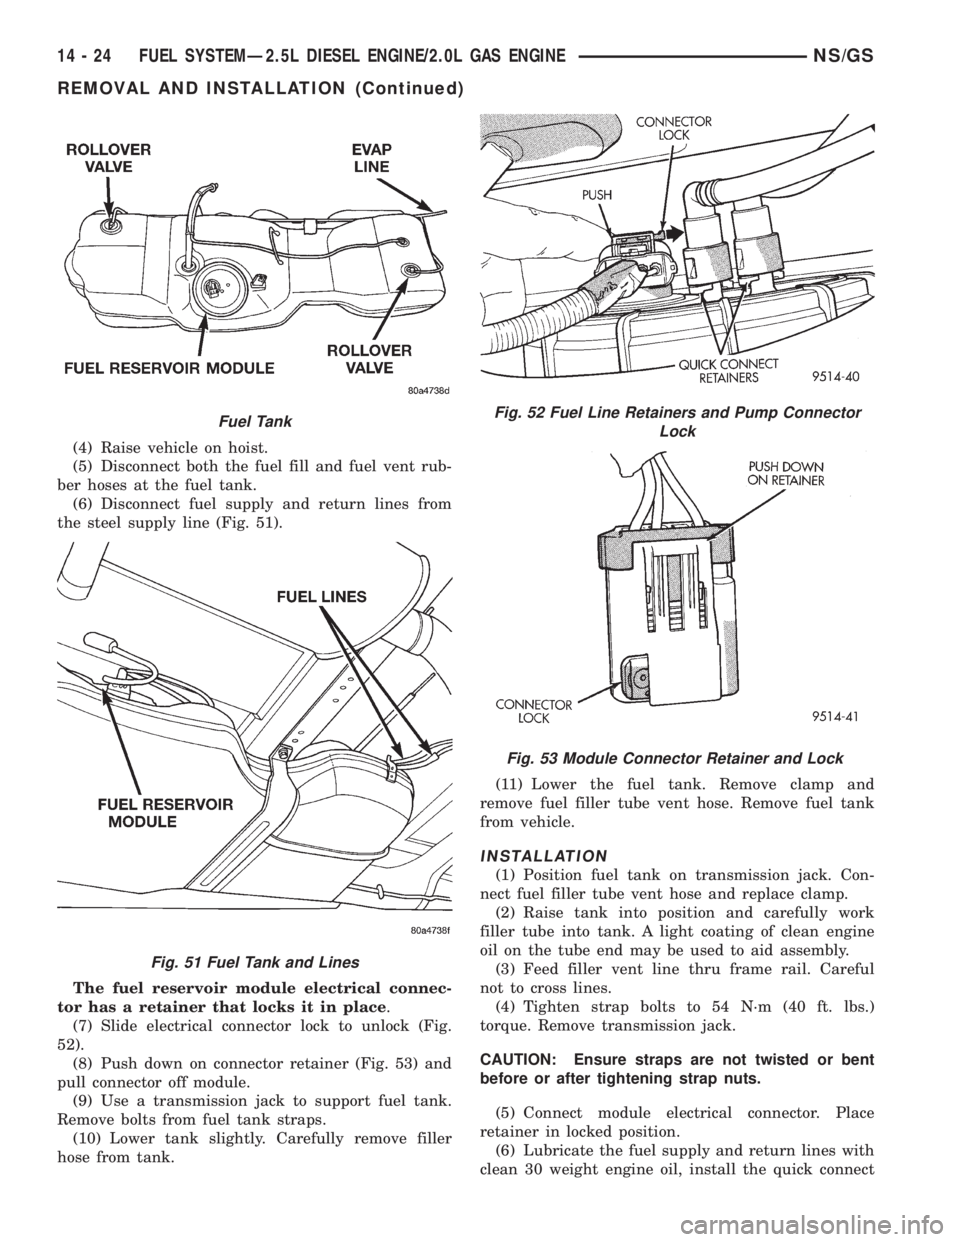
(6) Disconnect fuel supply and return lines from
the steel supply line (Fig. 51).
The fuel reservoir module electrical connec-
tor has a retainer that locks it in place.
(7) Slide electrical connector lock to unlock (Fig.
52).
(8) Push down on connector retainer (Fig. 53) and
pull connector off module.
(9) Use a transmission jack to support fuel tank.
Remove bolts from fuel tank straps.
(10) Lower tank slightly. Carefully remove filler
hose from tank.(11) Lower the fuel tank. Remove clamp and
remove fuel filler tube vent hose. Remove fuel tank
from vehicle.
INSTALLATION
(1) Position fuel tank on transmission jack. Con-
nect fuel filler tube vent hose and replace clamp.
(2) Raise tank into position and carefully work
filler tube into tank. A light coating of clean engine
oil on the tube end may be used to aid assembly.
(3) Feed filler vent line thru frame rail. Careful
not to cross lines.
(4) Tighten strap bolts to 54 N´m (40 ft. lbs.)
torque. Remove transmission jack.
CAUTION: Ensure straps are not twisted or bent
before or after tightening strap nuts.
(5) Connect module electrical connector. Place
retainer in locked position.
(6) Lubricate the fuel supply and return lines with
clean 30 weight engine oil, install the quick connect
Fuel Tank
Fig. 51 Fuel Tank and Lines
Fig. 52 Fuel Line Retainers and Pump Connector
Lock
Fig. 53 Module Connector Retainer and Lock
14 - 24 FUEL SYSTEMÐ2.5L DIESEL ENGINE/2.0L GAS ENGINENS/GS
REMOVAL AND INSTALLATION (Continued)
Page 1494 of 1938
(5) Continuity should exist only with transaxle in
Reverse position.
(6) No continuity should exist from either pin to
the case.
TRANSAXLE AND TORQUE CONVERTER REMOVAL
NOTE: Transaxle removal does NOT require engine
removal.
The transaxle and torque converter must be
removed as an assembly; otherwise, the torque con-
verter drive plate, pump bushing, or oil seal may be
damaged. The drive plate will not support a load;
therefore, none of the weight of the transaxle should
be allowed to rest on the plate during removal.
REMOVAL
(1) Disconnect negative battery cable.
(2) Remove air cleaner and hoses.
(3) Disconnect throttle linkage and shift linkage
from transaxle.
(4) Unplug torque converter clutch connector,
located near the dipstick. Unplug the gear position
switch.
(5) Remove transaxle dipstick tube.
(6) Remove the transaxle cooler lines and plug.
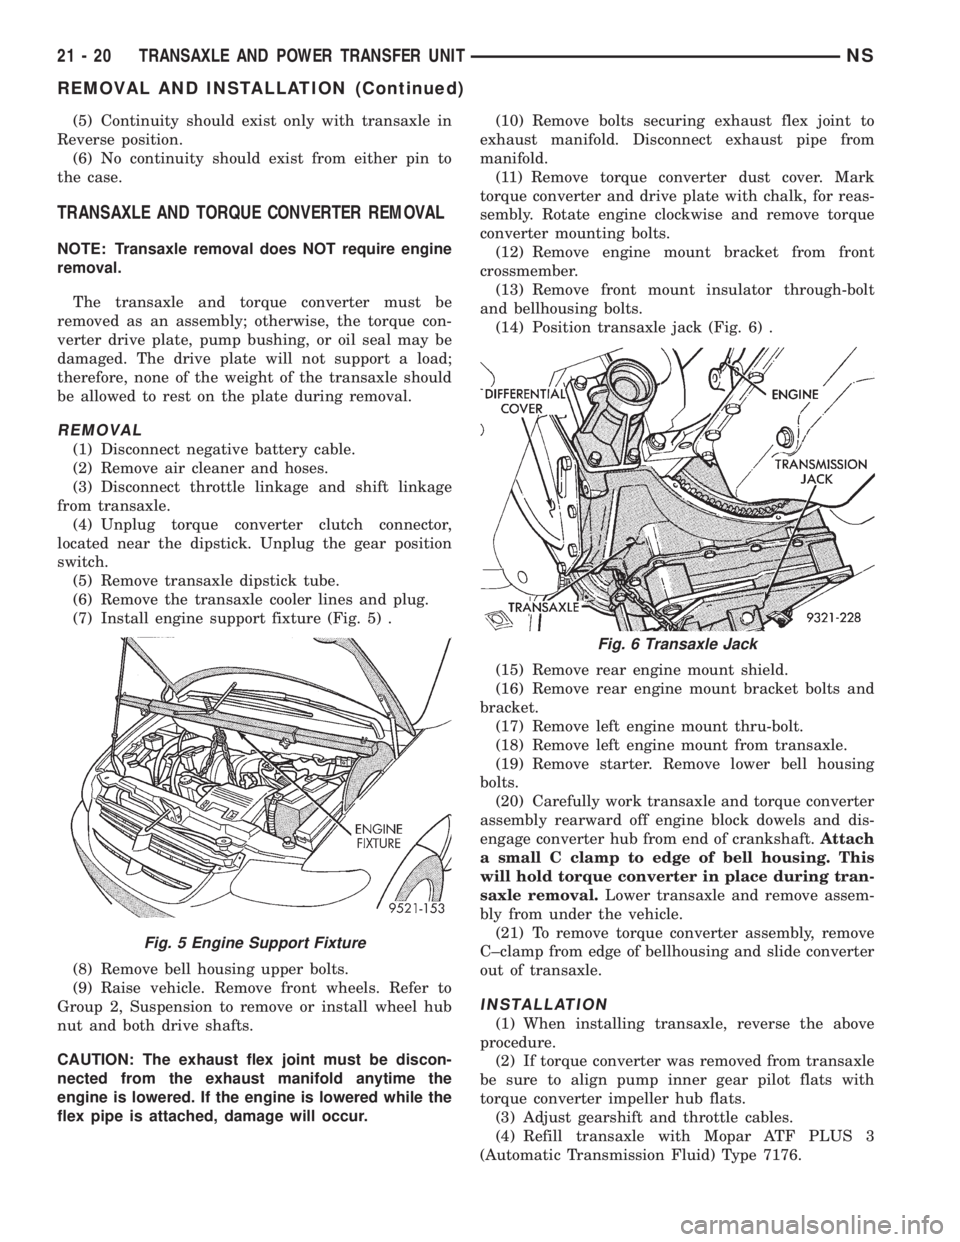
(7) Install engine support fixture (Fig. 5) .
(8) Remove bell housing upper bolts.
(9) Raise vehicle. Remove front wheels. Refer to
Group 2, Suspension to remove or install wheel hub
nut and both drive shafts.
CAUTION: The exhaust flex joint must be discon-
nected from the exhaust manifold anytime the
engine is lowered. If the engine is lowered while the
flex pipe is attached, damage will occur.(10) Remove bolts securing exhaust flex joint to
exhaust manifold. Disconnect exhaust pipe from
manifold.
(11) Remove torque converter dust cover. Mark
torque converter and drive plate with chalk, for reas-
sembly. Rotate engine clockwise and remove torque
converter mounting bolts.
(12) Remove engine mount bracket from front
crossmember.
(13) Remove front mount insulator through-bolt
and bellhousing bolts.
(14) Position transaxle jack (Fig. 6) .
(15) Remove rear engine mount shield.
(16) Remove rear engine mount bracket bolts and
bracket.
(17) Remove left engine mount thru-bolt.
(18) Remove left engine mount from transaxle.
(19) Remove starter. Remove lower bell housing
bolts.
(20) Carefully work transaxle and torque converter
assembly rearward off engine block dowels and dis-
engage converter hub from end of crankshaft.Attach
a small C clamp to edge of bell housing. This
will hold torque converter in place during tran-
saxle removal.Lower transaxle and remove assem-
bly from under the vehicle.
(21) To remove torque converter assembly, remove
C±clamp from edge of bellhousing and slide converter
out of transaxle.
INSTALLATION
(1) When installing transaxle, reverse the above
procedure.
(2) If torque converter was removed from transaxle
be sure to align pump inner gear pilot flats with
torque converter impeller hub flats.
(3) Adjust gearshift and throttle cables.
(4) Refill transaxle with Mopar ATF PLUS 3
(Automatic Transmission Fluid) Type 7176.
Fig. 5 Engine Support Fixture
Fig. 6 Transaxle Jack
21 - 20 TRANSAXLE AND POWER TRANSFER UNITNS
REMOVAL AND INSTALLATION (Continued)
Page 1539 of 1938
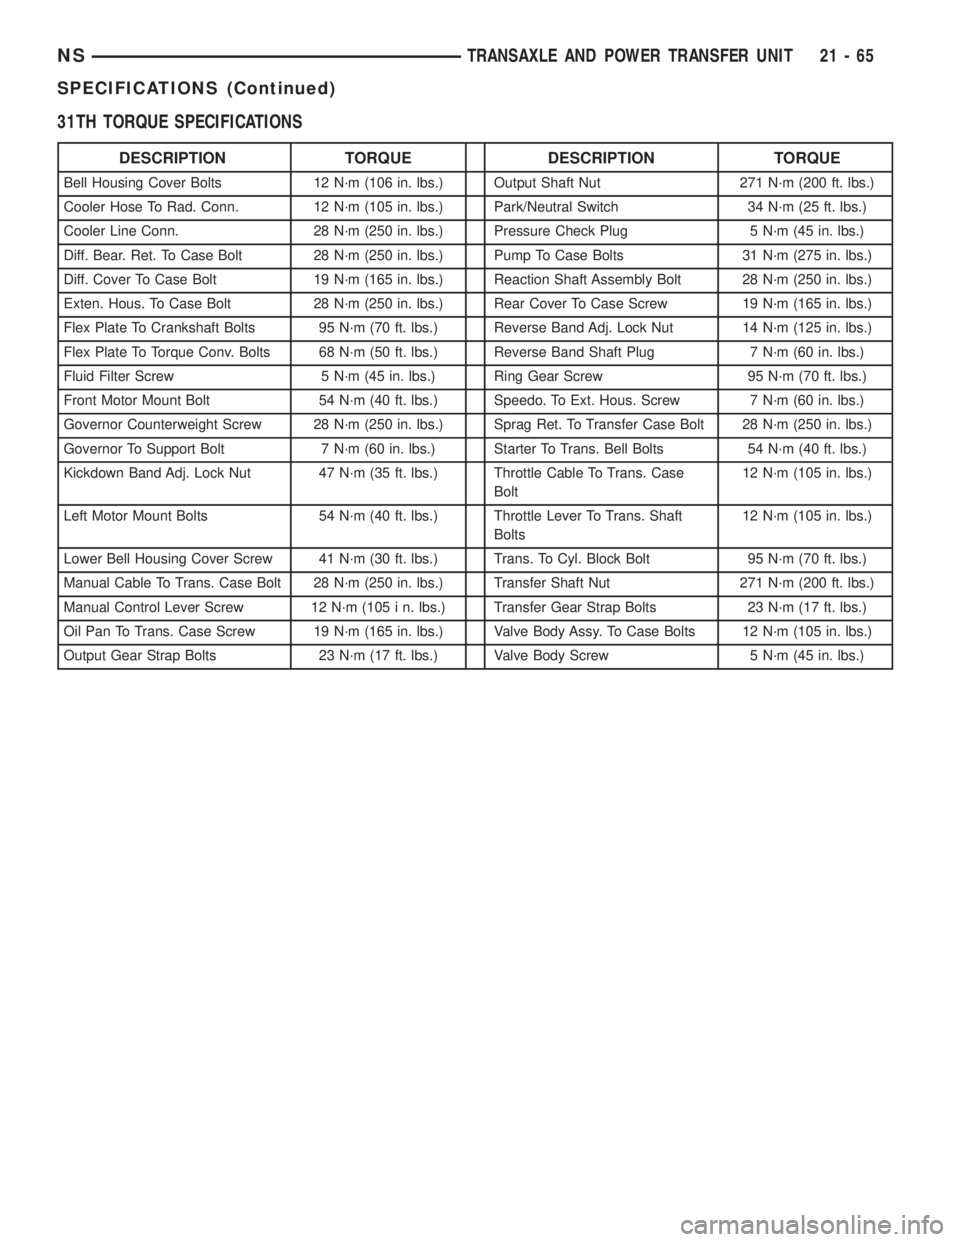
31TH TORQUE SPECIFICATIONS
DESCRIPTION TORQUE DESCRIPTION TORQUE
Bell Housing Cover Bolts 12 N´m (106 in. lbs.) Output Shaft Nut 271 N´m (200 ft. lbs.)
Cooler Hose To Rad. Conn. 12 N´m (105 in. lbs.) Park/Neutral Switch 34 N´m (25 ft. lbs.)
Cooler Line Conn. 28 N´m (250 in. lbs.) Pressure Check Plug 5 N´m (45 in. lbs.)
Diff. Bear. Ret. To Case Bolt 28 N´m (250 in. lbs.) Pump To Case Bolts 31 N´m (275 in. lbs.)
Diff. Cover To Case Bolt 19 N´m (165 in. lbs.) Reaction Shaft Assembly Bolt 28 N´m (250 in. lbs.)
Exten. Hous. To Case Bolt 28 N´m (250 in. lbs.) Rear Cover To Case Screw 19 N´m (165 in. lbs.)
Flex Plate To Crankshaft Bolts 95 N´m (70 ft. lbs.) Reverse Band Adj. Lock Nut 14 N´m (125 in. lbs.)
Flex Plate To Torque Conv. Bolts 68 N´m (50 ft. lbs.) Reverse Band Shaft Plug 7 N´m (60 in. lbs.)
Fluid Filter Screw 5 N´m (45 in. lbs.) Ring Gear Screw 95 N´m (70 ft. lbs.)
Front Motor Mount Bolt 54 N´m (40 ft. lbs.) Speedo. To Ext. Hous. Screw 7 N´m (60 in. lbs.)
Governor Counterweight Screw 28 N´m (250 in. lbs.) Sprag Ret. To Transfer Case Bolt 28 N´m (250 in. lbs.)
Governor To Support Bolt 7 N´m (60 in. lbs.) Starter To Trans. Bell Bolts 54 N´m (40 ft. lbs.)
Kickdown Band Adj. Lock Nut 47 N´m (35 ft. lbs.) Throttle Cable To Trans. Case
Bolt12 N´m (105 in. lbs.)
Left Motor Mount Bolts 54 N´m (40 ft. lbs.) Throttle Lever To Trans. Shaft
Bolts12 N´m (105 in. lbs.)
Lower Bell Housing Cover Screw 41 N´m (30 ft. lbs.) Trans. To Cyl. Block Bolt 95 N´m (70 ft. lbs.)
Manual Cable To Trans. Case Bolt 28 N´m (250 in. lbs.) Transfer Shaft Nut 271 N´m (200 ft. lbs.)
Manual Control Lever Screw 12 N´m (105 i n. lbs.) Transfer Gear Strap Bolts 23 N´m (17 ft. lbs.)
Oil Pan To Trans. Case Screw 19 N´m (165 in. lbs.) Valve Body Assy. To Case Bolts 12 N´m (105 in. lbs.)
Output Gear Strap Bolts 23 N´m (17 ft. lbs.) Valve Body Screw 5 N´m (45 in. lbs.)
NSTRANSAXLE AND POWER TRANSFER UNIT 21 - 65
SPECIFICATIONS (Continued)
Page 1563 of 1938
INSTALLATION
To install valve body, reverse removal procedure
CAUTION: The valve body manual shaft pilot may
distort and bind the manual valve if the valve body
is mishandled or dropped.
NOTE: To ease installation of the valve body, turn
the manual valve lever fully clockwise.
Guide park rod rollers into guide bracket, while
shifting manual lever assembly out of the installation
position.
TRANSAXLE
Transaxle removal does NOT require engine
removal.
See Group 7, Cooling to drain engine cooling sys-
tem and remove coolant return extension (3.0 liter
engine only).The transaxle and torque converter must be
removed as an assembly; otherwise, the torque con-
verter drive plate, pump bushing or oil seal may be
damaged. The drive plate will not support a load;
therefore, none of the weight of the transaxle should
be allowed to rest on the drive plate during removal.
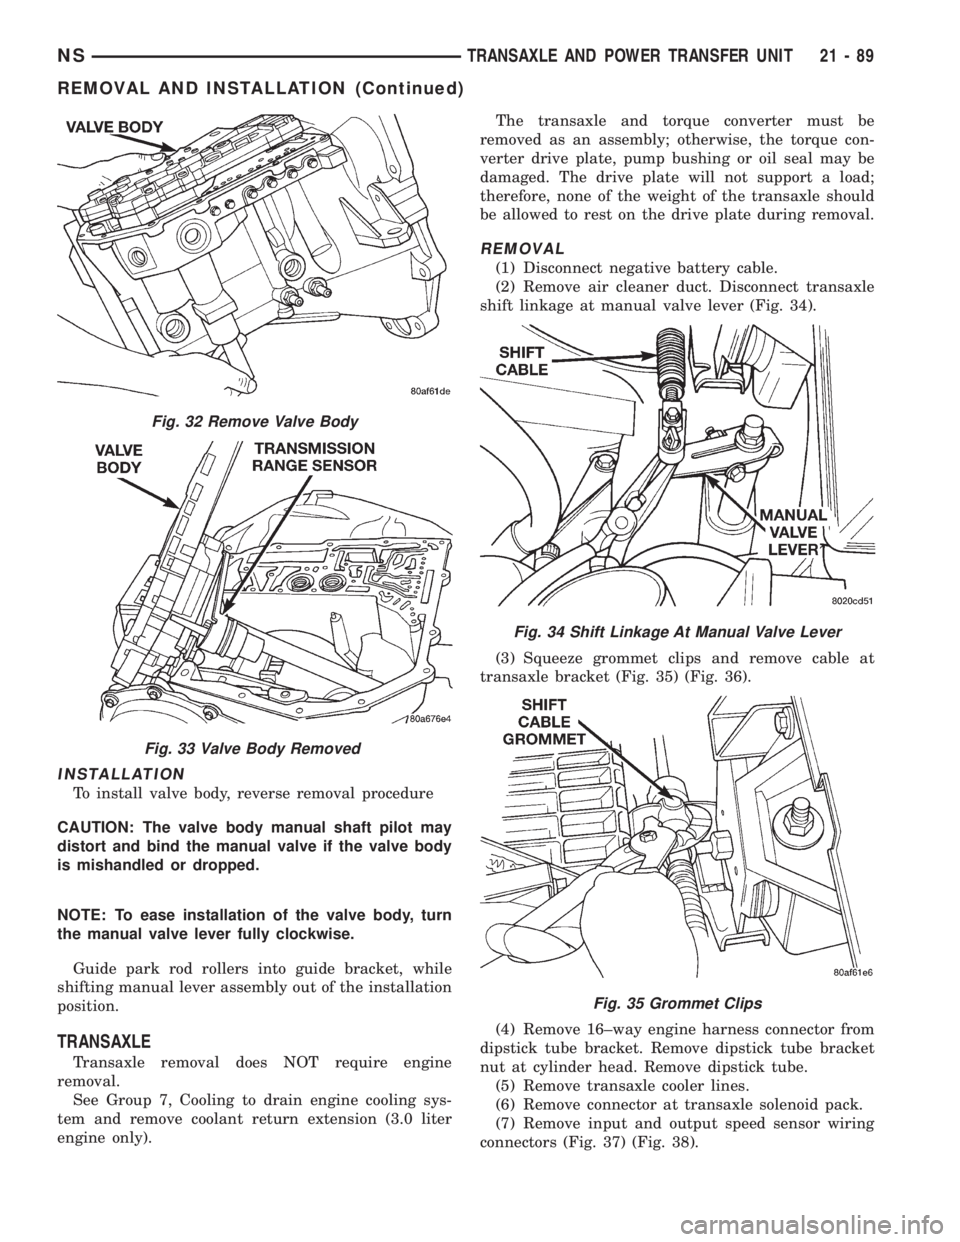
REMOVAL
(1) Disconnect negative battery cable.
(2) Remove air cleaner duct. Disconnect transaxle
shift linkage at manual valve lever (Fig. 34).
(3) Squeeze grommet clips and remove cable at
transaxle bracket (Fig. 35) (Fig. 36).
(4) Remove 16±way engine harness connector from
dipstick tube bracket. Remove dipstick tube bracket
nut at cylinder head. Remove dipstick tube.
(5) Remove transaxle cooler lines.
(6) Remove connector at transaxle solenoid pack.
(7) Remove input and output speed sensor wiring
connectors (Fig. 37) (Fig. 38).
Fig. 32 Remove Valve Body
Fig. 33 Valve Body Removed
Fig. 34 Shift Linkage At Manual Valve Lever
Fig. 35 Grommet Clips
NSTRANSAXLE AND POWER TRANSFER UNIT 21 - 89
REMOVAL AND INSTALLATION (Continued)
Page 1727 of 1938
WHEELS
INDEX
page page
DESCRIPTION AND OPERATION
WHEEL INFORMATION.................... 9
DIAGNOSIS AND TESTING
TIRE AND WHEEL RUNOUT............... 10
WHEEL INSPECTION...................... 9SERVICE PROCEDURES
TIRE AND WHEEL BALANCE............... 11
WHEEL INSTALLATION................... 11
SPECIFICATIONS
WHEEL SPECIFICATIONS................. 12
DESCRIPTION AND OPERATION
WHEEL INFORMATION
Original equipment wheels are designed for proper
operation at all loads up to the specified maximum
vehicle capacity.
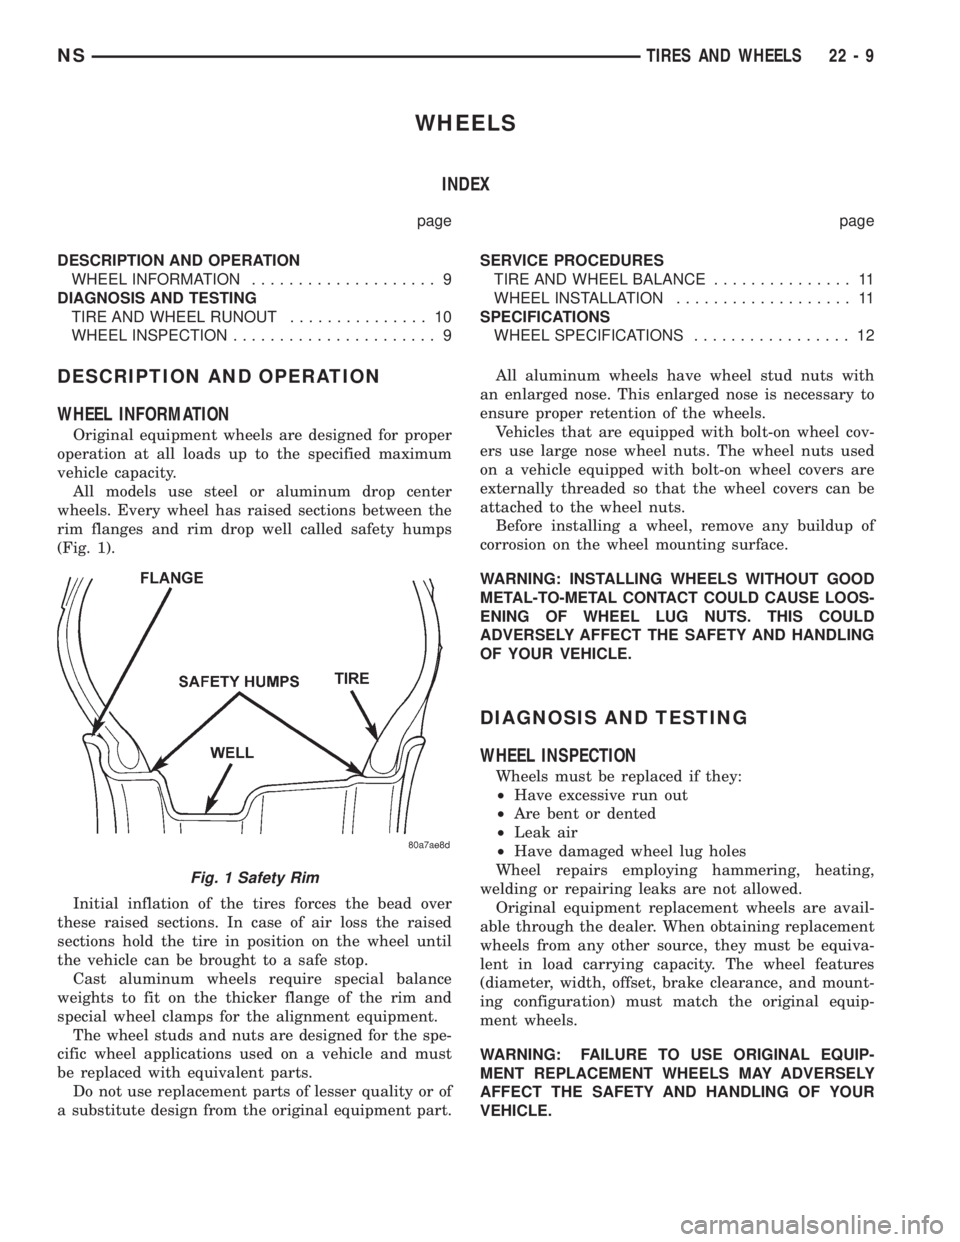
All models use steel or aluminum drop center
wheels. Every wheel has raised sections between the
rim flanges and rim drop well called safety humps
(Fig. 1).
Initial inflation of the tires forces the bead over
these raised sections. In case of air loss the raised
sections hold the tire in position on the wheel until
the vehicle can be brought to a safe stop.
Cast aluminum wheels require special balance
weights to fit on the thicker flange of the rim and
special wheel clamps for the alignment equipment.
The wheel studs and nuts are designed for the spe-
cific wheel applications used on a vehicle and must
be replaced with equivalent parts.
Do not use replacement parts of lesser quality or of
a substitute design from the original equipment part.All aluminum wheels have wheel stud nuts with
an enlarged nose. This enlarged nose is necessary to
ensure proper retention of the wheels.
Vehicles that are equipped with bolt-on wheel cov-
ers use large nose wheel nuts. The wheel nuts used
on a vehicle equipped with bolt-on wheel covers are
externally threaded so that the wheel covers can be
attached to the wheel nuts.
Before installing a wheel, remove any buildup of
corrosion on the wheel mounting surface.
WARNING: INSTALLING WHEELS WITHOUT GOOD
METAL-TO-METAL CONTACT COULD CAUSE LOOS-
ENING OF WHEEL LUG NUTS. THIS COULD
ADVERSELY AFFECT THE SAFETY AND HANDLING
OF YOUR VEHICLE.
DIAGNOSIS AND TESTING
WHEEL INSPECTION
Wheels must be replaced if they:
²Have excessive run out
²Are bent or dented
²Leak air
²Have damaged wheel lug holes
Wheel repairs employing hammering, heating,
welding or repairing leaks are not allowed.
Original equipment replacement wheels are avail-
able through the dealer. When obtaining replacement
wheels from any other source, they must be equiva-
lent in load carrying capacity. The wheel features
(diameter, width, offset, brake clearance, and mount-
ing configuration) must match the original equip-
ment wheels.
WARNING: FAILURE TO USE ORIGINAL EQUIP-
MENT REPLACEMENT WHEELS MAY ADVERSELY
AFFECT THE SAFETY AND HANDLING OF YOUR
VEHICLE.
Fig. 1 Safety Rim
NSTIRES AND WHEELS 22 - 9
Page 1729 of 1938
SERVICE PROCEDURES
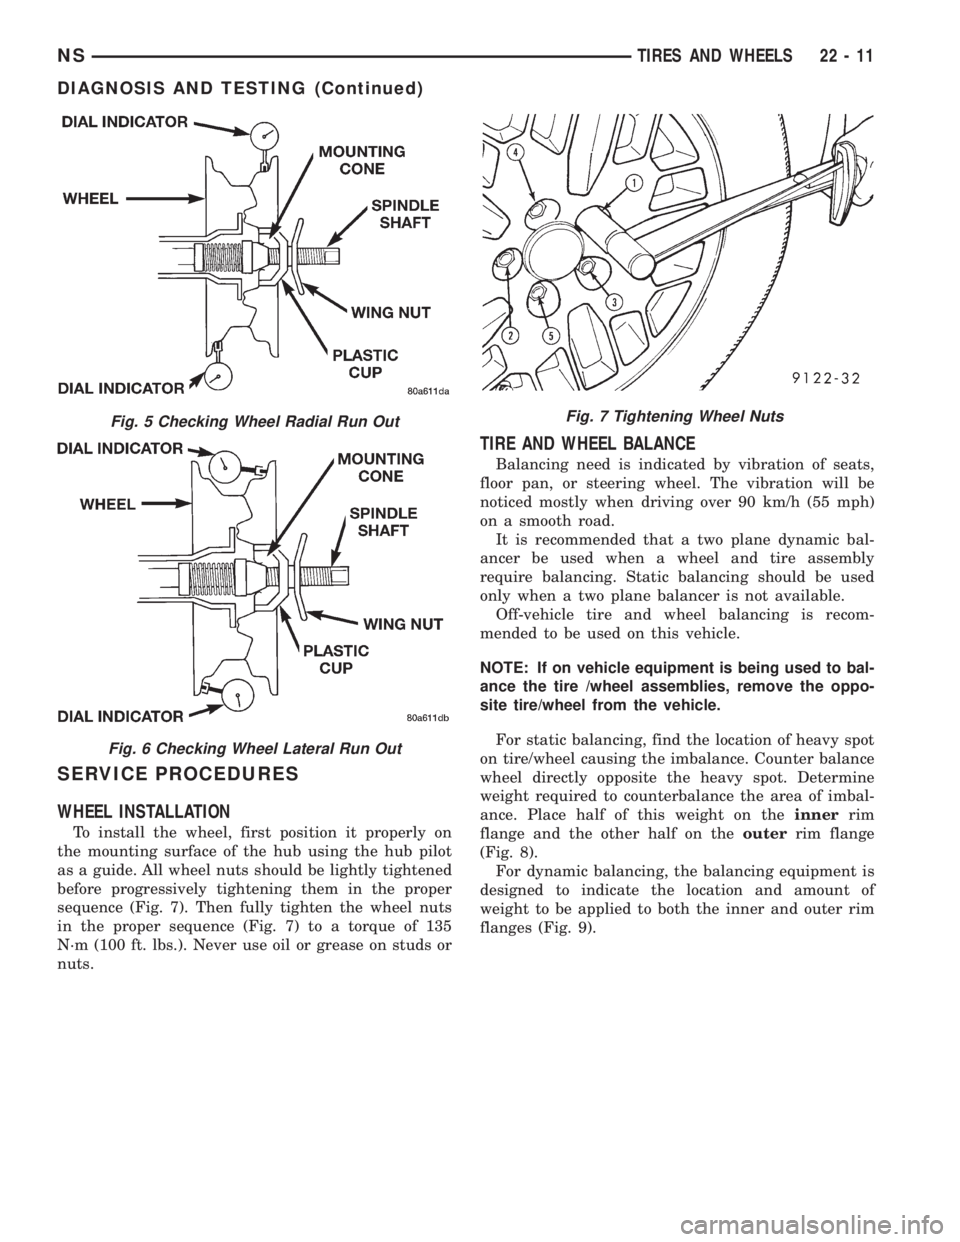
WHEEL INSTALLATION
To install the wheel, first position it properly on
the mounting surface of the hub using the hub pilot
as a guide. All wheel nuts should be lightly tightened
before progressively tightening them in the proper
sequence (Fig. 7). Then fully tighten the wheel nuts
in the proper sequence (Fig. 7) to a torque of 135
N´m (100 ft. lbs.). Never use oil or grease on studs or
nuts.
TIRE AND WHEEL BALANCE
Balancing need is indicated by vibration of seats,
floor pan, or steering wheel. The vibration will be
noticed mostly when driving over 90 km/h (55 mph)
on a smooth road.
It is recommended that a two plane dynamic bal-
ancer be used when a wheel and tire assembly
require balancing. Static balancing should be used
only when a two plane balancer is not available.
Off-vehicle tire and wheel balancing is recom-
mended to be used on this vehicle.
NOTE: If on vehicle equipment is being used to bal-
ance the tire /wheel assemblies, remove the oppo-
site tire/wheel from the vehicle.
For static balancing, find the location of heavy spot
on tire/wheel causing the imbalance. Counter balance
wheel directly opposite the heavy spot. Determine
weight required to counterbalance the area of imbal-
ance. Place half of this weight on theinnerrim
flange and the other half on theouterrim flange
(Fig. 8).
For dynamic balancing, the balancing equipment is
designed to indicate the location and amount of
weight to be applied to both the inner and outer rim
flanges (Fig. 9).
Fig. 5 Checking Wheel Radial Run Out
Fig. 6 Checking Wheel Lateral Run Out
Fig. 7 Tightening Wheel Nuts
NSTIRES AND WHEELS 22 - 11
DIAGNOSIS AND TESTING (Continued)