1996 CHRYSLER VOYAGER open hood
[x] Cancel search: open hoodPage 517 of 1938
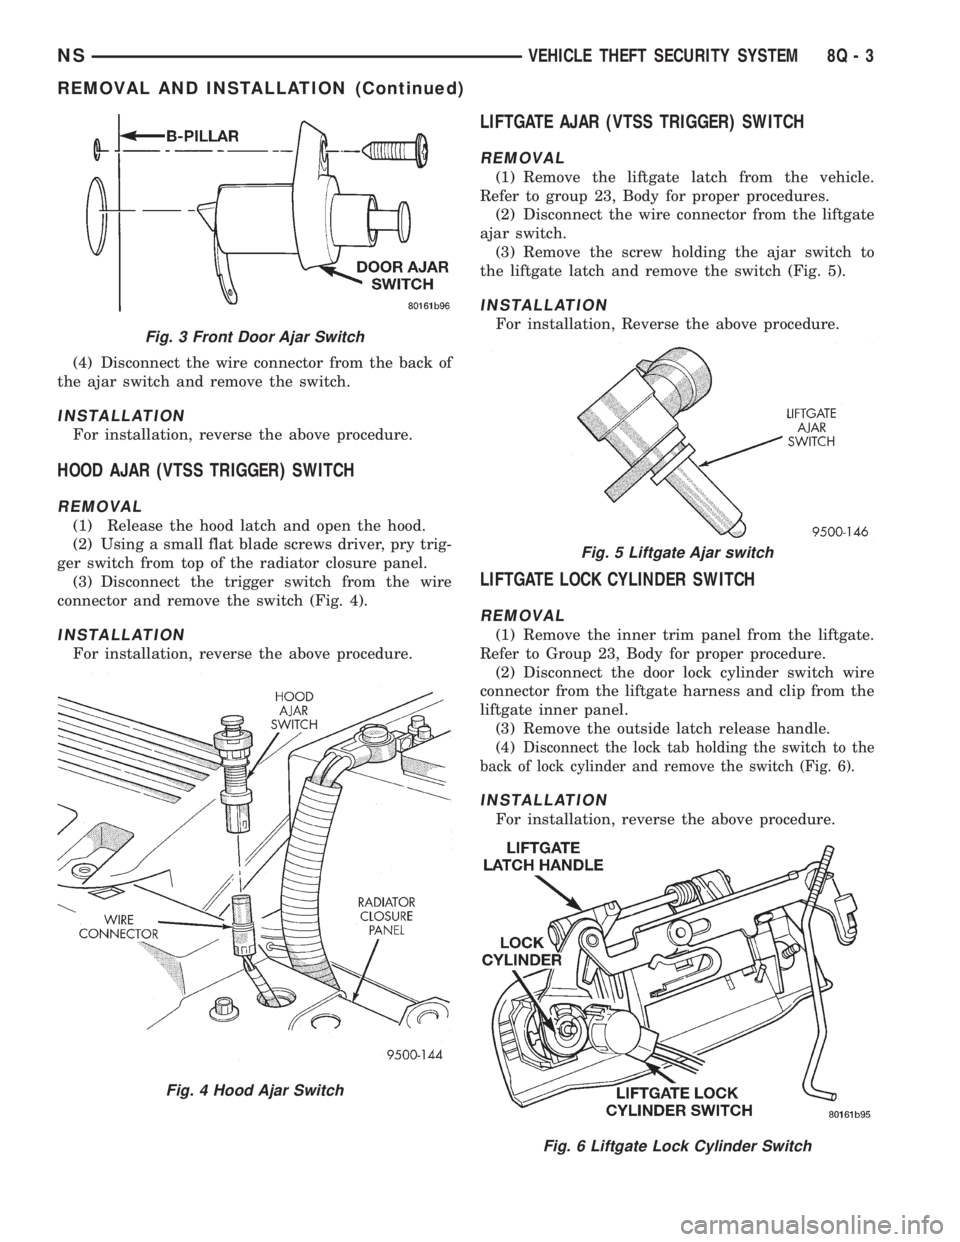
(4) Disconnect the wire connector from the back of
the ajar switch and remove the switch.
INSTALLATION
For installation, reverse the above procedure.
HOOD AJAR (VTSS TRIGGER) SWITCH
REMOVAL
(1) Release the hood latch and open the hood.
(2) Using a small flat blade screws driver, pry trig-
ger switch from top of the radiator closure panel.
(3) Disconnect the trigger switch from the wire
connector and remove the switch (Fig. 4).
INSTALLATION
For installation, reverse the above procedure.
LIFTGATE AJAR (VTSS TRIGGER) SWITCH
REMOVAL
(1) Remove the liftgate latch from the vehicle.
Refer to group 23, Body for proper procedures.
(2) Disconnect the wire connector from the liftgate
ajar switch.
(3) Remove the screw holding the ajar switch to
the liftgate latch and remove the switch (Fig. 5).
INSTALLATION
For installation, Reverse the above procedure.
LIFTGATE LOCK CYLINDER SWITCH
REMOVAL
(1) Remove the inner trim panel from the liftgate.
Refer to Group 23, Body for proper procedure.
(2) Disconnect the door lock cylinder switch wire
connector from the liftgate harness and clip from the
liftgate inner panel.
(3) Remove the outside latch release handle.
(4)
Disconnect the lock tab holding the switch to the
back of lock cylinder and remove the switch (Fig. 6).
INSTALLATION
For installation, reverse the above procedure.
Fig. 3 Front Door Ajar Switch
Fig. 4 Hood Ajar Switch
Fig. 5 Liftgate Ajar switch
Fig. 6 Liftgate Lock Cylinder Switch
NSVEHICLE THEFT SECURITY SYSTEM 8Q - 3
REMOVAL AND INSTALLATION (Continued)
Page 535 of 1938
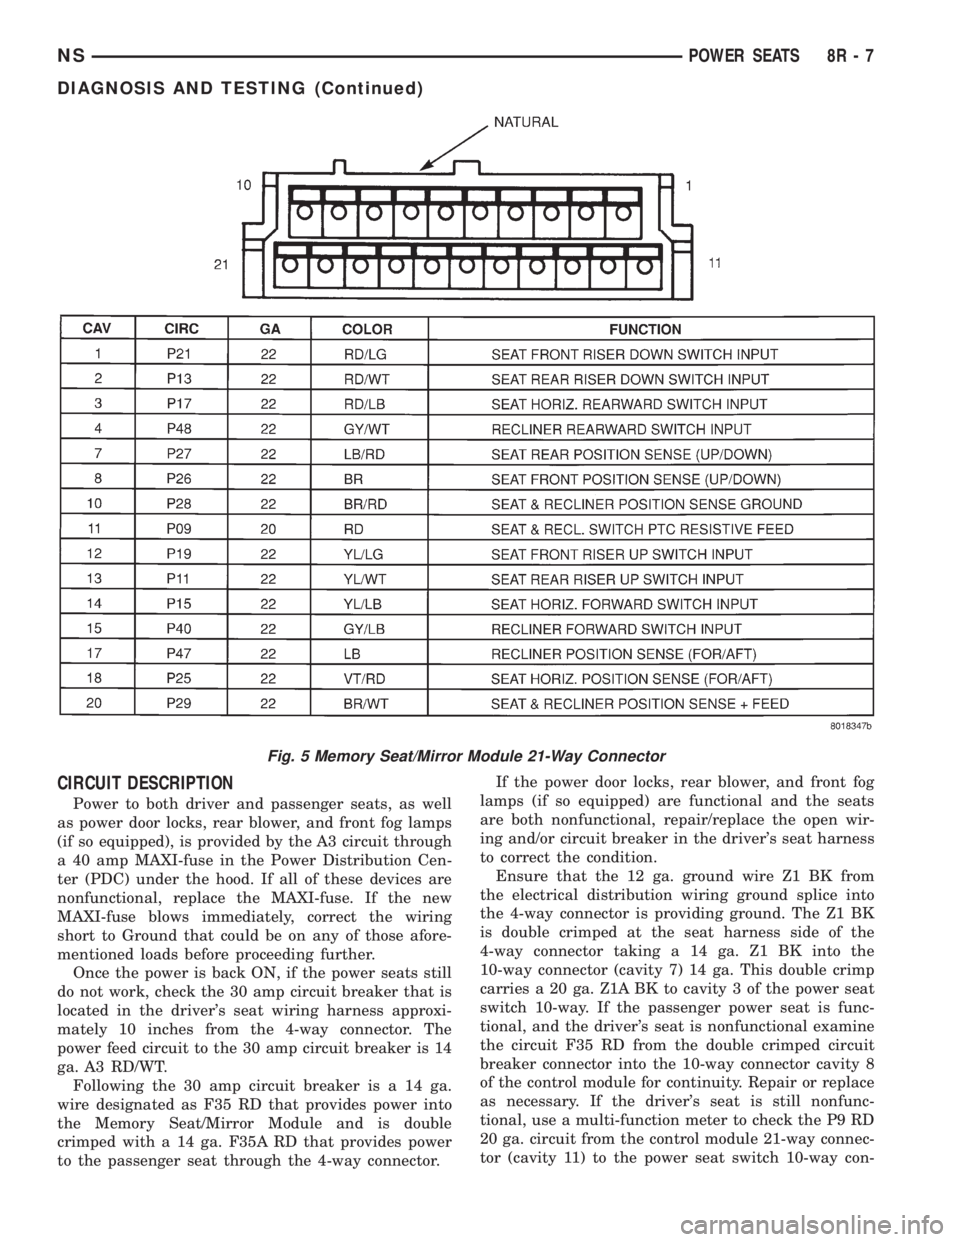
CIRCUIT DESCRIPTION
Power to both driver and passenger seats, as well
as power door locks, rear blower, and front fog lamps
(if so equipped), is provided by the A3 circuit through
a 40 amp MAXI-fuse in the Power Distribution Cen-
ter (PDC) under the hood. If all of these devices are
nonfunctional, replace the MAXI-fuse. If the new
MAXI-fuse blows immediately, correct the wiring
short to Ground that could be on any of those afore-
mentioned loads before proceeding further.
Once the power is back ON, if the power seats still
do not work, check the 30 amp circuit breaker that is
located in the driver's seat wiring harness approxi-
mately 10 inches from the 4-way connector. The
power feed circuit to the 30 amp circuit breaker is 14
ga. A3 RD/WT.
Following the 30 amp circuit breaker is a 14 ga.
wire designated as F35 RD that provides power into
the Memory Seat/Mirror Module and is double
crimped with a 14 ga. F35A RD that provides power
to the passenger seat through the 4-way connector.If the power door locks, rear blower, and front fog
lamps (if so equipped) are functional and the seats
are both nonfunctional, repair/replace the open wir-
ing and/or circuit breaker in the driver's seat harness
to correct the condition.
Ensure that the 12 ga. ground wire Z1 BK from
the electrical distribution wiring ground splice into
the 4-way connector is providing ground. The Z1 BK
is double crimped at the seat harness side of the
4-way connector taking a 14 ga. Z1 BK into the
10-way connector (cavity 7) 14 ga. This double crimp
carries a 20 ga. Z1A BK to cavity 3 of the power seat
switch 10-way. If the passenger power seat is func-
tional, and the driver's seat is nonfunctional examine
the circuit F35 RD from the double crimped circuit
breaker connector into the 10-way connector cavity 8
of the control module for continuity. Repair or replace
as necessary. If the driver's seat is still nonfunc-
tional, use a multi-function meter to check the P9 RD
20 ga. circuit from the control module 21-way connec-
tor (cavity 11) to the power seat switch 10-way con-
Fig. 5 Memory Seat/Mirror Module 21-Way Connector
NSPOWER SEATS 8R - 7
DIAGNOSIS AND TESTING (Continued)
Page 643 of 1938

8W-15 GROUND DISTRIBUTION
Component PageA/C Compressor Clutch....................8W-15-2, 3
A/C Heater Control........................8W-15-4
Airbag Control Module......................8W-15-4
All Wheel Drive Solenoid....................8W-15-13
Ash Receiver Lamp........................8W-15-6
Automatic Day/Night Mirror...................8W-15-5
AW4B13..............................8W-15-13
AWS1................................8W-15-13
Battery..............................8W-15-2, 3
Body Control Module.......................8W-15-6
Brake Pressure Switch......................8W-15-8
BS08.................................8W-15-5
BS31.................................8W-15-3
BS40.................................8W-15-3
BS41.................................8W-15-3
Center High Mounted Stop Lamp...............8W-15-14
Cigar/Accessory Relay.......................8W-15-7
Clockspring.............................8W-15-4
Clutch Switch............................8W-15-8
Combination Flasher/DRL Module...............8W-15-6
Controller Anti-Lock Brake....................8W-15-4
Crank Case Heater........................8W-15-3
CS06..............................8W-15-11, 12
Data Link Connector....................8W-15-2, 4, 12
Door Lock Relay..........................8W-15-6
Door Unlock Relay.........................8W-15-6
Downstream Heated Oxygen Sensor..............8W-15-5
Driver Door Arm/Disarm Switch.............8W-15-11, 12
Driver Door Courtesy Lamp...................8W-15-7
Driver Door Lock Switch..................8W-15-11, 12
Driver Door Unlock Relay....................8W-15-6
Driver Heated Seat Back.....................8W-15-9
Driver Heated Seat Cushion...................8W-15-9
Driver Heated Seat Module...................8W-15-9
Driver Heated Seat Switch....................8W-15-9
Driver Power Mirror........................8W-15-4
Driver Power Seat Switch....................8W-15-5
Driver Power Window Switch..................8W-15-7
DS01.................................8W-15-7
EC1C19...............................8W-15-5
Engine Speed Sensor.......................8W-15-3
ES01.................................8W-15-3
ES02.................................8W-15-3
ES11 .................................8W-15-2
ES12.................................8W-15-3
ES18.................................8W-15-2
ES23.................................8W-15-2
ES30.................................8W-15-3
ES31.................................8W-15-3
Front Blower Motor Relay....................8W-15-7
Front Cigar Lighter/Power Outlet...............8W-15-4
Fuel Heater.............................8W-15-3
Fuel Heater Relay.........................8W-15-3
Fuel Tank Module........................8W-15-13
G100................................8W-15-2, 3
G101.................................8W-15-2
G102................................8W-15-2, 3
G103................................8W-15-2, 3
G104.................................8W-15-4
G200.................................8W-15-4
G201.................................8W-15-4
G202.................................8W-15-5
G204.................................8W-15-4
G300...........................8W-15-5, 6, 7, 8, 9
G301............................8W-15-10, 11, 12
G302.................................8W-15-13
G400.................................8W-15-14
Headlamp Dimmer Switch....................8W-15-4
Headlamp Switch........................8W-15-4, 6
Headlamp Washer........................8W-15-10
High Note Horn.......................8W-15-11, 12
Hood Ajar Switch.........................8W-15-10
HS1..................................8W-15-9
HS3..................................8W-15-9
HS5D B09..............................8W-15-9
HS5P B56..............................8W-15-9
Ignition Switch.........................8W-15-4, 6
Instrument Cluster.......................8W-15-4, 6
Junction Block...........................8W-15-6
Key-In Halo Lamp.........................8W-15-6
Left Combination Relay.....................8W-15-13Component PageLeft Door Speaker.........................8W-15-5
Left Front Park/Turn Signal Lamp...............8W-15-7
Left Headlamp...........................8W-15-8
Left Headlamp Leveling Motor.................8W-15-8
Left High Headlamp........................8W-15-8
Left Liftgate Flood Lamp....................8W-15-14
Left Low Headlamp........................8W-15-8
Left Rear Door Ajar Switch...................8W-15-13
Left Rear Lamp Assembly....................8W-15-13
Left Rear Speaker.........................8W-15-5
Left Repeater Lamp........................8W-15-5
Left Speed Control Switch....................8W-15-4
Left Stop/Turn Signal Relay..................8W-15-13
License Lamp...........................8W-15-14
Liftgate Ajar Switch.......................8W-15-14
Liftgate Arm/Disarm Switch..................8W-15-14
Low Coolant Level Switch....................8W-15-3
Low Note Horn..........................8W-15-10
Low Washer Fluid Switch.................8W-15-11, 12
Memory Power Seat Switch..................8W-15-5, 9
Memory Seat/Mirror Module.................8W-15-5, 9
Memory Set Switch........................8W-15-7
Message Center...........................8W-15-6
Name Brand Speaker Relay...................8W-15-6
Needle Movement Sensor.....................8W-15-3
Overhead Console......................8W-15-11, 12
Passenger Door Arm/Disarm Switch.............8W-15-10
Passenger Door Courtesy Lamp.................8W-15-7
Passenger Door Lock Switch..................8W-15-10
Passenger Heated Seat Back...................8W-15-9
Passenger Heated Seat Cushion.................8W-15-9
Passenger Heated Seat Module.................8W-15-9
Passenger Heated Seat Switch.................8W-15-9
Passenger Power Mirror.....................8W-15-4
Passenger Power Seat Switch................8W-15-5, 12
Passenger Power Window Switch................8W-15-7
Power Distribution Center.................8W-15-2, 3, 7
Power Folding Mirror Switch..................8W-15-6
Power Mirror Switch.......................8W-15-6
Powertrain Control Module..................8W-15-2, 3
Radiator Fan Disconnect.....................8W-15-3
Radiator Fan No. 1........................8W-15-2
Radiator Fan No. 2........................8W-15-2
Radiator Fan Relay........................8W-15-2
Radiator Fan Relay No. 1.....................8W-15-3
Radio.................................8W-15-5
Rear Blower Front Control Switch...............8W-15-4
Rear Blower Rear Control Switch...............8W-15-13
Rear Cigar Lighter/Power Outlet...............8W-15-13
Rear Window Defogger.....................8W-15-14
Rear Wiper Motor.........................8W-15-14
Remote Keyless Entry Module..................8W-15-4
RF3E40...............................8W-15-2
RFS2.................................8W-15-2
Right Combination Relay....................8W-15-13
Right Door Speaker........................8W-15-5
Right Front Park/Turn Signal Lamp.............8W-15-10
Right Headlamp..........................8W-15-10
Right Headlamp Leveling Motor................8W-15-10
Right High Headlamp......................8W-15-10
Right Liftgate Flood Lamp...................8W-15-14
Right Low Headlamp......................8W-15-10
Right Rear Door Ajar Switch..................8W-15-13
Right Rear Lamp Assembly...................8W-15-13
Right Rear Speaker........................8W-15-5
Right Repeater Lamp......................8W-15-10
Right Speed Control Switch...................8W-15-4
Right Stop/Turn Signal Relay.................8W-15-13
Seat Belt Switch..........................8W-15-8
Sentry Key Immobilizer Module.................8W-15-4
Stop Lamp Switch.......................8W-15-6, 7
Traction Control Switch......................8W-15-6
Trailer Tow Connector......................8W-15-13
Transmission Control Module..................8W-15-2
Transmission Control Relay...................8W-15-2
Universal Garage Door Opener..............8W-15-11, 12
Upstream Heated Oxygen Sensor................8W-15-2
Vehicle Speed Control Servo...................8W-15-2
Wiper Module............................8W-15-5
Wiper On Relay...........................8W-15-7
NS/GS8W - 15 GROUND DISTRIBUTION 8W - 15 - 1
Page 759 of 1938

8W-44 INTERIOR LIGHTING
Component Page
A/C Heater Control....................8W-44-8
Ash Receiver Lamp....................8W-44-7
Automatic Day/Night Mirror.............8W-44-6
Back-Up Switch.......................8W-44-6
Body Control Module.....8W-44-2, 3, 4, 5, 6, 7, 8, 9
BS02...............................8W-44-6
Center Dome Lamp....................8W-44-4
Courtesy Lamp Relay..............8W-44-2, 3, 4
CS01...............................8W-44-4
CS02...........................8W-44-2, 3, 4
CS03...........................8W-44-2, 3, 4
CS04...............................8W-44-6
CS06...............................8W-44-8
CS1................................8W-44-4
Driver Door Ajar Switch................8W-44-5
Driver Door Courtesy Lamp.............8W-44-3
Driver Door Lock Switch................8W-44-9
Driver Power Mirror...................8W-44-6
Driver Power Window Switch............8W-44-9
DS01.............................8W-44-3, 9
EC1C19 ............................8W-44-6
Front Cigar Lighter/Power Outlet.........8W-44-8
Front Reading Lamp Defeat Switch.......8W-44-2
Front Reading Lamps/Switch............8W-44-2
Fuse 1 (JB)..........................8W-44-7
Fuse 3 (JB)..........................8W-44-7
Fuse 6 (JB)..........................8W-44-6
Fuse 12 (JB).........................8W-44-6
Fuse 18 (PDC)....................8W-44-2, 3, 4
Fuse 22 (PDC)........................8W-44-7
G200...............................8W-44-8
G201...............................8W-44-8
G300.......................8W-44-3, 6, 7, 8, 9
G301...........................8W-44-5, 8, 9
G302.............................8W-44-5, 8Component Page
G400.............................8W-44-4, 5
Glove Box Lamp..................8W-44-2, 3, 4
Headlamp Switch...................8W-44-2, 7
Hood Ajar Switch.....................8W-44-5
Ignition Switch.......................8W-44-8
Instrument Cluster....................8W-44-8
Interior Lamps On Switch...............8W-44-2
Junction Block............8W-44-2, 3, 4, 6, 7, 8, 9
Key-In Halo Lamp.....................8W-44-3
Left Liftgate Flood Lamp...............8W-44-4
Left Mid Reading Lamp................8W-44-4
Left Rear Door Ajar Switch..............8W-44-5
Left Rear Reading Lamp................8W-44-4
Left Visor/Vanity Mirror Lamps..........8W-44-3
Liftgate Ajar Switch...................8W-44-5
Message Center.......................8W-44-7
Park Lamp Relay.....................8W-44-7
Passenger Door Ajar Switch.............8W-44-5
Passenger Door Courtesy Lamp.........8W-44-3, 9
Passenger Door Lock Switch.............8W-44-9
Passenger Power Window Switch.......8W-44-3, 9
Power Distribution Center.........8W-44-2, 3, 4, 7
Power Mirror Switch...................8W-44-8
Radio.............................8W-44-7, 8
Rear Blower Front Control Switch........8W-44-8
Rear Blower Rear Control Switch.........8W-44-8
Rear Dome Lamp.....................8W-44-4
Right Liftgate Flood Lamp..............8W-44-4
Right Mid Reading Lamp...............8W-44-4
Right Rear Door Ajar Switch.............8W-44-5
Right Rear Reading Lamp...............8W-44-4
Right Visor/Vanity Mirror Lamps.........8W-44-3
Traction Control Switch.................8W-44-8
Transmission Range Sensor..............8W-44-6
Universal Garage Door Opener...........8W-44-8
NS/GS8W - 44 INTERIOR LIGHTING 8W - 44 - 1
Page 769 of 1938

8W-45 BODY CONTROL MODULE
Component Page
A/C Heater Control..................8W-45-5, 6
Ash Receiver Lamp....................8W-45-5
Automatic Day/Night Mirror.............8W-45-8
Back-Up Switch.......................8W-45-9
Battery.............................8W-45-9
Body Control Module . .8W-45-2, 3, 4, 5, 6, 7, 8, 9, 10
BS02...............................8W-45-9
BS10...............................8W-45-8
BS30...............................8W-45-9
Clockspring..........................8W-45-3
Combination Flasher/DRL Module........8W-45-5
Controller Anti-Lock Brake..............8W-45-6
CS03...............................8W-45-8
Data Link Connector...................8W-45-3
Door Lock Relay......................8W-45-7
Door Unlock Relay....................8W-45-7
Driver Door Ajar Switch................8W-45-7
Driver Door Arm/Disarm Switch..........8W-45-8
Driver Door Lock Switch..............8W-45-6, 8
Driver Door Unlock Relay...............8W-45-7
Driver Power Mirror..................8W-45-10
Driver Power Window Switch............8W-45-6
Engine Coolant Temperature Sensor.......8W-45-9
Engine Oil Pressure Switch..............8W-45-7
ES01...............................8W-45-9
ES02...............................8W-45-9
Front Cigar Lighter/Power Outlet.........8W-45-5
Front Reading Lamps/Switch............8W-45-8
Front Wiper Switch....................8W-45-4
Fuel Tank Module...................8W-45-7, 9
Fuse 1 (JB)..........................8W-45-3
Fuse 2 (JB)..........................8W-45-2
Fuse 3 (JB)..........................8W-45-3
Fuse 6 (JB)..........................8W-45-2
Fuse 19 (PDC)........................8W-45-4
Fuse 22 (PDC)........................8W-45-3
Fuse 28 (PDC)........................8W-45-2
G100...............................8W-45-9
G103...............................8W-45-9
G300............................8W-45-2, 10
G302...............................8W-45-9
Glove Box Lamp......................8W-45-8
Headlamp Dimmer Switch..............8W-45-5
Headlamp Switch...............8W-45-2, 3, 4, 5
Hood Ajar Switch.....................8W-45-7
Horn Relay..........................8W-45-3
HVAC Control........................8W-45-6
Ignition Switch.....................8W-45-2, 5
Instrument Cluster....................8W-45-5
Junction Block...........8W-45-2, 3, 4, 5, 6, 7, 10
Key-In Halo Lamp....................8W-45-10Component Page
Left Mid Reading Lamp................8W-45-8
Left Rear Door Ajar Switch..............8W-45-8
Left Rear Reading Lamp................8W-45-8
Left Visor/Vanity Mirror Lamps..........8W-45-8
Liftgate Ajar Switch...................8W-45-7
Liftgate Arm/Disarm Switch.............8W-45-6
LJ01 B17..........................8W-45-4, 6
Low Beam Relay......................8W-45-5
Low Coolant Level Switch...............8W-45-9
Low Washer Fluid Switch...............8W-45-3
Memory Seat/Mirror Module...........8W-45-2, 6
Message Center.....................8W-45-5, 6
Park Lamp Relay.....................8W-45-3
Passenger Door Ajar Switch.............8W-45-7
Passenger Door Arm/Disarm Switch.......8W-45-8
Passenger Door Lock Switch...........8W-45-6, 8
Passenger Power Mirror...............8W-45-10
Passenger Power Window Switch.........8W-45-6
Power Distribution Center...........8W-45-2, 3, 4
Power Folding Mirror Switch...........8W-45-10
Power Mirror Fold Relay...............8W-45-10
Power Mirror Switch...................8W-45-5
Power Mirror Unfold Relay.............8W-45-10
Powertrain Control Module..............8W-45-9
PS01...............................8W-45-3
PS02...............................8W-45-3
PTC 3 (JB)..........................8W-45-7
Radio.............................8W-45-4, 5
Rear Blower Front Control Switch........8W-45-5
Rear Blower Rear Control Switch.........8W-45-6
Rear Washer Motor....................8W-45-4
Rear Wiper Motor.....................8W-45-4
Remote Keyless Entry Module...........8W-45-6
Right Mid Reading Lamp...............8W-45-8
Right Rear Door Ajar Switch.............8W-45-8
Right Rear Reading Lamp...............8W-45-8
Right Visor/Vanity Mirror Lamps.........8W-45-8
Seat Belt Switch......................8W-45-7
Traction Control Switch.................8W-45-5
Universal Garage Door Opener...........8W-45-6
Wiper Module........................8W-45-3
Wiper On Relay.......................8W-45-4
NS/GS8W - 45 BODY CONTROL MODULE 8W - 45 - 1
Page 1281 of 1938
FRAME AND BUMPERS
CONTENTS
page page
BUMPERS AND FASCIA.................... 1FRAME................................. 3
BUMPERS AND FASCIA
INDEX
page page
REMOVAL AND INSTALLATION
FRONT BUMPER FASCIA.................. 1
FRONT BUMPER REINFORCEMENT.......... 1REAR BUMPER FASCIA................... 2
REAR BUMPER REINFORCEMENT........... 2
REMOVAL AND INSTALLATION
FRONT BUMPER FASCIA
REMOVAL
(1) Release hood latch and open hood.
(2) Remove bolts holding fascia to headlamp
mounting panel at each side of grille.
(3) Hoist and support vehicle on safety stands.
(4) Remove front wheels. Refer to Group 22,
Wheels and Tires, for proper procedures and
sequence.
(5) Remove front wheelhouse splash shields fasten-
ers as necessary to gain access to bolts holding front
fascia to fender. Refer to Group 23, Body, for proper
procedures.
(6) Remove bolts holding fascia to bottom of front
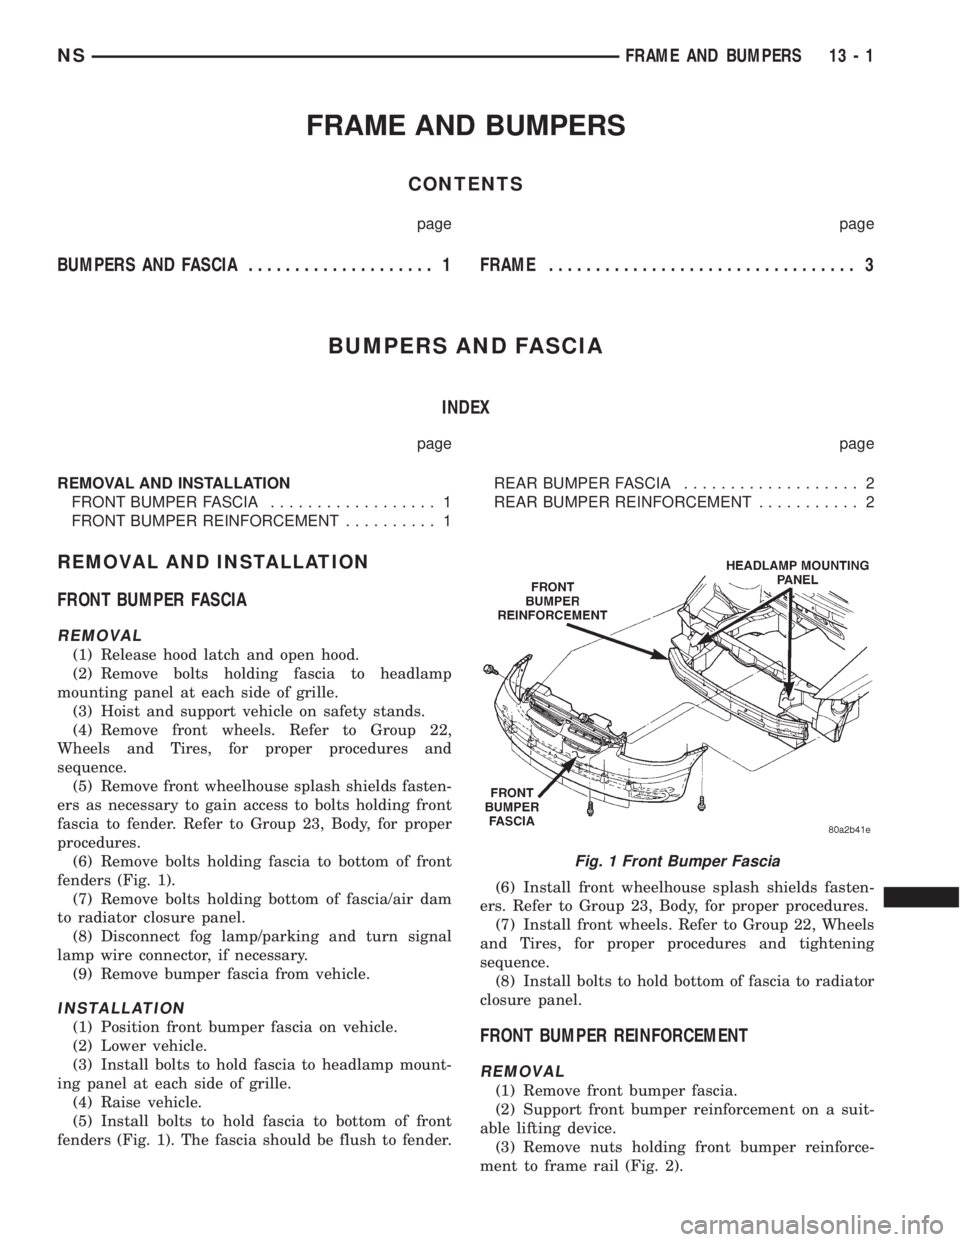
fenders (Fig. 1).
(7) Remove bolts holding bottom of fascia/air dam
to radiator closure panel.
(8) Disconnect fog lamp/parking and turn signal
lamp wire connector, if necessary.
(9) Remove bumper fascia from vehicle.
INSTALLATION
(1) Position front bumper fascia on vehicle.
(2) Lower vehicle.
(3) Install bolts to hold fascia to headlamp mount-
ing panel at each side of grille.
(4) Raise vehicle.
(5) Install bolts to hold fascia to bottom of front
fenders (Fig. 1). The fascia should be flush to fender.(6) Install front wheelhouse splash shields fasten-
ers. Refer to Group 23, Body, for proper procedures.
(7) Install front wheels. Refer to Group 22, Wheels
and Tires, for proper procedures and tightening
sequence.
(8) Install bolts to hold bottom of fascia to radiator
closure panel.FRONT BUMPER REINFORCEMENT
REMOVAL
(1) Remove front bumper fascia.
(2) Support front bumper reinforcement on a suit-
able lifting device.
(3) Remove nuts holding front bumper reinforce-
ment to frame rail (Fig. 2).
Fig. 1 Front Bumper Fascia
NSFRAME AND BUMPERS 13 - 1
Page 1734 of 1938
STATIONARY GLASS
INDEX
page page
DESCRIPTION AND OPERATION
SAFETY PRECAUTIONS................... 4
REMOVAL AND INSTALLATION
BODY SIDE/SLIDING DOOR STATIONARY
GLASS............................... 6REAR WINDOW.......................... 7
WINDSHIELD............................ 4
DESCRIPTION AND OPERATION
SAFETY PRECAUTIONS
WARNING: DO NOT OPERATE THE VEHICLE
WITHIN 24 HOURS OF WINDSHIELD INSTALLATION.
IT TAKES AT LEAST 24 HOURS FOR URETHANE
ADHESIVE TO CURE. IF IT IS NOT CURED, THE
WINDSHIELD MAY NOT PERFORM PROPERLY IN
AN ACCIDENT.
URETHANE ADHESIVES ARE APPLIED AS A SYS-
TEM. USE GLASS CLEANER, GLASS PREP SOL-
VENT, GLASS PRIMER, PVC (VINYL) PRIMER AND
PINCHWELD (FENCE) PRIMER PROVIDED BY THE
ADHESIVE MANUFACTURER. IF NOT, STRUCTURAL
INTEGRITY COULD BE COMPROMISED.
CHRYSLER DOES NOT RECOMMEND GLASS
ADHESIVE BY BRAND. TECHNICIANS SHOULD
REVIEW PRODUCT LABELS AND TECHNICAL DATA
SHEETS, AND USE ONLY ADHESIVES THAT THEIR
MANUFACTURES WARRANT WILL RESTORE A
VEHICLE TO THE REQUIREMENTS OF FMVSS 212.
TECHNICIANS SHOULD ALSO INSURE THAT PRIM-
ERS AND CLEANERS ARE COMPATIBLE WITH THE
PARTICULAR ADHESIVE USED.
BE SURE TO REFER TO THE URETHANE MANU-
FACTURER'S DIRECTIONS FOR CURING TIME
SPECIFICATIONS, AND DO NOT USE ADHESIVE
AFTER ITS EXPIRATION DATE.
VAPORS THAT ARE EMITTED FROM THE URE-
THANE ADHESIVE OR PRIMER COULD CAUSE
PERSONAL INJURY. USE THEM IN A WELL-VENTI-
LATED AREA.
SKIN CONTACT WITH URETHANE ADHESIVE
SHOULD BE AVOIDED. PERSONAL INJURY MAY
RESULT.
ALWAYS WEAR EYE AND HAND PROTECTION
WHEN WORKING WITH GLASS.
CAUTION: Protect all painted and trimmed surfaces
from coming in contact with urethane or primers.Be careful not to damage painted surfaces when
removing moldings or cutting urethane around
windshield.
It is difficult to salvage a windshield during the
removal operation. The windshield is part of the
structural support for the roof. The urethane bonding
used to secure the windshield to the fence is difficult
to cut or clean from any surface. If the moldings are
set in urethane, it would also be unlikely they could
be salvaged. Before removing the windshield, check
the availability of the windshield and moldings from
the parts supplier.
REMOVAL AND INSTALLATION
WINDSHIELD
The urethane adhesive holding the windshield to
the opening pinch weld (fence) can be cut using a
sharp cold knife from the exterior of the vehicle.
Using the cold knife method is effective if the wind-
shield is already broken. If the glass must be sal-
vaged, cutting the urethane adhesive from the
interior of the vehicle using a reciprocating or oscil-
lating power knife is recommended.
WINDSHIELD REMOVAL ± EXTERIOR METHOD
(1) Remove inside rear view mirror.
(2) Remove windshield wiper arms.
(3) Remove cowl cover.
(4) Remove A-pillar trim panels.
(5) Disconnect wire connectors to windshield
defroster grid.
(6) Place protective covers over instrument panel
and hood.
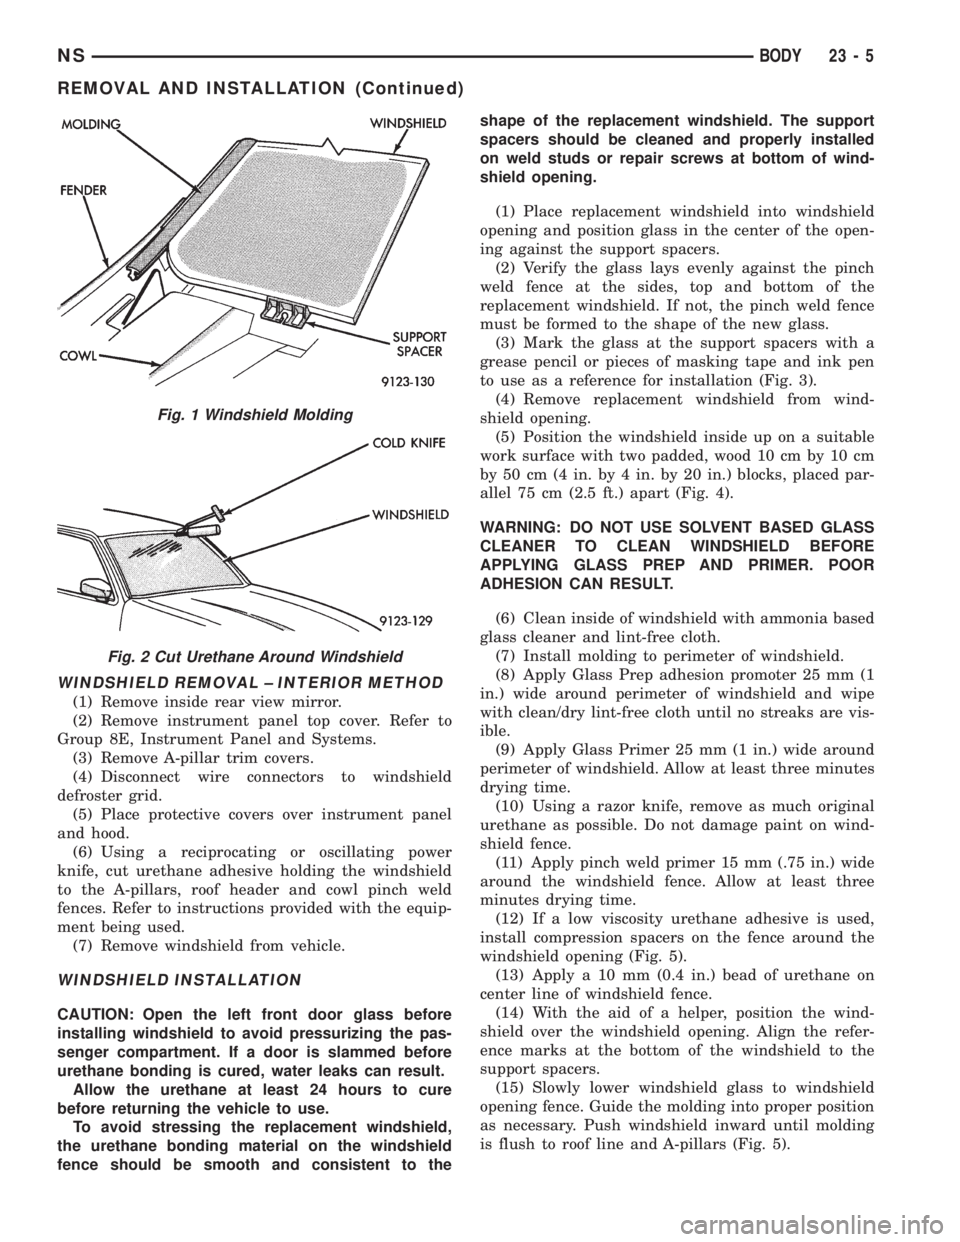
(7) Remove windshield molding (Fig. 1). Using pli-
ers, pull outward on molding at the bottom of A-pil-
lars.
(8) Using a sharp cold knife, cut urethane adhe-
sive holding the windshield to the A-pillars, roof
header and cowl pinch weld fences (Fig. 2). A power
cutting device can be used if available.
(9) Remove windshield from vehicle.
23 - 4 BODYNS
Page 1735 of 1938
WINDSHIELD REMOVAL ± INTERIOR METHOD
(1) Remove inside rear view mirror.
(2) Remove instrument panel top cover. Refer to
Group 8E, Instrument Panel and Systems.
(3) Remove A-pillar trim covers.
(4) Disconnect wire connectors to windshield
defroster grid.
(5) Place protective covers over instrument panel
and hood.
(6) Using a reciprocating or oscillating power
knife, cut urethane adhesive holding the windshield
to the A-pillars, roof header and cowl pinch weld
fences. Refer to instructions provided with the equip-
ment being used.
(7) Remove windshield from vehicle.
WINDSHIELD INSTALLATION
CAUTION: Open the left front door glass before
installing windshield to avoid pressurizing the pas-
senger compartment. If a door is slammed before
urethane bonding is cured, water leaks can result.
Allow the urethane at least 24 hours to cure
before returning the vehicle to use.
To avoid stressing the replacement windshield,
the urethane bonding material on the windshield
fence should be smooth and consistent to theshape of the replacement windshield. The support
spacers should be cleaned and properly installed
on weld studs or repair screws at bottom of wind-
shield opening.
(1) Place replacement windshield into windshield
opening and position glass in the center of the open-
ing against the support spacers.
(2) Verify the glass lays evenly against the pinch
weld fence at the sides, top and bottom of the
replacement windshield. If not, the pinch weld fence
must be formed to the shape of the new glass.
(3) Mark the glass at the support spacers with a
grease pencil or pieces of masking tape and ink pen
to use as a reference for installation (Fig. 3).
(4) Remove replacement windshield from wind-
shield opening.
(5) Position the windshield inside up on a suitable
work surface with two padded, wood 10 cm by 10 cm
by 50 cm (4 in. by 4 in. by 20 in.) blocks, placed par-
allel 75 cm (2.5 ft.) apart (Fig. 4).
WARNING: DO NOT USE SOLVENT BASED GLASS
CLEANER TO CLEAN WINDSHIELD BEFORE
APPLYING GLASS PREP AND PRIMER. POOR
ADHESION CAN RESULT.
(6) Clean inside of windshield with ammonia based
glass cleaner and lint-free cloth.
(7) Install molding to perimeter of windshield.
(8) Apply Glass Prep adhesion promoter 25 mm (1
in.) wide around perimeter of windshield and wipe
with clean/dry lint-free cloth until no streaks are vis-
ible.
(9) Apply Glass Primer 25 mm (1 in.) wide around
perimeter of windshield. Allow at least three minutes
drying time.
(10) Using a razor knife, remove as much original
urethane as possible. Do not damage paint on wind-
shield fence.
(11) Apply pinch weld primer 15 mm (.75 in.) wide
around the windshield fence. Allow at least three
minutes drying time.
(12) If a low viscosity urethane adhesive is used,
install compression spacers on the fence around the
windshield opening (Fig. 5).
(13) Apply a 10 mm (0.4 in.) bead of urethane on
center line of windshield fence.
(14) With the aid of a helper, position the wind-
shield over the windshield opening. Align the refer-
ence marks at the bottom of the windshield to the
support spacers.
(15) Slowly lower windshield glass to windshield
opening fence. Guide the molding into proper position
as necessary. Push windshield inward until molding
is flush to roof line and A-pillars (Fig. 5).
Fig. 1 Windshield Molding
Fig. 2 Cut Urethane Around Windshield
NSBODY 23 - 5
REMOVAL AND INSTALLATION (Continued)