1996 CHRYSLER VOYAGER fuel pump
[x] Cancel search: fuel pumpPage 1917 of 1938
EVAPORATIVE EMISSION CONTROLS
INDEX
page page
DESCRIPTION AND OPERATION
CRANKCASE VENT FILTER................ 16
EVAPORATION CONTROL SYSTEM......... 13
EVAPORATIVE (EVAP) CANISTER........... 13
LEAK DETECTION PUMP................. 14
POSITIVE CRANKCASE VENTILATION (PCV)
SYSTEMS............................ 15
PRESSURE-VACUUM FILLER CAP.......... 14
PROPORTIONAL PURGE SOLENOID......... 13ROLLOVER VALVE....................... 13
VEHICLE EMISSION CONTROL INFORMATION
LABEL............................... 16
DIAGNOSIS AND TESTING
LEAK DETECTION PUMP................. 16
PCV VALVE TEST....................... 16
REMOVAL AND INSTALLATION
LEAK DETECTION PUMP REPLACEMENT.... 16
ROLLOVER VALVES..................... 17
DESCRIPTION AND OPERATION
EVAPORATION CONTROL SYSTEM
The evaporation control system prevents the emis-
sion of fuel tank vapors into the atmosphere. When
fuel evaporates in the fuel tank, the vapors pass
through vent hoses or tubes to a charcoal filled evap-
orative canister. The canister temporarily holds the
vapors. The Powertrain Control Module (PCM) allows
intake manifold vacuum to draw vapors into the com-
bustion chambers during certain operating condi-
tions.
All engines use a duty cycle purge system. The
PCM controls vapor flow by operating the duty cycle
EVAP purge solenoid. Refer to Duty Cycle EVAP
Purge Solenoid in this section.
NOTE: The evaporative system uses specially man-
ufactured hoses. If they need replacement, only use
fuel resistant hose.
ROLLOVER VALVE
All vehicles have a rollover valve. The valve also
prevents fuel flow through the fuel tank vent valve
hoses should the vehicle rollover. All vehicles pass a
360É rollover.
The charcoal filled evaporative canister stores the
vapors. The rollover valve is not a serviceable item.
EVAPORATIVE (EVAP) CANISTER
All vehicles use a sealed, maintenance free, evapo-
rative (charcoal) canister. The canister is attached to
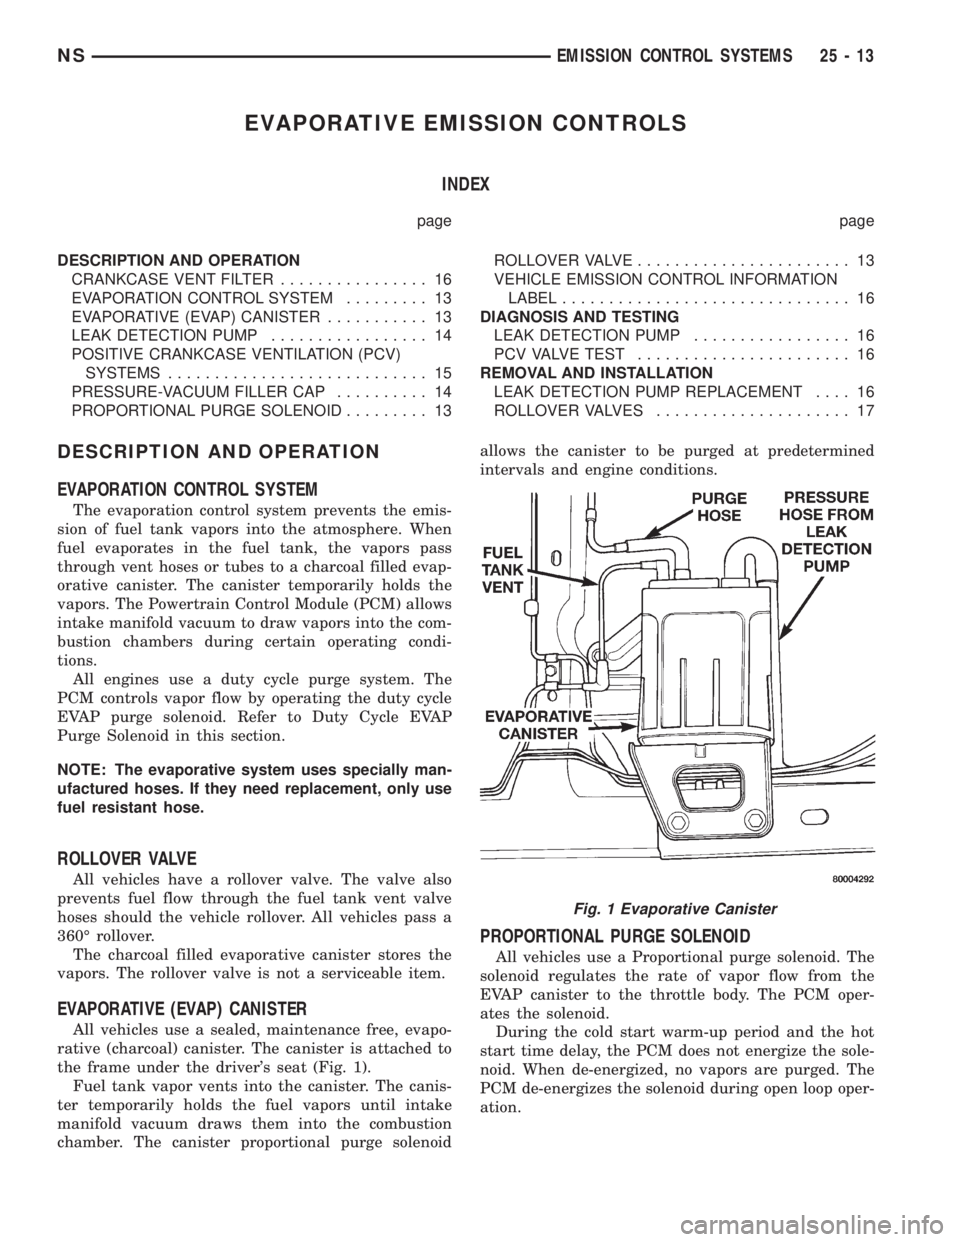
the frame under the driver's seat (Fig. 1).
Fuel tank vapor vents into the canister. The canis-
ter temporarily holds the fuel vapors until intake
manifold vacuum draws them into the combustion
chamber. The canister proportional purge solenoidallows the canister to be purged at predetermined
intervals and engine conditions.
PROPORTIONAL PURGE SOLENOID
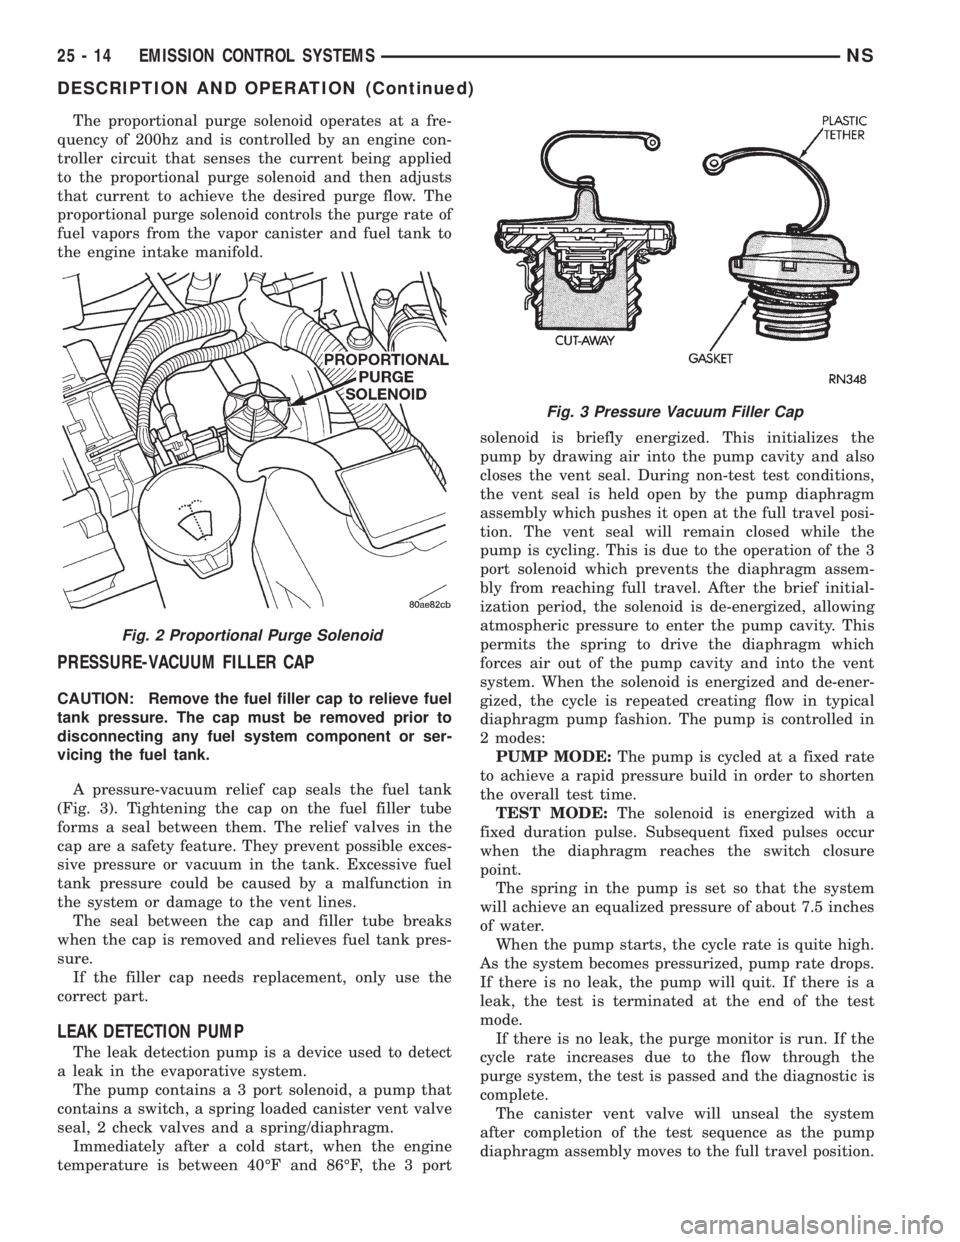
All vehicles use a Proportional purge solenoid. The
solenoid regulates the rate of vapor flow from the
EVAP canister to the throttle body. The PCM oper-
ates the solenoid.
During the cold start warm-up period and the hot
start time delay, the PCM does not energize the sole-
noid. When de-energized, no vapors are purged. The
PCM de-energizes the solenoid during open loop oper-
ation.
Fig. 1 Evaporative Canister
NSEMISSION CONTROL SYSTEMS 25 - 13
Page 1918 of 1938
The proportional purge solenoid operates at a fre-
quency of 200hz and is controlled by an engine con-
troller circuit that senses the current being applied
to the proportional purge solenoid and then adjusts
that current to achieve the desired purge flow. The
proportional purge solenoid controls the purge rate of
fuel vapors from the vapor canister and fuel tank to
the engine intake manifold.
PRESSURE-VACUUM FILLER CAP
CAUTION: Remove the fuel filler cap to relieve fuel
tank pressure. The cap must be removed prior to
disconnecting any fuel system component or ser-
vicing the fuel tank.
A pressure-vacuum relief cap seals the fuel tank
(Fig. 3). Tightening the cap on the fuel filler tube
forms a seal between them. The relief valves in the
cap are a safety feature. They prevent possible exces-
sive pressure or vacuum in the tank. Excessive fuel
tank pressure could be caused by a malfunction in
the system or damage to the vent lines.
The seal between the cap and filler tube breaks
when the cap is removed and relieves fuel tank pres-
sure.
If the filler cap needs replacement, only use the
correct part.
LEAK DETECTION PUMP
The leak detection pump is a device used to detect
a leak in the evaporative system.
The pump contains a 3 port solenoid, a pump that
contains a switch, a spring loaded canister vent valve
seal, 2 check valves and a spring/diaphragm.
Immediately after a cold start, when the engine
temperature is between 40ÉF and 86ÉF, the 3 portsolenoid is briefly energized. This initializes the
pump by drawing air into the pump cavity and also
closes the vent seal. During non-test test conditions,
the vent seal is held open by the pump diaphragm
assembly which pushes it open at the full travel posi-
tion. The vent seal will remain closed while the
pump is cycling. This is due to the operation of the 3
port solenoid which prevents the diaphragm assem-
bly from reaching full travel. After the brief initial-
ization period, the solenoid is de-energized, allowing
atmospheric pressure to enter the pump cavity. This
permits the spring to drive the diaphragm which
forces air out of the pump cavity and into the vent
system. When the solenoid is energized and de-ener-
gized, the cycle is repeated creating flow in typical
diaphragm pump fashion. The pump is controlled in
2 modes:
PUMP MODE:The pump is cycled at a fixed rate
to achieve a rapid pressure build in order to shorten
the overall test time.
TEST MODE:The solenoid is energized with a
fixed duration pulse. Subsequent fixed pulses occur
when the diaphragm reaches the switch closure
point.
The spring in the pump is set so that the system
will achieve an equalized pressure of about 7.5 inches
of water.
When the pump starts, the cycle rate is quite high.
As the system becomes pressurized, pump rate drops.
If there is no leak, the pump will quit. If there is a
leak, the test is terminated at the end of the test
mode.
If there is no leak, the purge monitor is run. If the
cycle rate increases due to the flow through the
purge system, the test is passed and the diagnostic is
complete.
The canister vent valve will unseal the system
after completion of the test sequence as the pump
diaphragm assembly moves to the full travel position.
Fig. 2 Proportional Purge Solenoid
Fig. 3 Pressure Vacuum Filler Cap
25 - 14 EMISSION CONTROL SYSTEMSNS
DESCRIPTION AND OPERATION (Continued)
Page 1921 of 1938
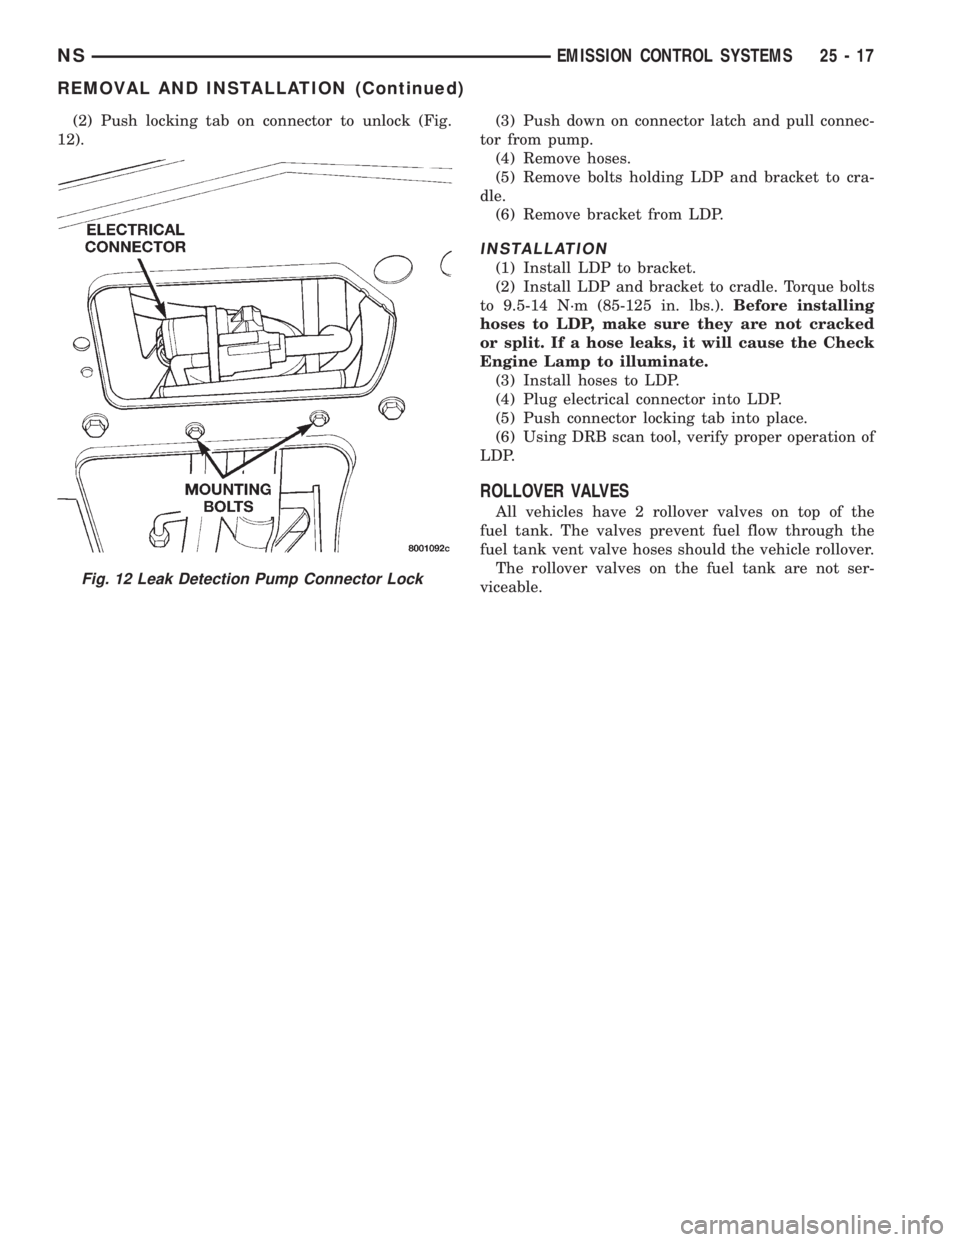
(2) Push locking tab on connector to unlock (Fig.
12).(3) Push down on connector latch and pull connec-
tor from pump.
(4) Remove hoses.
(5) Remove bolts holding LDP and bracket to cra-
dle.
(6) Remove bracket from LDP.
INSTALLATION
(1) Install LDP to bracket.
(2) Install LDP and bracket to cradle. Torque bolts
to 9.5-14 N´m (85-125 in. lbs.).Before installing
hoses to LDP, make sure they are not cracked
or split. If a hose leaks, it will cause the Check
Engine Lamp to illuminate.
(3) Install hoses to LDP.
(4) Plug electrical connector into LDP.
(5) Push connector locking tab into place.
(6) Using DRB scan tool, verify proper operation of
LDP.
ROLLOVER VALVES
All vehicles have 2 rollover valves on top of the
fuel tank. The valves prevent fuel flow through the
fuel tank vent valve hoses should the vehicle rollover.
The rollover valves on the fuel tank are not ser-
viceable.
Fig. 12 Leak Detection Pump Connector Lock
NSEMISSION CONTROL SYSTEMS 25 - 17
REMOVAL AND INSTALLATION (Continued)
Page 1929 of 1938
EMISSION CONTROL SYSTEM
CONTENTS
page page
EMISSION CONTROL SYSTEMÐ
2.0L ENGINE.......................... 9
EXHAUST EMISSION CONTROLSÐ
2.5L DIESEL ENGINE................... 5ON-BOARD DIAGNOSTICSÐ
2.5L DIESEL ENGINE................... 1
ON-BOARD DIAGNOSTICSÐ2.5L DIESEL ENGINE
INDEX
page page
GENERAL INFORMATION
SYSTEM DESCRIPTIONÐ
2.5L DIESEL ENGINE................... 1DESCRIPTION AND OPERATION
DIAGNOSTIC TROUBLE CODES............ 2
GENERAL INFORMATION
SYSTEM DESCRIPTIONÐ2.5L DIESEL ENGINE
The 2.5L diesel Powertrain Control Module (PCM)
monitors and controls many different circuits in the
fuel injection pump and engine systems. If the PCM
senses a problem with a monitored circuit that indi-
cates an actual problem, a Diagnostic Trouble Code
(DTC) will be stored in the PCM's memory, and even-
tually will illuminate the Diesel Glow Plug lamp con-
stantly while the key is on. If the problem is
repaired, or is intermittent, the PCM will erase the
DTC after 40 warm-up cycles. A warm-up cycle con-
sists of starting the vehicle when the engine is cold,
then the engine to warms up to a certain tempera-
ture, and finally, the engine temperature falls to a
normal operating temperature, then the key is
turned off.
Certain criteria must be met for a DTC to be
entered into PCM memory. The criteria may be a
specific range of engine rpm, engine or fuel tempera-
ture and/or input voltage to the PCM. A DTC indi-
cates that the PCM has identified an abnormal
signal in a circuit or the system. A DTC may indicate
the result of a failure, but never identify the failed
component directly.
There are several operating conditions that the
PCM does not monitor and set a DTC for. Refer to
the following Monitored Circuits and Non±Monitored
Circuits in this section.
MONITORED CIRCUITS
The PCM can detect certain problems in the elec-
trical system.
Open or Shorted Circuit± The PCM can deter-
mine if sensor output (which is the input to PCM) is
within proper range. It also determines if the circuit
is open or shorted.
Output Device Current Flow± The PCM senses
whether the output devices are electrically connected.
If there is a problem with the circuit, the PCM
senses whether the circuit is open, shorted to ground
(±), or shorted to (+) voltage.
NON±MONITORED CIRCUITS
The PCM does not monitor the following circuits,
systems or conditions that could have malfunctions
that result in driveability problems. A DTC will not
be displayed for these conditions.
Fuel Pressure:Fuel pressure is controlled by the
fuel injection pump. The PCM cannot detect prob-
lems in this component.
Cylinder Compression:The PCM cannot detect
uneven, low, or high engine cylinder compression.
Exhaust System:The PCM cannot detect a
plugged, restricted or leaking exhaust system.
Fuel Injector Malfunctions:The PCM cannot
determine if the fuel injector is clogged, or the wrong
injector is installed. The fuel injectors on the diesel
engine arenot controlledby the PCM, although a
NS/GSEMISSION CONTROL SYSTEM 25 - 1
Page 1933 of 1938
EXHAUST EMISSION CONTROLSÐ2.5L DIESEL ENGINE
INDEX
page page
DESCRIPTION AND OPERATION
EXHAUST GAS RECIRCULATION (EGR)
SYSTEM............................. 5
VACUUM HOSE ROUTING SCHEMATIC...... 5
DIAGNOSIS AND TESTING
EGR GAS FLOW TEST................... 6
ELECTRIC VACUUM MODULATOR (EVM)
TEST............................... 7REMOVAL AND INSTALLATION
EGR TUBE............................. 7
EGRVALVE ............................ 7
ELECTRIC VACUUM MODULATOR (EVM)..... 7
SPECIFICATIONS
TORQUE CHARTÐ2.5L DIESEL............ 8
DESCRIPTION AND OPERATION
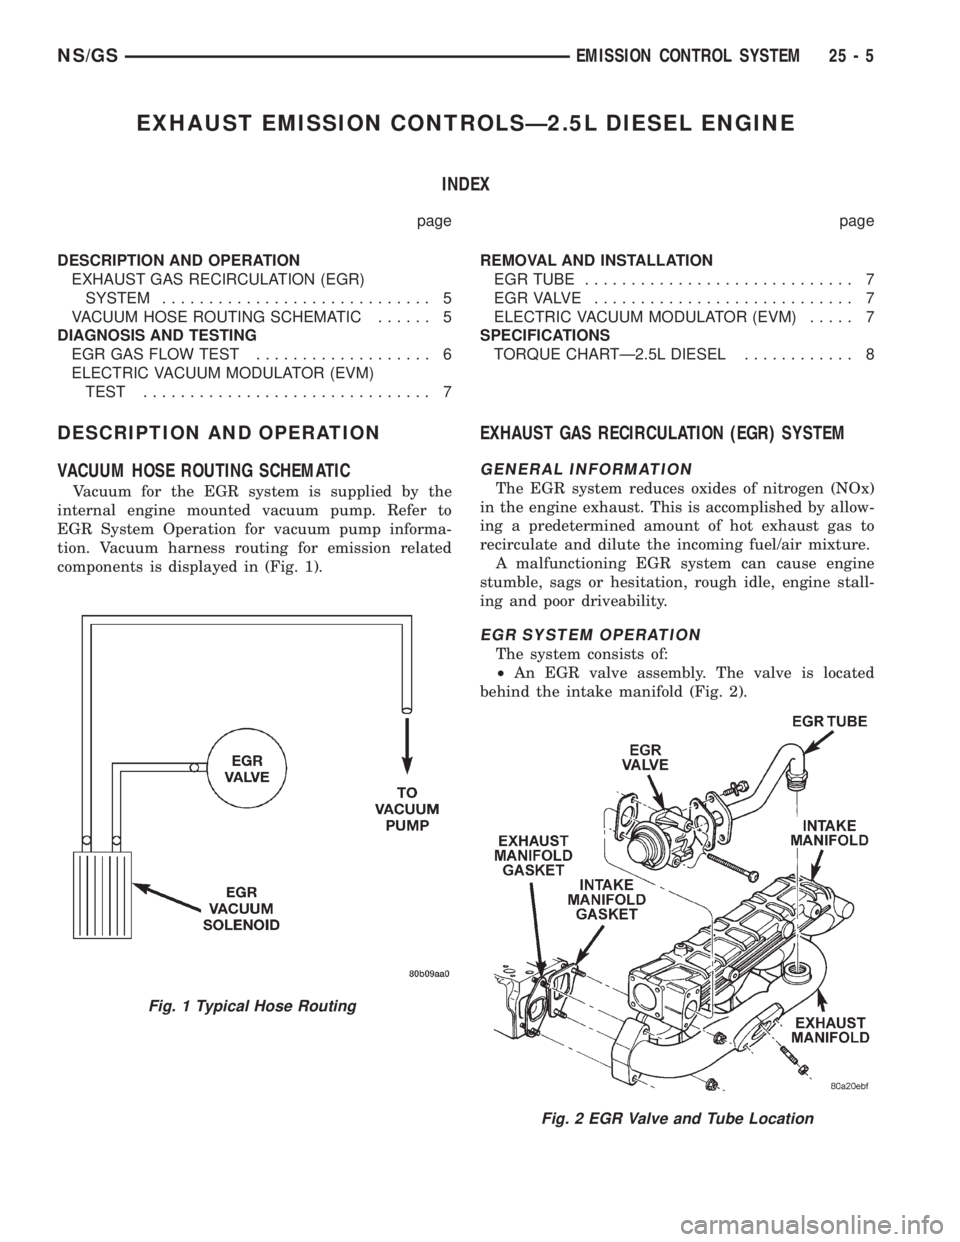
VACUUM HOSE ROUTING SCHEMATIC
Vacuum for the EGR system is supplied by the
internal engine mounted vacuum pump. Refer to
EGR System Operation for vacuum pump informa-
tion. Vacuum harness routing for emission related
components is displayed in (Fig. 1).
EXHAUST GAS RECIRCULATION (EGR) SYSTEM
GENERAL INFORMATION
The EGR system reduces oxides of nitrogen (NOx)
in the engine exhaust. This is accomplished by allow-
ing a predetermined amount of hot exhaust gas to
recirculate and dilute the incoming fuel/air mixture.
A malfunctioning EGR system can cause engine
stumble, sags or hesitation, rough idle, engine stall-
ing and poor driveability.
EGR SYSTEM OPERATION
The system consists of:
²An EGR valve assembly. The valve is located
behind the intake manifold (Fig. 2).
Fig. 1 Typical Hose Routing
Fig. 2 EGR Valve and Tube Location
NS/GSEMISSION CONTROL SYSTEM 25 - 5