1996 CHEVROLET TAHOE spare wheel
[x] Cancel search: spare wheelPage 173 of 403
Downloaded from www.Manualslib.com manuals search engine Off-Road Driving with Your
Four-Wheel-Drive Vehicle
This off-road guide is for vehicles that have
four-wheel drive.
Also, see “Anti-Lock Brakes’’ in the Index.
If your vehicle doesn’t have four-wheel drive, you
shouldn’t drive off-road unless you’re on a level,
solid surface.
Off-road driving can be great fun. But
it does have
some definite hazards. The greatest
of these is the
terrain itself.
“Off-roading” means you’ve left the great North
American road system behind. Traffic lanes aren’t
marked. Curves aren’t banked. There are no road signs.
Surfaces can be slippery, rough, uphill or downhill. In
short, you’ve gone right back
to nature.
Off-road driving involves some new skills. And that’s
why it’s very important that you read this guide. You’ll
find many driving tips and suggestions. These’will help
make your off-road driving safer and more enjoyable.
Before You Go Off-Roading
There are some things to do before you go out. For
example, be sure
to have all necessary maintenance and
service work done. Check to make sure all underbody
shields
(if so equipped) are properly attached. Be sure
you read all the information about your
four-wheel-drive vehicle in this manual. Is there enough
fuel? Is the spare tire fully inflated? Are the fluid levels
up where they should be? What are
the local laws that
apply to off-roading where you’ll be driving? If
you
don’t know, you should check with law enforcement
people in the area. Will you be on someone’s private
land? If
so, be sure to get the necessary permission.
Loading’ Your Vehicle for Off-Road Driving
There are some important things to remember about
how to load your vehicle.
0 The heaviest things should be on the load floor and
forward
of your rear axle. Put heavier items as far
forward as you can.
Be sure the load is secured properly, so driving on
the off-road terrain doesn’t toss things around.
4-14
Page 237 of 403
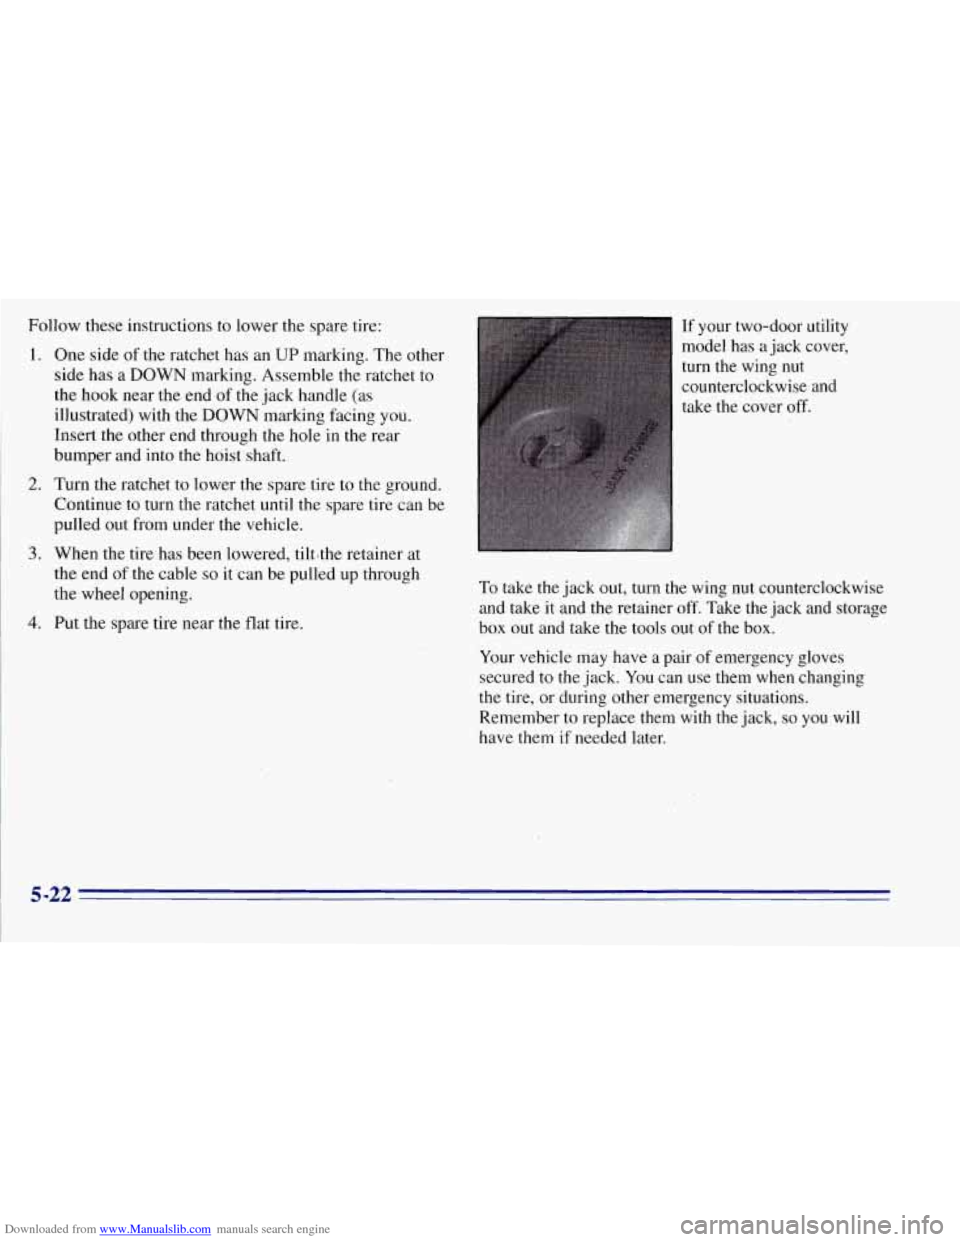
Downloaded from www.Manualslib.com manuals search engine Follow these instructions to lower the spare tire:
1. One side of the ratchet has an UP marking. The other
side has a
DOWN marking. Assemble the ratchet to
the hook near the end
of the jack handle (as
illustrated) with the
DOWN marking facing you.
Insert the other end through the hole in the rear
bumper and into the hoist shaft.
2. Turn the ratchet to lower the spare tire to the ground.
Continue to turn the ratchet until the spare tire can be
pulled out from under the vehicle.
3. When the tire has been lowered, tiltlthe retainer at
the end
of the cable so it can be pulled up through
the wheel opening.
4. Put the spare tire near the flat tire. If
your two-door utility
model has a jack cover,
turn the wing nut
counterclockwise and
take the cover off.
To take the jack out, turn the wing nut counterclockwise
and take it and the retainer off. Take the jack and storage
box out and take the tools out of the box.
Your vehicle may have a pair of emergency gloves
secured to the jack. You can use them when changing
the tire, or during other emergency situations.
Remember to replace them with the jack,
so you will
have them
if needed later.
5-22
Page 241 of 403
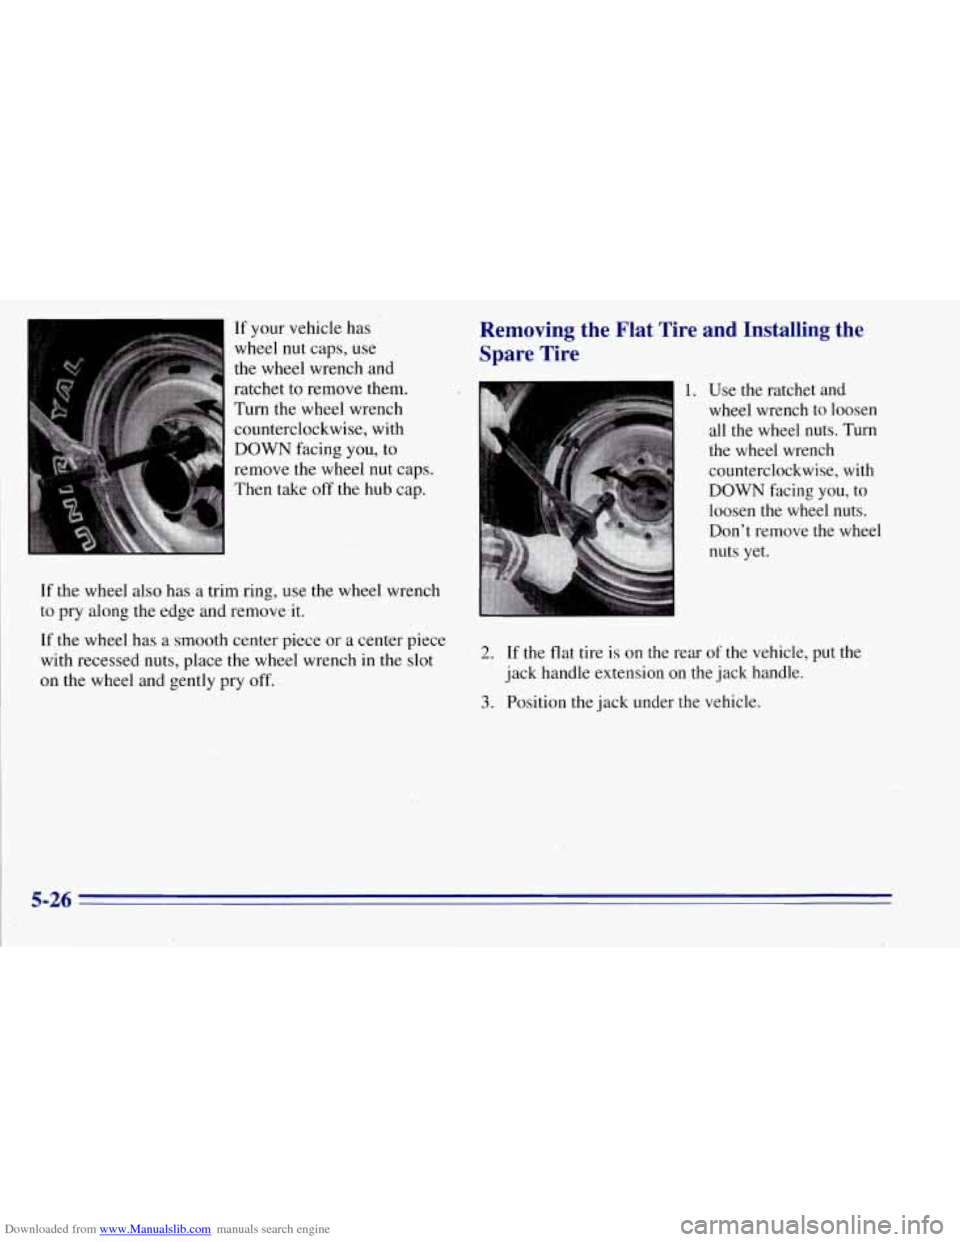
Downloaded from www.Manualslib.com manuals search engine If your vehicle has
wheel nut caps, use
the wheel wrench and
ratchet
to remove them.
Turn the wheel wrench counterclockwise, with
DOWN facing
you, to
remove the wheel nut caps.
Then take off the hub cap.
If the wheel also has a trim ring, use the wheel wrench
to pry along the edge and remove it.
Removing the Flat Tire and Installing the
Spare Tire
1. Use the ratchet and
wheel wrench
to loosen
all the wheel nuts. Turn
the wheel wrench
counterclockwise, with
DOWN facing you, to
loosen the wheel nuts.
Don’t remove the wheel
nuts
yet.
If the wheel has a smooth center piece or a center piece
with recessed nuts, place the wheel wrench in the slot
on the wheel and gently pry off. 2. If the flat tire is on the rear of the vehicle, put the
jack handle extension on the jack handle.
3. Position the jack under the vehicle.
5-26
Page 243 of 403

Downloaded from www.Manualslib.com manuals search engine 4. With UP on the ratchet facing you, raise the vehicle
by rotating the ratchet and wheel wrench clockwise.
Raise the vehicle far mough
off the ground so there
is enough room for ,the spare tire to fit.
5. Remove all the wheel
nuts and take off the
flat tire. Remove any rust
or dirt
from the wheel
bolts,
mounting surfaces and
spare wheel.
&!+ CAUTION:
Rust or dirt on the wheel, or on the parts to
which it is fastened, can make the wheel nuts
become loose after a time. The wheel could come
off and cause an accident. When you change a
wheel, remove any rust or dirt from the places
where the wheel attaches to the vehicle.
In an
emergency, you can use a cloth
or a paper towel
to do this; but be sure to use a scraper or wire
brush later, if you need to, to get all the rust or
dirt off.
5-28
Page 246 of 403
Downloaded from www.Manualslib.com manuals search engine NOTICE:
Improperly tightened wheel nuts can lead to
brake pulsation and rotor damage.
To avoid
expensive brake repairs, evenly tighten the wheel
nuts in the proper sequence and to the proper
torque specification.
11. Put the wheel trim back on. For vehicles with
plastic wheel nut caps, tighten the caps until they
are finger tight, then tighten them an additional
one-half turn with the ratchet and wheel wrench.
Storing a Flat or Spare Tire and "001s
1 A CAUTION:
Storing a jack, a tire or other equipment in the
passenger compartment
of the vehicle could
cause injury. In
a sudden stop or collision, loose
equipment could strike someone. Store
all these
in the proper place.
Store the flat tire where the spare tire is stored.
Put the tools into the storage box and close
it tightly.
Fit the storage box
on the bracket with the bolt through
the box. Put the jack onto the box. Be sure the jack is
stored as shown in the following illustrations. Secure the
emergency gloves, if your vehicle has them, to the jack
using the provided strap.
Slide the retainer over the bolt onto the jack and put
the
wing nut on it. Turn the nut clockwise until it is tight
against the retainer.
Replace the jack storage cover, if your vehicle has
one, by simply reversing the removal procedure
described earlier.
5-31
Page 249 of 403
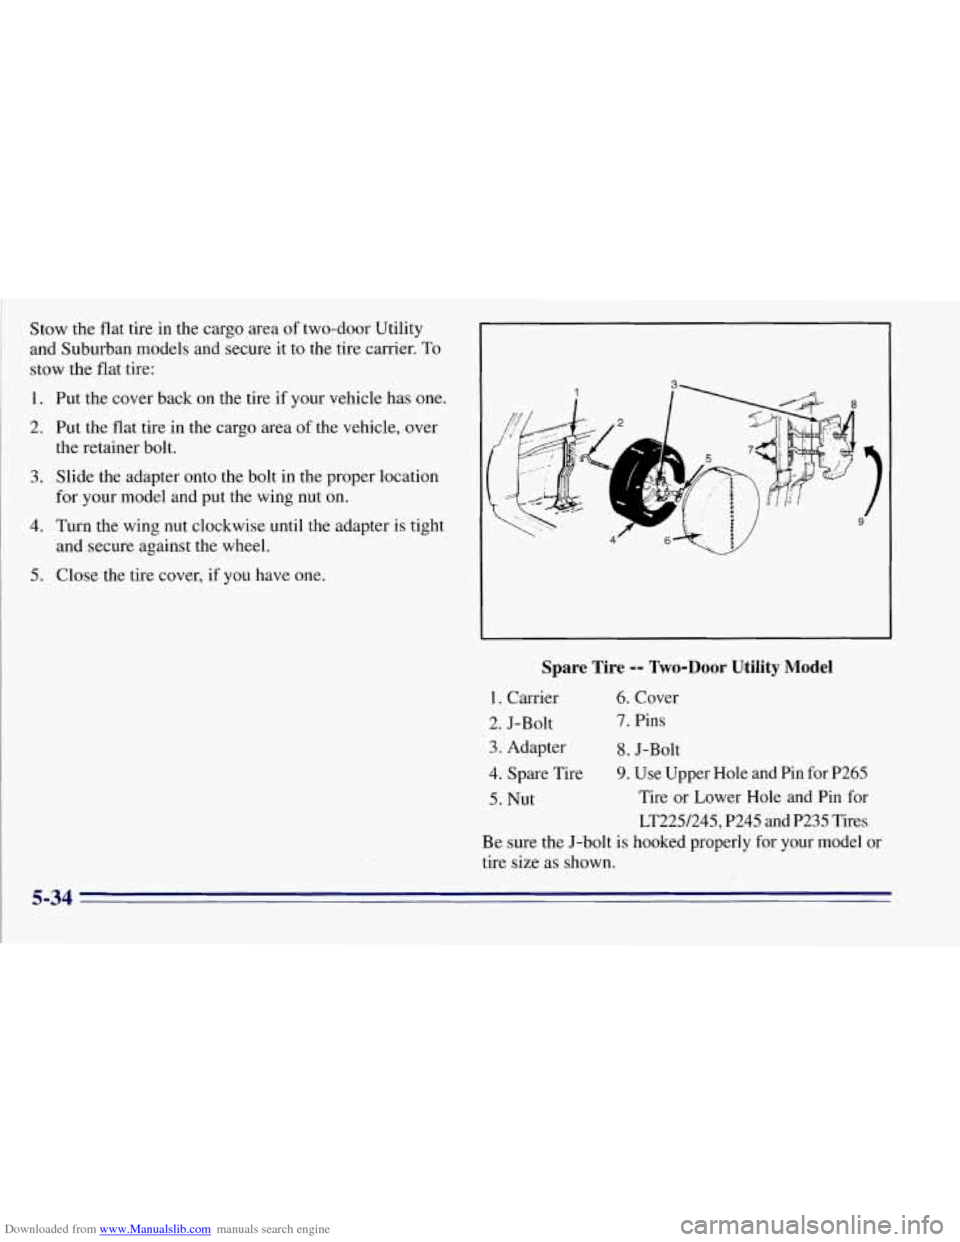
Downloaded from www.Manualslib.com manuals search engine Stow the flat tire in the cargo area of two-door Utility
and Suburban models and secure it to the tire carrier. To
stow the flat tire:
1. Put the cover back on the tire if your vehicle has one.
2. Put the flat tire in the cargo area of the vehicle, over
the retainer bolt.
3. Slide the adapter onto the bolt in the proper location
for your model and put the wing nut on.
4. Turn the wing nut clockwise until the adapter is tight
and secure against the wheel.
5. Close the tire cover, if you have one-
Spare Tire -- Two-Door Utility Model
1. Carrier 6. Cover
2. J-Bolt 7. Pins
3. Adapter 8. J-Bolt
4. Spare Tire 9. Use Upper Hole and Pin for P265
5. Nut Tire or Lower Hole and Pin for
LT225/245, P245 and
P235 Tires
Be sure the J-bolt is hooked properly for your model or
tire size
as shown.
5-34
Page 251 of 403
Downloaded from www.Manualslib.com manuals search engine For four-door utility models equipped with an
underbody spare tire carrier, follow these instructions to
restore a spare or flat tire:
1.
2.
3.
4.
5.
Lay the tire on the ground at the rear of the vehicle.
Position the tire
so that the valve stem is pointed
down and to the rear of the vehicle.
Tilt the retainer downward and through the wheel
opening. Make sure that the retainer is fully seated
across the underside of the wheel.
Attach the ratchet, with the UP mark facing you,
near the hook at the end
of the jack handle. Insert the
other end, on an angle, through the hole in the rear
bumper and into-the hoist shaft.
Raise the tire fully against the underside
of the
vehicle. Continue turning the ratchet until there are
two “clicks” or “ratchets.” The spare tire hoist
cannot be over-tightened.
Grasp and push against the tire to be sure it is stored
securely and does not move.
If You’re Stuck: In Sand, Mud, Ice or
Snow
What you don’t want to do when your vehicle is stuck is
to spin your wheels too fast. The method known as
“rocking” can help
you get out when you’re stuck, but
you must use caution.
n
I A CAUTION:
If you let your tires spin at high speed, they can
explode, and you or others could be injured. And,
the transmission or other parts
of the vehicle can
overheat. That could cause an engine
compartment fire or other damage. When you’re stuck, spin the wheels as little
as possible. Don’t
spin the wheels above
35 mph (55 km/h) as shown
on the speedometer.
5-36
Page 298 of 403
Downloaded from www.Manualslib.com manuals search engine When to Check
Check your tires once a month or more. Also, check the
tire pressure of the spare tire.
How to Check
Use a good quality pocket-type gage to check tire
pressure.
You can’t tell.if your tires are properly inflated
simply by looking at them. Radial tires may look
properly inflated even when they’re underinflated.
Be sure to put the valve caps back on the valve
stems. They help prevent leaks by keeping out dirt
and moisture.
Tire Inspection and Rotation
Tires should be inspected every 6,000 to 8,000 miles
(10
000 to 13 000 km) for any signs of unusual wear.
If unusual wear is present, rotate your tires as soon as
possible and check wheel alignment. Also check for
damaged tires or wheels. See “When It’s Time for New
Tires” and “Wheel Replacement” later in this section for
more information.
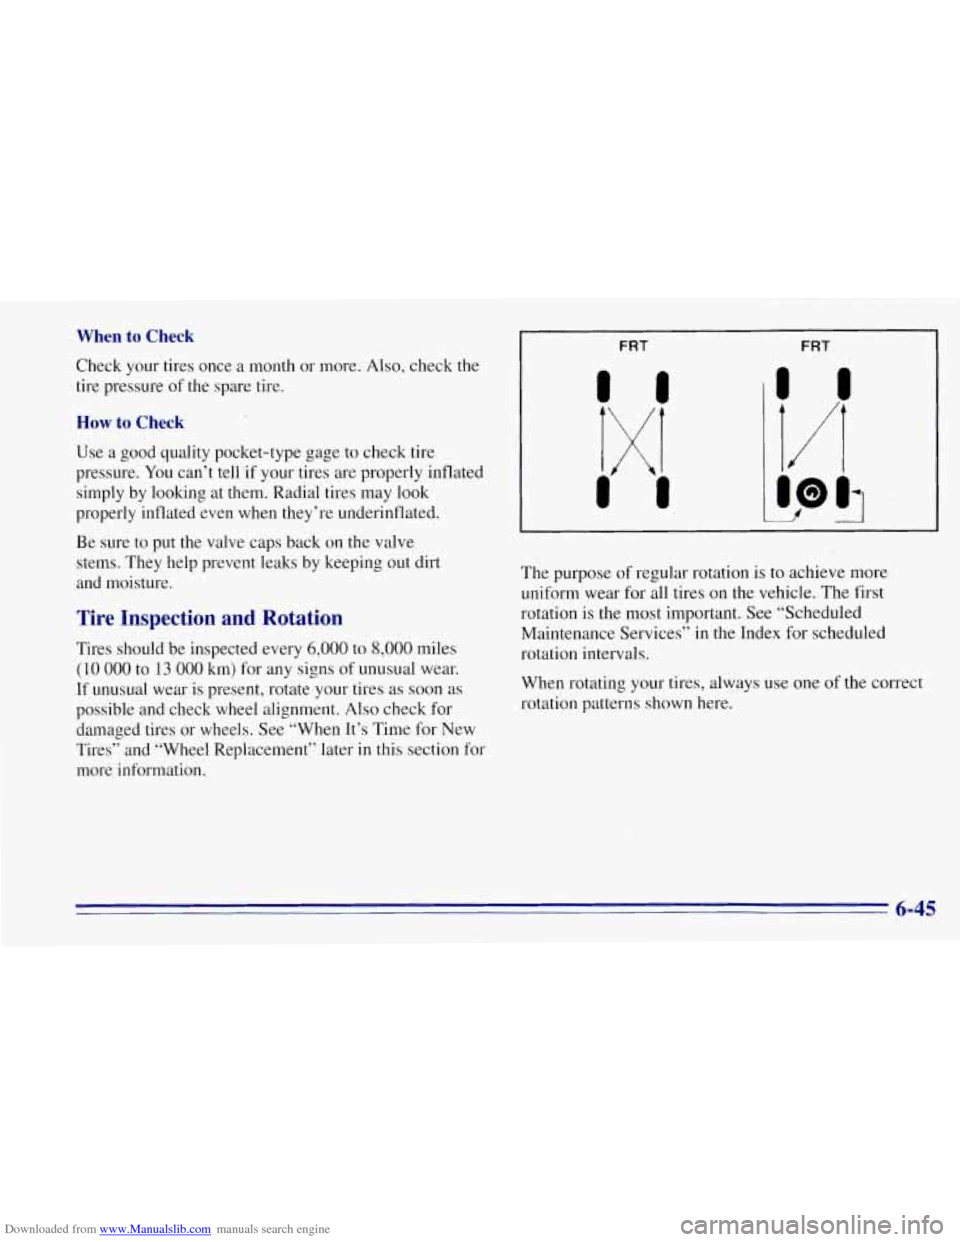
I FRT FRT
The purpose of regular rotation is to achieve more
uniform wear for all tires on the vehicle. The first
rotation
is the most important. See “Scheduled
Maintenance Services” in the Index for scheduled
rotation intervals.
When rotating your tires, always use one
of the correct
rotation patterns shown here.
6-45