1996 CHEVROLET ASTRO turn signal bulb
[x] Cancel search: turn signal bulbPage 90 of 372

Turn and Lane Change Signals
The turn signal has two upward (for right) and two
downward (for left) positions. These positions allow you
to signal a turn or a lane change.
To signal
a turn, move the lever all the way up or down.
When the
turn is finished, the lever will return automatically.
A
An arrow on the instrument
panel will flash in
the
direction of the turn or
lane change.
To signal a lane change, just raise or lower the lever
until the arrow starts to flash. Hold it there until
you
complete your lane change. The lever will return by
itself when you release
it.
As you signal a turn or a lane change, if the arrows don’t
flash
but just stay on, a signal bulb may be burned out
and other drivers won’t see your turn signal.
If a bulb is burned out, replace it to help avoid an
accident. If the arrows don’t go on at all when you
signal a turn, check the fuse (see “Fuses and Circuit
Breakers” in the Index) and for burned-out bulbs.
If you have a trailer towing option with added wiring for
the trailer lamps,
a different turn signal flasher is used.
With this flasher installed, the signal indicator will flash
even if a turn signal bulb is burned out. Check the front
and rear turn signal lamps regularly to make sure they
are working.
Headlamp High/Low Beam Changer
To change the headlamps from low beam to high or high
to low, pull the multifunction lever all the way toward
you. Then release it.
When the high beams are
on, this indicator light on
the instrument panel also
will be on.
2-30
Page 189 of 372

Making Turns
NOTICE:
Making very sharp turns while trailering could
cause the trailer to come in contact with the
vehicle. Your vehicle could
be damaged. Avoid
making very sharp turns while trailering.
When you’re turning with a trailer, make wider turns than
normal.
Do this so your trailer won’t strike soft shoulders,
curbs, road signs, trees or other objects. Avoid jerky or
sudden maneuvers. Signal well in advance.
Tbrn Signals When Towing a Trailer
When you tow a trailer, your vehicle has to have extra
wiring and a heavy-duty turn signal flasher (included
in
the optional trailering package).
The green arrows on your instrument panel will flash
whenever you signal a turn or lane change. Properly
hooked up, the trailer lamps will also flash, telling other
drivers you’re about to turn, change lanes or stop. When
towing
a trailer, the green arrows on your
instrument panel will flash for turns even if the bulbs
on
the trailer are burned out. Thus, you may think drivers
behind you are seeing your signal when they are not. It’s
important
to check occasionally to be sure the trailer
bulbs are still working.
Driving On Grades
Reduce speed and shift to a lower gear before you start
down a long or steep downgrade. If
you don’t shift
down, you might have to use your brakes
so much that
they would get hot and
no longer work well.
On a long uphill grade, shift down and reduce your
speed to around
45 mph (70 km/h) to reduce the
possibility
of engine and transmission overheating.
When towing at high altitude on steep uphill grades,
consider the following: Engine coolant will boil at a
lower temperature than at normal altitudes. If you turn
your engine off immediately after towing at high altitude
on steep uphill grades, your vehicle may show signs
similar to engine overheating.
To avoid this, let the
engine run while parked (preferably on level ground)
with the automatic transmission in
PARK (P) for a few
minutes before turning
the engine off. If you do get the
overheat warning, see “Engine Overheating” in
the Index.
4-35
Page 267 of 372

Headlamps
Sealed Beam Lamps
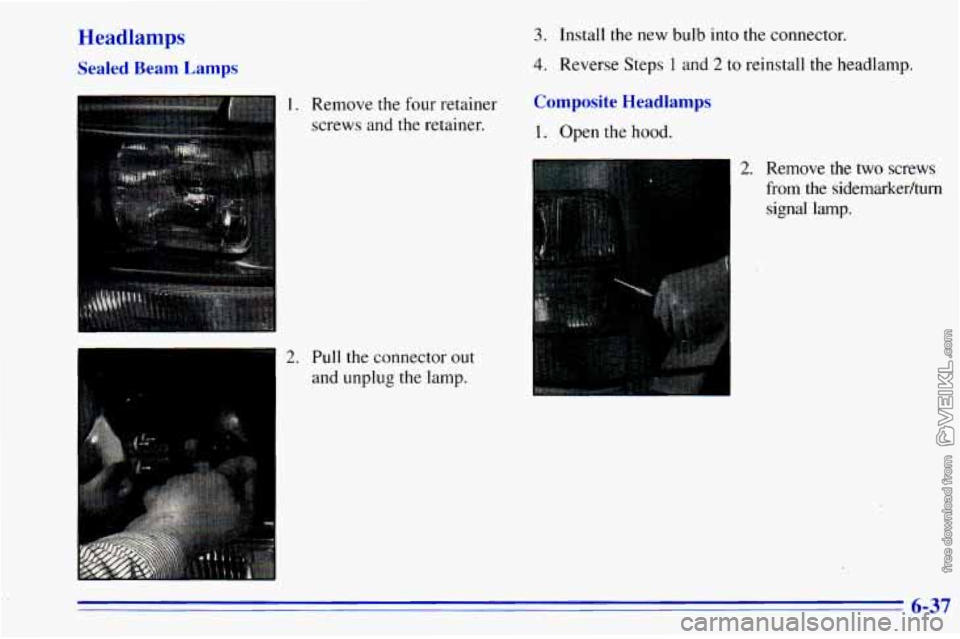
1. Remove the four retainer
screws and the retainer.
2. Pull the connector out
and unplug the lamp.
3. Install the new bulb into the connector.
4. Reverse Steps 1 and 2 to reinstall the headlamp.
Composite Headlamps
1. Open the hood.
1
2. Remove the two screws
from the sidemarkedturn signal lamp.
6-37
Page 270 of 372

Front Turn Signal -Lamps Taillamps
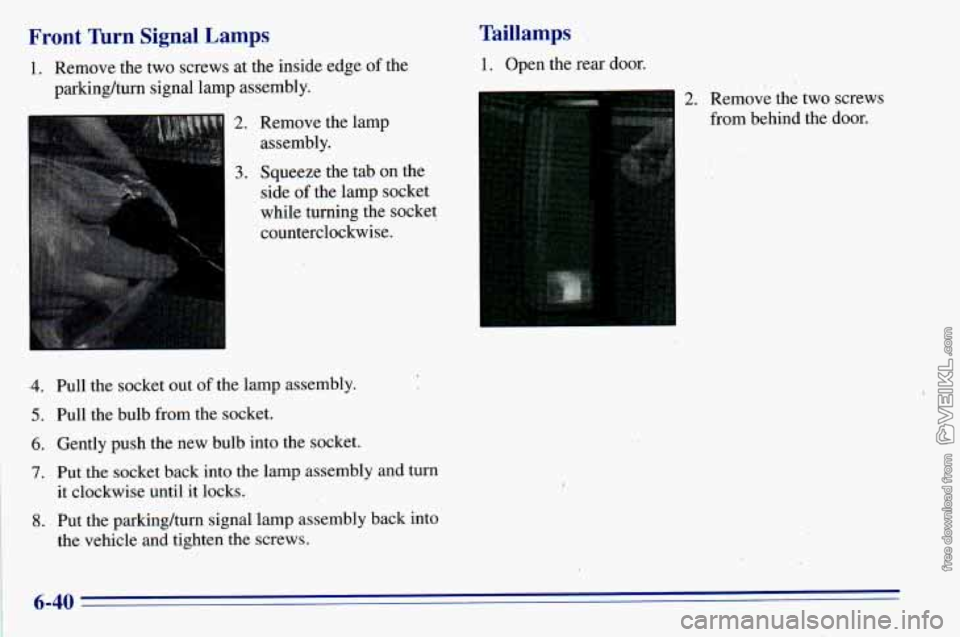
1. Remove
the two screws at the inside edge of the 1. Open the rear door.
parking/turn signal lamp assembly.
2. Remove the lamp
assembly.
2. Remove the two screws
from behind the door.
3
3. Squeeze the tab on the
side
of the lamp socket
while turning the socket
I
counterclockwise.
.4. Pull the socket out of the lamp assembly.
5. Pull the bulb from the socket.
6. Gently push the new bulb into the socket.
7. Put-the socket back into the lamp assembly and turn
it clockwise until it locks.
8. Put the parking/turn signal lamp assembly back into
the vehicle and tighten the screws.
6-40
Page 296 of 372

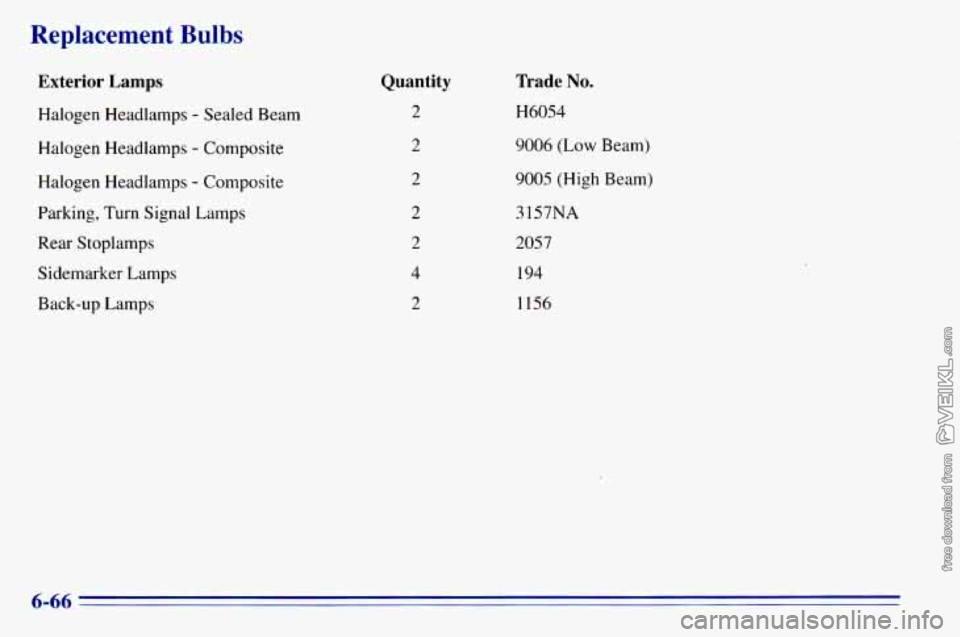
Replacement Bulbs
Exterior Lamps
Halogen Headlamps - Sealed Beam
Halogen Headlamps
- Composite
Halogen Headlamps
- Composite
Parking, Turn Signal Lamps
Rear Stoplamps
Sidemarker Lamps
Back-up Lamps
Quantity
2
2
2
2
2
4
2
Trade No.
H6054
9006 (Low Beam)
9005 (High Beam)
3 157NA
2057
194
1156
6-66
Page 364 of 372

Finish Damage ................................. 6-56
First Gear
..................................... 2-20
Flashers. Hazard Warning
......................... 5-1
Flat Tire. Changing ............................. 5-23
Fluid Capacities
................................ 6-67
Fluids and Lubricants
............................ 7-47
Foreign Countries. Fuel
........................... 6-4
French Language Manual
11
Front Axle .................................... 6-24
Front Storage Area
.............................. 2-40
Front Towing
.............................. 5-9. 5- 10
Front Turn Signal Lamp Bulb Replacement .......... 6-40
Fuel
.......................................... 6-3
Canada
...................................... 6-3
Filling Your Tank
.............................. 6-5
Gage
....................................... 2-63
In Foreign Countries
........................... 6-4
Regulator
................................... 2-16
Fuses
and Circuit Breakers ....................... 6-61
Gages
.. ...........................
Engine Coolant Temperature .................... 2-62
Engine Oil Pressure
........................... 2-60
Fuel
....................................... 2-63
Garage Door Opener
............................ 2-43
Gear Positions. Automatic Transmission
............. 2- 18
GloveBox .................................... 2-40
Gross Axle Weight Rating
........................ 4-26
Gross Vehicle Weight Rating
...................... 4-26
Guide en FranGais
11
GVWR ....................................... 4-26
GAWR
....................................... 4-26
.. .................................
Halogen
Bulbs ................................ 6-36
Hatch Release
.................................. 2-11
Hazard Warning Flashers .......................... 5-1
Head Restraints ................................. 1-5
Headlamps .................................... 2-35
Bulb Replacement
............................ 6-36
Highkow Beam Changer
...................... 2-30
OnReminder
................................ 2-36
Wiring
..................................... 6-60
Hearing Impaired. Customer Assistance
.............. 8-3
Heating ........................................ 3-5
High-Beam Headlamps
.......................... 2-30
Highway Hypnosis
.............................. 4-20
Hill and Mountain Roads
......................... 4-20
Hitches. Trailer
................................. 4-32
Hood Checking Things Under
......................... 6-7
Prop
....................................... 6-10
Release
...................................... 6-8
Horn
......................................... 2-29
Hydroplaning
.................................. 4-16
Ignition Positions
.............................. 2-14
Inflation. Tire
.................................. 6-43
Inside Daymight Rearview Mirror
................. 2-38
Inspections
.................................... 7-45
Brakesystem
................................ 7-46
Drive Axle
.................................. 7-46
Exhaust Systems
............................. 7-45
Radiator and Heater Hose
...................... 7-45
Steering
.................................... 7-45
Suspension
.................................. 7-45
Throttle Linkage
.............................. 7-45
9-4