1996 CADILLAC FLEETWOOD buttons
[x] Cancel search: buttonsPage 108 of 306
Downloaded from www.Manualslib.com manuals search engine This device complies with Part 15 of the FCC Rules.
Operation is subject to the following two conditions:
(1) Th~s device may not cause harmful interference, and
(2) This device must accept any interference received,
including interference that may cause undesired operation.
Programming the Transmitter
Do not use the transmitter with any garage door opener
that does not have the “stop and reverse’’ safety feature.
This includes any garage door opener model
manufactured before April
1, 1982.
Be sure that people and objects are clear of the garage
door
you are programming!
Your vehicle’s engine should be turned off while
programming your transmitter. Follow these steps to
program up to three channels:
1. If you have not previously programmed a channel,
proceed to Step
2. Otherwise, hold down the two
outside buttons on the transmitter until the red light
begins to flash rapidly (approximately
20 seconds).
Then release the buttons. This procedure initializes
the memory and erases any previous settings for all
three channels.
2. Hold the end of your hand-held transmitter against
the bottom surface
of the transmitter so that you can
still see the red light.
3. Decide which one of the three channels you want to
program. Using both hands, press the hand-held
transmitter button and the desired button on the
transmitter. Continue to hold both buttons through
Step
4.
4. Hold down both buttons until you see the red light
on the transmitter flash rapidly. The rapid flashing,
which could take up to
90 seconds, indicates that the
transmitter has been programmed. Release both
buttons once the light starts to flash rapidly.
If you have trouble programming the transmitter, make
sure that you have followed the directions exactly as
described and that the batteries in the hand-held
transmitter
are not dead. If you still cannot program it,
rotate your hand-held transmitter end over end and try
again. The transmitter may not work with older garage
door openers that do not meet current Federal Consumer
Safety Standards. If you cannot program the transmitter
after repeated attempts, consult your Cadillac dealer.
Be sure to keep your original hand-held transmitter in
case you need to erase and reprogram the transmitter.
Page 109 of 306
Downloaded from www.Manualslib.com manuals search engine Note to Canadian Owners: During programming, your
hand-held transmitter may stop transmitting after one or
two seconds.
If you are programming from one of these
transmitters, the indicator light may prompt you to
re-activate your hand-held transmitter with a series of double blinks. After you re-activate your hand-held
transmitter, the light should flash rapidly. If it flashes
slowly, continue to periodically re-activate your
hand-held transmitter until the light flashes rapidly.
Operating the Transmitter
Press and hold the appropriate button on the Universal
transmitter. The red light comes on while the signal
is
being transmitted.
Note that the effective transmission range of the
transmitter may differ from your hand-held transmitter
and
from one channel to another.
Erasing Channels
To erase all three programmed channels, hold down the
two outside buttons until the red light begins to flash.
Individual channels cannot be erased, but can be
reprogrammed using the procedure for programming the
transmitter explained earlier.
Accessories
Accessories for your Universal Transmitter are available
from the manufacturer
of the unit. If you would like
additional information please call 1-800-355-3515.
2-50
Page 132 of 306
Downloaded from www.Manualslib.com manuals search engine AM-FM Stereo with Cassette Player
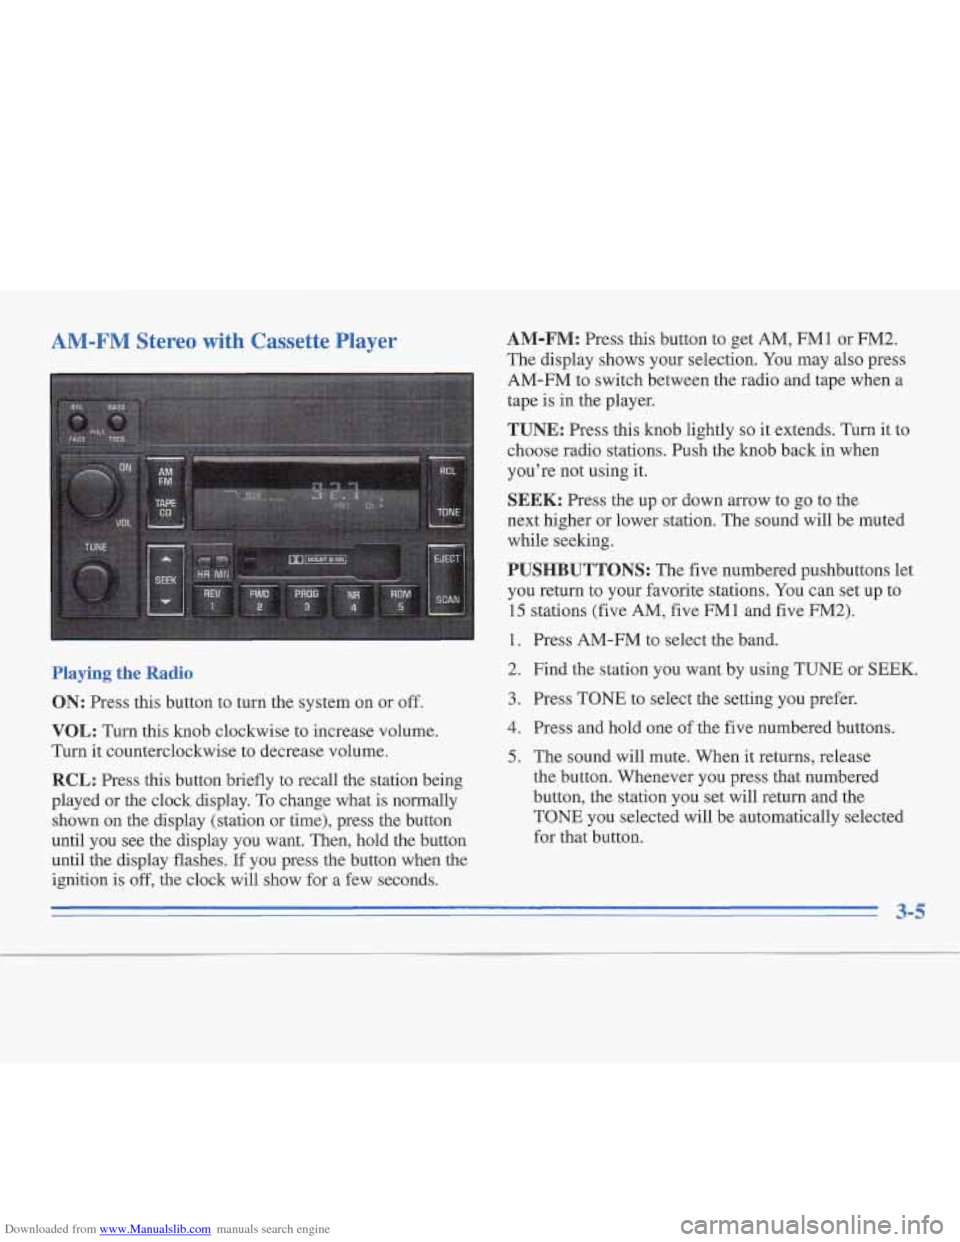
Playing the Radio
ON: Press this button to turn the system on or off.
VOL: Turn this knob clockwise to increase volume.
Turn it counterclockwise to decrease volume.
RCL: Press this button briefly to recall the station being
played or the clock display. To change what is normally
shown
on the display (station or time), press the button
until you see the display you want. Then, hold the button
until the display flashes.
If you press the button when the
ignition
is off, the clock will show for a few seconds.
AM-FM: Press this button to get AM, FM1 or FM2.
The display shows your selection. You may also press
AM-FM to switch between the radio and tape when a
tape
is in the player.
TUNE: Press this knob lightly so it extends. Turn it to
choose radio stations. Push the knob back in when
you’re not using it.
SEEK: Press the up or down arrow to go to the
next higher or lower station. The sound will be muted
while seeking.
PUSHBUTTONS: The five numbered pushbuttons let
you return to your favorite stations. You can set up to
15 stations (five AM, five FMl and five FM2).
1. Press AM-FM to select the band.
2. Find the station you want by using TUNE or
SEEK.
3. Press TONE to select the setting you prefer.
4. Press and hold one of the five numbered buttons.
5. The sound will mute. When it returns, release
the button. Whenever you press that numbered
button,
the station you set will return and the
TONE you selected will be automatically selected
for that button.
3-5
Page 136 of 306
Downloaded from www.Manualslib.com manuals search engine RCL: Press this button briefly to recall the station being
played or
the clock display. To change what is normally
shown on
the display (station or time), press the button
until you see the &splay you want. Then, hold the button
until the display flashes.
If you press the button when the
ignition is
off, the clock will show for a few seconds.
AM-FM: Press this button to get AM, FMl or FM2.
The display shows your selection. You may also press
AM-FM to switch between the radio and tape when a
tape is in the player.
TUNE: Press this knob lightly so it extends. Turn it to
choose radio stations. Push the knob back in when
you're not using it.
SEEK: Press the up or down arrow to go to the
next higher or lower station. The sound will be muted
while seeking.
PUSHBUTTONS: The five numbered pushbuttons let
you return to your favorite stations. You can set up to
15 stations (five AM, five FM1 and five
FM2).
1. Press AM-FM to select the band.
2. Find the station you want by using TUNE or SEEK.
3. Press TONE to select the setting you prefer.
4. Press and hold one of the five numbered buttons.
5. The sound will mute. When it returns, release
the button. Whenever you press that numbered
button, the station you set will return and the
TONE you selected will be automatically selected
for that button.
TONE: This feature allows you to choose preset treble
and bass equalization settings designed for jazz, vocal,
pop, rock and classical stations. JAZZ will appear on the
display when you first press TONE. Each time you press
it, another setting will appear on the display. Press
it
again after classic appears, and MANUAL will appear.
Tone control will return to the TREB and BASS knobs.
Also, if you use the TREB and BASS knobs, control
will return to them and MANUAL will appear.
SCAN: Press and release this button to listen to stations
for a few seconds. The radio will go to a station, stop for
a few seconds, then go on to the next station. Press
SCAN again to stop scanning. The sound will be muted
while scanning, and SCAN will appear on the display.
If
you press SCAN for more than two seconds, the radio
will change to PSCAN mode. PSCAN will appear on
the display.
PSCAN: Press SCAN for more than two seconds for
PSCAN to appear
on the display. The radio will go to the
first preset station, stop for a few seconds, then go to the
next preset station. Press SCAN again to stop scanning.
3-9
Page 141 of 306
Downloaded from www.Manualslib.com manuals search engine 4. Press the 1 and 4 buttons together. Hold them down
until
--- shows on the display. Next you will use the
secret code number which you have written down.
5. Press MN and
000 will appear on the display.
6. Press MN again to make the last two digits agree
with your code.
7. Press HR to make the first one or two digits agree
8. Press AM-FM after you have confirmed that the
with your
code.
code matches the secret code you have written down.
The display will show REP to let you know that you
need to repeat Steps
5 through 7 to confirm your
secret code.
9. Press AM-FM and this time the display will show
SEC to let you know that your radio is secure. The
indicator by the volume control will begin flashing
when the ignition is turned
off.
Unlocking the Theft-Deterrent Feature After a
Power Loss
Enter your secret code as follows; pause no more than
15 seconds between steps:
1.
LOC appears when the ignition is on.
2. Press MN and 000 will appear on the display.
3. Press MN again to make the last two digits agree
with your code.
4. Press HR to make the first one or two digits agree
5. Press AM-FM after you have confirmed that the
with your
code.
code matches the secret code you have written down.
The display will show
SEC, indicating the radio is
now operable and secure.
If you enter the wrong code eight times, INOP will
appear on the display.
You will have to wait an hour
with the ignition
on before you can try again. When you
try again, you will only have three chances to enter the
correct code before
INOP appears.
If you lose or forget your code, contact your dealer.
3-14
Page 142 of 306
Downloaded from www.Manualslib.com manuals search engine Disabling the Theft-Deterrent Feature
Enter your secret code as follows; pause no more than
15 seconds between steps:
1.
2.
3.
4.
5.
6.
7.
Turn the ignition to the ACCESSORY or
RUN position.
Turn the radio off.
Press the
1 and 4 buttons together. Hold them down
until SEC shows
on the display.
Press
MN and 000 will appear on the display.
Press
MN again to make the last two digits agree
with your code.
Press
HR to make the first one or two digits agree
with your code.
Press
AM-FM after you have confirmed that the
code matches the secret code you have written down.
The display will show
---, indicating that the radio is
no longer secured.
If the code entered is incorrect, SEC will appear on the
display. The radio will remain secured until the correct
code is entered.
When battery power
is given to a secured radio, the
radio won’t turn on and LOC will appear on the display.
Understanding Radio Reception
FM Stereo
FM stereo will give you the best sound. But FM signals
will reach only about
10 to 40 miles (16 to 65 km). Tall
buildings or hills can interfere with FM signals, causing
the sound to come and go.
AM
The range for most AM stations is greater than for FM,
especially at night. The longer range, however, can
cause stations
to interfere with each other. AM can pick
up noise from things like storms and power lines.
Try
reducing the treble to reduce this noise if you ever get it.
3-15