1996 CADILLAC FLEETWOOD manual transmission
[x] Cancel search: manual transmissionPage 177 of 306
Downloaded from www.Manualslib.com manuals search engine Your vehicle can tow a trailer if it is equipped with
proper towing equipment. To identify what the vehicle
trailering capacity is for your vehicle, you should read
the information in “Weight of the Trailer” that appears
later in this section. But trailering is different than just
driving your vehicle by itself. Trailering means changes
in handling, durability, and fuel economy. Successful,
safe trailering takes correct equipment, and it has to be
used properly.
That’s the reason for this part. In it
are many
time-tested, important trailering tips and safety rules.
Many of these are important for your safety and that of
your passengers.
So please read this section carefully
before you pull a trailer.
Your Cadillac is a passenger vehicle. Trailer towing can
change the way your vehicle performs on the road. The
loads and forces created when trailering subject the
vehicle to significant levels of stress.
Load-pulling components such as the engine, transmission, rear axle, wheel assemblies and tires are
forced to work harder against the drag
of the added
weight. The engine is required to operate at relatively
higher speeds and under greater loads, generating extra
heat. What’s more, the trailer adds considerably to wind
resistance, increasing the pulling requirements.
If You Do Decide To Pull A Trailer
If you do, here are some important points:
0
0
e
0
0
There are many different laws, including speed limit
restrictions, having to do with trailering. Make sure
your rig will be legal, not only where you live but
also where you’ll be driving.
A good source for this
information can be state
or provincial police.
You should always use a weight distributing
(equalizing) hitch if your trailer will weigh more
than 3,000 lbs. (1 362 kg). Consider using sway
control if your loaded trailer will weigh 3,000 lbs.
(1 362 kg) or more. You can ask a hitch dealer
about sway controls.
Consider using a sway control if your trailer will
weigh 2,000 lbs.
(900 kg) or less. You should always
use a sway control if your trailer will weigh more
than
2,000 lbs. (900 kg). You can ask a hitch dealer
about sway controls.
Trailers that weigh more than
1,000 lbs. (454 kg)
should be equipped with trailer brakes.
Surge brakes may be used on some trailers (e.g., boat
trailers). However, surge brakes do not work well with most sway control devices.
Do not use sway
control devices on trailers equipped with surge brakes.
4-32
Page 184 of 306
Downloaded from www.Manualslib.com manuals search engine Turn Signals When Towing a Trailer
When you tow a trailer, your vehicle may need a
different turn signal flasher and/or extra wiring.
Check with your Cadillac dealer.
The arrows on your instrument panel will flash
whenever you signal a turn or lane change. Properly
hooked up, the trailer lamps will also flash, telling other
drivers you’re about to turn, change lanes or stop.
When towing a trailer, the arrows on your instrument
panel will flash for turns even if
the bulbs on the trailer
are burned out. Thus, you may think drivers behind
you are seeing your signal when they are not. It’s
important to check occasionally to be sure the trailer
bulbs
are still working.
Driving On Grades
Reduce speed and shift to a lower gear before you start
down a long or steep downgrade. If you don’t shift
down, you might have to use your brakes
so much that
they would get hot and no longer work well.
On a long uphill grade,
shift down to a lower gear and
reduce your speed to around
45 mph (70 km/h) to reduce
the possibility of engine and transmission overheating.
If your trailer weighs more than 2,000 lbs. (900 kg), you
should drive in DRIVE
(D or 3) instead of
AUTOMATIC OVERDRIVE (@). This allows the
torque convertor clutch to engage and the transmission
to run cooler.
Parking on Hills
You really should not park your vehicle, with a trailer
attached, on a hill. If something goes wrong, your rig
could start to move. People can be injured, and both
’
your vehicle and the trailer can be damaged.
But if you ever have to park your rig on a hill, here’s
how to do
it:
1. Apply your regular brakes, but don’t shift into
2. Have someone place chocks under the downhill side
PARK
(P) yet.
of the trailer wheels.
3. When the wheel chocks are in place, release the
regular brakes until the chocks absorb the load.
4. Reapply the regular brakes. Then shift into
PARK (P) and apply the parking brake.
5. Release the regular brakes.
Page 185 of 306
Downloaded from www.Manualslib.com manuals search engine ’men You Are Ready to Leave After
Parking on a Hill
1. Apply your regular brakes and hold the pedal down
while you:
Start your engine;
Shift into a gear; and
Be sure the parking brake has released.
2. Let up on the brake pedal.
3. Drive slowly until the trailer is clear of the chocks.
4. Stop and have someone pick up and store the chocks.
Engine Cooling When Trailering
Your cooling system may temporarily overheat during
severe operating conditions such as:
Climbing grades steeper than four percent at
temperatures above
90°F (32°C) with a loaded
vehicle and trailer.
Stopping after high-speed driving.
Idling for long periods in stop-and-go traffic.
Maintenance When Trailer Towing
Your vehicle will need service more often when you’re
pulling a trailer. See the Maintenance Schedule for more
on this. Things that
are especially important in trailer
operation are automatic transmission fluid (don’t
overfill), engine oil, axle lubricant, belt, cooling system and brake adjustment. Each of these is covered in this
manual, and the Index will help you find them quickly.
If you’re trailering, it’s a good idea to review these
sections before
you start your trip.
Check periodically to see that all hitch nuts and bolts
are tight.
4-40
Page 193 of 306
Downloaded from www.Manualslib.com manuals search engine A CAUTION:
A vehicle can fall from a car carrier if it isn’t
adequately secured. This can cause a collision,
serious personal injury and vehicle damage. The
vehicle should be tightly secured with chains
or
steel cables before it is transported.
Don’t use substitutes (ropes, leather straps,
canvas webbing, etc.) that can be cut
by sharp
edges underneath the towed vehicle. Always use
T-hooks inserted in the T-hook slots. Never use
J-hooks. They will damage drivetrain and
suspension components.
When your vehicle is being towed, have the ignition key
OFF. The steering wheel should be clamped in a
straight-ahead position, with a clamping device
designed
for towing service. Do not use the vehicle’s
steering column
lock for,this. The transmission should
be in
NEUTRAL (N) and the parking brake released.
Page 225 of 306
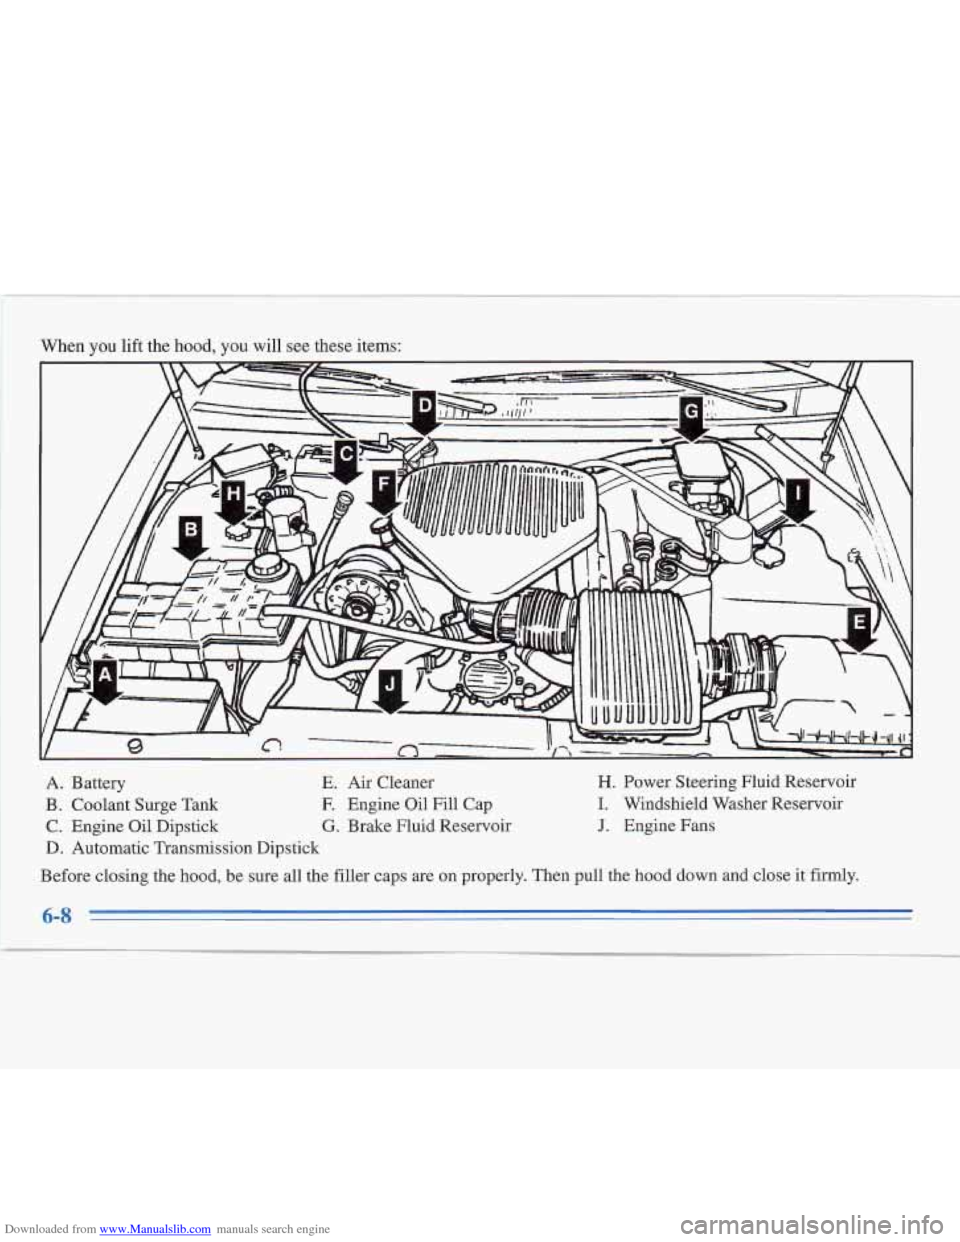
Downloaded from www.Manualslib.com manuals search engine When you lift the hood, you will see these items:
A. Battery E. Air Cleaner
B. Coolant Surge Tank E Engine Oil Fill Cap
C. Engine Oil Dipstick G. Brake Fluid Reservoir
D. Automatic Transmission Dipstick
H. Power Steering Fluid Reservoir
I. Windshield Washer Reservoir
J. Engine Fans
Before closing the hood, be sure all the filler caps are
on properly. Then pull the hood down and close it firmly.
Page 233 of 306
Downloaded from www.Manualslib.com manuals search engine ~~
~ Automatic Transmission -Fluid
When to Check and Change
A good time to check your automatic transmission fluid
level is when the engine oil is changed.
Change both the fluid and filter every
50,000 miles
(83
000 km) if the vehicle is mainly driven under one or
more of these conditions:
0 In heavy city traffic where the outside temperature
0 In hilly or mountainous terrain.
0 When doing frequent trailer towing.
0 Uses such as found in taxi, police or delivery service.
If you do not use your vehicle under any of these
conditions, the fluid and filter do not require changing.
See "Scheduled Maintenance Services" in the Index.
regularly reaches
90°F (32"
C) or higher.
How to Check
Because this operation can be a little difficult, you may
choose to have this done at your Cadillac dealership Service Department.
If you do it yourself, be sure to follow all the
instructions here, or you could get a false reading on
the dipstick.
NOTICE:
Too much or too little fluid can damage your
transmission.
Too much can mean that some of
the fluid could come out and fall
on hot engine
parts or exhaust system parts, starting a fire. Be
sure to get an accurate reading if you check your
transmission fluid.
Wait at least 30 minutes before checking the
transmission fluid level if you have been driving:
0 When outside temperatures are above 90°F (32" C).
0 At high speed for quite a while.
0 In heavy traffic -- especially in hot weather.
While pulling a trailer.
To get the right reading, the fluid should be at normal
operating temperature, which is
180 OF to 200 OF
(82°C to 93°C).
6-16
Page 236 of 306
Downloaded from www.Manualslib.com manuals search engine How to Add Fluid Rear Axle
Refer to the Maintenance Schedule to determine what
kind of transmission fluid to use. See “Recommended
Fluids and Lubricants” in the Index.
Add fluid
only after checking the transmission fluid
HOT. (A COLD check is used only as a reference.) If
the fluid level is low, add only enough
of the proper
fluid to bring the level up to the
HOT area for a hot
check. It doesn’t take much fluid, generally less than a
pint
(OSL). Don ’t overfiill. We recommend you use only
fluid labeled DEXRON@-III, because fluid with that
label is made especially for your automatic transmission.
Damage caused by fluid other than DEXRON-111 is not
covered
by your new vehicle warranty.
After adding fluid, recheck the fluid level as
described under “How to Check.”
When the correct fluid level is obtained, push the
dipstick back in all the way; then flip the handle
down to lock the dipstick in place.
When to Check and Change Lubricant
Refer to the Maintenance Schedule to determine how
often to check the lubricant and when to change it. See
“Scheduled Maintenance Services” in the Index.
How to Check Lubricant
If the level is below the bottom of the filler plug hole,
you’ll need to add some lubricant. Add enough lubricant
to raise the level to the bottom of the filler plug hole.
What to Use
Use Axle Lubricant (GM Part No. 1052271) or
SAE 8OW-90 GL-5 gear lubricant.
6-19
Page 279 of 306

Downloaded from www.Manualslib.com manuals search engine I
FUSE USAGE CHART
91 LEVEL CONTROL I
zuu *P U
Fuse
1
2
3
5
6
7
Usage
Circuit Breakers: 3,4; I/P Fuses: 36,37, 38,
39,40
Circuit Breaker: 2;
UP Fuses: 21,22,26,27,
28,29,33,34,35
Concealed Fuse;
I/P Fuses: 8,9, 10, 11, 12,
13, 14, 15,24; Underhood Electrical Center:
15, 16, 17, 18
ABS/TCS Brake Pressure Modulator Valve
ABS/TCS Brake Pressure Modulator Valve
Secondary Engine Cooling EmRelay 16
17
18
A C
6-62
Fuse
8
9
10
11
13
14
15
Usage
Primary Engine Cooling Fan Relay
Automatic Level Control Air Compressor
Engine Compartment Fuses: 13, 14
Circuit Breaker:
5; I/P Fuses: 31, 32
Fuel Pump Relay, Powertrain Control
Module (PCM)
Secondary Air Injection (AIR) Pump Relay
rowertrain Control Module (PCM),
Ignition Coil
Fuel Injectors Cylinders 1,4, 6,7
Exhaust Gas Recirculation (EGR), Vacuum
Control Signal Solenoid Valve, Secondary
Air Injection (AIR), Pump Relay (Coil), Mass
Air Flow Sensor, Electronic Transmission,
Left and Right Heated Oxygen Sensors,
Evaporative Emission (EVAP) Canister Purge
Solenoid Valve
Fuel Injectors Cylinders 2, 3,
5, 8
A/C Compressor Relay
Secondary Air Injection (AIR) Pump Relay