Page 17 of 35
26-12
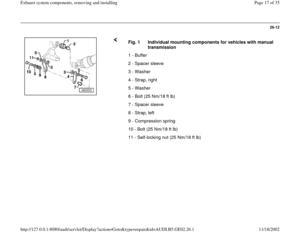
Fig. 1 Individual mounting components for vehicles with manual
transmission
1 - Buffer
2 - Spacer sleeve
3 - Washer
4 - Strap, right
5 - Washer
6 - Bolt (25 Nm/18 ft lb)
7 - Spacer sleeve
8 - Strap, left
9 - Compression spring
10 - Bolt (25 Nm/18 ft lb)
11 - Self-locking nut (25 Nm/18 ft lb)
Pa
ge 17 of 35 Exhaust s
ystem com
ponents, removin
g and installin
g
11/18/2002 htt
p://127.0.0.1:8080/audi/servlet/Dis
play?action=Goto&t
yp
e=re
pair&id=AUDI.B5.GE02.26.1
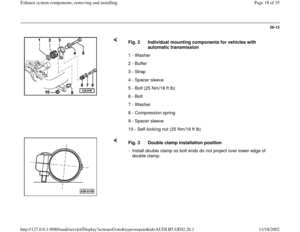
Page 18 of 35
26-13
Fig. 2 Individual mounting components for vehicles with
automatic transmission
1 - Washer
2 - Buffer
3 - Strap
4 - Spacer sleeve
5 - Bolt (25 Nm/18 ft lb)
6 - Bolt
7 - Washer
8 - Compression spring
9 - Spacer sleeve
10 - Self-locking nut (25 Nm/18 ft lb)
Fig. 3 Double clamp installation position
- Install double clamp so bolt ends do not project over lower edge of
double clamp.
Pa
ge 18 of 35 Exhaust s
ystem com
ponents, removin
g and installin
g
11/18/2002 htt
p://127.0.0.1:8080/audi/servlet/Dis
play?action=Goto&t
yp
e=re
pair&id=AUDI.B5.GE02.26.1
Page 19 of 35
26-14
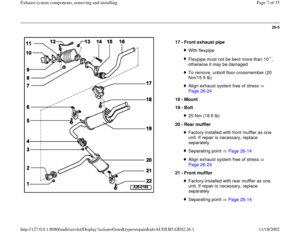
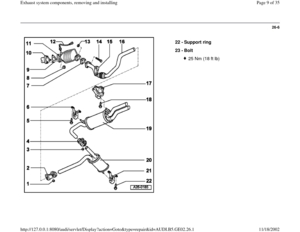
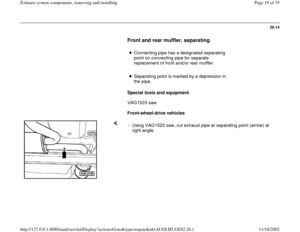
Front and rear muffler, separating
Connecting pipe has a designated separating
point on connecting pipe for separate
replacement of front and/or rear muffler.
Separating point is marked by a depression in
the pipe.
Special tools and equipment
VAG1523 saw
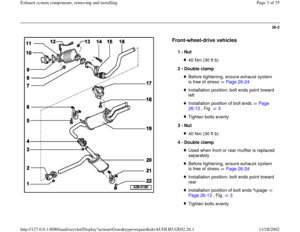
Front-wheel-drive vehicles
- Using VAG1523 saw, cut exhaust pipe at separating point (arrow) at
right angle.
Pa
ge 19 of 35 Exhaust s
ystem com
ponents, removin
g and installin
g
11/18/2002 htt
p://127.0.0.1:8080/audi/servlet/Dis
play?action=Goto&t
yp
e=re
pair&id=AUDI.B5.GE02.26.1
Page 20 of 35
26-15
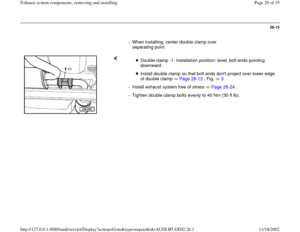
- When installing, center double clamp over
separating point.
Double clamp -1- installation position: level, bolt ends pointing
downward
Install double clamp so that bolt ends don't project over lower edge
of double clamp Page 26
-13
, Fig. 3
- Install exhaust system free of stress Page 26
-24
.
- Tighten double clamp bolts evenly to 40 Nm (30 ft lb).
Pa
ge 20 of 35 Exhaust s
ystem com
ponents, removin
g and installin
g
11/18/2002 htt
p://127.0.0.1:8080/audi/servlet/Dis
play?action=Goto&t
yp
e=re
pair&id=AUDI.B5.GE02.26.1
Page 21 of 35
26-16
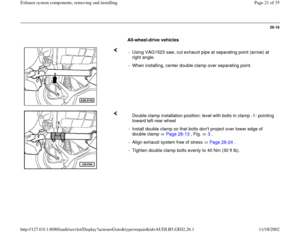
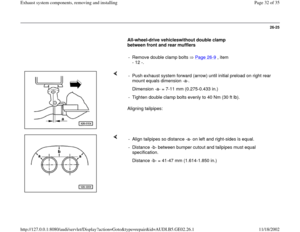
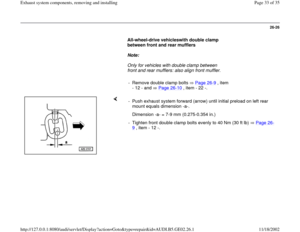
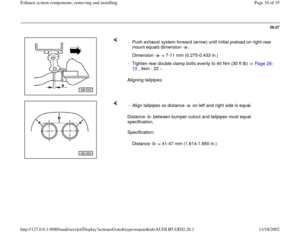
All-wheel-drive vehicles
- Using VAG1523 saw, cut exhaust pipe at separating point (arrow) at
right angle.
- When installing, center double clamp over separating point.
Double clamp installation position: level with bolts in clamp -1- pointing
toward left-rear wheel
- Install double clamp so that bolts don't project over lower edge of
double clamp Page 26
-13
, Fig. 3
.
- Align exhaust system free of stress Page 26
-24
.
- Tighten double clamp bolts evenly to 40 Nm (30 ft lb).
Pa
ge 21 of 35 Exhaust s
ystem com
ponents, removin
g and installin
g
11/18/2002 htt
p://127.0.0.1:8080/audi/servlet/Dis
play?action=Goto&t
yp
e=re
pair&id=AUDI.B5.GE02.26.1
Page 22 of 35
26-17
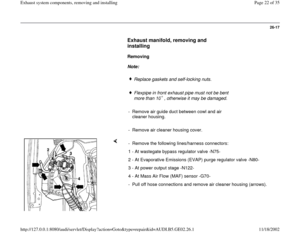
Exhaust manifold, removing and
installing
Removing
Note:
Replace gaskets and self-locking nuts.
Flexpipe in front exhaust pipe must not be bent
more than 10 , otherwise it may be damaged.
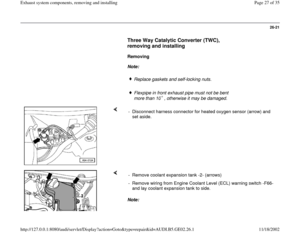
- Remove air guide duct between cowl and air
cleaner housing.
- Remove air cleaner housing cover.
- Remove the following lines/harness connectors:
1 - At wastegate bypass regulator valve -N75-
2 - At Evaporative Emissions (EVAP) purge regulator valve -N80-
3 - At power output stage -N122-
4 - At Mass Air Flow (MAF) sensor -G70-
- Pull off hose connections and remove air cleaner housing (arrows).
Pa
ge 22 of 35 Exhaust s
ystem com
ponents, removin
g and installin
g
11/18/2002 htt
p://127.0.0.1:8080/audi/servlet/Dis
play?action=Goto&t
yp
e=re
pair&id=AUDI.B5.GE02.26.1
Page 23 of 35
26-18
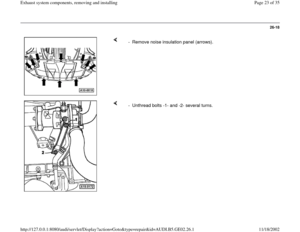
- Remove noise insulation panel (arrows).
- Unthread bolts -1- and -2- several turns.
Pa
ge 23 of 35 Exhaust s
ystem com
ponents, removin
g and installin
g
11/18/2002 htt
p://127.0.0.1:8080/audi/servlet/Dis
play?action=Goto&t
yp
e=re
pair&id=AUDI.B5.GE02.26.1
Page 24 of 35
26-19
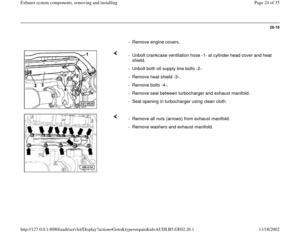
- Remove engine covers.
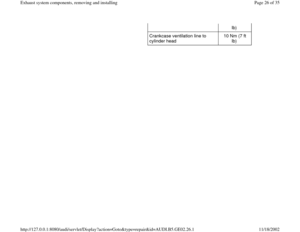
- Unbolt crankcase ventilation hose -1- at cylinder head cover and heat
shield.
- Unbolt both oil supply line bolts -2-.
- Remove heat shield -3-.
- Remove bolts -4-.
- Remove seal between turbocharger and exhaust manifold.
- Seal opening in turbocharger using clean cloth.
- Remove all nuts (arrows) from exhaust manifold.
- Remove washers and exhaust manifold.
Pa
ge 24 of 35 Exhaust s
ystem com
ponents, removin
g and installin
g
11/18/2002 htt
p://127.0.0.1:8080/audi/servlet/Dis
play?action=Goto&t
yp
e=re
pair&id=AUDI.B5.GE02.26.1


7 - Spacer sl")

6 - Bolt
7 - Washer
8 - Comp")


 at
right angle.
- When installing, center double clamp over separating point.")

.
- Unthread bolts -1- and -2- several turns.
Pa
ge 23 of 35 Exhaust s
ystem com
ponents, removin
g and installin
g
11/18/2002 htt
p://127.0")
