Page 17 of 35
15-17
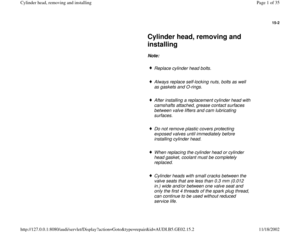
Cylinder head cover, removing and
installing
Removing
- Remove engine covers.
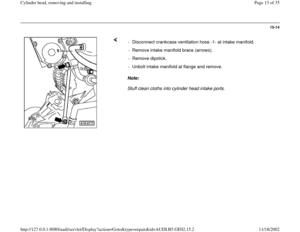
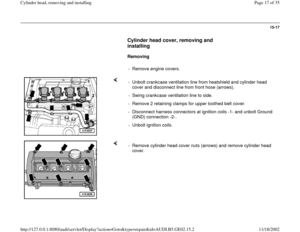
- Unbolt crankcase ventilation line from heatshield and cylinder head
cover and disconnect line from front hose (arrows).
- Swing crankcase ventilation line to side.
- Remove 2 retaining clamps for upper toothed belt cover.
- Disconnect harness connectors at ignition coils -1- and unbolt Ground
(GND) connection -2-.
- Unbolt ignition coils.
- Remove cylinder head cover nuts (arrows) and remove cylinder head
cover.
Pa
ge 17 of 35 C
ylinder head, removin
g and installin
g
11/18/2002 htt
p://127.0.0.1:8080/audi/servlet/Dis
play?action=Goto&t
yp
e=re
pair&id=AUDI.B5.GE02.15.2
Page 18 of 35
15-18
Installing
Installation is the reverse of removal, noting the
following:
Note:
Replace cylinder head cover gaskets if damaged.
CAUTION!
Part numbers are listed here for reference only. Always check with
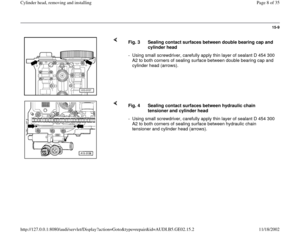
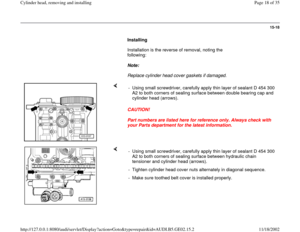
your Parts department for the latest information. - Using small screwdriver, carefully apply thin layer of sealant D 454 300
A2 to both corners of sealing surface between double bearing cap and
cylinder head (arrows).
- Using small screwdriver, carefully apply thin layer of sealant D 454 300
A2 to both corners of sealing surface between hydraulic chain
tensioner and cylinder head (arrows).
- Tighten cylinder head cover nuts alternately in diagonal sequence.
- Make sure toothed belt cover is installed properly.
Pa
ge 18 of 35 C
ylinder head, removin
g and installin
g
11/18/2002 htt
p://127.0.0.1:8080/audi/servlet/Dis
play?action=Goto&t
yp
e=re
pair&id=AUDI.B5.GE02.15.2
Page 19 of 35
15-19
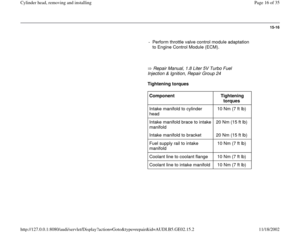
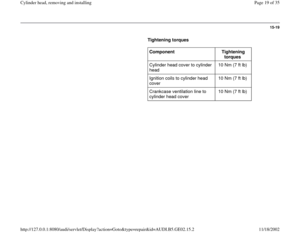
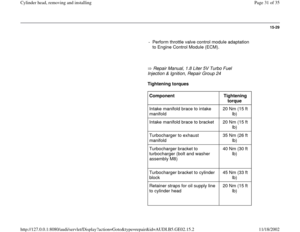
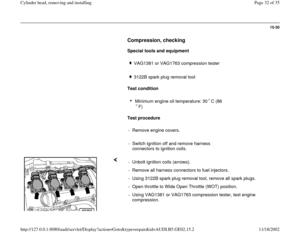
Tightening torques
Component
Tightening
torques
Cylinder head cover to cylinder
head 10 Nm (7 ft lb)
Ignition coils to cylinder head
cover 10 Nm (7 ft lb)
Crankcase ventilation line to
cylinder head cover 10 Nm (7 ft lb)
Pa
ge 19 of 35 C
ylinder head, removin
g and installin
g
11/18/2002 htt
p://127.0.0.1:8080/audi/servlet/Dis
play?action=Goto&t
yp
e=re
pair&id=AUDI.B5.GE02.15.2
Page 20 of 35
15-20
Cylinder head, removing
Engine installed
Lock carrier in service position Page 13
-1
Note:
Secure all hose connections with original
equipment clamps parts catalog.
All tie wraps opened or cut during removal must
be reinstalled at the same locations.
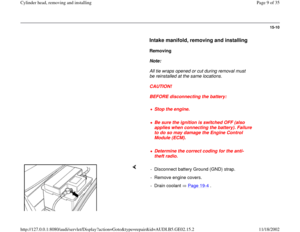
CAUTION!
BEFORE disconnecting the battery:
Stop the engine.
Be sure the ignition is switched OFF (also
applies when connecting the battery). Failure
to do so may damage the Engine Control
Module (ECM).
Determine the correct coding for the anti-
theft radio.
Pa
ge 20 of 35 C
ylinder head, removin
g and installin
g
11/18/2002 htt
p://127.0.0.1:8080/audi/servlet/Dis
play?action=Goto&t
yp
e=re
pair&id=AUDI.B5.GE02.15.2
Page 21 of 35
15-21
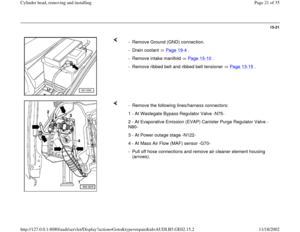
- Remove Ground (GND) connection.
- Drain coolant Page 19
-4 .
- Remove intake manifold Page 15
-10
.
- Remove ribbed belt and ribbed belt tensioner Page 13
-15
.
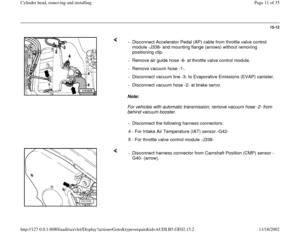
- Remove the following lines/harness connectors:
1 - At Wastegate Bypass Regulator Valve -N75-
2 - At Evaporative Emission (EVAP) Canister Purge Regulator Valve -
N80-
3 - At Power outage stage -N122-
4 - At Mass Air Flow (MAF) sensor -G70-
- Pull off hose connections and remove air cleaner element housing
(arrows).
Pa
ge 21 of 35 C
ylinder head, removin
g and installin
g
11/18/2002 htt
p://127.0.0.1:8080/audi/servlet/Dis
play?action=Goto&t
yp
e=re
pair&id=AUDI.B5.GE02.15.2
Page 22 of 35
15-22
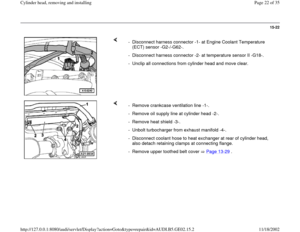
- Disconnect harness connector -1- at Engine Coolant Temperature
(ECT) sensor -G2-/-G62-.
- Disconnect harness connector -2- at temperature sensor II -G18-.
- Unclip all connections from cylinder head and move clear.
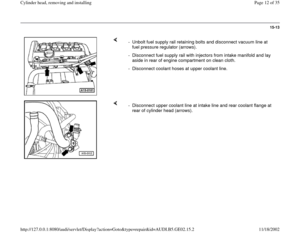
- Remove crankcase ventilation line -1-.
- Remove oil supply line at cylinder head -2-.
- Remove heat shield -3-.
- Unbolt turbocharger from exhaust manifold -4-.
- Disconnect coolant hose to heat exchanger at rear of cylinder head,
also detach retaining clamps at connecting flange.
- Remove upper toothed belt cover Page 13
-29
.
Pa
ge 22 of 35 C
ylinder head, removin
g and installin
g
11/18/2002 htt
p://127.0.0.1:8080/audi/servlet/Dis
play?action=Goto&t
yp
e=re
pair&id=AUDI.B5.GE02.15.2
Page 23 of 35
15-23
CAUTION!
Before removing toothed belt, note direction of rotation with chalk or
felt-tip marker. Reversing the direction of rotation of a used belt can
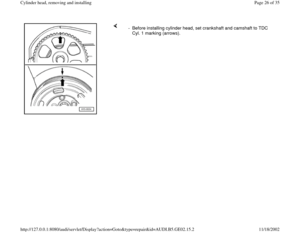
destroy the belt. - Turn crankshaft at central bolt of toothed belt gear in direction of engine
rotation to TDC Cyl. 1 marking (arrows).
Pa
ge 23 of 35 C
ylinder head, removin
g and installin
g
11/18/2002 htt
p://127.0.0.1:8080/audi/servlet/Dis
play?action=Goto&t
yp
e=re
pair&id=AUDI.B5.GE02.15.2
Page 24 of 35
15-24
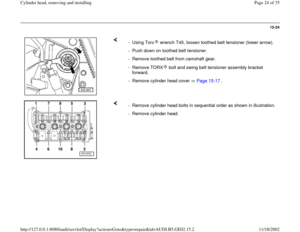
-
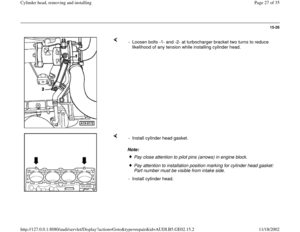
Using Torx wrench T45, loosen toothed belt tensioner (lower arrow).- Push down on toothed belt tensioner.
- Remove toothed belt from camshaft gear.
-
Remove TORX bolt and swing belt tensioner assembly bracket
forward. - Remove cylinder head cover Page 15
-17
.
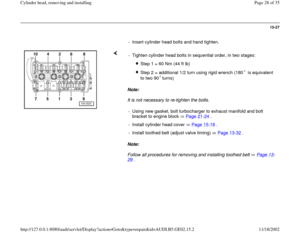
- Remove cylinder head bolts in sequential order as shown in illustration.
- Remove cylinder head.
Pa
ge 24 of 35 C
ylinder head, removin
g and installin
g
11/18/2002 htt
p://127.0.0.1:8080/audi/servlet/Dis
play?action=Goto&t
yp
e=re
pair&id=AUDI.B5.GE02.15.2


Ignition coils to cylinder head
cover 10 Nm (7 ft lb)
Crankcase v")

 connection.
- Drain coolant Page 19
-4 .
- Remove intake manifold Page 15
-10
.
- Remove ribbed belt and ribbed belt tensioner Page 13
-15
.
- Remove")
 sensor -G2-/-G62-.
- Disconnect harness connector -2- at temperature sensor II -G18-.
- Unclip all connections")

.- Push down on toothed belt tensioner.
- Remove toothed belt from camshaft gear.
-
Remove TORX bolt and swing be")