Page 9 of 35
26-6
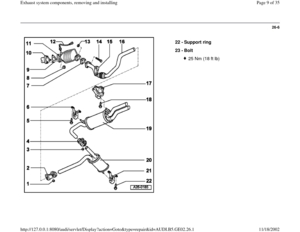
22 -
Support ring
23 -
Bolt
25 Nm (18 ft lb)
Pa
ge 9 of 35 Exhaust s
ystem com
ponents, removin
g and installin
g
11/18/2002 htt
p://127.0.0.1:8080/audi/servlet/Dis
play?action=Goto&t
yp
e=re
pair&id=AUDI.B5.GE02.26.1
Page 10 of 35
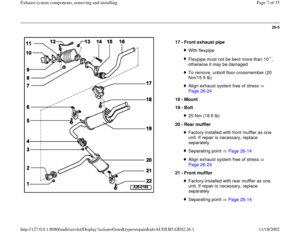
26-7
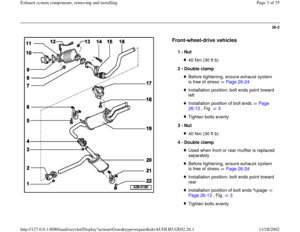
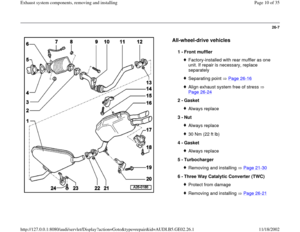
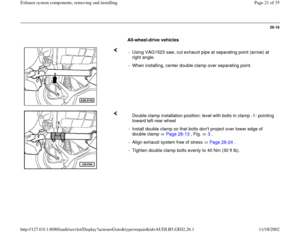
All-wheel-drive vehicles
1 -
Front muffler
Factory-installed with rear muffler as one
unit. If repair is necessary, replace
separately Separating point Page 26
-16
Align exhaust system free of stress
Page 26
-24
2 -
Gasket
Always replace
3 -
Nut Always replace30 Nm (22 ft lb)
4 -
Gasket Always replace
5 -
Turbocharger Removing and installing Page 21
-30
6 -
Three Way Catalytic Converter (TWC)
Protect from damageRemoving and installing Page 26
-21
Pa
ge 10 of 35 Exhaust s
ystem com
ponents, removin
g and installin
g
11/18/2002 htt
p://127.0.0.1:8080/audi/servlet/Dis
play?action=Goto&t
yp
e=re
pair&id=AUDI.B5.GE02.26.1
Page 11 of 35
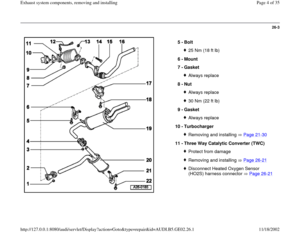
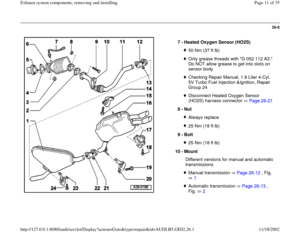
26-8
7 -
Heated Oxygen Sensor (HO2S)
50 Nm (37 ft lb)Only grease threads with "G 052 112 A3."
Do NOT allow grease to get into slots on
sensor body Checking Repair Manual, 1.8 Liter 4-Cyl.
5V Turbo Fuel Injection &Ignition, Repair
Group 24 Disconnect Heated Oxygen Sensor
(HO2S) harness connector Page 26
-21
8 -
Nut
Always replace25 Nm (18 ft lb)
9 -
Bolt 25 Nm (18 ft lb)
10 -
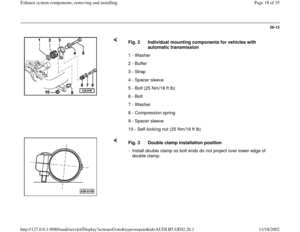
Mount
Different versions for manual and automatic
transmissions Manual transmission Page 26
-12
, Fig.
1
Automatic transmission Page 26
-13
,
Fig. 2
Pa
ge 11 of 35 Exhaust s
ystem com
ponents, removin
g and installin
g
11/18/2002 htt
p://127.0.0.1:8080/audi/servlet/Dis
play?action=Goto&t
yp
e=re
pair&id=AUDI.B5.GE02.26.1
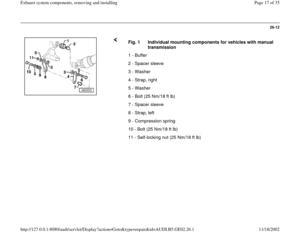
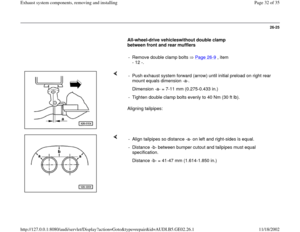
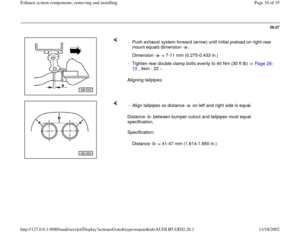
Page 12 of 35
26-9
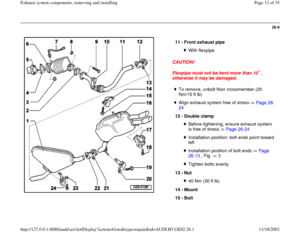
CAUTION!
Flexpipe must not be bent more than 10 ,
otherwise it may be damaged. 11 -
Front exhaust pipe
With flexpipe
To remove, unbolt floor crossmember (20
Nm/15 ft lb)
Align exhaust system free of stress Page 26
-
24
12 -
Double clamp
Before tightening, ensure exhaust system
is free of stress Page 26
-24
Installation position: bolt ends point toward
left Installation position of bolt ends Page 26
-13
, Fig. 3
Tighten bolts evenly
13 -
Nut 40 Nm (30 ft lb)
14 -
Mount
15 -
Bolt
Pa
ge 12 of 35 Exhaust s
ystem com
ponents, removin
g and installin
g
11/18/2002 htt
p://127.0.0.1:8080/audi/servlet/Dis
play?action=Goto&t
yp
e=re
pair&id=AUDI.B5.GE02.26.1
Page 13 of 35
25 Nm (18 ft lb)
Pa
ge 13 of 35 Exhaust s
ystem com
ponents, removin
g and installin
g
11/18/2002 htt
p://127.0.0.1:8080/audi/servlet/Dis
play?action=Goto&t
yp
e=re
pair&id=AUDI.B5.GE02.26.1
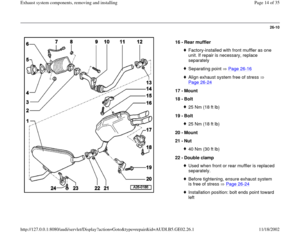
Page 14 of 35
26-10
16 -
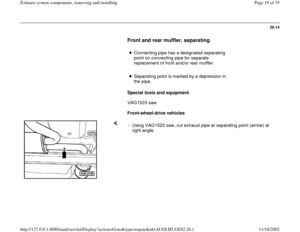
Rear muffler
Factory-installed with front muffler as one
unit. If repair is necessary, replace
separately Separating point Page 26
-16
Align exhaust system free of stress
Page 26
-24
17 -
Mount
18 -
Bolt
25 Nm (18 ft lb)
19 -
Bolt 25 Nm (18 ft lb)
20 -
Mount
21 -
Nut 40 Nm (30 ft lb)
22 -
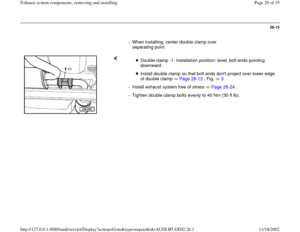
Double clamp Used when front or rear muffler is replaced
separately. Before tightening, ensure exhaust system
is free of stress Page 26
-24
Installation position: bolt ends point toward
left
Pa
ge 14 of 35 Exhaust s
ystem com
ponents, removin
g and installin
g
11/18/2002 htt
p://127.0.0.1:8080/audi/servlet/Dis
play?action=Goto&t
yp
e=re
pair&id=AUDI.B5.GE02.26.1
Page 15 of 35
Installation position of bolt ends Page 26
-13
, Fig. 3
Tighten bolts evenly
Pa
ge 15 of 35 Exhaust s
ystem com
ponents, removin
g and installin
g
11/18/2002 htt
p://127.0.0.1:8080/audi/servlet/Dis
play?action=Goto&t
yp
e=re
pair&id=AUDI.B5.GE02.26.1
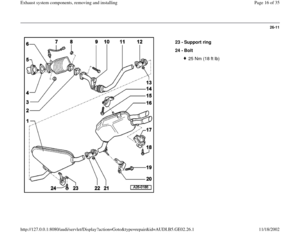
Page 16 of 35
26-11
23 -
Support ring
24 -
Bolt
25 Nm (18 ft lb)
Pa
ge 16 of 35 Exhaust s
ystem com
ponents, removin
g and installin
g
11/18/2002 htt
p://127.0.0.1:8080/audi/servlet/Dis
play?action=Goto&t
yp
e=re
pair&id=AUDI.B5.GE02.26.1


Pa
ge 9 of 35 Exhaust s
ystem com
ponents, removin
g and installin
g
11/18/2002 htt
p://127.0.0.1:8080/audi/servlet/Dis
play?action=Goto&t
yp")


50 Nm (37 ft lb)Only grease threads with \"G 052 112 A3.\"
Do NOT allow grease to get into slots on
sensor body Checking Repair Manual, 1.8 Liter 4-Cyl.
5V")

Align exhau")

Pa
ge 13 of 35 Exhaust s
ystem com
ponents, removin
g and installin
g
11/18/2002 htt
p://127.0.0.1:8080/audi/servlet/Dis
play?action=Goto&t
yp
e=re
pair&id=AUDI.B5.GE02.26.1")


Pa
ge 16 of 35 Exhaust s
ystem com
ponents, removin
g and installin
g
11/18/2002 htt
p://127.0.0.1:8080/audi/servlet/Dis
play?action=Goto&t")