Page 17 of 51
15-44
Installing - Grease threaded head of 2085 seal puller, attach and with forced
pressure screw into oil seal as far as possible.
- Loosen knurled bolt and turn inner part against crankshaft until oil seal
is removed.
- Clamp 2085 seal puller in vise at flat surfaces. Remove oil seal using
pliers.
- Lightly oil lip of oil seal.
- Place 3241/2 guide sleeve on end of camshaft.
- Slide oil seal over guide sleeve.
Pa
ge 17 of 51 Valvetrain, servicin
g
11/18/2002 htt
p://127.0.0.1:8080/audi/servlet/Dis
play?action=Goto&t
yp
e=re
pair&id=AUDI.B5.GE02.15.3
Page 18 of 51
15-45
- Using 3241/5 camshaft fitting tool and 3241/1 pressure sleeve, press
oil seal in to stop.
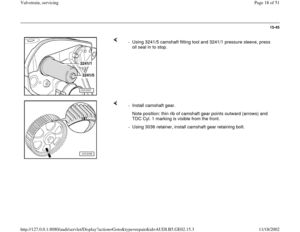
- Install camshaft gear.
Note position: thin rib of camshaft gear points outward (arrows) and
TDC Cyl. 1 marking is visible from the front.
- Using 3036 retainer, install camshaft gear retaining bolt.
Pa
ge 18 of 51 Valvetrain, servicin
g
11/18/2002 htt
p://127.0.0.1:8080/audi/servlet/Dis
play?action=Goto&t
yp
e=re
pair&id=AUDI.B5.GE02.15.3
Page 19 of 51
15-46
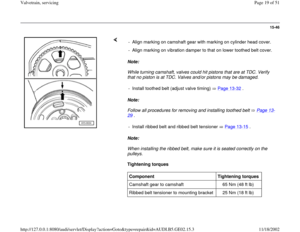
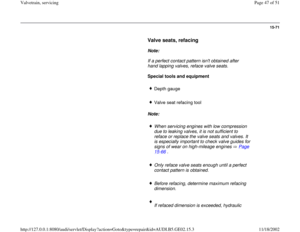
Note:
While turning camshaft, valves could hit pistons that are at TDC. Verify
that no piston is at TDC. Valves and/or pistons may be damaged.
Note:
Follow all procedures for removing and installing toothed belt Page 13
-
29
.
Note:
When installing the ribbed belt, make sure it is seated correctly on the
pulleys.
Tightening torques - Align marking on camshaft gear with marking on cylinder head cover.
- Align marking on vibration damper to that on lower toothed belt cover.
- Install toothed belt (adjust valve timing) Page 13
-32
.
- Install ribbed belt and ribbed belt tensioner Page 13
-15
.
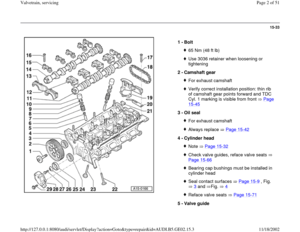
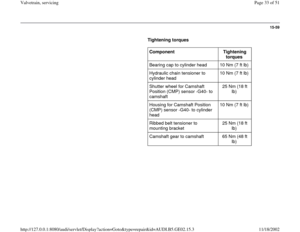
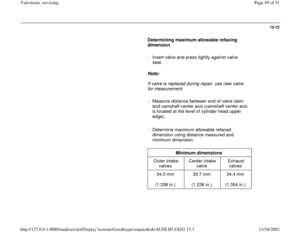
Component
Tightening torques
Camshaft gear to camshaft 65 Nm (48 ft lb)
Ribbed belt tensioner to mounting bracket 25 Nm (18 ft lb)
Pa
ge 19 of 51 Valvetrain, servicin
g
11/18/2002 htt
p://127.0.0.1:8080/audi/servlet/Dis
play?action=Goto&t
yp
e=re
pair&id=AUDI.B5.GE02.15.3
Page 20 of 51
15-47
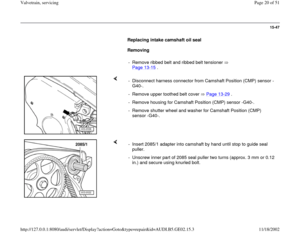
Replacing intake camshaft oil seal
Removing
- Remove ribbed belt and ribbed belt tensioner
Page 13
-15
.
- Disconnect harness connector from Camshaft Position (CMP) sensor -
G40-.
- Remove upper toothed belt cover Page 13
-29
.
- Remove housing for Camshaft Position (CMP) sensor -G40-.
- Remove shutter wheel and washer for Camshaft Position (CMP)
sensor -G40-.
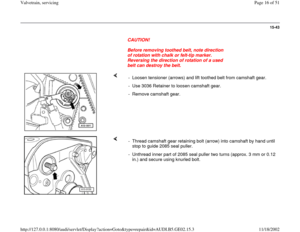
- Insert 2085/1 adapter into camshaft by hand until stop to guide seal
puller.
- Unscrew inner part of 2085 seal puller two turns (approx. 3 mm or 0.12
in.) and secure using knurled bolt.
Pa
ge 20 of 51 Valvetrain, servicin
g
11/18/2002 htt
p://127.0.0.1:8080/audi/servlet/Dis
play?action=Goto&t
yp
e=re
pair&id=AUDI.B5.GE02.15.3
Page 21 of 51
15-48
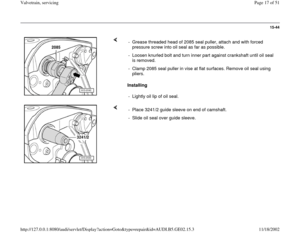
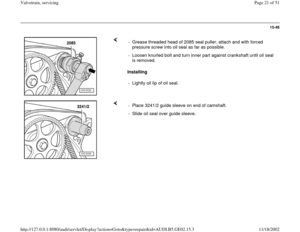
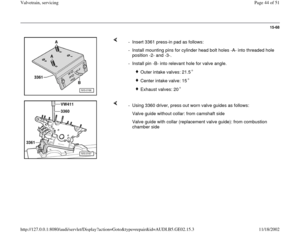
Installing - Grease threaded head of 2085 seal puller, attach and with forced
pressure screw into oil seal as far as possible.
- Loosen knurled bolt and turn inner part against crankshaft until oil seal
is removed.
- Lightly oil lip of oil seal.
- Place 3241/2 guide sleeve on end of camshaft.
- Slide oil seal over guide sleeve.
Pa
ge 21 of 51 Valvetrain, servicin
g
11/18/2002 htt
p://127.0.0.1:8080/audi/servlet/Dis
play?action=Goto&t
yp
e=re
pair&id=AUDI.B5.GE02.15.3
Page 22 of 51
15-49
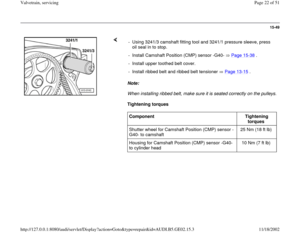
Note:
When installing ribbed belt, make sure it is seated correctly on the pulleys.
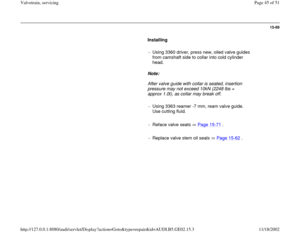
Tightening torques - Using 3241/3 camshaft fitting tool and 3241/1 pressure sleeve, press
oil seal in to stop.
- Install Camshaft Position (CMP) sensor -G40- Page 15
-38
.
- Install upper toothed belt cover.
- Install ribbed belt and ribbed belt tensioner Page 13
-15
.
Component
Tightening
torques
Shutter wheel for Camshaft Position (CMP) sensor -
G40- to camshaft 25 Nm (18 ft lb)
Housing for Camshaft Position (CMP) sensor -G40-
to cylinder head 10 Nm (7 ft lb)
Pa
ge 22 of 51 Valvetrain, servicin
g
11/18/2002 htt
p://127.0.0.1:8080/audi/servlet/Dis
play?action=Goto&t
yp
e=re
pair&id=AUDI.B5.GE02.15.3
Page 23 of 51
15-50
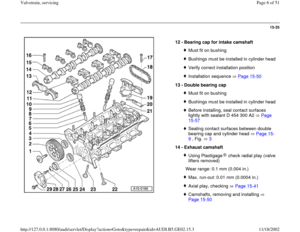
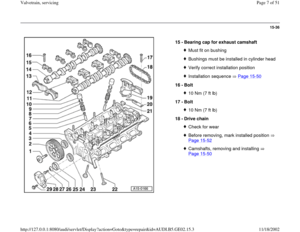
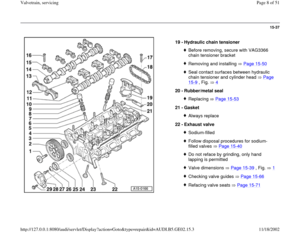
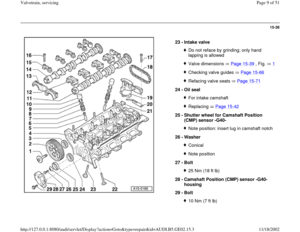
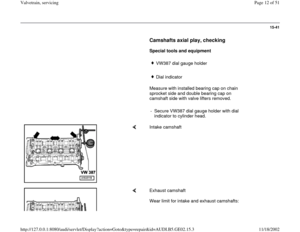
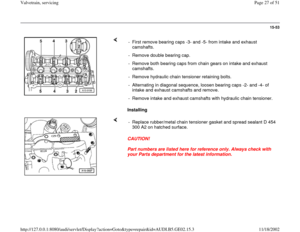
Camshafts and hydraulic chain
tensioner, removing and installing
Cylinder head installed
Lock carrier in service position Page 13
-1
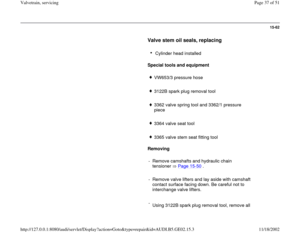
Special tools and equipment
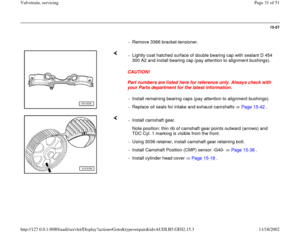
3036 retainer
3366 bracket-tensioner
Removing
- Remove ribbed belt and ribbed belt tensioner
Page 13
-15
.
- Remove engine covers.
- Remove upper toothed belt cover Page 13
-
29
.
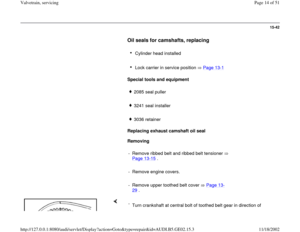
- Turn crankshaft at central bolt of toothed belt gear in direction of engine
rotation to TDC Cyl. 1 marking (arrows).
- Remove cylinder head cover Page 15
-17
.
Pa
ge 23 of 51 Valvetrain, servicin
g
11/18/2002 htt
p://127.0.0.1:8080/audi/servlet/Dis
play?action=Goto&t
yp
e=re
pair&id=AUDI.B5.GE02.15.3
Page 24 of 51
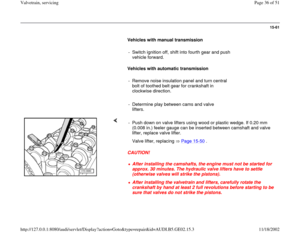
CAUTION!
Before removing toothed belt, note direction of rotation with chalk or
felt-tip marker. Reversing the direction of rotation of a used belt can
destroy the belt.
Pa
ge 24 of 51 Valvetrain, servicin
g
11/18/2002 htt
p://127.0.0.1:8080/audi/servlet/Dis
play?action=Goto&t
yp
e=re
pair&id=AUDI.B5.GE02.15.3