1995 PONTIAC BONNEVILLE height
[x] Cancel search: heightPage 18 of 338
The lap part of the belt should be worn low and snug on
the hips, just touching the thighs. In
a crash, this applies
force to the strong pelvic bones. And you’d be less
likely to slide under the lap belt. If you slid under it, the
belt would apply force at your abdomen. This could
cause serious or even fatal injuries. The shoulder belt
should
go over the shoulder and across the chest. These
parts of the body are best able to take belt restraining
forces.
The safety belt locks if there’s a sudden stop or crash.
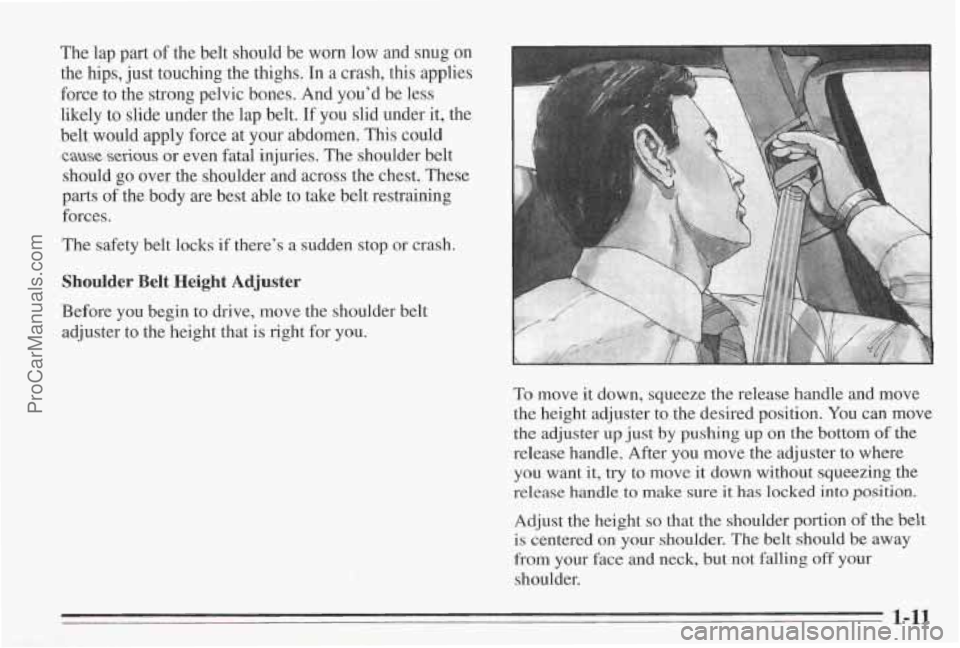
Shoulder Belt Height Adjuster
Before you begin to drive, move the shoulder belt
adjuster to the height that
is right for you.
To move it down, squeeze the release handle and move
the height adjuster to the desired position.
You can move
the adjuster
up just by pushing up on the bottom of the
release handle. After you move the adjuster to where
you want it,
try to move it down without squeezing the
release handle to
make sure it has locked into pasition
Adjust the height so that the shoulder portion of the belt
is centered on your shoulder. The belt should be away
from your face and-neck, but not falling off your
shoulder.
1-11
ProCarManuals.com
Page 111 of 338
I
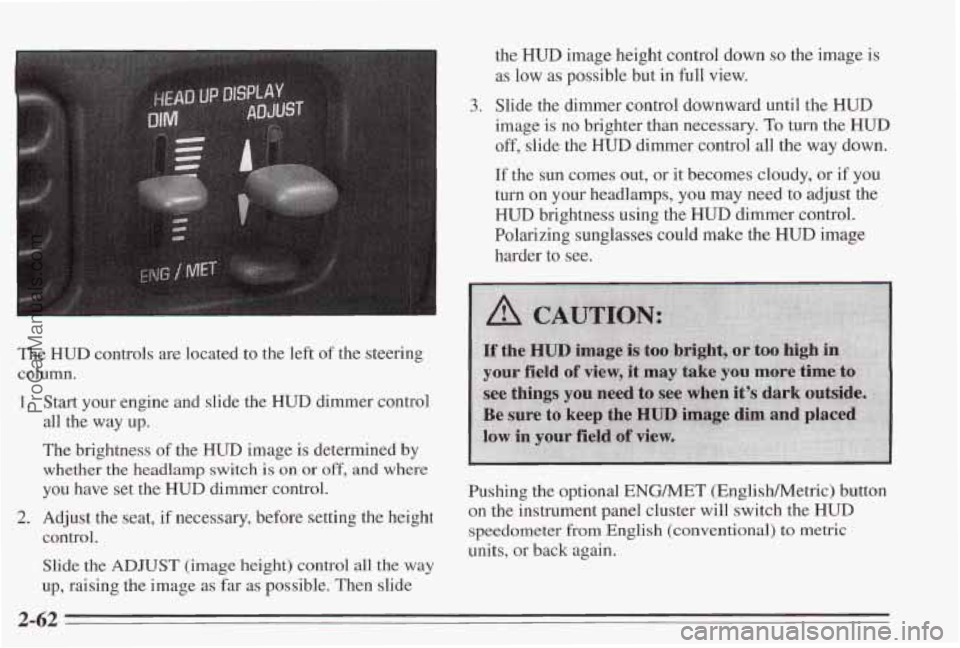
The HUD controls are located to the left of the steering
column.
1.
2.
Start your engine and slide the HUD dimmer control
all the way up.
The brightness of the
HUD image is determined by
whether the headlamp switch is on or off, and where
you have set the
HUD dimmer control.
Adjust the seat,
if necessary, before setting the height
control.
Slide the
ADJUST (image height) control all the way
up, raising the image as far as possible. Then slide the
HUD image height control down so the image is
as low as possible but in full view.
3. Slide the dimer control downward until the HUD
image is no brighter than necessary. To turn the HUD
off, slide the HUD dimmer control all the way down.
If the sun comes out, or it becomes cloudy, or
if you
turn on your headlamps, you may need to adjust the
HUD brightness using the HUD dimmer control.
Polarizing sunglasses could make the HUD image
harder to see.
Pushing the optional ENG/MET (Englishhletric) button
on the instrument panel cluster will switch the
HUD
speedometer fkom Englrsh (conventional) to metric
units, or back again.
2-62
ProCarManuals.com
Page 112 of 338
Clean the inside of the windshield as needed to remove
any dirt or film that reduces the sharpness or clarity of
the
HUD image.
Spray household glass cleaner on a
soft, clean cloth.
Wipe the HUD lens gently, then dry it. Do not spray
cleaner directly on the lens, because the cleaner fluid
could leak inside the unit if you do.
If you can’t see the HUD image when the ignition
is on,
check to see if
The headlamps are on?
Anything is covering the HUD unit?
0 The HUD dimmer control is adjusted correctly?
0 The HUD image is adjusted to the proper height?
A fuse in the fuse panel may be blown. See “Fuses
If the HUD image is not clear it could be too bright,
move the
HUD dimmer control further downward. You
may need to clean the windshield and HUD lens.
Your windshield is part
of the HUD system. If you ever
have to have a new windshield, be sure to get one
designed
for HUD. If you don’t, the HUD image may
look blurred and out of focus.
and Circuit Breakers”
in the Index.
Battery Warning Light
This light will come on
briefly when you start the
vehicle, as a check to show
If it stays on, or comes on while you are dnving, you
may have a problem with the electrical charging system.
It could indicate that you have a generator problem or
another electrical system problem. Have it checked right
away. Driving while this light
is on could drain your
battery.
If you must drive a short distance with the light on, be
certain to turn
off all your accessories, such as the radio
and climate control system.
Some clusters with gages do not have a battery
warning
light. They have a CHECK GAGES warning to indicate
a problem. Vehicles with the supercharged engine also
have a similar battery warning light.
2-63
ProCarManuals.com
Page 242 of 338
NOTICE:
Continuing to drive with worn-out brake pads
could result in costly
brake repair.
b
Some driving conditions or climates may cause a brake
squeal when the brakes are first applied or lightly
applied. This does not mean something is wrong with
your brakes.
Your rear drum brakes don’t have wear indicators, but if
you ever hear a rear brake rubbing noise, have the rear
brake linings inspected. Also, the rear brake drums
should be removed and inspected each time the tires are
removed for rotation or changing. When you have the
front brakes replaced, have the rear brakes inspected,
too.
Brake linings should always be replaced as complete
axle sets.
Brake Pedal Travel
See your dealer if the brake pedal does not return to
normal height, or if there is a rapid increase in pedal
travel. This
could be a sign of brake trouble.
Brake Adjustment
Every time you apply the brakes moderately, with or
without the vehicle moving, your brakes adjust for wear.
Replacing Brake System Parts
The braking system on a modern vehicle is complex. Its
many parts have to be
of top quality and work well
together if the vehicle is to have really good braking.
Vehicles we design and test have top-quality GM brake
parts in them,
as your Pontiac does when it is new.
When you replace parts of your braking system
-- for
example, when your brake linings wear down and you
have to have new ones put in
-- be sure you get new
genuine GM replacement parts.
If you don’t, your
brakes may no longer work properly.
For example, if
someone puts in brake linings that are wrong for your
vehicle, the balance between your front and rear brakes
can change
-- for the worse. The braking performance
you’ve come to expect can change in many other ways
if
someone puts in the wrong replacement brake parts.
Battery
Every new Pontiac has a Delco Freedom@ battery. You
never have to add water to one of these. When it’s time
for a new battery, we recommend
a Delco Freedom@
battery. Get one
that has the replacement number shown
on the original battery’s label.
ProCarManuals.com
Page 252 of 338
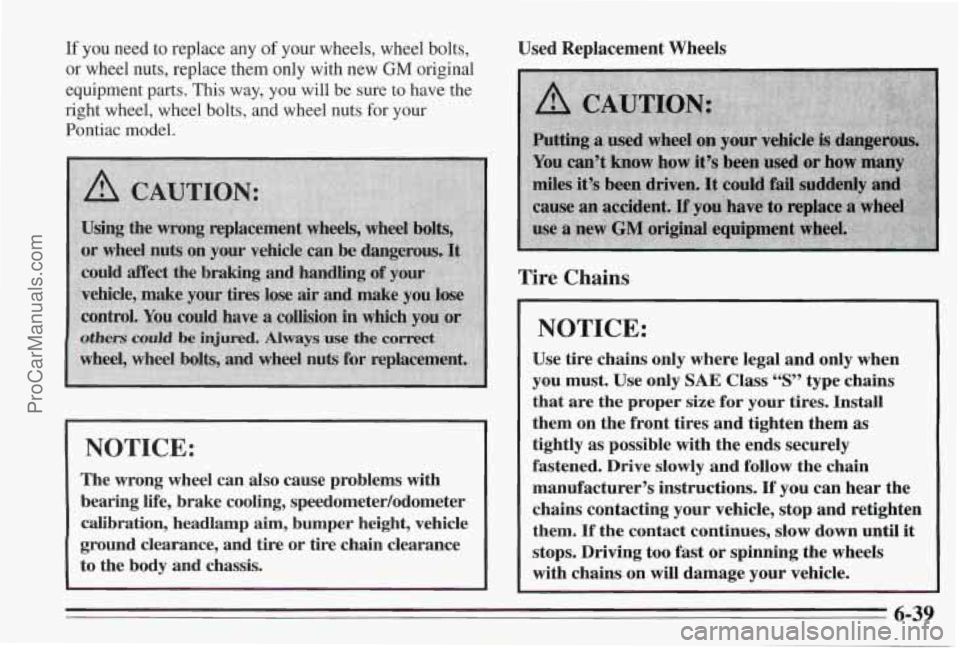
If you need to replace any of your wheels, wheel bolts,
or wheel nuts, replace them only with new GM original
equipment parts. This way, you will be sure
to have the
right wheel, wheel bolts, and wheel nuts for your
Pontiac model.
NOTICE:
The wrong wheel can also cause problems with
bearing life, brake cooling, speedometer/odometer
calibration, headlamp aim, bumper height, vehicle
ground clearance, and tire or tire chain clearance
to the body and chassis. Used
Replacement Wheels
Tire Chains
NOTICE:
Use tire chains only where legal and only when
you must. Use only
SAE Class “S” type chains
that are the proper size for your tires. Install
them on the front tires and tighten them as
tightly as possible with the ends securely
fastened. Drive slowly and follow the chain
manufacturer’s instructions.
If you can hear the
chains contacting your vehicle, stop and retighten
them.
If the contact continues, slow down until it
stops. Driving too fast or spinning the wheeIs
with chains on will damage your vehicle.
6-39
ProCarManuals.com
Page 333 of 338
Radios
AM/FM Stereo ............................... 3-8
AMFM Stereo Radios with Cassette .............. 3-9
Rain. Driving
In ................................ 4- 16 AMm Stereo Radios with Compact Disc Player ... 3-12
Reading Lamps
Front
...................................... 2-40
Rear
....................................... 2-40
Rear Door Security Locks ......................... 2-7
Rear Seat Passengers
............................ 1-24
Rear Storage Compartment
....................... 2-46
Rear Window Defogger
........................... 3-3
Rear Window Defogger (Electronic Climate Control)
... 3-6
Rearview Mirror ....................................
Automatic .................................. 2-41
InsideManual ............................... 2-41
Reclining Front Seatbacks ......................... 1-3
Recommended Fluids and Lubricants ............... 7-41
Remote Keyless Entry
............................ 2-5
Battery Replacement
........................... 2-6
Matching
Transmitters ......................... 2-6
Operation
................................... 2-6
Remote Trunk Release
........................... 2- 12
Replacement Bulbs
............................. 6-53
Replacement Parts .............................. 6-56
Replacement. Wheel ............................ 6-38
Replacing Safety Belts ........................... 1-42
Restraints. Checking Your
........................ 1-42
Restraints. Child
................................ 1-3 1
Restraints, Head ................................. 1-4
Restraints, Replacing Parts After a Crash ............ 1-42
Retained Accessory Power
........................ 2- 15
Reverse Position ................................ 2- 19
Replacing Seat and Restraint System Parts After a Crash 1-42 Right Front
Passenger Position
.................... 1-22
Roadside Assistance
.............................. 8-6
Roadside Assistance, Canadian
..................... 8-7
Rocking Your Vehicle ........................... 5-33
Rotation, Tire .................................. 6-35
RightFusePanel ............................... 6-52
Safety Belt Extender
............................ 1-42
Safety Belt Reminder Light
................... 1.5. 2.52
Safety Belts
.................................... 1-5
Adults ...................................... 1-9
Careof .................................... 6-43
Center Passenger Position ...................... 1-23
Comfort
Guides ............................. 1-27
Driver Position .............................. 1-10
How to Wear Properly
......................... 1-9
Incorrect Usage
.................... 1 - 12, 1-40, 1-41
Lap-Shoulder .......................... 1-10. 1-24
Questions People Ask .......................... 1-9
Rear Comfort Guides ......................... 1-27
Rear Seat Outside Passenger Positions ............ 1-24
Rear Seat Passengers
......................... 1-24
Replacing After a Crash
....................... 1-42
Right Front Passenger Position
.................. 1-22
Shoulder Belt Height Adjuster
.................. 1-11
Use by Children ............................. 1-29
Use by Larger Children
........................ 1-39
Use by Smaller Children and Babies ............. 1-29
Use During Pregnancy
........................ 1-22
Extender
.............,..................... l-42
LapBelt ................................... 1-23
WhyTheyWork
......,..,.................... l-6
9-8
ProCarManuals.com
Page 334 of 338
Safety Chains ... ..................... 4-33
Safety Defects
Reporting to General Motors
.................... 8-5
Reporting to the Canadian Government ............ 8-5
Reporting to the United States Government ......... 8-4
Seat. Power
.................................... 1-2
Adjustable Support ............................ 1-2
Reclining Front
............................... 1-3
... Safety Warnings and Symbols ....................... 111
Scheduled Maintenance Services .................... 7-3
Seats
.......................................... 1-1
ManualFront ................................ 1-1
Securing a Child Restraint ..................... 1-33
Seats and Restraint Systems ........................ 1 - 1
Seats and Seat Controls ........................... 1 - 1
SecondGear ................................... 2-21
Security Messages
.............................. 2-67
Security System (PASS-Key 11)
.................... 2- IO
Service and Appearance Care ...................... 6-1
Service Engine Soon Light
....................... 2-57
Service Manuals. Ordering
........................ 8-7
Service
........................................ 6-1
Service and Owner Publications
.................... 8-7
Service Bulletins. Ordering
........................ 8-7
Service Parts Identification Label
.................. 6-48
Service Publications
.............................. 8-7
Service Work. Doing Your Own
.................... 6-2
Servicing Your Air Bag-Equipped Pontiac
........... 1-21
Sheet Metal Damage
............................ 6-45
Shift Lever. Console
............................. 2-25
Shift Lever. Steering Column
..................... 2-24
Shifting Into
Park (P) ............................ 2-24
Shifting Out of Park (P)
.......................... 2-27
Shifting. Automatic Transaxle
..................... 2- 18
Shifting. Performance ....... . * * . . 2-22
Shoulder Belt Height Adjuster .... ... 1-11
Signaling Turns ............ ... 2-31
Sound Equipment, Adding
........................ 3-18
Spare Tire, Compact
............................. 5-32
Speedometer
................................... 2-50
Stains, Cleaning .......... ............... 6-41
Standard Climate Control
.......................... 3-2
Starter Switch
.................................. 7-38
Starting Your Engine
............................ 2-15
Steam, If Coming From Your Engine
............... 5-12
Steering
....................................... 4-9
Steering Column Lock
........................... 7-39
Steering Column Shift Lever
...................... 2-24
Steering Wheel, Tilt
............................. 2-30
Steering, In Emergencies ......................... 4-10
Steering, Power
................................. 4-9
Steering, Tips
................................... 4-9
Steering, Variable Effort
........................... 4-9
Storage Armrest
................................ 2-45
Storage, Rear Compartment
....................... 2-46
Storage, Sunglasses
............................. 2-44
Sunglasses Storage
.............................. 2-44
Sunroof, Express Open
.......................... 2-45
Supercharged Engine
............................ 6-11
Skidding
...................................... 4-13
Steering Wheel Touch Controls, Audio System
....... 3-17
Storage, Of Your Vehicle
......................... 6-30
Sunvisors
.................................... 2-44
SuperchargerOil
............................... 6-18
Checking ................................... 6-19
What Kind
to Use ............................ 6-19
WhenToAdd ............................... 6-19
9-9
ProCarManuals.com