1995 LAND ROVER DISCOVERY anti lock
[x] Cancel search: anti lockPage 80 of 873

10MAINTENANCE
18
MAINTENANCE
ABS VEHICLES - CHECK ROAD WHEEL SPEED
SENSOR ELECTRICAL HARNESS FOR DAMAGE
RENEW OXYGEN SENSORS
See EMISSION CONTROL, Repair, Heated
Oxygen Sensor (HO2S)
RENEW CATALYTIC CONVERTERS
See MANIFOLD AND EXHAUST SYSTEM, Repair,
Exhaust System Complete
REPORT ANY UNUSUAL FEATURES OF VEHICLE
CONDITION AND ADDITIONAL WORK REQUIREDCARRY OUT ROAD TEST
For details of dynamometer testing.See
INTRODUCTION, Information, Dynamometer
Testing - Non Anti-lock brake vehicles See
INTRODUCTION, Information, Dynamometer
Testing - Vehicles with Anti-lock brakes (ABS)
Check following items:
1.Inhibitor switch only operates in P and N.
2.Engine for excessive noise.
3.Clutch for slip, judder or spin.
4.Automatic gear selection/shift speeds.
5.Gear selection/noise - high/low range.
6.Steering for abnormal noise/effort.
7.Steering for free play.
8.All instruments, gauges and warning indicators.
9.Heater and air conditioning systems.
10.Heated rear screen.
11.Shock absorbers - ride irregularities.
12.Foot brake, on emergency stop, pulling to one
side, binding, pedal effort.
13.Parkbrake efficiency.
14.Seat reclining and latching.
15.Fully extend seat belt, check operation of
retraction and latching. Inertia belts lock when
snatched or vehicle on slope.
16.Road wheel balance.
17.Transmission for vibrations.
18.Body noises, squeaks and rattles.
19.Excessive exhaust smoke.
20.Engine idle speed.
21.Endorse service record.
22.Report any unusual features of vehicle condition
and additional work required.
ENDORSE SERVICE RECORD
Page 99 of 873

12ENGINE
18
REPAIR 10.Apply sealant to flywheel housing mating face on
cylinder block (Fig. J5944).
11.Fit housing to cylinder block and secure with
bolts as removed. Tighten to
45 Nm.
12.Remove surplus sealant from block.
13.Refit starter motor.
14.Refit flywheel.
See Flywheel
15.Refit clutch.See CLUTCH, Repair, Clutch
Assembly
16.Refit gearbox.See MANUAL GEARBOX,
Repair, R380 Manual Gearbox
17.Reconnect battery negative lead.OIL FILTER
Service repair no - 12.60.01
Remove
1.Place drain tray under filter.
2.Unscrew filter anti-clockwise, using a strap or
spanner.
Refit
3.Smear clean engine oil on seal of new filter.
4.Screw on filter until sealing ring touches
machined face, then tighten a further half turn by
hand only. Do not over tighten.
Page 180 of 873

12ENGINE
22
REPAIR
CAUTION: Ease timing belt off gears using
fingers only. Metal levers may damage the
belt and gears. Do not rotate engine with
timing belt removed and cylinder head fitted.
Timing belts must be stored and handled with
care. Always store a timing belt on its edge with a
bend radius greater than 50 mm. Do not use a
timing belt which has been twisted or bent double
as this can fracture reinforcing fibres. Do not use
an oil contaminated timing belt. Although the belt
has a service life of 96,000 miles, 160,000 km, an
existing belt should only be refitted if it has
completed less than 48,000 miles, 80,000 km.
Refit
NOTE: For torque values.See
Specifications, torque, Torque values
1.Clean timing belt gears and pulleys.
2.Clean crankshaft pulley.
CAUTION: If original belt is to be refitted,
ensure direction of rotation mark is facing
correct way.
3.Fit timing belt to gears, starting at the crankshaft
gear and working in an anti-clockwise direction.
CAUTION: Ensure the belt run between the
crankshaft and exhaust camshaft gear is
kept taut during the fitting procedure.
4.Fit timing belt lower cover, tighten 3 bolts to the
correct torque.
5.Fit crankshaft pulley to crankshaft timing gear.
6.Fit tool LRT-12-059 to crankshaft pulley, fit 2
bolts to retain tool.
7.Fit crankshaft pulley centre bolt, and using tool
LRT-12-059 to restrain pulley, tighten bolt to the
correct torque.
8.Remove tool LRT-12-059
9.Fit bolts securing crankshaft pulley to timing
gear, tighten bolts to the correct torque.
10.Remove tool LRT-12-060.Tension belt
1.Loosen timing belt tensioner pulley bolt.
2.Apply
40Nmanti-clockwise torque to inlet cam
pulley bolt and release.
3.Tighten tensioner pulley bolt to the correct
torque.
4.Remove tool LRT-12-058 from flywheel.
5.Fit timing belt centre cover, tighten 5 bolts to the
correct torque.
6.Fit timing belt upper cover, tighten 5 bolts to the
correct torque.
7.Fit drive belt.
Page 193 of 873

EMISSION CONTROL
7
DESCRIPTION AND OPERATION ADD: 09/95
Fuel filler neck components
A Anti-trickle fill valve
B Liquid/Vapour Separator
C Vent line to pressure sensor
D From fuel tank to liquid/vapour separator
E From EVAP canister to anti-trickle fill valve
F Fuel filler hose, Dual layer, convolute nylon
G Fuel tank internal breather hoseIdentification
The system was introduced on all North American
specification vehicles from October 1996 and the
vehicles can be recognised by the information
contained in theEVAP. FAMILYentry on the
underbonnet Emission label (mounted on the vertical
face of the bonnet lock platform).
A - Vehicles with advanced EVAPS
VLR1124AYPFE
B - Vehicles without advanced EVAPS
VLR1060AYPBC
Page 194 of 873

17EMISSION CONTROL
8
DESCRIPTION AND OPERATION ADD: 09/95 System operation
The system is designed to prevent fuel vapour
escaping to atmosphere, and consists of four roll-over
valves fitted internally in the fuel tank, connected to
the liquid/vapour separator by a nylon line. The
separator is mounted to the side of the filler neck. An
EVAP canister is positioned in the engine
compartment mounted on the right front side valance.
The liquid/vapour separator and EVAP canister are
connected by a nylon line which runs the length of the
chassis.
Pressure/vacuum relief valves are incorporated into
the fuel filler cap and are designed to protect the fuel
tank from permanent deformation in the event of
system pressure or vacuum exceeding the system
operating parameters. There are no other relief or
one-way valves in the system.
A vent line flow restrictor known as an anti-trickle fill
valve is fitted to the filler pipe in the line between the
tank and EVAP canister. The function of this valve is
to prevent overfilling the tank by trickling fuel in,
thereby preserving the vapour space in the tank to
allow for fuel expansion during hot weather.
The valve achieves this by blocking the vent line
during the fuel filling process. The valve is operated
by the action of inserting the filler gun so that when
the fuel in the tank reaches the level of the filling
breather, flow cut off occurs due to fuel filling the filler
pipe.During normal vehicle operation and when the engine
is switched off, the venting system between the fuel
tank and EVAP canister is open to allow the free
passage of vapour.
The EVAP canister, which is connected by a nylon
hose to the plenum chamber, absorbs and stores the
fuel vapour from the fuel tank when the engine is not
running. With the engine running, vapour is purged
from the EVAP canister by allowing outside air to be
drawn through the EVAP canister vent solenoid and
link pipe by the influence of manifold vacuum to the
EVAP canister purge connection on the canister.
Filter pads are fitted above and below the charcoal
and in the EVAP canister vent solenoid to prevent the
ingress of foreign matter into the purge line.
The EVAP canister purge valve, which is fitted in the
line from the EVAP canister to the plenum, is
controlled by the ECM which determines the most
emission acceptable time at which purging should
take place. This will normally be at engine speeds
above idle and when the vehicle is in motion.
The EVAP canister vent solenoid is mounted on the
side of the EVAP canister bracket and is connected to
the EVAP canister by a length of large bore hose. The
ECVS is controlled by the ECM and is normally open.
The function of the ECVS is to block the air intake
side of the EVAP canister. When the system receives
an ECM signal the valve closes; this allows the
system leak check to take place. The leak check only
occurs when pre-determined vehicle operating
conditions are met.
Page 217 of 873
19FUEL SYSTEM
2
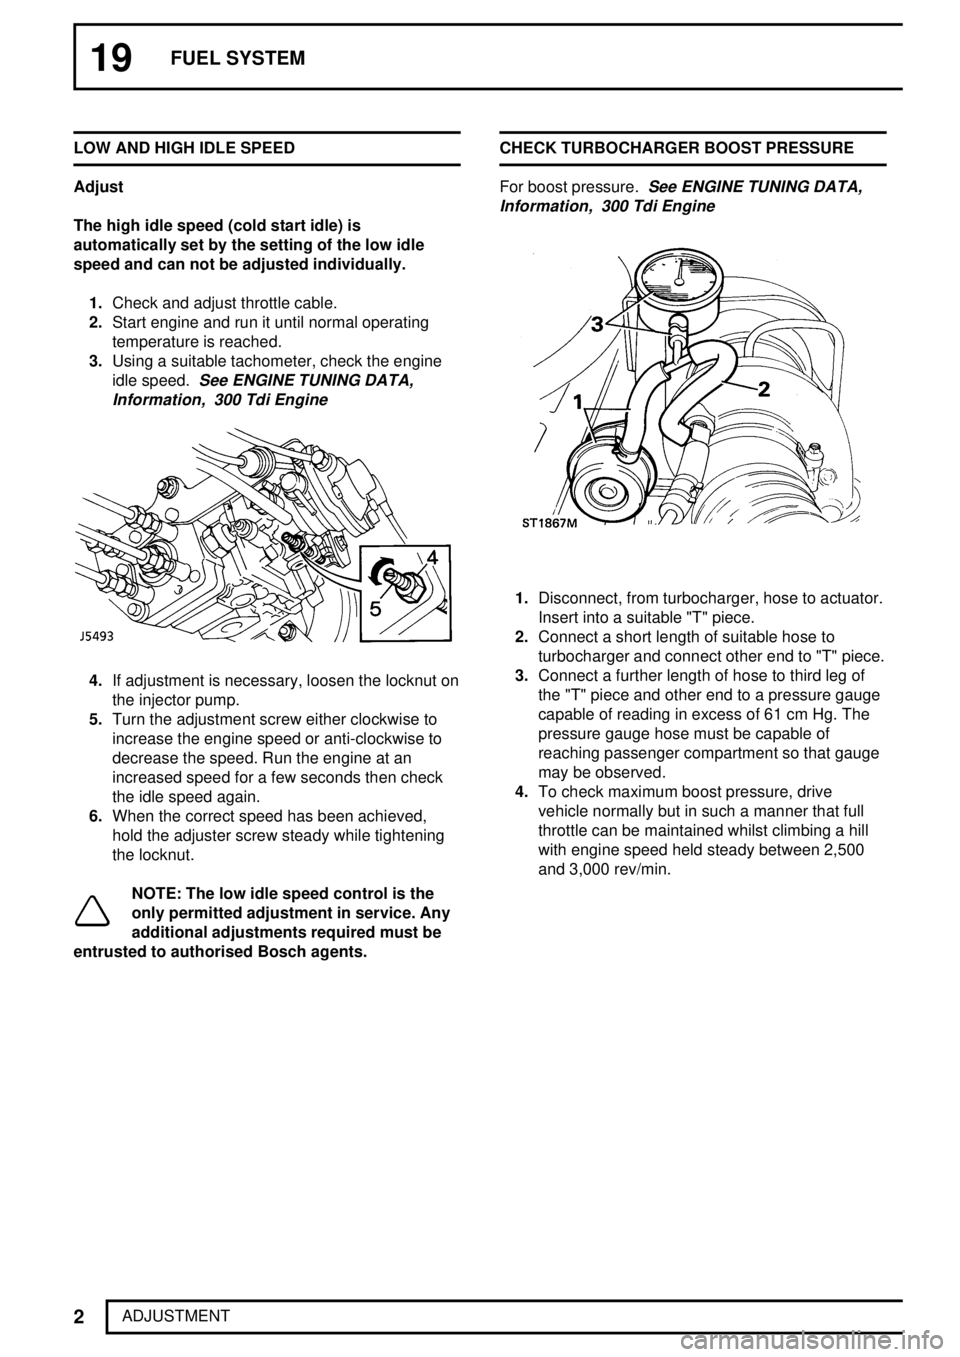
ADJUSTMENT LOW AND HIGH IDLE SPEED
Adjust
The high idle speed (cold start idle) is
automatically set by the setting of the low idle
speed and can not be adjusted individually.
1.Check and adjust throttle cable.
2.Start engine and run it until normal operating
temperature is reached.
3.Using a suitable tachometer, check the engine
idle speed.
See ENGINE TUNING DATA,
Information, 300 Tdi Engine
4.If adjustment is necessary, loosen the locknut on
the injector pump.
5.Turn the adjustment screw either clockwise to
increase the engine speed or anti-clockwise to
decrease the speed. Run the engine at an
increased speed for a few seconds then check
the idle speed again.
6.When the correct speed has been achieved,
hold the adjuster screw steady while tightening
the locknut.
NOTE: The low idle speed control is the
only permitted adjustment in service. Any
additional adjustments required must be
entrusted to authorised Bosch agents.CHECK TURBOCHARGER BOOST PRESSURE
For boost pressure.
See ENGINE TUNING DATA,
Information, 300 Tdi Engine
1.Disconnect, from turbocharger, hose to actuator.
Insert into a suitable "T" piece.
2.Connect a short length of suitable hose to
turbocharger and connect other end to "T" piece.
3.Connect a further length of hose to third leg of
the "T" piece and other end to a pressure gauge
capable of reading in excess of 61 cm Hg. The
pressure gauge hose must be capable of
reaching passenger compartment so that gauge
may be observed.
4.To check maximum boost pressure, drive
vehicle normally but in such a manner that full
throttle can be maintained whilst climbing a hill
with engine speed held steady between 2,500
and 3,000 rev/min.
Page 230 of 873

Tdi
13
REPAIR Refit
21.Remove blanks from pump.
22.Remove special tool pin from pump.
23.Clean mating faces of pump and front cover.
24.Fit pump to cover with a new gasket and secure
with nuts. Tighten to
25 Nm.
25.Attach pump to bracket and finger tighten nuts
and bolts
26.First tighten bolts securing bracket to block and
then bolts securing pump to bracket.
27.Connect spill return, main fuel pipes. Tighten to
25 Nm.
28.Connect boost signal pipe and secure with banjo
bolts. Tighten to
10 Nm.
29.Connect stop control solenoid lead.
30.Connect throttle cable and where applicable
hand throttle cable.
31.Remove special tool LRT-12-045.
32.Fit gear lock plate.
33.Fit pin from special tool LRT-12-045.
34.Secure gear with bolts.
35.Remove special tool pin.
36.Turn crankshaft two complete revolutions, check
timing pin from LRT-12-045 can be fully and
easily inserted into the pump. At the same time
check flywheel timing pin LST-12-044 can also
be inserted in the flywheel slot.
37.If, with the flywheel timing pin located, the timing
pin cannot be inserted cleanly into the injection
pump, carry out the following:
(a) Ensure flywheel timing pin is disengaged
from slot in flywheel.
(b) Turn the crankshaft the small amount
necessary to enable the timing pin to be
inserted into the pump.
(c) Loosen the three pump gear retaining
bolts.
(d) Turn the crankshaft to T.D.C..
(e) Check that the timing pin is an easy fit in
the pump and that the flywheel timing pin
locates.
(f) Tighten the pump gear retaining bolts to
the correct torque.
(g) Remove the timing pin from the pump and
the timing tool from the flywheel housing.
38.Using antisieze compound, fit the blanking plug
to flywheel housing. Tighten to
12 Nm.
39.Fit access plate with gasket to front cover plate.
Tighten to
25 Nm.
40.Refit injector pipes. Tighten to29 Nm.
Page 307 of 873

19FUEL SYSTEM
24
REPAIRADD: 09/95 Refit
29.Fit NEW pump seal to tank opening.
30.Carefully lower pump into tank opening, pressing
firmly on the pump top flange to allow correct
positioning.
NOTE: Ensure location tag on pump top
flange is engaged correctly to tank
opening lip.
31.Fit locking ring and tighten to
35 Nmusing
service tool LRT-19-009.
32.Fit vent hose to fuel tank clips and connect to
pressure sensor.
33.With assistance, fit fuel tank into position.
34.Fit fuel tank cradle and secure with nuts and
bolts.
35.Align upper fuel tank strap and secure with nut
and bolt.
36.Fit NEW clip to fuel filler neck hose.
37.Connect fuel filler neck internal breather to tank.
38.Connect fuel filler neck hose to tank.
39.Position fuel filler neck hose clip and tighten until
head shears.
40.Connect vent line quickfit connector to
liquid/vapour separator.
41.Connect vent line hose connection.
42.Position anti-roll [sway] bar straps and secure
with nuts and bolts.
43.Remove stand(s) and lower vehicle.
44.Connect both fuel lines to the pump by pushing
the connectors down each line square to the
pump connection until the connectors positively
latches.
45.Connect multiplugs to fuel pump and pressure
sensor.
46.Reconnect battery negative lead.
47.Refill tank with drained fuel.
48.Run the engine to check for any fuel leaks.
49.Fit access panel and secure with screws.
50.Reposition loadspace sound insulation and
carpet.
51.Fit RH luggage compartment side panel.
See
CHASSIS AND BODY, Repair, rear
compartment trim panels
52.Fit tail door tread strip and secure with screws.FUEL TANK - DRAINING - ADVANCED EVAPS
Service repair no - 19.55.02
WARNING: Before removing the fuel tank
it must be drained.
WARNING: Petrol/gasoline vapour is
highly flammable and in confined spaces
is also explosive and toxic. Always have a
fire extinguisher containing FOAM, CO2, GAS or
POWDER close at hand when handling or draining
fuel. See Introduction
CAUTION: Before disconnecting any part
of fuel system, it is imperative that all dust,
dirt and debris is removed from around
components to prevent ingress of foreign matter
into fuel system.
NOTE: Assuming the fuel tank is FULL
drain the following quantities:
Renew Fuel pump = 9 Litres (2.4 US Gallons)
Renew Fuel filler neck = 22 Litres (6 US Gallons)
Renew Fuel tank = COMPLETE DRAIN
1.Depressurise fuel system.
See fuel system -
depressurise - advanced evaps
2.Disconnect battery negative lead.
3.Remove 6 screws securing tail door tread strip
and remove tread strip.
4.Remove RH luggage compartment side panel.
See CHASSIS AND BODY, Repair,