Page 1619 of 2158
(3) Install reverse shift rail C-ring (Fig. 51).
Fig. 85 Shift Rail Ball-Plug-Pin Position
Fig. 86 Installing Reverse Shift Rail Interlock Pin
Fig. 87 Installing Reverse Shift Rail And Fork
JAX 15 MANUAL TRANSMISSION 21 - 57
Page 1620 of 2158
(4) Position 1-2 and 3-4 shift forks in synchro
sleeves (Fig. 88).
(5) Coat reverse rail lock ball with petroleum jelly.
Then tilt reverse shift fork upward and insert ball in
intermediate plate (Fig. 89).
(6) Coat 1-2 shift rail interlock plug with petro-
leum jelly and install it in intermediate plate bore
(Fig. 90).
(7) Coat 1-2 shift rail interlock pin with petroleum
jelly and insert it in shift rail (Fig. 91).(8) Install 1-2 shift rail in intermediate plate and
1-2 fork (Fig. 92).
Fig. 88 Shift Fork Installation
Fig. 89 Installing Reverse Shift Rail Lock Ball
Fig. 90 Installing 1-2 Shift Rail Interlock Plug
Fig. 91 Installing 1-2 Shift Rail Interlock Pin
Fig. 92 Installing 1-2 Shift Rail
21 - 58 AX 15 MANUAL TRANSMISSIONJ
Page 1621 of 2158

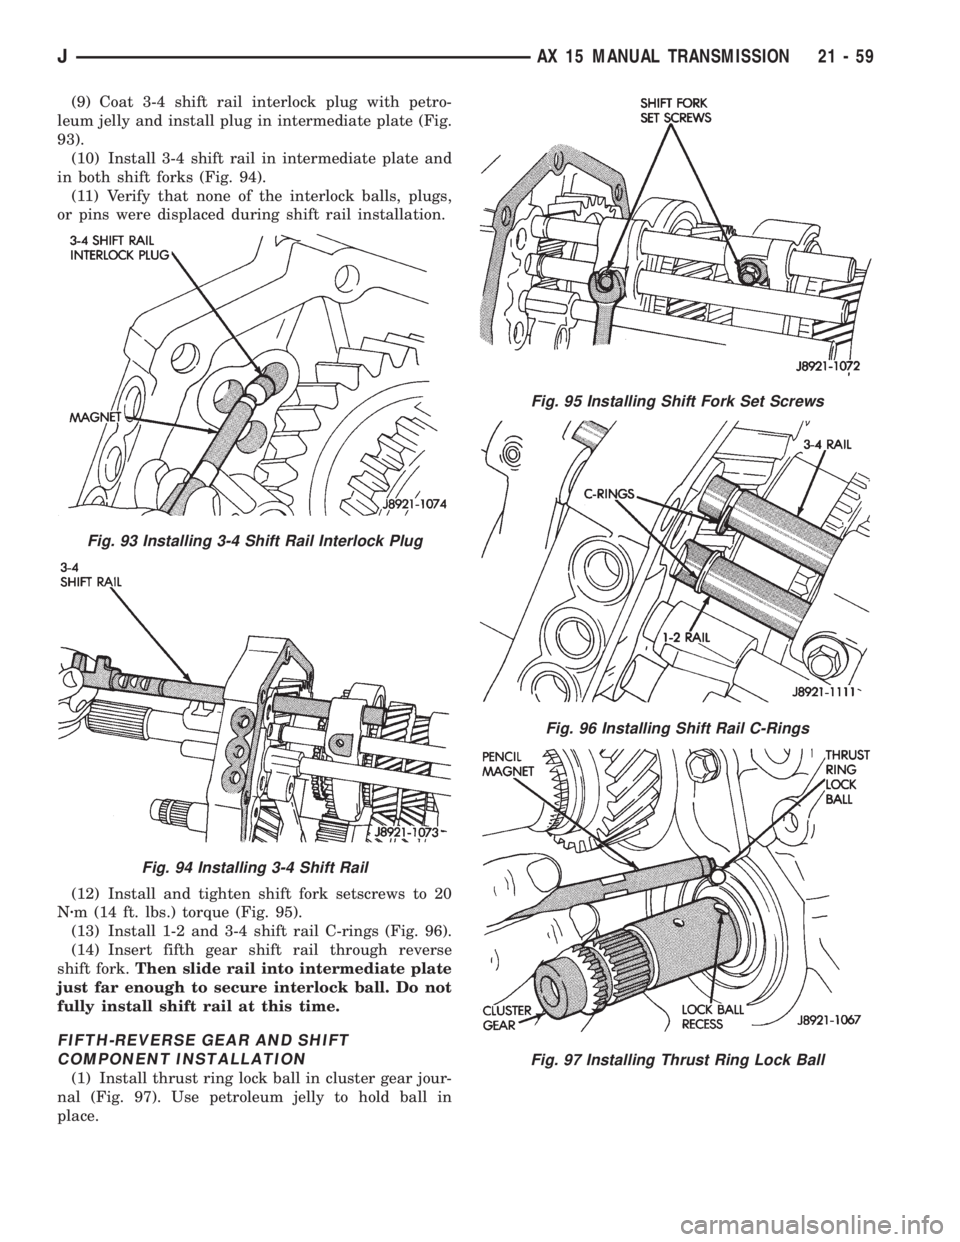
(9) Coat 3-4 shift rail interlock plug with petro-
leum jelly and install plug in intermediate plate (Fig.
93).
(10) Install 3-4 shift rail in intermediate plate and
in both shift forks (Fig. 94).
(11) Verify that none of the interlock balls, plugs,
or pins were displaced during shift rail installation.
(12) Install and tighten shift fork setscrews to 20
Nzm (14 ft. lbs.) torque (Fig. 95).
(13) Install 1-2 and 3-4 shift rail C-rings (Fig. 96).
(14) Insert fifth gear shift rail through reverse
shift fork.Then slide rail into intermediate plate
just far enough to secure interlock ball. Do not
fully install shift rail at this time.
FIFTH-REVERSE GEAR AND SHIFT
COMPONENT INSTALLATION
(1) Install thrust ring lock ball in cluster gear jour-
nal (Fig. 97). Use petroleum jelly to hold ball in
place.
Fig. 93 Installing 3-4 Shift Rail Interlock Plug
Fig. 94 Installing 3-4 Shift Rail
Fig. 95 Installing Shift Fork Set Screws
Fig. 96 Installing Shift Rail C-Rings
Fig. 97 Installing Thrust Ring Lock Ball
JAX 15 MANUAL TRANSMISSION 21 - 59
Page 1622 of 2158
(2) Install fifth gear thrust ring (Fig. 98). Be sure
thrust ring notch fits over lock ball.
(3) Assemble counter fifth gear, synchro sleeve, in-
serts and insert springs (Fig. 99).
(4) Lubricate two-piece bearing with petroleum
jelly and install it in counter fifth gear (Fig. 100).
(5) Install counter fifth gear and synchro assembly
on cluster gear journal (Fig. 101).
(6) Install synchro ring in synchro sleeve (Fig.
102).
Fig. 98 Installing Fifth Gear Thrust Ring
Fig. 99 Assembling Fifth Gear And Synchro
Assembly
Fig. 100 Installing Counter Fifth Gear Bearing
Fig. 101 Installing Counter Fifth Gear And Sleeve
Fig. 102 Installing Fifth Gear Synchro Ring
21 - 60 AX 15 MANUAL TRANSMISSIONJ
Page 1623 of 2158
(7) Install fifth spline gear on cluster journal (Fig.
103). Tap spline gear into place with plastic mallet if
necessary.
(8) Install fifth gear selective snap ring (Fig. 104).
Use thickest snap ring that will fit in shaft groove.
(9) Install reverse shift head and rail (Fig. 105).
Then install lock ball in shift head.
(10) Position fifth gear shift fork in synchro sleeve
(Fig. 106).(11) Install fifth gear shift rail (Fig. 107). Slide rail
through fork, shift head, intermediate plate and re-
verse shift fork. Be sure interlock ball is not dis-
placed during installation.
Fig. 103 Installing Fifth Spline Gear
Fig. 104 Installing Fifth Gear Snap Ring
Fig. 105 Installing Reverse Shift Head And Rail
Fig. 106 Fifth Gear Shift Fork Installation
Fig. 107 Fifth Gear Shift Rail Installation
JAX 15 MANUAL TRANSMISSION 21 - 61
Page 1624 of 2158

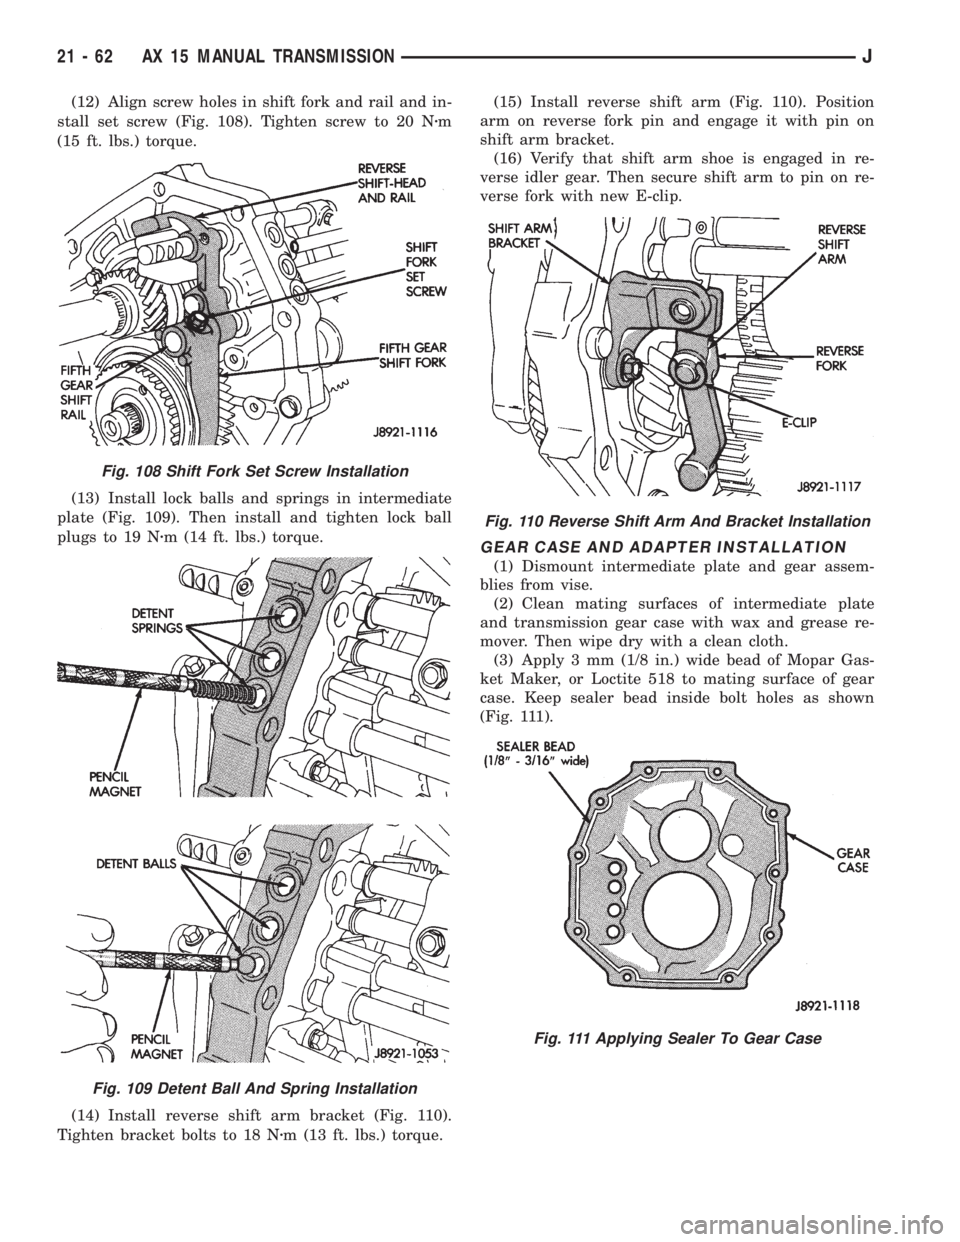
(12) Align screw holes in shift fork and rail and in-
stall set screw (Fig. 108). Tighten screw to 20 Nzm
(15 ft. lbs.) torque.
(13) Install lock balls and springs in intermediate
plate (Fig. 109). Then install and tighten lock ball
plugs to 19 Nzm (14 ft. lbs.) torque.
(14) Install reverse shift arm bracket (Fig. 110).
Tighten bracket bolts to 18 Nzm (13 ft. lbs.) torque.(15) Install reverse shift arm (Fig. 110). Position
arm on reverse fork pin and engage it with pin on
shift arm bracket.
(16) Verify that shift arm shoe is engaged in re-
verse idler gear. Then secure shift arm to pin on re-
verse fork with new E-clip.
GEAR CASE AND ADAPTER INSTALLATION
(1) Dismount intermediate plate and gear assem-
blies from vise.
(2) Clean mating surfaces of intermediate plate
and transmission gear case with wax and grease re-
mover. Then wipe dry with a clean cloth.
(3) Apply 3 mm (1/8 in.) wide bead of Mopar Gas-
ket Maker, or Loctite 518 to mating surface of gear
case. Keep sealer bead inside bolt holes as shown
(Fig. 111).
Fig. 108 Shift Fork Set Screw Installation
Fig. 109 Detent Ball And Spring Installation
Fig. 110 Reverse Shift Arm And Bracket Installation
Fig. 111 Applying Sealer To Gear Case
21 - 62 AX 15 MANUAL TRANSMISSIONJ
Page 1625 of 2158

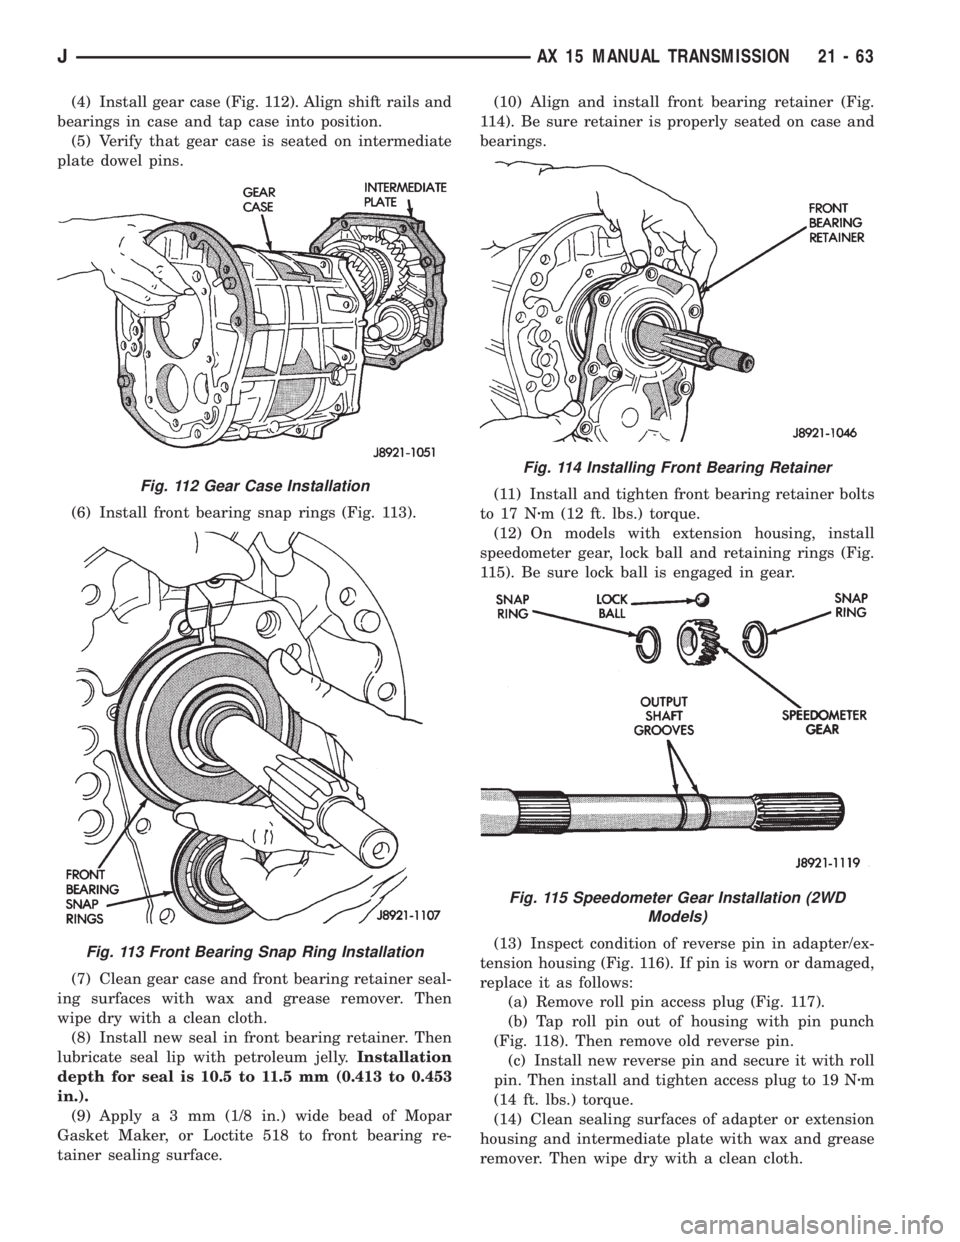
(4) Install gear case (Fig. 112). Align shift rails and
bearings in case and tap case into position.
(5) Verify that gear case is seated on intermediate
plate dowel pins.
(6) Install front bearing snap rings (Fig. 113).
(7) Clean gear case and front bearing retainer seal-
ing surfaces with wax and grease remover. Then
wipe dry with a clean cloth.
(8) Install new seal in front bearing retainer. Then
lubricate seal lip with petroleum jelly.Installation
depth for seal is 10.5 to 11.5 mm (0.413 to 0.453
in.).
(9) Applya3mm(1/8 in.) wide bead of Mopar
Gasket Maker, or Loctite 518 to front bearing re-
tainer sealing surface.(10) Align and install front bearing retainer (Fig.
114). Be sure retainer is properly seated on case and
bearings.
(11) Install and tighten front bearing retainer bolts
to 17 Nzm (12 ft. lbs.) torque.
(12) On models with extension housing, install
speedometer gear, lock ball and retaining rings (Fig.
115). Be sure lock ball is engaged in gear.
(13) Inspect condition of reverse pin in adapter/ex-
tension housing (Fig. 116). If pin is worn or damaged,
replace it as follows:
(a) Remove roll pin access plug (Fig. 117).
(b) Tap roll pin out of housing with pin punch
(Fig. 118). Then remove old reverse pin.
(c) Install new reverse pin and secure it with roll
pin. Then install and tighten access plug to 19 Nzm
(14 ft. lbs.) torque.
(14) Clean sealing surfaces of adapter or extension
housing and intermediate plate with wax and grease
remover. Then wipe dry with a clean cloth.
Fig. 112 Gear Case Installation
Fig. 113 Front Bearing Snap Ring Installation
Fig. 114 Installing Front Bearing Retainer
Fig. 115 Speedometer Gear Installation (2WD
Models)
JAX 15 MANUAL TRANSMISSION 21 - 63
Page 1626 of 2158
(15) Apply 3 mm (1/8 in.) wide bead of Mopar Gas-
ket Maker, or Loctite 518 to sealing surface of
adapter or extension housing. Keep sealer bead in-
side bolt holes as shown in Figure 111.
(16) Align and install adapter or extension housing
on intermediate plate (Fig. 119). Be sure housing is
seated on intermediate plate dowel pins.(17) Coat threads of housing attaching bolts with
Mopar silicone sealer. Then install and tighten bolts
to 37 Nzm (27 ft. lbs.) torque.
(18) Install detent ball (Fig. 120).
(19) Install detent spring (Fig. 121).
Fig. 116 Reverse Pin Position
Fig. 117 Access Plug Removal/Installation
Fig. 118 Roll Pin Removal/Installation
Fig. 119 Adapter/Extension Housing Installation
Fig. 120 Installing Detent Ball
Fig. 121 Installing Detent Spring
21 - 64 AX 15 MANUAL TRANSMISSIONJ