Page 153 of 240
Cooling System, Windshield Washers
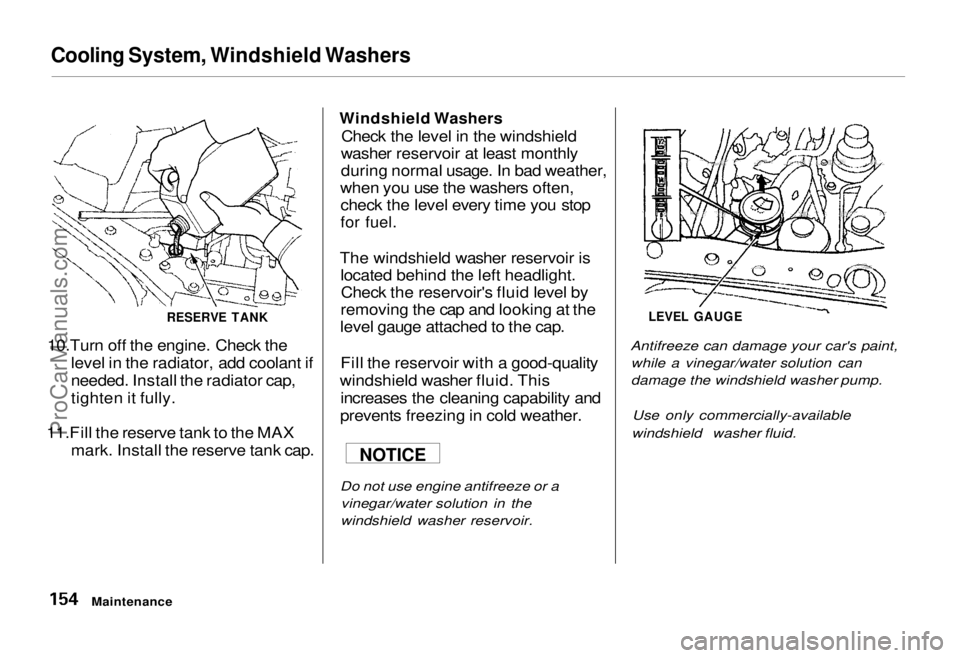
10.Turn off the engine. Check the level in the radiator, add coolant if needed. Install the radiator cap,
tighten it fully.
11.Fill the reserve tank to the MAX mark. Install the reserve tank cap.
Windshield Washers
Check the level in the windshield
washer reservoir at least monthly
during normal usage. In bad weather,
when you use the washers often, check the level every time you stop
for fuel.
The windshield washer reservoir is located behind the left headlight.Check the reservoir's fluid level by
removing the cap and looking at the
level gauge attached to the cap.
Fill the reservoir with a good-quality
windshield washer fluid. This increases the cleaning capability and
prevents freezing in cold weather.
Do not use engine antifreeze or a vinegar/water solution in the
windshield washer reservoir.
LEVEL GAUGE
Antifreeze can damage your car's paint, while a vinegar/water solution can
damage the windshield washer pump.
Use only commercially-available
windshield washer fluid.
Maintenance
RESERVE TANK
NOTICEProCarManuals.comMain Menu Table of Contents s t
Page 154 of 240
Automatic Transmission Fluid
Check the fluid level with the engine
at normal operating temperature.
1. Park the car on level ground. Shut off the engine.
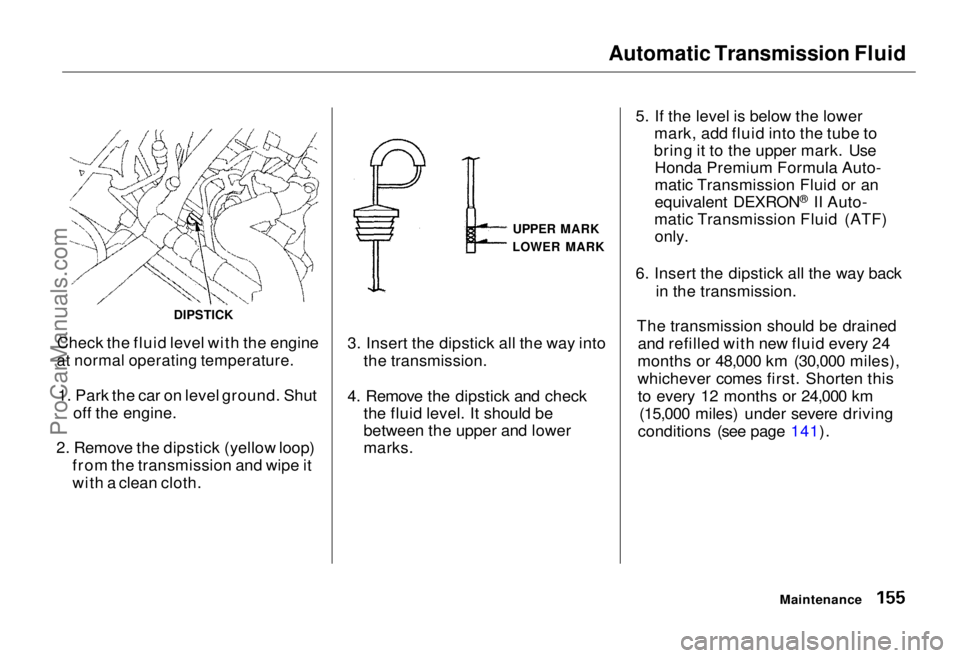
2. Remove the dipstick (yellow loop) from the transmission and wipe it
with a clean cloth.
UPPER MARK
3. Insert the dipstick all the way into the transmission.
4. Remove the dipstick and check the fluid level. It should be
between the upper and lower
marks. 5. If the level is below the lower
mark, add fluid into the tube to
bring it to the upper mark. Use Honda Premium Formula Auto-
matic Transmission Fluid or an
equivalent DEXRON ®
II Auto-
matic Transmission Fluid (ATF) only.
6. Insert the dipstick all the way back in the transmission.
The transmission should be drained and refilled with new fluid every 24
months or 48,000 km (30,000 miles),
whichever comes first. Shorten this to every 12 months or 24,000 km (15,000 miles) under severe driving
conditions (see page 141).
Maintenance
DIPSTICK
LOWER MARKProCarManuals.comMain Menu Table of Contents s t
Page 156 of 240
Brake Fluid, Power Steering
Anti-lock Brake System
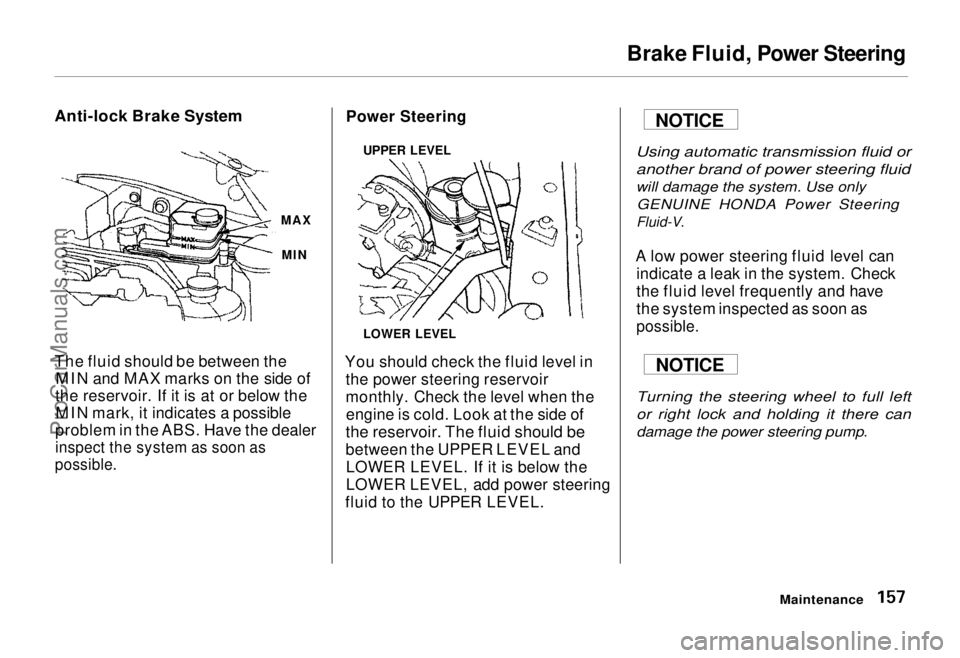
The fluid should be between the MIN and MAX marks on the side of
the reservoir. If it is at or below the MIN mark, it indicates a possible
problem in the ABS. Have the dealer
inspect the system as soon as
possible.
Power Steering
You should check the fluid level in the power steering reservoir
monthly. Check the level when theengine is cold. Look at the side of
the reservoir. The fluid should be
between the UPPER LEVEL and LOWER LEVEL. If it is below the
LOWER LEVEL, add power steering
fluid to the UPPER LEVEL. A low power steering fluid level can
indicate a leak in the system. Check
the fluid level frequently and have
the system inspected as soon as
possible.
Maintenance
NOTICETurning the steering wheel to full left
or right lock and holding it there can
damage the power steering pump.
NOTICE
UPPER LEVE
L
MAX MIN
LOWER LEVEL
Using automatic transmission fluid or
another brand of power steering fluid
will damage the system. Use only
GENUINE HONDA Power Steering
Fluid-V.
ProCarManuals.comMain Menu Table of Contents s t
Page 157 of 240
Air Cleaner
The air cleaner element should be replaced every 2 years or 48,000 km (30,000 miles), whichever comes
first. Under severe driving condi-
tions, it should also be cleaned every 12 months or 24,000 km (15,000
miles), whichever comes first. Cleaning (Severe Conditions)
Clean the air cleaner element by
blowing compressed air through it in the opposite direction to normal air
flow. If you do not have access to compressed air (such as a gas
station), ask your Honda dealer to do
this service.
Follow the replacement procedure
for removal and reinstallation.
The air cleaner element is inside thebox on the passenger's side of theengine compartment.
To replace it:
1. Remove the two pins holding the air intake cover by pulling the
head on each pin. Remove the air intake cover.
2. Remove the air duct from the air cleaner housing cover.
MaintenanceProCarManuals.comMain Menu Table of Contents s t
Page 160 of 240
Spark Plugs
5. Torque the spark plug. (If you do not have a torque wrench, tighten
the spark plug 2/3 turn after it
contacts the cylinder head.)
Tightening torque:
18 N .
m (1.8 kg-m, 13 Ib-ft)
Tighten the spark plugs carefully. A
spark plug that is too loose can
overheat and damage the engine.
Overtightening can cause damage to
the threads in the cylinder head.
6. Install
the spark plug cap.
7. Repeat this procedure for the other three spark plugs. Specifications:
NGK: ZFR5F-11
Nippondenso: KJ16CR-L11
Spark Plug
Gap:
1.1 mm (0.04 in)
Maintenance
NOTICE
ProCarManuals.comMain Menu Table of Contents s t
Page 167 of 240
Air Conditioning
Your car's air conditioning is a sealed system. Any major maintenance,
such as recharging, should be done
by
a qualified technician. There are a
couple of things you can do to make sure the air conditioning works
efficiently.
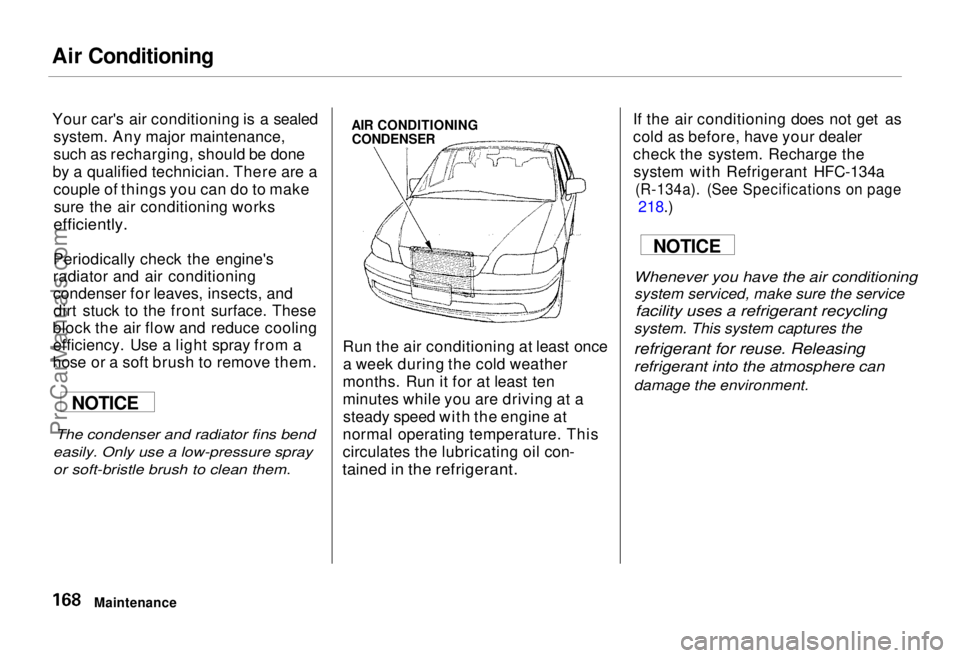
Periodically check the engine's
radiator and air conditioning
condenser for leaves, insects
, and
dirt stuck to the front surface.
These
block the air flow and reduce cooling efficiency. Use a light spray from a
hose or
a soft brush to remove them. Run the air conditioning at least once
a week during the cold weather
months
. Run it for at least ten
minutes while you are driving at a steady speed with the engin
e at
normal operating temperature. This
circulates
the lubricating oil con-
tained in the refrigerant.
If th
e air conditioning does not get as
cold
as before, have your dealer
chec
k the system. Recharge the
syste
m with Refrigerant HFC-134a
(R-134a). (See Specifications on page
218.)
Whenever you have the air conditioning
system. This system captures the
refrigerant for reuse. Releasing
refrigerant into the atmosphere can
damage the environment.
Maintenance
AIR CONDITIONING
CONDENSER
The condenser and radiator fins bend
easily. Only use a low-pressure spray
or soft-bristle brush to clean them.
NOTICE NOTICE
system serviced, make sure the service
facility uses a refrigerant recycling
ProCarManuals.comMain Menu Table of Contents s t
Page 181 of 240
Storing Your Car
If you need to park your car for an
extended period (more than 1
month), there are several things you should do to prepare it for storage.
Proper preparation helps prevent
deterioration and makes it easier to
get your car back on the road. It is best to store your car indoors if at all
possible.
Fill the fuel tank. Change the engine oil and filter
(see page 148 ). Wash and dry the exterior
completely.
Clean the interior. Make sure the
carpeting, floor mats, etc. are
completely dry. Leave the parking brake off. Put
the transmission in Park. Block the rear wheels.
If the car is to be stored for a
longer period, it should be supported on jackstands so the
tires are off the ground. Leave one window open slightly (if
the car is being stored indoors).
Disconnect the battery. Support the front and rear wiper
blade arms with a folded towel or
rag so they do not touch the
windshield. Apply a silicone spray lubricant to
all door and tailgate seals. Also,
apply wax to the painted surfaces
that mate with the door and
tailgate seals. Cover the car with a "breathable"
car cover, one made from a porous
material such as cotton.
Nonporous materials, such as plastic sheeting, trap moisture
which can damage the paint. If possible, run the engine for a
while periodically (preferably once a month).
If you store your car for 12 months
or longer, have your Honda dealer
perform the inspections called for in
the 24 months/48,000 km (30,000
miles) maintenance schedule (Normal Conditions) as soon as you
take it out of storage (see page 140 ).
The replacements called for in the maintenance schedule are notneeded unless the car has actually
reached that time or mileage.
MaintenanceProCarManuals.comMain Menu Table of Contents s t
Page 190 of 240
Taking Care of the Unexpected
This section covers the more- common problems that motorists
experience with their cars. It gives
you information about how to safely evaluate the problem and what to do
to correct it. If the problem has stranded you on the side of the road,
you may be able to get going again. If not, you will also find instructions
on getting your car towed. Compact Spare Tire....................... 192
Changing a Flat Tire..................... 193
If Your Engine Won't Start........... 199 Nothing Happens....................... 199
The Starter Operates
Normally................................ 200
Jump Starting................................. 200 If Your Engine Overheats............. 202Low Oil Pressure........................... 204
Charging System Indication......... 205
Malfunction Indicator Lamp/ Check Engine Light.................. 206
Closing the Sunroof....................... 207
Fuses............................................... 208
Checking and Replacing........... 209
Towing............................................ 213
Taking Care of the UnexpectedProCarManuals.comMain Menu s t