Page 51 of 240
Steering Wheel Controls, Keys and Locks
Horn
Press either of the buttons on the
steering wheel spokes to sound the
horn.
Keys
Your car comes with two kinds of
keys: a master key and a valet key.
The master key fits all locks on your
car:
IgnitionDoors
Glove box Tailgate
The valet key only works the ignition
and the door locks. You can keep the
glove box locked when you leave
your car and valet key at a parking
facility.
You should have received a key number plate with your set of keys.
You will need this key number if you ever have to replace a lost key. Store
this plate in a safe place.
When replacing keys, use only Honda-approved key blanks.
Instruments and Controls
HORN BUTTONS
KEY
NUMBER
PLATE
VALET
KEY
MASTER
KEYProCarManuals.comMain Menu Table of Contents s t
Page 52 of 240
Keys and Locks
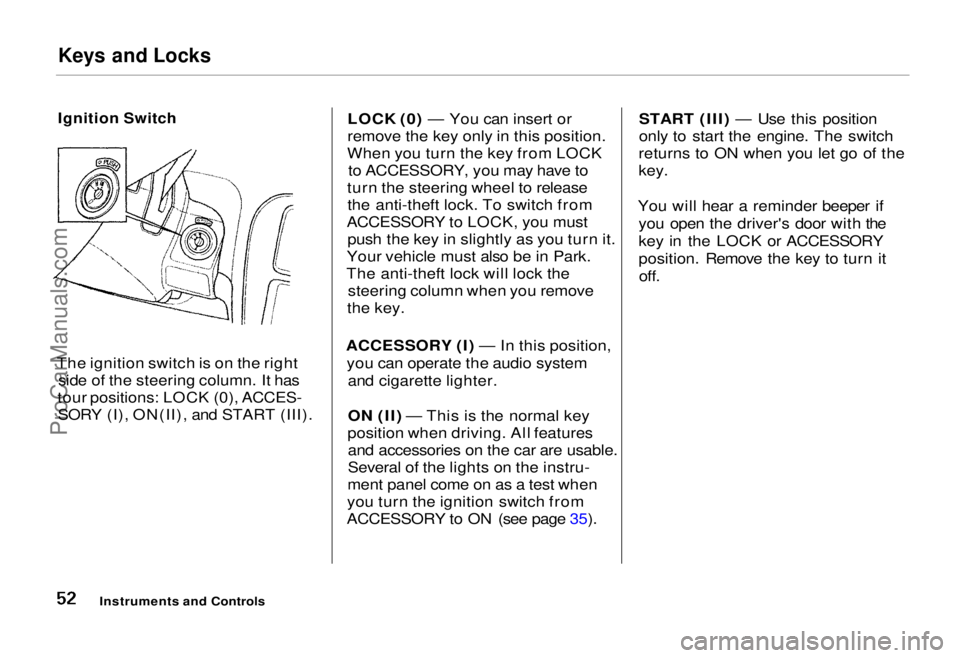
Ignition Switch
The ignition switch is on the right side of the steering column. It has
tour positions: LOCK (0), ACCES- SORY (I), ON(II), and START (III). LOCK (0) — You can insert or
remove the key only in this position.
When you turn the key from LOCK to ACCESSORY, you may have to
turn the steering wheel to release the anti-theft lock. To switch from
ACCESSORY to LOCK, you must push the key in slightly as you turn it.
Your vehicle must also be in Park.
The anti-theft lock will lock the steering column when you remove
the key.
ACCESSORY (I) — In this position, you can operate the audio system and cigarette lighter.
ON (II) — This is the normal key
position when driving. All features and accessories on the car are usable.
Several of the lights on the instru-
ment panel come on as a test when
you turn the ignition switch from
ACCESSORY to ON (see page 35). START (III) — Use this position
only to start the engine. The switch
returns to ON when you let go of the
key.
You will hear a reminder beeper if you open the driver's door with the
key in the LOCK or ACCESSORY
position. Remove the key to turn itoff.
Instruments and ControlsProCarManuals.comMain Menu Table of Contents s t
Page 118 of 240

Preparing to Drive
You should do the following checks and adjustments every day before
you drive your car.
1. Make sure all windows, mirrors, and outside lights are clean and
unobstructed. Remove frost, snow,
or ice.
2. Check that the hood and tailgate are fully closed.
3. Visually check the tires. If a tire looks low, use a gauge to check its
pressure.
4. Check that any items you may be carrying with you inside are stored
properly or fastened down
securely. 5. Check the adjustment of the seat
(see page 56).
6. Check the adjustment of the inside and outside mirrors (see
page 66).
7. Check the adjustment of the steering wheel (see page 46).
8. Make sure the doors are securely closed and locked.
9. Fasten your seat belt. Check that your passengers have fastened
their seat belts (see page 7). 10. Turn the ignition ON (II). Check
the indicator lights in the instru-
ment panel.
11. Start the engine (see page 119).
12. Check the gauges and indicator lights in the instrument panel (see
page 35).
DrivingProCarManuals.comMain Menu Table of Contents s t
Page 123 of 240
Automatic Transmission
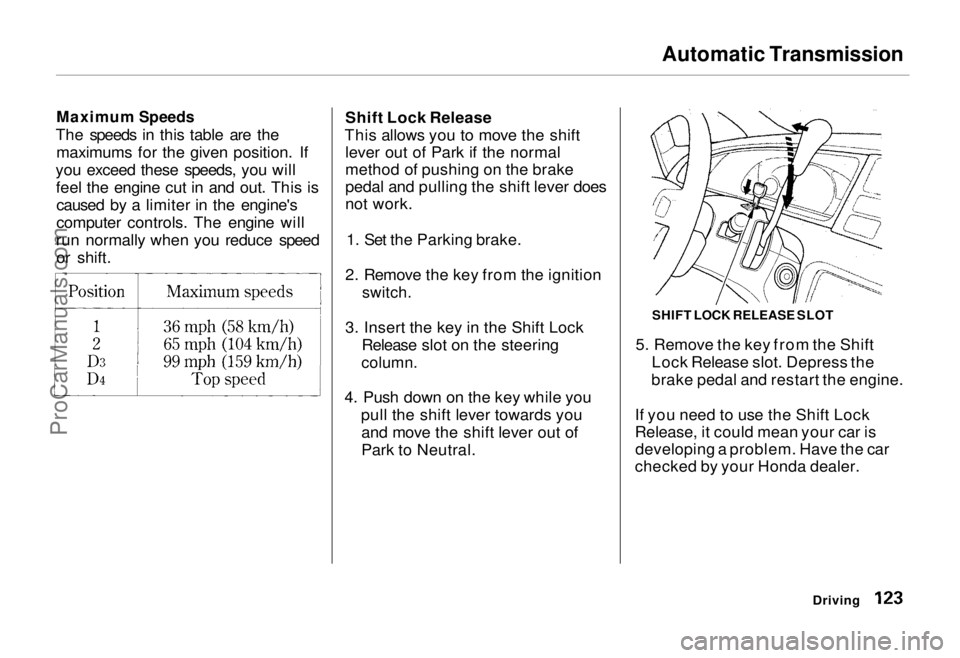
Maximum Speeds
The speeds in this table are the maximums for the given position. If
you exceed these speeds, you will feel the engine cut in and out. This iscaused by a limiter in the engine's
computer controls. The engine will
run normally when you reduce speed or shift. Shift Lock Release
This allows you to move the shift lever out of Park if the normal
method of pushing on the brake
pedal and pulling the shift lever does
not work.
1. Set the Parking brake.
2. Remove the key from the ignition
switch.
3. Insert the key in the Shift Lock Release slot on the steering
column.
4. Push down on the key while you pull the shift lever towards youand move the shift lever out of
Park to Neutral. 5. Remove the key from the Shift
Lock Release slot. Depress the
brake pedal and restart the engine.
If you need to use the Shift Lock
Release, it could mean your car is developing a problem. Have the car
checked by your Honda dealer.
Driving
SHIFT LOCK RELEASE SLOTProCarManuals.comMain Menu Table of Contents s t
Page 125 of 240
The Braking System
If this happens, you will immediately
notice that the brake pedal goes down much farther and you need to
press on it much harder. A much
longer distance will be needed to stop the car.
Slow the car by downshifting to a
lower gear and removing your foot
from the accelerator pedal. Pull to the side of the road as soon as it issafe. Because of the longer stopping
distance needed, brake system
failure is very hazardous. It is best to
have your car towed, but if you must drive the car in this condition, be
extremely cautious. Have your car
repaired as soon as possible.
Anti-lock Brakes
All U.S. models and the Canadian six-passenger model have an Anti-lockBrake System (ABS) as standard
equipment. It is optional on the
Canadian seven-passenger model.
ABS helps you maintain steering control. It does this by helping you to
prevent the wheels from locking up and skidding.
The ABS is always "On". It requires no special effort or driving technique.
You will feel a pulsation in the brake pedal when the ABS activates.
Activation varies with the amount of traction your tires have. On dry
pavement, you will need to press on
the brake pedal very hard before you
feel the pedal pulsation that means
the ABS has activated. However, youmay feel the ABS activate immedi-
ately if you are trying to stop on
snow or ice. Under all conditions, the
ABS is helping to prevent the wheels from locking so you can retainsteering control. You should con-
tinue to press on the brake pedal
with the same force.
You may feel a slight movement of the brake pedal just after you start
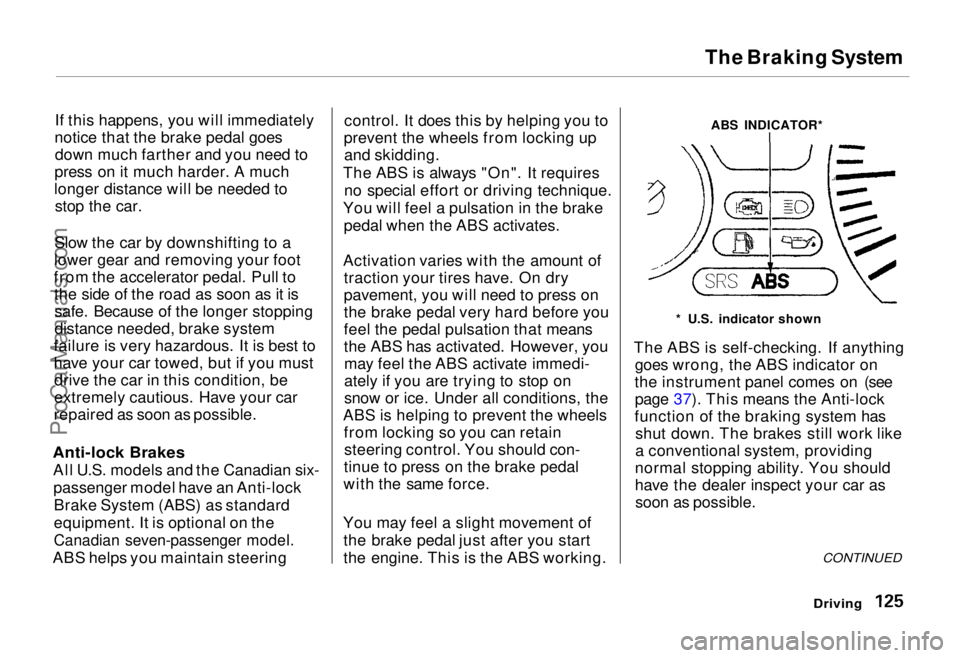
the engine. This is the ABS working. ABS INDICATOR*
* U.S. indicator shown
The ABS is self-checking. If anything goes wrong, the ABS indicator on
the instrument panel comes on (see page 37). This means the Anti-lock
function of the braking system has shut down. The brakes still work like
a conventional system, providing
normal stopping ability. You should
have the dealer inspect your car as soon as possible.
CONTINUED
DrivingProCarManuals.comMain Menu Table of Contents s t
Page 126 of 240
The Braking System, Driving in Bad Weather
A car with ABS may require a longer
distance to stop on loose or uneven
surfaces than an equivalent car with-
out Anti-lock. The ABS cannot make
up for road conditions or bad judg-
ment. It is still your responsibility to
drive at reasonable speeds for
weather and traffic conditions, and to leave a margin of safety.
For a technical description of the
ABS hardware, refer to page 220. Driving in Bad Weather
Rain, fog, and snow conditions re-
quire a different driving technique
because of reduced traction and
visibility. Keep your car well- maintained and exercise greater
caution when you need to drive in
bad weather. The cruise control should not be used in these condi-
tions. Driving Technique — Always drive
slower than you would in dry
weather. It takes your car longer to
react, even in conditions that may seem just barely damp. Apply
smooth, even pressure to all the
controls. Abrupt steering wheel
movements or sudden, hard appli-
cation of the brakes can cause loss of
control in wet weather. Be extra
cautious for the first few miles of driving while you adjust to the
change in driving conditions. This is especially true in snow. A person can
forget some snow-driving techniques during the summer months. Practice
is needed to relearn those skills.
Exercise extra caution when driving
in rain after a long dry spell. After
months of dry weather, the first
rains bring oil to the surface of the
roadway, making it slippery.
DrivingProCarManuals.comMain Menu Table of Contents s t
Page 129 of 240
Towing a Trailer
The best way to confirm that your total towing package is within thesespecifications is to get it weighed.
Load the car and trailer as you
normally would while towing, and
take them to a public scale. Have
them check the total weight and the
weight at each axle, then compare
them to the specifications.
Trailer Hitches
Your Honda dealer, or the Honda Customer Relations Zone Office, can
give you advice on the proper hitch
for your car. Never use a hitch that mounts only to the rear bumper. The
bumper is not designed to handle
that type of load. The hitch shouldbolt to the underbody of the car anddistribute the load over a wide area.
Always have a trailer hitch installed by a qualified technician.
A trailer hitch that is not adequate for the size of the trailer, or a hitch that isimproperly installed, can cause damage
to the underside of your car.
Driving
NOTICE
Improperly loading your car and
trailer can seriously affect its
steering and braking performance, causing a crashin which you can be seriously
injured.
Check the loading of your car
and trailer carefully before starting to drive.ProCarManuals.comMain Menu Table of Contents s t
Page 133 of 240
Towing a Trailer
If you have to stop while going uphill, do not hold the car in place by
pressing on the accelerator. This can cause the automatic transmission to
overheat. Use the parking brake or
footbrake.
When parking your car and trailer, especially on a hill, be sure to follow
all the normal precautions. Turn
your front wheels into the curb, set the parking brake firmly, and put thetransmission in Park. In addition,
place wheel chocks at each of the
trailer's tires. Backing up with a trailer is difficult
and takes practice. Drive slowly,
make small movements with the
steering wheel, and have someone
stand outside to guide you. Grip the
steering wheel on the bottom (rather
than the usual position near the top). Move your hand to the left to get the
trailer to move to the left, and right
to move the trailer right.
DrivingProCarManuals.comMain Menu Table of Contents s t