1995 CHEVROLET SUBURBAN tires
[x] Cancel search: tiresPage 220 of 486
Loading Your Vehicle
I
PSI/KPA (COLD)
~ SEE OWNER'S MANUAL FOR ADDITIONAL INFORMATION
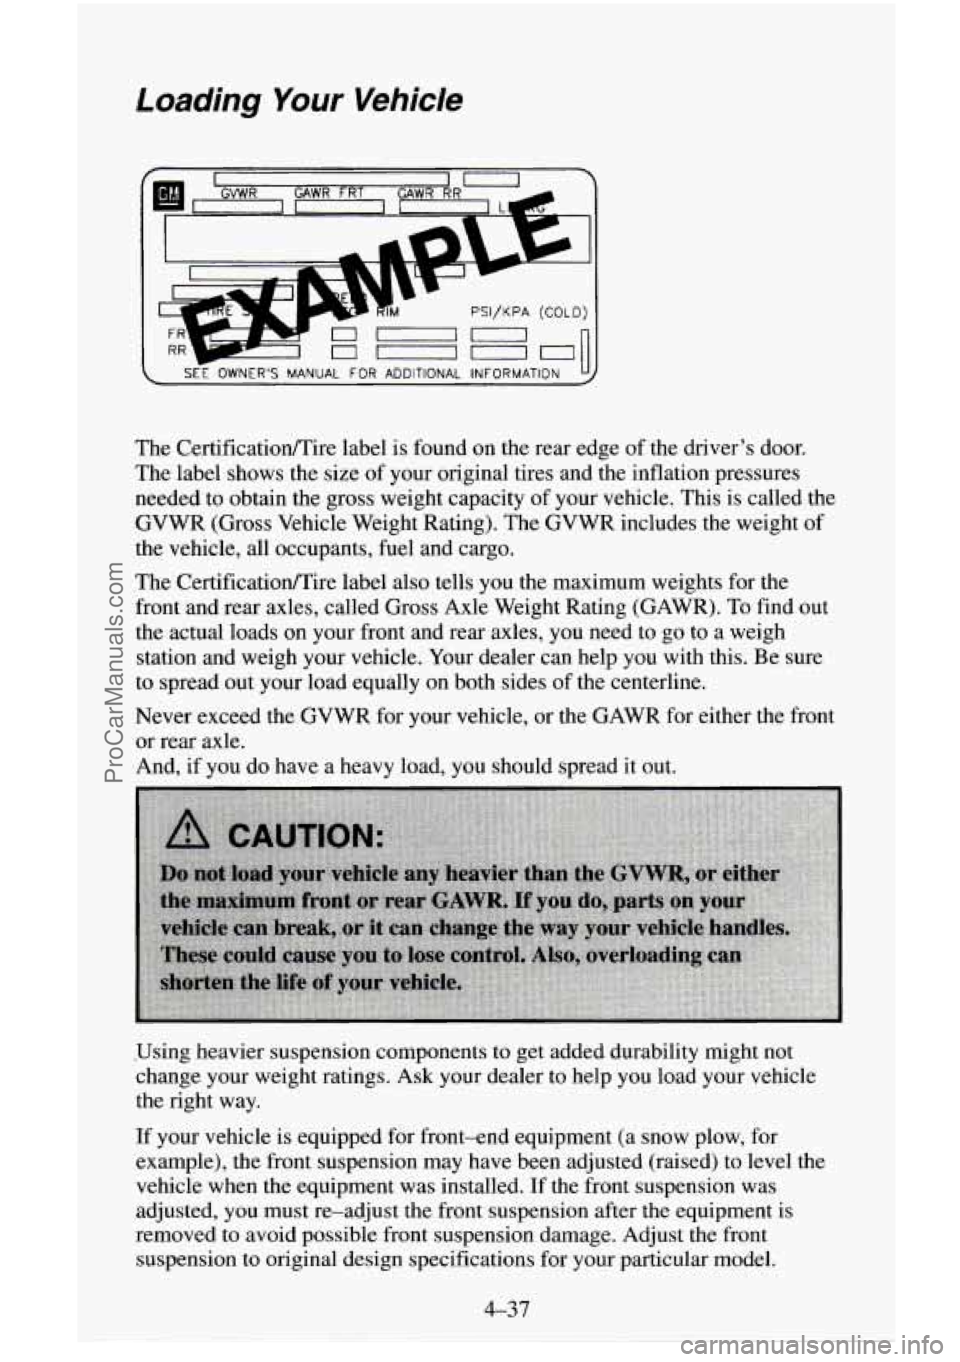
The CertificatiodTire label is found on the rear edge of the driver's door.
The label shows the size
of your original tires and the inflation pressures
needed to obtain the gross weight capacity of your vehicle. This is called the
GVWR (Gross Vehicle Weight Rating). The GVWR includes the weight of
the vehicle, all occupants, fuel and cargo.
The Certificatiodl'ire label
also tells you the maximum weights for the
front and rear axles, called Gross Axle Weight Rating (GAWR). To find
out
the actual loads on your front and rear axles, you need to go to a weigh
station and weigh your vehicle. Your dealer can help you with this. Be sure
to spread out your load equally on both sides
of the centerline.
Never exceed the GVWR
for your vehicle, or the GAWR for either the front
or rear axle.
And, if you do have a heavy load, you should spread it out.
.Using heavier suspension components to get added durability might not
change your weight ratings. Ask your dealer to help you load your vehicle
the right way.
If your vehicle is equipped for front-end equipment (a snow plow, for
example), the front suspension may have been adjusted (raised) to level the
vehicle when the equipment was installed. If the front suspension was
adjusted, you must re-adjust the front suspension after the equipment is
removed to avoid possible front suspension damage. Adjust the front
suspension
to original design specifications for your particular model.
4-37
ProCarManuals.com
Page 225 of 486
After you’ve loaded your trailer, weigh the trailer and then the tongue,
separately, to see
if the weights are proper. If they aren’t, you may be able to
get them right simply by moving some items around in the trailer.
Total Weight on Your Vehicle’s Tires
Be sure your vehicle’s tires are inflated to the limit for cold tires. You’ll find
these numbers on the Certification label at the rear edge of the driver’s door
or see “Tire Loading”
in the Index. Then be sure you don’t go over the
GVW limit for your vehicle, including the weight of the trailer tongue.
Hitches
It’s important to have the correct hitch equipment. Crosswinds, large trucks
going by, and rough roads are a few reasons why
you’ll need the right hitch.
Here are some rules to follow:
If you use a step bumper hitch, and your trailer tongue has a V-shaped
foot, your bumper could be damaged in sharp turns. Check the distance
from the front edge
of the foot to the middle of the hitch ball socket. If
the distance is less than 12 inches, take the foot off the trailer tongue.
0 If you’ll be pulling a trailer with a utility model that, when loaded, will
weigh more then
3,000 pounds (2 250 kg) be sure to use a properly
mounted, weight-distributing hitch and sway control of the proper size.
This equipment is very important for proper vehicle loading and good
handling when you’re driving.
If you’ll be pulling
a trailer with a Suburban that, when loaded, will
weigh more than
4,000 pounds (1 8 14 kg) be sure to use a properly
mounted, weight-distributing hitch and sway control
of the proper size.
This equipment is very important for proper vehicle loading and good
handling when you’re driving.
Will you have to make any holes in the body of your vehicle when you
install
a trailer hitch? If you do, then be sure to seal the holes later
when you remove the
hitch. If you don’t seal them, deadly carbon
monoxide
(CO) from your exhaust can get into your vehicle (see
“Carbon Monoxide’’ in the Index). Dirt and water can, too.
Safety Chains
You should always attach chains between your vehicle and your trailer.
Cross the safety chains under the tongue of the trailer
so that the tongue will
not drop to the road if it becomes separated from the hitch. Instructions
about safety chains may be provided by the hitch manufacturer or by the
trailer manufacturer. Follow the manufacturer’s recommendation for
attaching safety chains and do
not attach them to the bumper. Always leave
just enough slack
so you can turn with your rig. And, never allow safety
chains to drag on the ground.
4-42
ProCarManuals.com
Page 227 of 486
Towing a trailer requires a certain amount of experience. Before setting out
for the open road,
you’ll want to get to know your rig. Acquaint yourself
with the feel
of handling and braking with the added weight of the trailer.
And always keep in mind that the vehicle
you are driving is now a good
deal longer and not nearly as responsive as your vehicle
is by itself.
Before
you start, check the trailer hitch and platform (and attachments),
safety chains, electrical connector, lamps, tires and mirror adjustment.
If the
trailer has electric brakes, start your vehicle and trailer moving and then
apply the trailer brake controller by hand to be sure the brakes are working.
This
lets you check your electrical connection at the same time.
During your trip, check occasionally
to be sure that the load is secure, and
that the lamps and any trailer brakes are
still working.
Following Distance
Stay at least twice as far behind the vehicle ahead as you would when
driving your vehicle without a trailer. This can help
you avoid situations that
require heavy braking and sudden turns.
Passing
You’ll need more passing distance up ahead when you’re towing a trailer.
And, because you’re a good deal longer, you’ll need to go much farther
beyond the passed vehicle before
you can return to your lane.
Backing Up
Hold the bottom of the steering wheel with one hand. Then, to move the
trailer
to the left, just move that hand to the left. To move the trailer to the
right, move your hand to
the right. Always back up slowly and, if possible,
have someone guide
you.
Making Turns
I NOTICE:
Making very sharp turns while trailering could cause the traile\
r
to come in contact with the vehicle. Your vehicle could be
damaged. Avoid making very sharp turns while trailering.
When you’re turning with a trailer, make wider turns than normal. Do this
so your trailer won’t strike soft shoulders, curbs, road signs, trees, or other
objects. Avoid jerky or sudden maneuvers. Signal well in advance.
4-44
ProCarManuals.com
Page 240 of 486
To wing Your Vehicle
Try to have your GM dealer or a professional towing service tow your
vehicle. They can provide the right equipment and know how
to tow it
without damage.
If your vehicle has been changed since it was factory-new, by adding such
things like fog lamps, aero skirting, or special tires and wheels, these things
could be damaged during towing.
Before you do anything, turn on the hazard warning flashers.
When you call, tell the towing service:
0 That your vehicle has rear-wheel drive, or that it has the four-wheel
drive option.
The make, model, and year of your vehicle.
0 Whether you can move the shift lever for the transmission and transfer
case, if you have one.
0 If there was an accident, what was damaged.
When your vehicle is being towed, have
the ignition key off. The steering
wheel should be clamped
in a straight-ahead position, with a clamping
device designed for towing service.
Do not use the vehicle’s steering
column
lock for this. The transmission and transfer case, if you have one,
should be in NEUTRAL (N) and the parking brake released.
5-7
ProCarManuals.com
Page 257 of 486
h
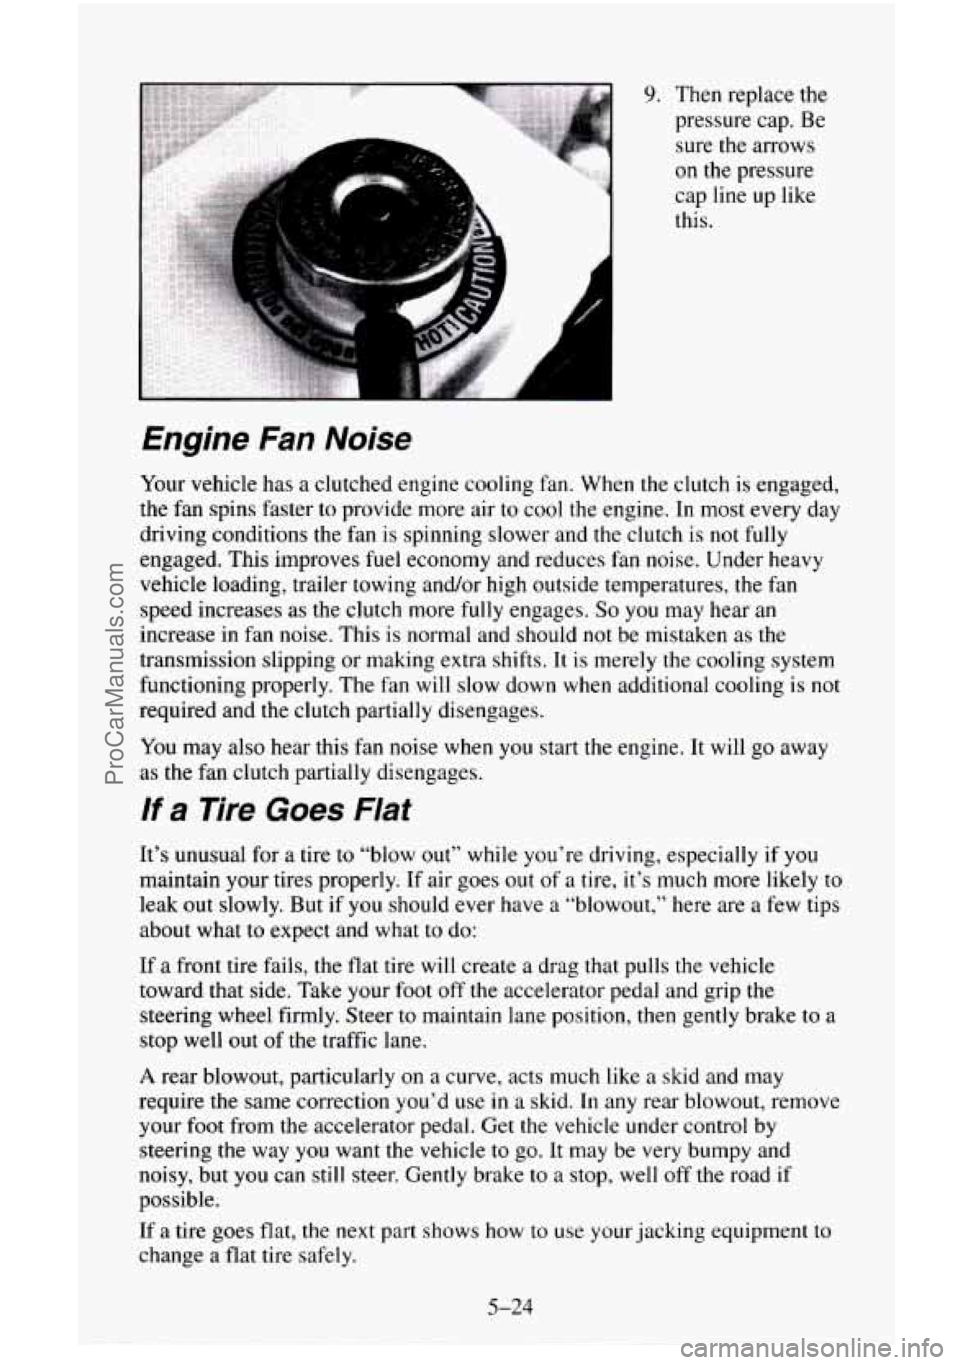
9. Then replace the
pressure cap. Be
sure the arrows
on the pressure
cap line up like
this.
Engine Fan Noise
Your vehicle has a clutched engine cooling fan. When the clutch is engaged,
the fan spins faster to provide more air to cool the engine. In most every day
driving conditions the fan
is spinning slower and the clutch is not fully
engaged. This improves fuel economy and reduces fan noise. Under heavy
vehicle loading, trailer towing and/or high outside temperatures,
the fan
speed increases as the clutch more
fully engages. So you may hear an
increase in fan noise. This is normal and should not be mistaken as the
transmission slipping
or making extra shifts. It is merely the cooling system
functioning properly. The fan will slow down when additional cooling is not
required and the clutch partially disengages.
You may also hear this fan noise when you start the engine. It will go away
as the fan clutch partially disengages.
If a Tire Goes Flat
It’s unusual for a tire to “blow out” while you’re driving, especially if you
maintain your tires properly. If air goes out of a tire, it’s much more likely to
leak out slowly. But if you should ever have a “blowout,” here are a few tips
about what
to expect and what to do:
If a front tire fails, the flat tire will create a drag that pulls the vehicle
toward that side. Take your foot off the accelerator pedal and grip the
steering wheel firmly. Steer
to maintain lane position, then gently brake to a
stop well out of the traffic lane.
A rear blowout, particularly on a curve, acts much like a skid and may
require the same correction you’d
use in a skid. In any rear blowout, remove
your foot from
the accelerator pedal. Get the vehicle under control by
steering the way
you want the vehicle to go. It may be very bumpy and
noisy, but you can still steer. Gently brake to a stop, well
off the road if
possible.
If a tire goes flat, the next part shows how to use your jacking equipment to
change a flat tire safely.
5-24
ProCarManuals.com
Page 263 of 486
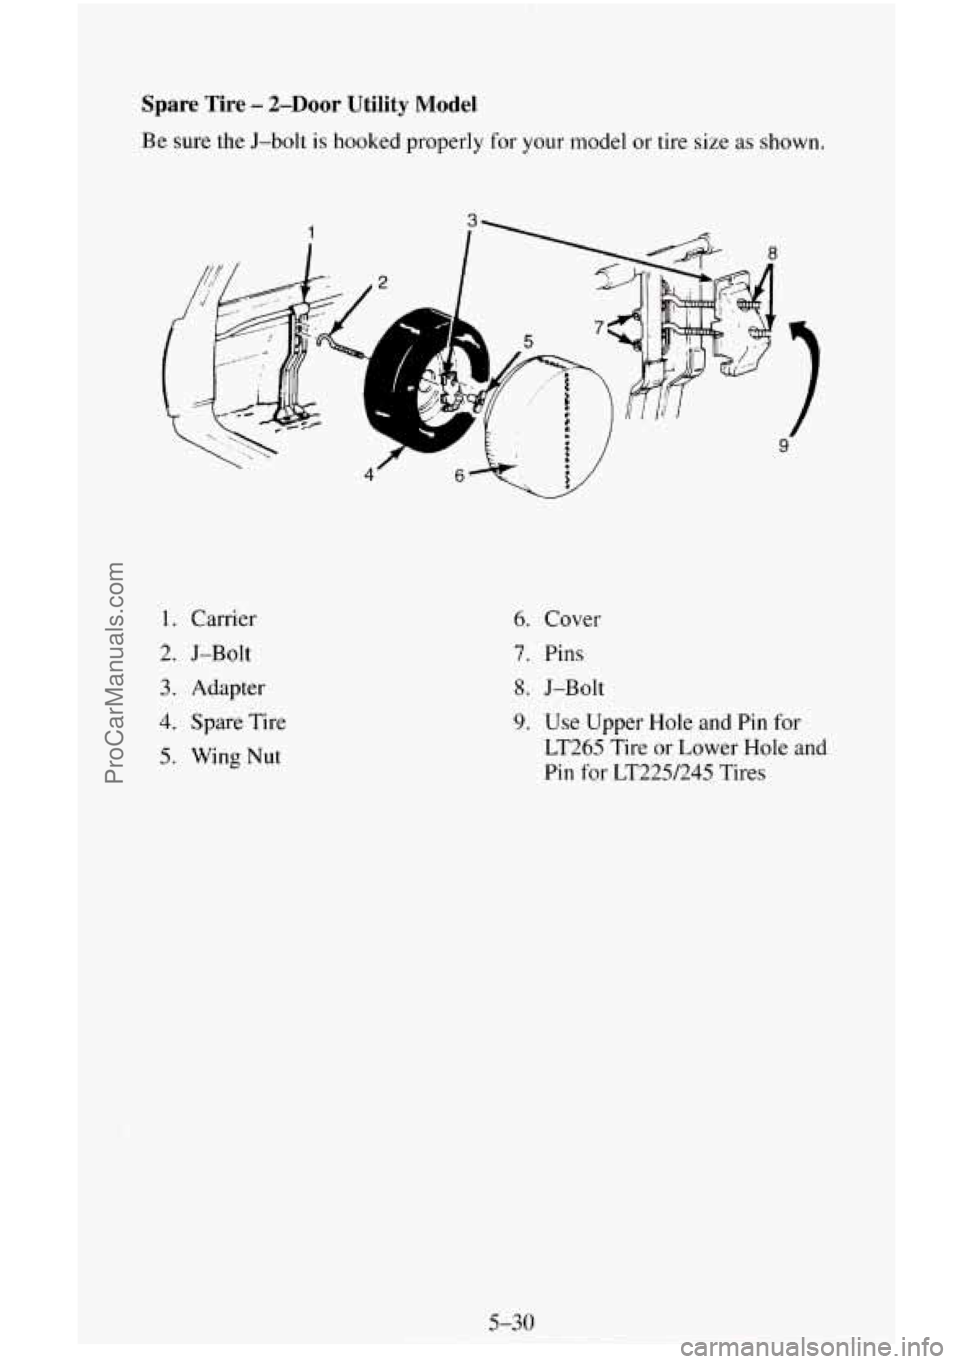
Spare Tire - 2-Door Utility Model
Be sure the J-bolt is hooked properly for your model or tire size as shown.
1
1. Carrier
2. J-Bolt
3. Adapter
4. Spare Tire
5. Wing Nut
4 f
6. Cover
7. Pins
8. J-Bolt
9. Use Upper Hole and Pin for
LT265 Tire or Lower Hole and
Pin
for LT225/245 Tires
5-30
ProCarManuals.com
Page 274 of 486
If You’re Stuck: In Sand, Mud, /ce or Snow
What you don’t want to do when your vehicle is stuck is to spin your wheels
too fast. The method known as “rocking” can help you get out when you’re
stuck, but you must use caution.
I NOTICE:
Spinning your wheels can destroy parts of your vehicle as well as
the tires. If you spin the wheels too fast while shifting you\
r
transmission back and forth, you can destroy your transmission. \
For information about using tire chains on your vehicle, see “Tire Chains”
in the Index.
Rocking your vehicle to get it out:
First, turn your steering wheel left and right. That will clear the area around
your front wheels. Then shift back and forth between REVERSE (R) and a
forward gear (or with a manual transmission, between FIRST
(1) or
SECOND
(2) gear and REVERSE), spinning the wheels as little as possible.
Release the accelerator pedal while you shift, and press lightly on the
accelerator pedal when the transmission
is in gear. If that doesn’t get you
out after a few tries, you may need to be towed out. Or, you can use your
recovery hooks,
if your vehicle has them. If you do need to be towed out,
see “Towing Your Vehicle” in the Index.
5-41
ProCarManuals.com
Page 320 of 486
Brake Wear
Your vehicle has front disc brakes and rear drum brakes.
Disc brake pads
have built-in wear indicators that make a high-pitched
warning sound when the brake pads are worn and new pads are needed. The
sound may come and
go or be heard all the time your vehicle is moving
(except when you are pushing on the brake pedal firmly).
I NOTICE:
Continuing to drive with worn-out brake pads could result in
costly brake repair.
Some driving conditions or climates may cause a brake squeal when the
brakes are first applied or lightly applied. This does not mean something is
wrong with your brakes.
Your rear drum brakes don’t have wear indicators, but
if you ever hear a
rear brake rubbing noise, have the rear brake linings inspected. Also, the
rear brake drums should be removed and inspected each time the tires are
removed for rotation or changing. When
you have the front brakes replaced,
have
the rear brakes inspected, too.
Brake linings should always be replaced as complete axle sets.
Brake Pedal Travel
See your dealer if the brake pedal does not return to normal height, or if
there
is a rapid increase in pedal travel. This could be a sign of brake
trouble.
Brake Adjustment
Every time you make a brake stop, your disc brakes adjust for wear.
If your brake pedal goes down farther than normal, your rear drum brakes
may need adjustment. Adjust them by backing up and firmly applying the
brakes a few times.
6-43
ProCarManuals.com