1995 CHEVROLET S10 radio
[x] Cancel search: radioPage 131 of 354
Downloaded from www.Manualslib.com manuals search engine NOTICE:
Before you add any sound equipment to your vehicle - like a
tape player,
CB radio, mobile telephone or two-way radio - be
sure you can add what you want. If
you can, it’s very important
to do it properly. Added sound equipment may interfere with th\
e
operation of your vehicle’s engine, Delco@ radio or other
systems, and even damage them. And, your vehicle’s systems
may interfere with the operation of sound equipment that has been added improperly.
So, before adding sound equipment, check with your dealer and
be sure to check Federal rules covering mobile radio and telephone units.
Care of Your Cassette Player and Tape
A tape player that is not cleaned regularly is subject to reduced sound
quality, ruining the cassette, or damaging the mechanism. Tape cassettes that
are not properly stored in their plastic cases away from contaminants, direct
sunlight, and extreme heat, may not operate properly and could cause
premature failure of the tape player.
Your tape player should be cleaned with every
50 hours of use to provide
optimum performance. Your radio may display “Cln” (Clean)
to indicate
that you have used your tape player for
50 hours without re-setting the tape
clean timer. If you notice a reduction in sound quality, regardless \
of when
the tape player was last cleaned, try playing a different cassette to see if the
tape
or tape player is at fault. If the second cassette results in no
improvement in sound quality, try cleaning the tape player.
Proper tape player cleaning should be done with a scrubbing action,
non-abrasive cleaning cassette. This is a wet-type cleaning system that uses
a cleaning cassette with pads which scrub the tape head as the hubs of the
cleaner cassette turn. To properly clean your tape player, follow instructions
with the cleaning cassette. If
you use this type of cleaner, the radio may
display an error and eject
the cartridge. This is normal and is the result of an
added feature in the tape player that detects broken tapes. If an error occurs,
you will need to insert the cleaning cassette at least
3 times to thoroughly
clean the tape player.
You may prefer
to use a non-scrubbing action, wet-type cleaner. This type
of cleaner uses a fabric belt to clean the tape head. This type of cleaner
cassette will not cause an error, but it may not clean the tape player as
thoroughly as the scrubbing type cleaner.
3-18
Page 132 of 354
Downloaded from www.Manualslib.com manuals search engine A scrubbing action cleaner cassette is available through your retailer (SPO
12344600).
Cassettes are subject to wear and the sound quality may degrade over time.
Always verify that the cassette tape
is in good condition and the tape player
is clean before obtaining service on your tape player.
NOTICE:
Cassette tape adapter kits for portable CD players will not work
in your cassette player. These adapters will cause the radio
to
display an error and the adapter cassette will be ejected.
Care of Compact Discs
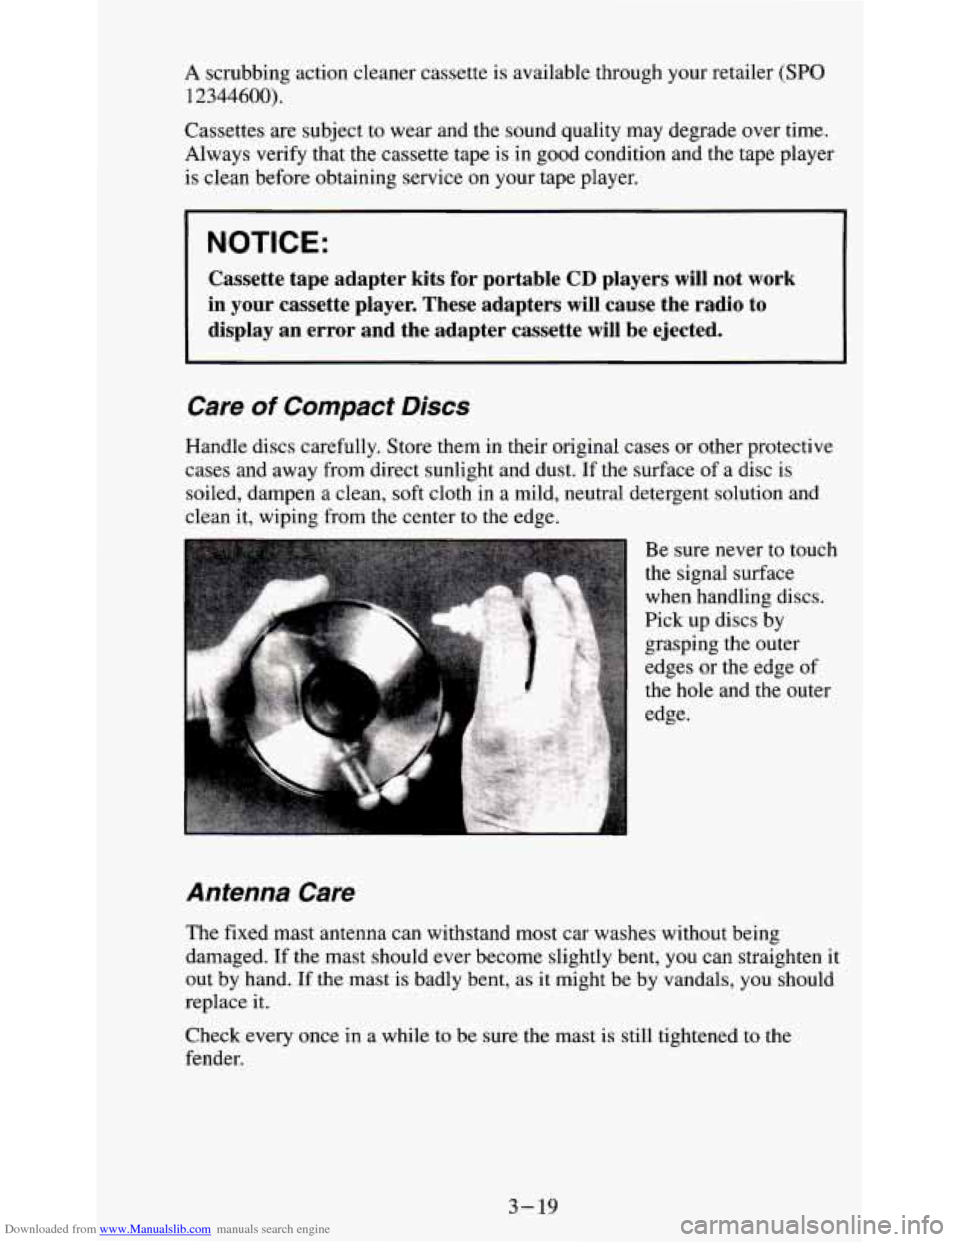
Handle discs' carefully. Store them in their original cases or other protective
cases and away from direct sunlight and dust. If the surface of a disc
is
soiled, dampen a clean, soft cloth in a mild, neutral detergent solution and
clean it, wiping from the center to the edge.
Antenna Care
The fixed mast antenna can withstand most car washes without being
damaged. If the mast should ever become slightly bent, you can straighten
it
out by hand. If the mast is badly bent, as it might be by vandals, you should
replace it.
Check every once in a while to be sure the mast is still tightened
to the
fender.
3-19
Page 186 of 354
Downloaded from www.Manualslib.com manuals search engine NOTICE:
Ignoring these steps could result in costly damage to your
vehicle that wouldn’t be covered by your warranty.
Trying to start your vehicle by pushing or pulling
it could
damage your vehicle, even if you have a manual transmission.
And if you have an automatic transmission, it won’t
start that
way.
To Jump Start Your Vehicle;
1. Check the other vehicle. It must have a 12-volt battery with a negative
ground system.
NOTICE:
If the other system isn’t a 12-volt system with a negative
ground, both vehicles can be damaged.
2. Get the vehicles close enough so the jumper cables can reach, but be
sure the vehicles aren’t touching each other. If they are, it could cause
a
ground connection you don’t want. You wouldn’t be able to start your
vehicle, and the bad grounding could damage the electrical systems.
You could be injured if the vehicles roll. Set the parking brake firmly
on each vehicle. Put an automatic transmission in
PARK (P) or a
manual transmission in NEUTRAL (N). If you have
a
four-wheel-drive vehicle with a manual transfer case shift lever, be
sure the transfer case is not in NEUTRAL
(N).
3. Turn off the ignition on both vehicles. Turn off all lights that aren’t
needed, and radios. This will avoid sparks and help save both batteries.
And it could save your radio!
NOTICE:
If you leave your radio on, it could be badly damaged. The
repair wouldn’t be covered by your warranty.
4. Open the hoods and locate the batteries. Find the positive (+) and
negative
(-) terminals on each battery.
5-3
Page 278 of 354
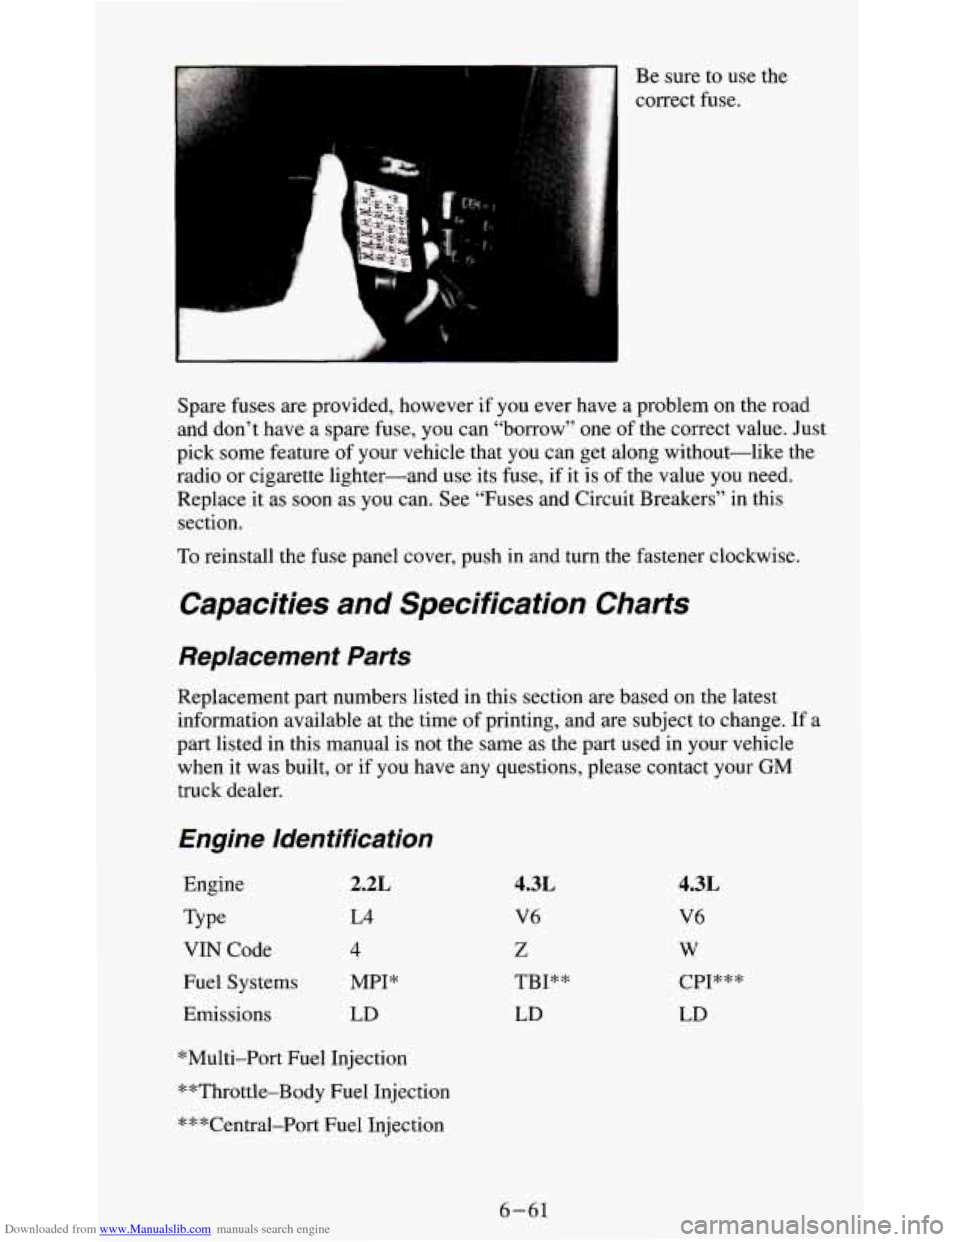
Downloaded from www.Manualslib.com manuals search engine Be sure to use the
correct fuse.
Spare fuses are provided, however if you ever have a problem on the road
and don’t have a spare fuse, you
can “borrow” one of the correct value. Just
pick some feature of your vehicle that you can get along without-like the
radio or cigarette lighter-and use its fuse, if it is of the value you need.
Replace it as soon as you
can. See “Fuses and Circuit Breakers” in this
section.
To reinstall the fuse panel cover, push in and turn the fastener clockwise.
Capacities and Specification Charts
Replacement Parts
Replacement part numbers listed in this section are based on the latest
information available at the time of printing, and are subject to change. If a
part listed in this manual is not the same as the part used in your vehicle
when
it was built, or if you have any questions, please contact your GM
truck dealer.
Engine Ideniificafion
Engine
Type VIN Code
Fuel Systems Emissions 2.2L
L4
4
MPI*
LD
4.3L
V6
Z
m1* *
LD
4.3L
V6
W
CPI* * *
LD
*Multi-Port Fuel Injection
**Throttle-Body Fuel Injection
***Central-Port Fuel Injection
6-61
Page 285 of 354
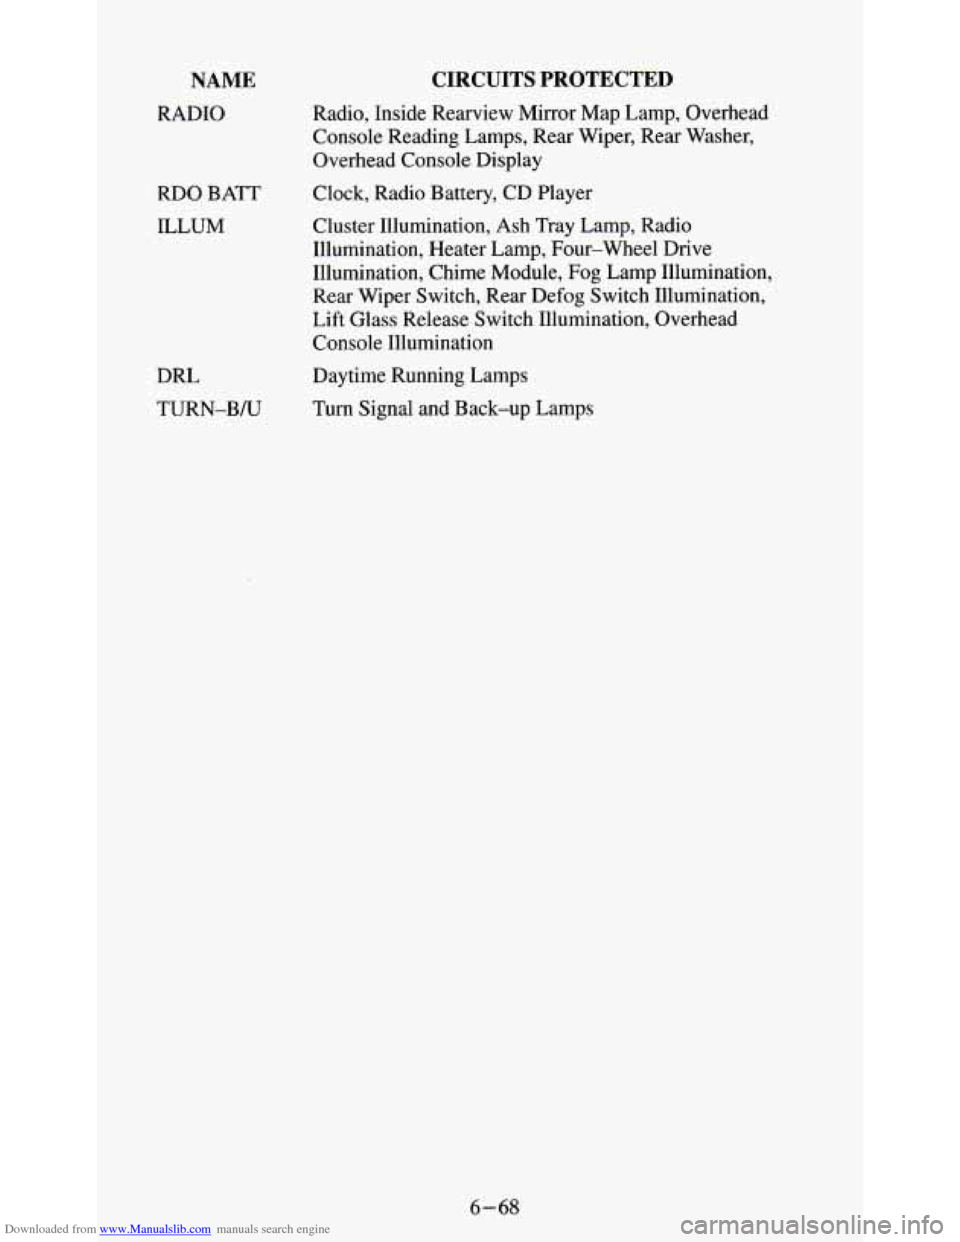
Downloaded from www.Manualslib.com manuals search engine NAME
RADIO
RDO BATT
ILLUM
DRL
TURN-B/U
CIRCUITS PROTECTED
Radio, Inside Rearview Mirror Map Lamp, Overhead
Console Reading Lamps, Rear Wiper, Rear Washer,
Overhead Console Display
Clock, Radio Battery, CD Player
Cluster Illumination, Ash Tray Lamp, Radio
Illumination, Heater Lamp, Four-wheel Drive
Illumination, Chime Module, Fog Lamp Illumination,
Rear Wiper Switch, Rear Defog Switch Illumination,
Lift Glass Release Switch Illumination, Overhead
Console Illumination
Daytime Running Lamps
Turn Signal and Back-up Lamps
6-68
Page 344 of 354
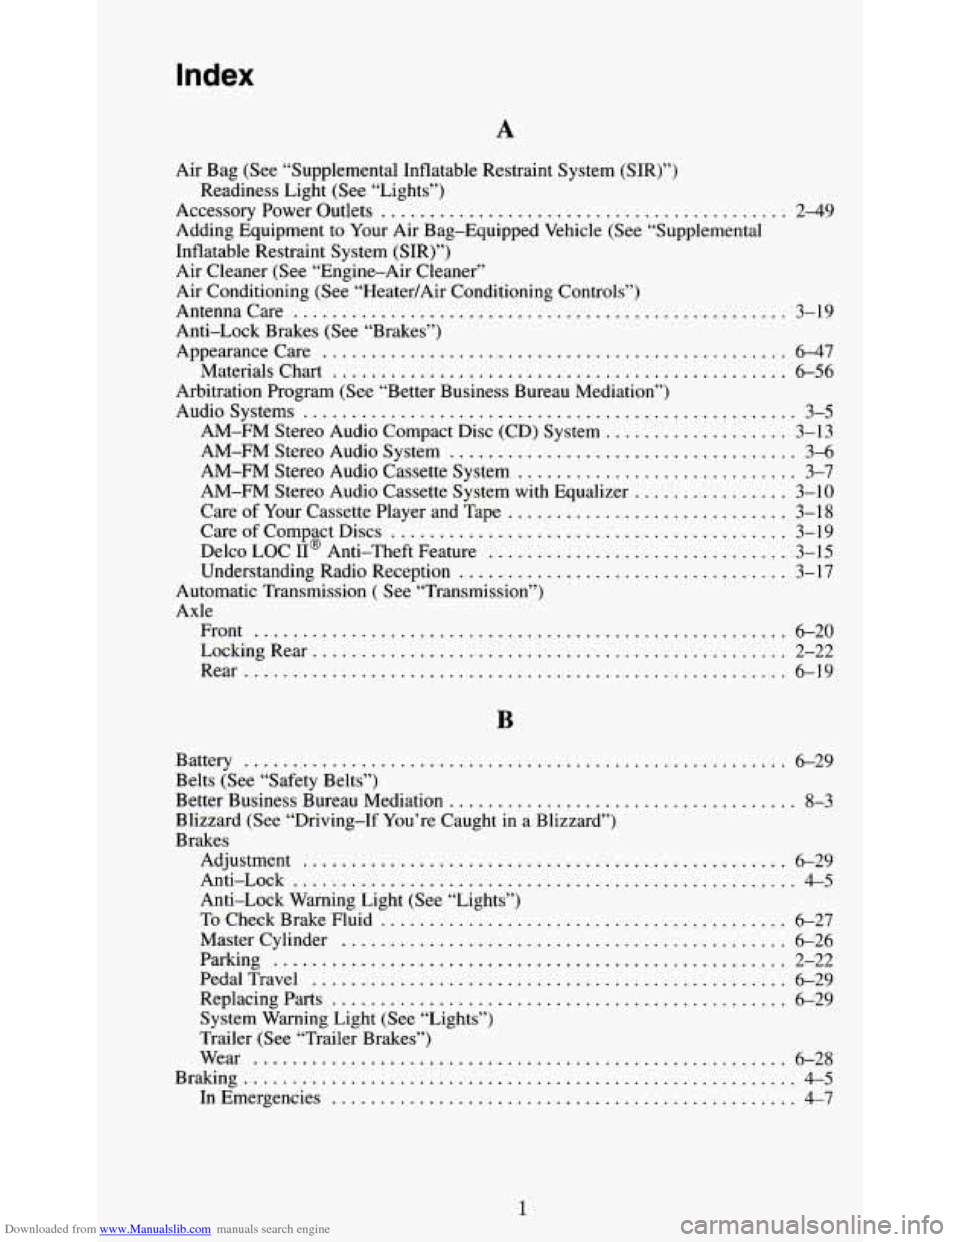
Downloaded from www.Manualslib.com manuals search engine Index
A
Air Bag (See “Supplemental Inflatable Restraint System (SIR)”)
Accessory Power Outlets
.......................................... 249
Adding Equipment to Your Air Bag-Equipped Vehicle (See “Supplemental
Inflatable Restraint System (SIR)”)
Air Cleaner (See “Engine-Air Cleaner”
Air Conditioning
(See “Heater/Air Conditioning Controls”)
Antennacare
................................................... 3-19
Anti-Lock Brakes (See “Brakes”)
Appearance Care
................................................ 6-47
Materials Chart
............................................... 6-56
Arbitration Program (See “Better Business Bureau Mediation”)
Audiosystems
................................................... 3-5
AM-FM Stereo Audio Compact Disc (CD) System
................... 3-13
AM-FM Stereo Audio System
.................................... 3-6
AM-FM Stereo Audio Cassette System
............................. 3-7
AM-FM Stereo Audio Cassette System
with Equalizer ................ 3-10
Care
of Your Cassette Player and Tape ............................. 3-18
Care of Compact Discs
......................................... 3-19
Delco LOC II@ Anti-Theft Feature
............................... 3-15
Understanding Radio Reception
.................................. 3-17
Readiness Light (See “Lights”)
Automatic Transmission
( See “Transmission”)
Axle Front
....................................................... 6-20
LockingRear
................................................. 2-22
Rear
........................................................ 6-19
B
Battery ........................................................ 6-29
Belts (See “Safety Belts”)
Better Business Bureau Mediation
.................................... 8-3
Blizzard (See “Driving-If You’re Caught in a Blizzard”)
Brakes
Adjustment
.................................................. 6-29
Anti-Lock
.................................................... 4-5
Anti-Lock Warning Light (See “Lights”)
To Check Brake Fluid .......................................... 6-27
Master Cylinder
.............................................. 6-26
Parking
..................................................... 2-22
PedalTravel
................................................. 6-29
Replacingparts
............................................... 6-29
System Warning Light (See “Lights”)
Trailer (See “Trailer Brakes”)
Wear
....................................................... 6-28
Braking
......................................................... 4-5
In Emergencies
................................................ 4-7
1
Page 349 of 354
Downloaded from www.Manualslib.com manuals search engine M
Malfunction Indicator Lamp (See “Lights”)
Maintenance (See “Scheduled Maintenance Services’’)
Maintenance Record (See “Scheduled Maintenance Services”)
Master Cylinder (See “Brakes”)
Mirrors
Convexoutside
............................................... 2-48
Inside
....................................................... 2-46
Outside
..................................................... 2-47
Vanity ...................................................... 2-48
Multifunction Lever
.............................................. 2-34
OBDII ........................................................ 2-60
Odometer (See “Gages”)
Off-Road Driving (See “Driving”)
Oil
............................................................ 6-8
Additives
.................................................... 6-11
Pressure Gage (See “Gages”)
ToCheck
..................................................... 6-8
WhatKindtoUse .............................................. 6-9
WhentoAdd .................................................. 6-9
Whentochange .............................................. 6-11
What to Do with Used
.......................................... 6-12
Owner Checks and Services
........................................ 7-35
Off-Road Recovery ............................................... 4-9
P
Parking
Brake
( See “Brakes-Parking”)
On Hills
( See “Towing-Parking On Hills”)
Over Things That
Burn ......................................... 2-25
Your Vehicle (Manual Transmission)
............................ 2-25
Passing (See “Driving-Passing”)
Payload (See “Loading
Your Vehicle”)
Periodic Maintenance Inspections (See “Scheduled Maintenance Services”)
Power
Door Locks
( See “Doors”)
Steering
...................................................... 4-7
SteeringFluid ................................................ 6-24
Winches (See “Winches”)
Radiator Pressure Cap
............................................ 6-23
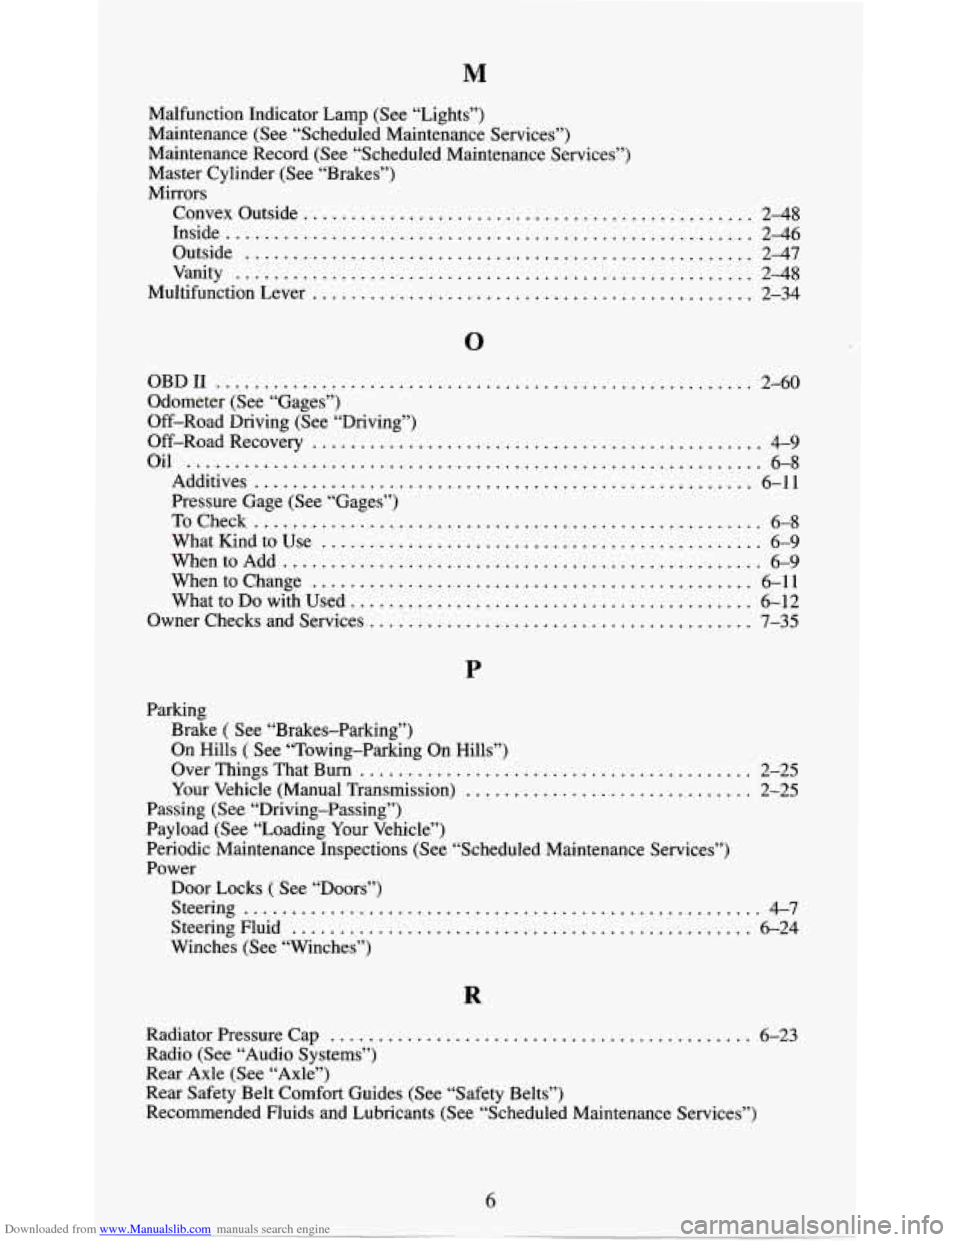
Radio (See “Audio Systems”)
Rear Axle (See “Axle”)
Rear Safety Belt Comfort Guides (See “Safety Belts”)
Recommended Fluids and Lubricants (See “Scheduled Maintenance Services”)