Page 167 of 354
Downloaded from www.Manualslib.com manuals search engine Run your engine only as long as you must. This saves fuel. When you run
the engine, make it go
a little faster than just idle. That is, push the
accelerator slightly. This uses less fuel for the heat that you get and
it keeps
the battery charged. You will need
a well-charged battery to restart the
vehicle, and possibly
for signaling later on with your headlamps. Let the
heater run
for awhile.
Then, shut the engine off and close the window almost all the way to
preserve the heat. Start the engine again and repeat this only when you feel
really uncomfortable from the cold. But do
it as little as possible. Preserve
the fuel
as long as you can. To help keep warm, you can get out of the
vehicle and
do some fairly vigorous exercises every half hour or so until
help comes.
4-34
Page 169 of 354
Downloaded from www.Manualslib.com manuals search engine 5. Release the parking brake only after the vehicle being towed is firmly
attached to the tow vehicle.
6. Insert the ignition key into the ignition switch and turn it one notch
forward of the
LOCK position. This places the key into the OFF
position, which unlocks the steering column while preventing battery
drain. Unlocking the steering column will allow for proper movement
of the front wheelshires during towing.
NOTICE:
You should exercise extra care whenever towing another vehicle.
Loading Your Vehicle
PAYLOAD =I-1
The Certificatioflire label is found on the driver’s door lock pillar. The
label shows the size of your original tires and the inflation pressures needed
to obtain the gross weight capacity of your vehicle. This is called the
GVWR (Gross Vehicle Weight Rating). The GVWR includes the weight of
the vehicle, all occupants, fuel, cargo and trailer tongue weight, if pulling a
trailer.
4-36
Page 185 of 354
Downloaded from www.Manualslib.com manuals search engine Push the button on top
of the steering column
all the way down
to
make your front and
rear turn signal lights
flash on and
off. Your
hazard warning
flashers work
no
matter what position
your key is
in, and
even if the key isn’t
in.
To turn off the flashers, push the button until the first click and release.
When the hazard warning flashers are on, your turn signals won’t work. The
flashers will stop if you step on the brake.
Other Warning Devices
If you carry reflective triangles, you can set one up at the side of the road
about
300 feet (100 m) behind your vehicle.
Jump Starting
If your battery has run down, you may want to use another vehicle and some
jumper cables to start your vehicle. But please follow the steps below to do
it safely.
5-2
Page 186 of 354

Downloaded from www.Manualslib.com manuals search engine NOTICE:
Ignoring these steps could result in costly damage to your
vehicle that wouldn’t be covered by your warranty.
Trying to start your vehicle by pushing or pulling
it could
damage your vehicle, even if you have a manual transmission.
And if you have an automatic transmission, it won’t
start that
way.
To Jump Start Your Vehicle;
1. Check the other vehicle. It must have a 12-volt battery with a negative
ground system.
NOTICE:
If the other system isn’t a 12-volt system with a negative
ground, both vehicles can be damaged.
2. Get the vehicles close enough so the jumper cables can reach, but be
sure the vehicles aren’t touching each other. If they are, it could cause
a
ground connection you don’t want. You wouldn’t be able to start your
vehicle, and the bad grounding could damage the electrical systems.
You could be injured if the vehicles roll. Set the parking brake firmly
on each vehicle. Put an automatic transmission in
PARK (P) or a
manual transmission in NEUTRAL (N). If you have
a
four-wheel-drive vehicle with a manual transfer case shift lever, be
sure the transfer case is not in NEUTRAL
(N).
3. Turn off the ignition on both vehicles. Turn off all lights that aren’t
needed, and radios. This will avoid sparks and help save both batteries.
And it could save your radio!
NOTICE:
If you leave your radio on, it could be badly damaged. The
repair wouldn’t be covered by your warranty.
4. Open the hoods and locate the batteries. Find the positive (+) and
negative
(-) terminals on each battery.
5-3
Page 187 of 354
Downloaded from www.Manualslib.com manuals search engine A CAUTION:
5. Check that the jumper cables don’t have loose or missing insulation. If
they do,
you could get a shock. The vehicles could be damaged too.
Before you connect the cables, here are some basic things
you should
know. Positive
(+) will go to positive (+) and negative (-) will go to
negative
(-) or a metal engine part. Don’t connect (+) to (-) or you’ll
get a short that would damage the battery and maybe other parts
too.
A CAUTION:
Fans or other moving engine parts can injure you badly. Keep
your
hands away from moving parts once the engines are
running,
6. Connect the red positive (+) cable to the positive (+) terminal of the
vehicle with the dead battery.
5-4
Page 188 of 354
Downloaded from www.Manualslib.com manuals search engine Dead Battery (+) Good Battery (+)
7. Don’t let the other end touch metal. Connect it to the positive (+)
8. Now connect the black negative (-) cable to the good battery’s negative
(-) terminal.
Don’t let the other end touch anything until the next step. The other end
of the negative cable doesn’t go to the dead battery. It goes to a heavy
unpainted metal part on the engine
of the vehicle with the dead battery.
Good Battery (-) Heavy Metal Engine Part
terminal of the good battery.
9. Attach the cable at least 18 inches (45 cm) away from the dead battery,
but
not near engine parts that move. The electrical connection is just as
good there, but the chance
of sparks getting back to the battery is much
less.
5-5
Page 189 of 354

Downloaded from www.Manualslib.com manuals search engine 10. Now start the vehicle with the good battery and run the engine for a
while.
11. Try to start the vehicle with the dead battery. If it won’t start after a few
tries make sure all connections are good.
If it still won’t start, it
probably needs service.
12. Remove the cables in reverse order to prevent electrical shorting. Take
care that they don’t touch each other or
any other metal.
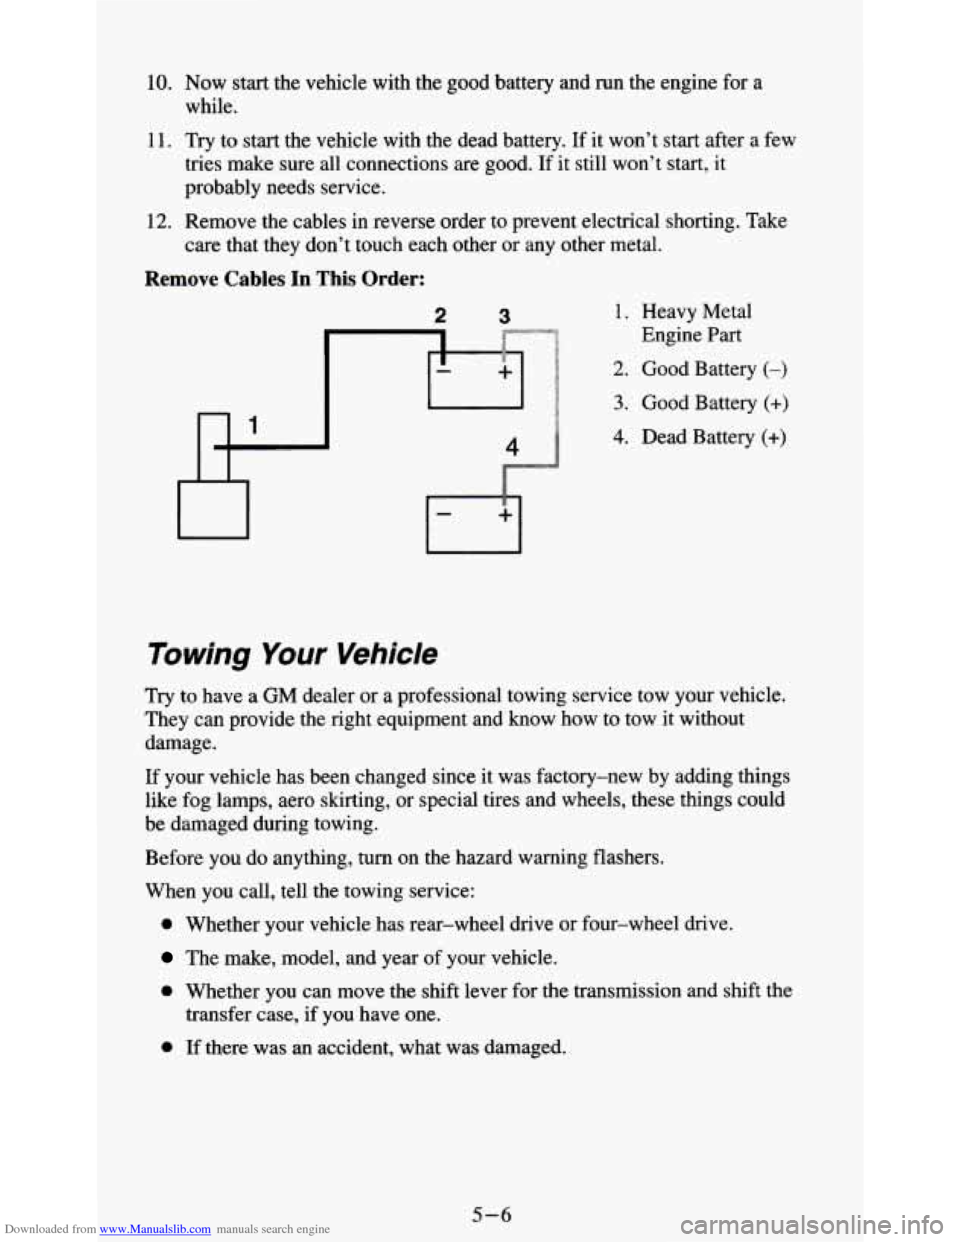
Remove Cables In This Order:
2 3 1. Heavy Metal
Engine Part
2. Good Battery (-)
3. Good Battery (+)
4. Dead Batten (+)
Towing Your Vehicle
Try to have a GM dealer or a professional towing service tow your vehicle.
They can provide the right equipment and know how to tow it without
damage.
If your vehicle has been changed since it was factory-new
by adding things
like fog lamps, aero skirting,
or special tires and wheels, these things could
be damaged during towing.
Before you do anything, turn on the hazard warning flashers.
When you call, tell the towing service:
0 Whether your vehicle has rear-wheel drive or four-wheel drive.
The make, model, and year of your vehicle.
0 Whether you can move the shift lever for the transmission and shift the
transfer case, if you have one.
0 If there was an accident, what was damaged.
5-6
Page 246 of 354

Downloaded from www.Manualslib.com manuals search engine Brake Pedal Travel
See your dealer if the brake pedal does not return to normal height, or if
there is a rapid increase in pedal travel. This could be a sign
of brake
trouble.
Brake Adjustment
Every time you make a brake stop, your disc brakes adjust for wear.
If your brake pedal goes down farther than normal, your rear drum brakes
may need adjustment. Adjust them by backing up and firmly applying the
brakes a few times.
Replacing Brake System Parts
The braking system on a modern vehicle is complex. Its many parts have to
be of top quality and work well together if the vehicle is to have really good
braking. Vehicles we design and test have top-quality GM brake parts in
them, as your vehicle does when it is new. When you replace parts
of your
braking system
- for example, when your brake linings wear down and
you have to have new ones put in
- be sure you get new genuine GM
replacement parts. If you don’t, your brakes may no longer work properly.
For example, if someone puts in brake linings that are wrong for your
vehicle, the balance between your front and rear brakes can change
- for
the worse. The braking performance you’ve come to expect can change in
many other ways if someone puts in the wrong replacement brake parts.
Battery
Every new vehicle has a Delco Freedom@ battery. You never have to add
water to one
of these. When it’s time for a new battery, we recommend a
Delco Freedom@ battery. Get one that has the replacement number shown
on the original battery’s label.
Vehicle Storage
If you’re not going to drive your vehicle for 25 days or more, take off the
black, negative
(-) cable from the battery. This will help keep your battery
from running down.
6-29