1995 CHEVROLET CORVETTE manual transmission
[x] Cancel search: manual transmissionPage 255 of 386
Downloaded from www.Manualslib.com manuals search engine Automatic Transmission Fluid
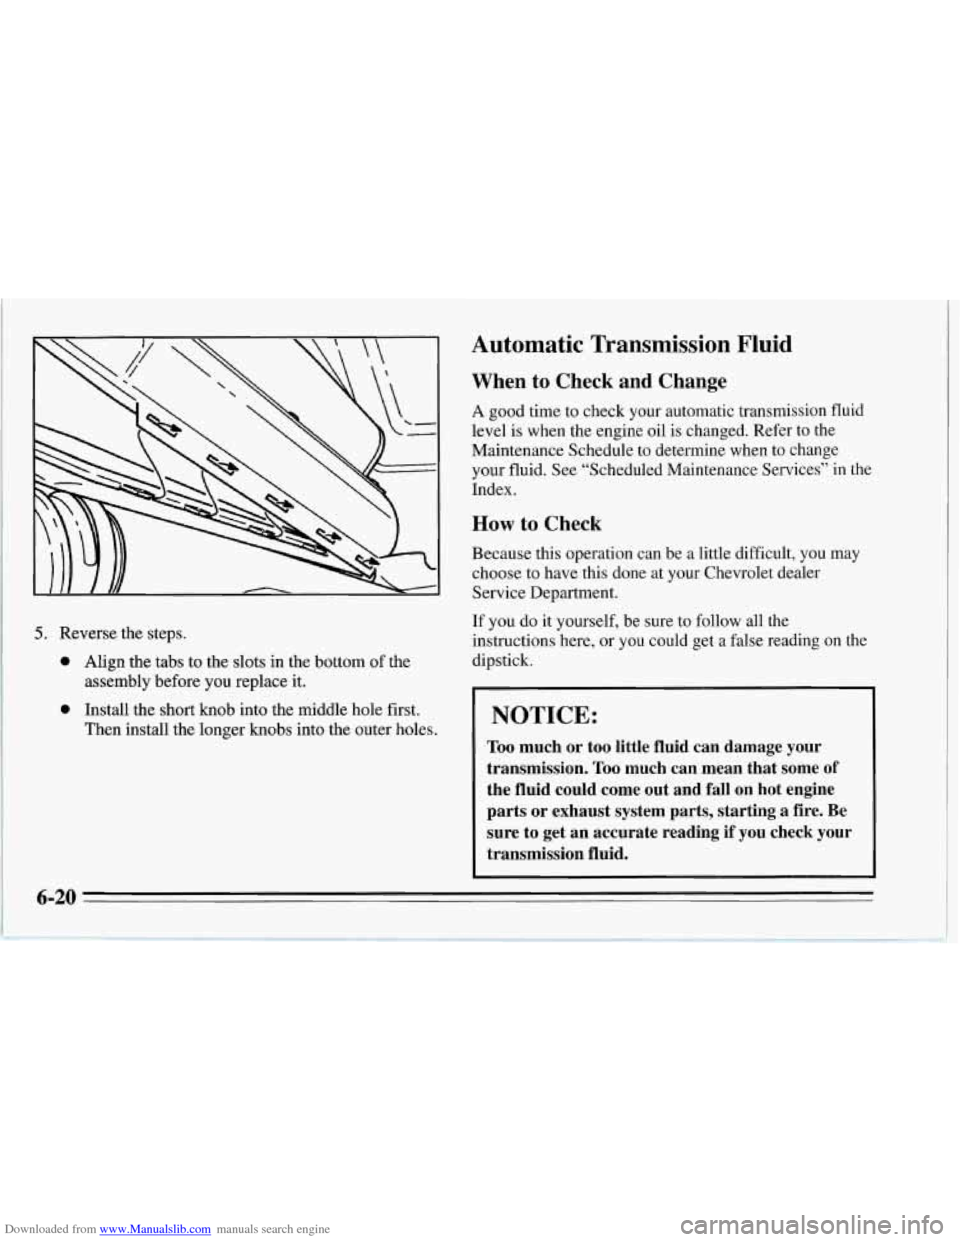
5. Reverse the steps.
0 Align the tabs to the slots in the bottom of the
0 Install the short knob into the middle hole first.
assembly before you
replace it.
Then install the longer knobs into the outer holes.
When to Check and Change
A good time to check your automatic transmission fluid
level is when the engine oil is changed. Refer to the
Maintenance Schedule to determine when to change
your fluid. See “Scheduled Maintenance Services” in the
Index.
How to Check
Because this operation can be a little difficult, you may
choose to have this done at your Chevrolet dealer
Service Department.
If you do it yourself, be sure to follow all the
instructions here, or you could get a false reading on the
dipstick.
I
I NOTICE:
Too much or too little fluid can damage your
transmission.
Too much can mean that some of
the fluid could come out and fall on hot engine
parts or exhaust system parts, starting a fire. Be sure to get an accurate reading if you check your
transmission fluid.
6-20
Page 256 of 386
Downloaded from www.Manualslib.com manuals search engine Wait at least 30 minutes before checking the
transmission fluid level if you have been driving:
When outside temperatures are above 90°F (32°C).
At high speed for quite a while.
In heavy traffic -- especially in hot weather.
To get the right reading, the fluid should be at normal
operating temperature, which is
1 80°F to 200°F (82 "C
to 93 " C).
To check transmission fluid hot: Get the vehicle
warmed up by driving about
15 miles (24 km) when
outside temperatures are above 50°F
(10°C). You may
have to drive longer to bring the fluid to 180°F to
200" F
(82°C to 93 "C) in colder outside temperatures. See
"Automatic Transmission Fluid Temperature Reading"
in the Index.
To check transmission fluid cold: A cold check is
made after the vehicle has been sitting for eight hours or
more with the engine off and is used only as a reference.
Let the engine run at idle for five minutes if outside
temperatures are
50°F (10°C) or more. If it's colder
than
50°F (IOOC), you may have to idle the engine
longer. Should the fluid level be low during a cold
check, you
must perform a hot check before adding
fluid. This will give you
a more accurate reading of the
fluid level.
To check the fluid hot or cold
Park your vehicle on a level place. Keep the engine
running.
in PARK (P).
With the parking brake applied, place the shift lever
With your foot on the brake pedal, move the shift
lever through each gear range, pausing for about
three seconds in each range. Then, position the shift
lever in PARK (P).
Let the engine run at idle for three minutes or more.
Then, without shutting off the engine, follow these steps:
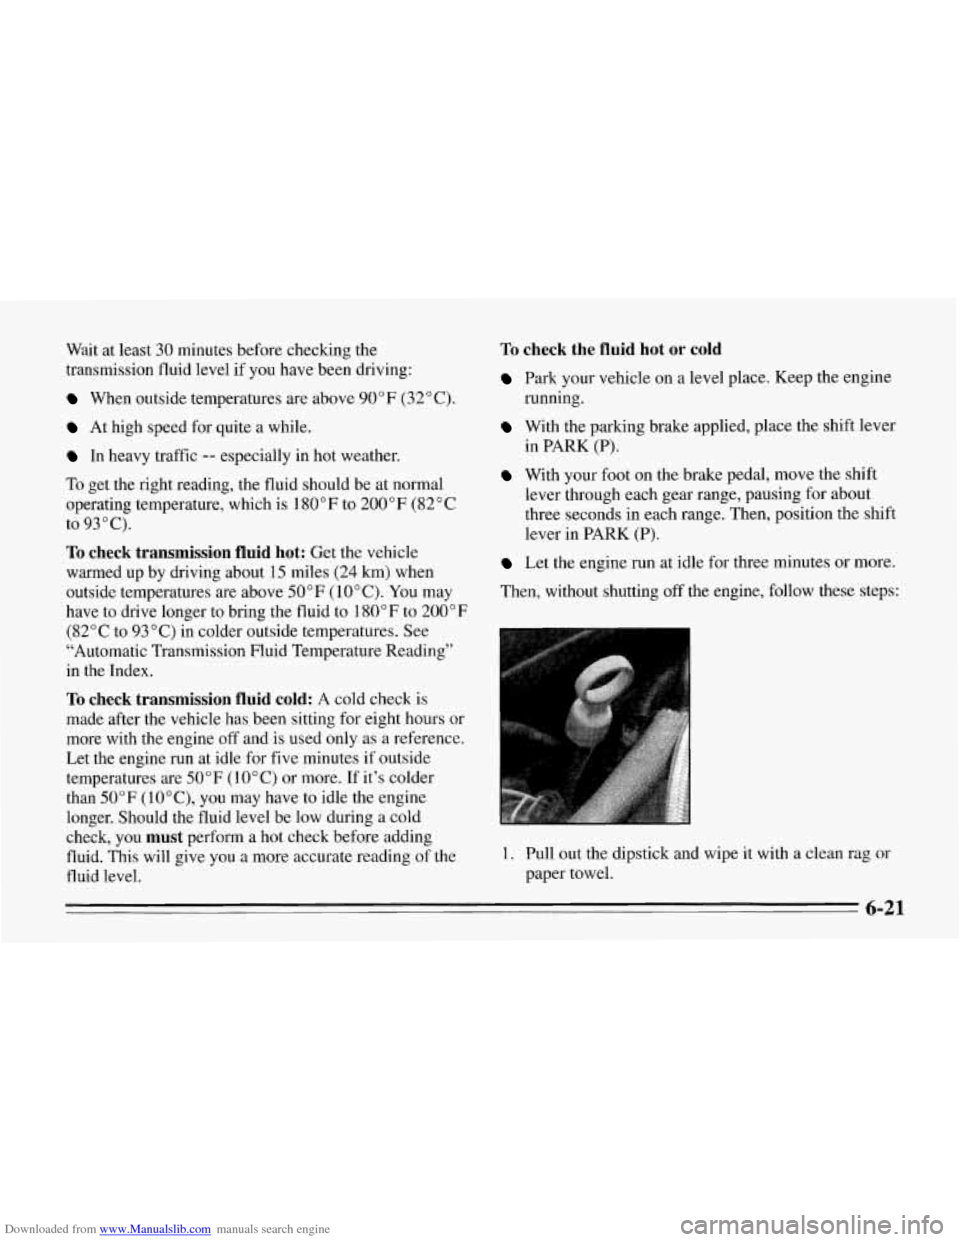
1. Pull out the dipstick and wipe it with a clean rag or
paper towel.
6-21
Page 257 of 386
Downloaded from www.Manualslib.com manuals search engine 2. Push it back in all the way, wait three seconds and
then pull it back out again.
3.
4.
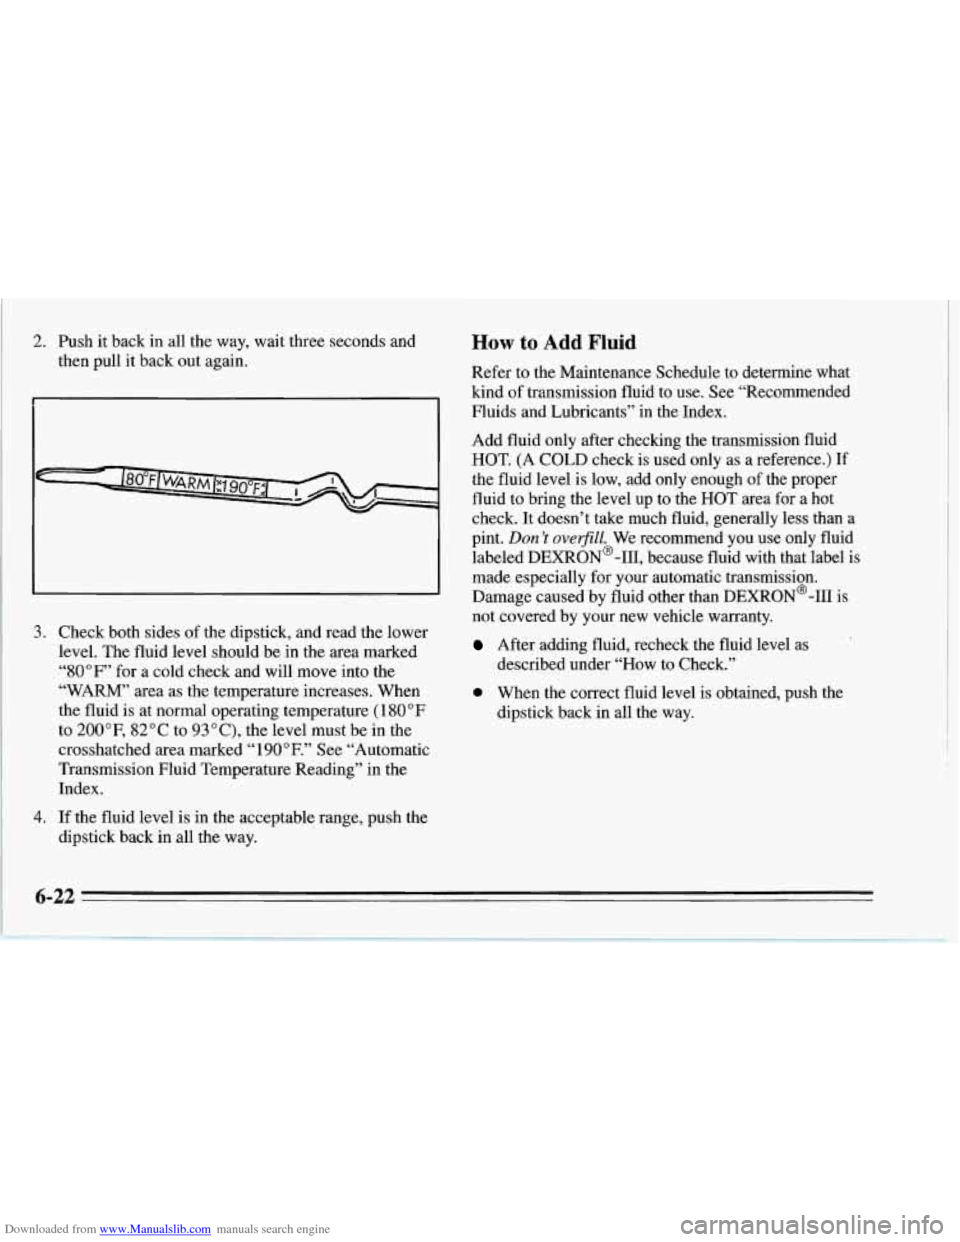
Check both sides of the dipstick, and read the lower
level. The fluid level should be in the area marked
“80°F” for a cold check and will move into the
“WARM”
area as the temperature increases. When
the fluid is at normal operating temperature
( 180 OF
to 200”F, 82°C to 93”C), the level must be in the
crosshatched area marked
“1 90°F.” See “Automatic
Transmission Fluid Temperature Reading” in the
Index.
If the fluid level is in the acceptable range, push the
dipstick back in all the way.
How to Add Fluid
Refer to the Maintenance Schedule to determine what
kind
of transmission fluid to use. See “Recommended
Fluids and Lubricants” in the Index.
Add fluid only after checking the transmission fluid
HOT.
(A COLD check is used only as a reference.) If
the fluid level is low, add only enough of the proper
fluid to bring the level up to the HOT area for a hot
check. It doesn’t take much fluid, generally less than a
pint.
Don ’t ove@ZZ. We recommend you use only fluid
labeled DEXRON@-111, because fluid with that label is
made especially for your automatic transmission.
Damage caused by fluid other than DEXRON@-I11 is
not covered by your new vehicle warranty.
After adding fluid, recheck the fluid level as
described under “How to Check.”
a When the correct fluid level is obtained, push the
dipstick back in all the way.
6-22
Page 258 of 386
Downloaded from www.Manualslib.com manuals search engine Manual Transmission Fluid
How to Check
Because this operation can be difficult, you may choose
to have this done at your Chevrolet dealer Service
Department.
If you do it yourself, be sure to follow all the
instructions here, or you could get a false reading.
NOTICE:
Too much or too little fluid can damage your
transmission.
Too much can mean that some of
the fluid could come out and
fall on hot engine
parts or exhaust system parts, starting
a fire. Be
sure to get an accurate reading
if you check your
transmission fluid.
Check the fluid level only when your engine is off, the
vehicle is parked on a level place and the transmission is
cool enough for
you to rest your fingers on the
transmission case. Then,
follow these steps:
n
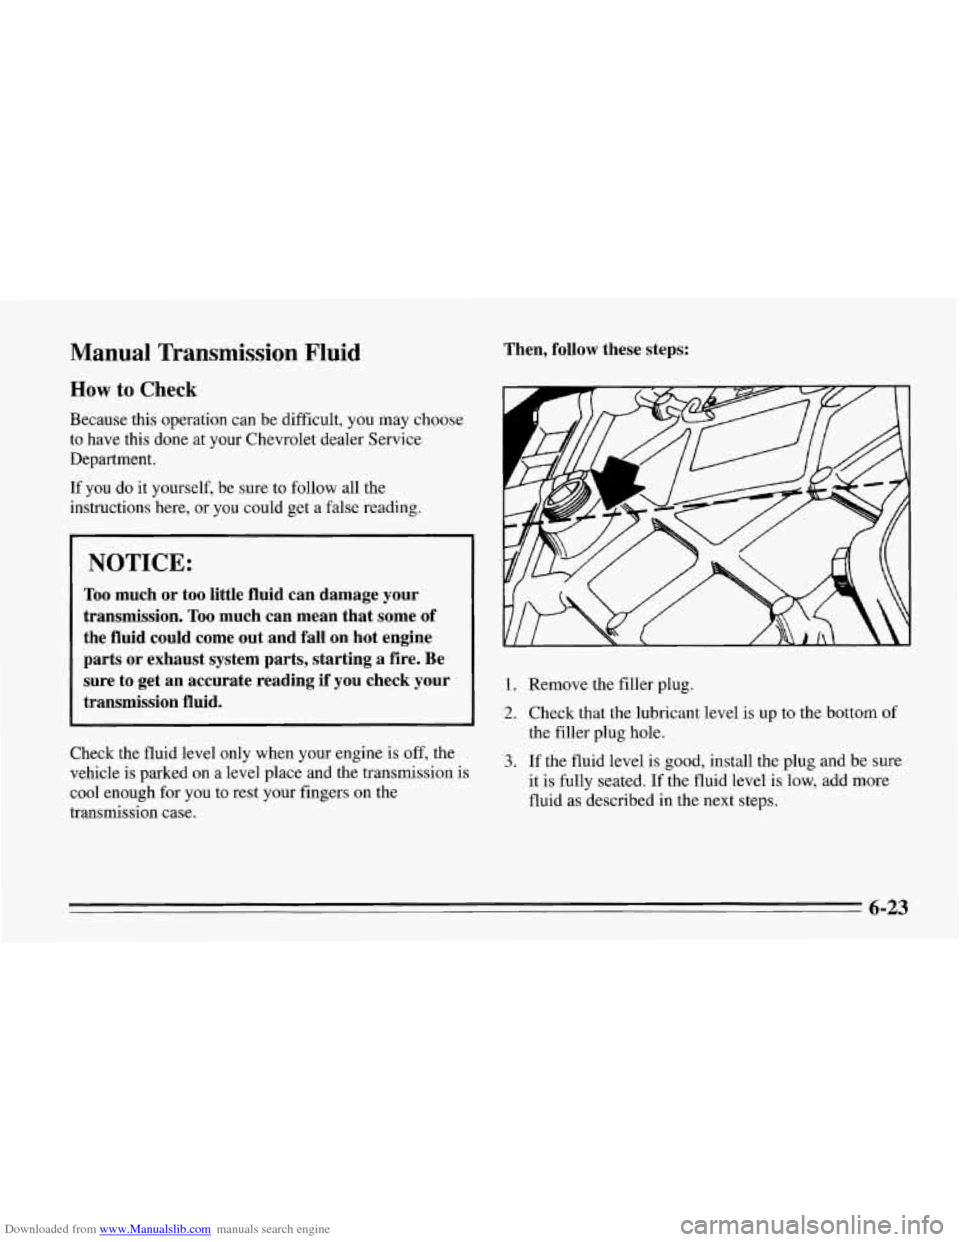
1. Remove the filler plug.
2. Check that the lubricant level is up to the bottom of
the filler plug hole.
3. If the fluid level is good, install the plug and be sure
it is fully seated.
If the fluid level is low, add more
fluid as described in the next steps.
6-23
Page 305 of 386
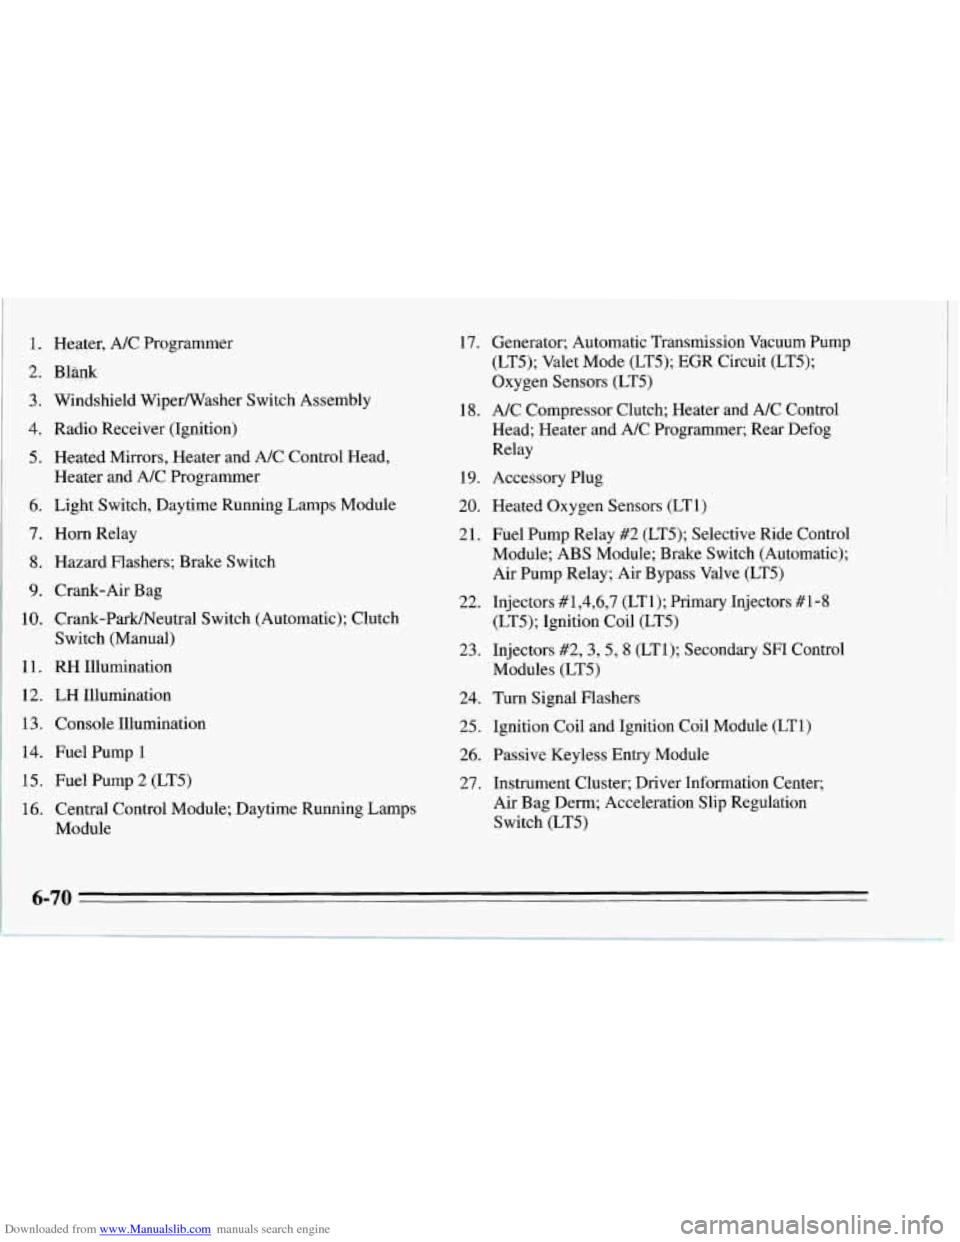
Downloaded from www.Manualslib.com manuals search engine 1. Heater, A/C Programmer
2. Bl@k
3. Windshield Wipermasher Switch Assembly
4, Radio Receiver (Ignition)
5. Heated Mirrors, Heater and A/C Control Head,
Heater and NC Programmer
6. Light Switch, Daytime Running Lamps Module
7. Horn Relay
8. Hazard Flashers; Brake Switch
9. Crank-Air Bag
10. Crank-ParWNeutral Switch (Automatic); Clutch
Switch (Manual)
1 1. RH Illumination
12. LH Illumination
13. Console Illumination
14. Fuel Pump 1
15. Fuel Pump 2 (LT5)
16. Central Control Module; Daytime R
Module unning Lamps 17. Generator;
Automatic Transmission Vacuum Pump
(LT5); Valet Mode (LT5); EGR Circuit (LT5);
Oxygen Sensors (LT5)
18. A/C Compressor Clutch; Heater and A/C Control
Head; Heater and NC Programmer; Rear Defog
Relay
19. Accessory Plug
20. Heated Oxygen Sensors (LT1)
21. Fuel Pump Relay #2 (LT5); Selective Ride Control
Module; ABS Module; Brake Switch (Automatic);
Air Pump Relay; Air Bypass Valve (LT5)
22. Injectors #1,4,6,7 (LTl); Primary Injectors #1-8
(LT5); Ignition Coil (LT5)
23. Injectors #2,3,5, 8 (LTl); Secondary SF1 Control
Modules (LT5)
24. Turn Signal Flashers
25. Ignition Coil and Ignition Coil Module (LT1)
26. Passive Keyless Entry Module
27. Instrument Cluster; Driver Information Center;
Air Bag Denn; Acceleration Slip Regulation
Switch (LT5)
Page 306 of 386
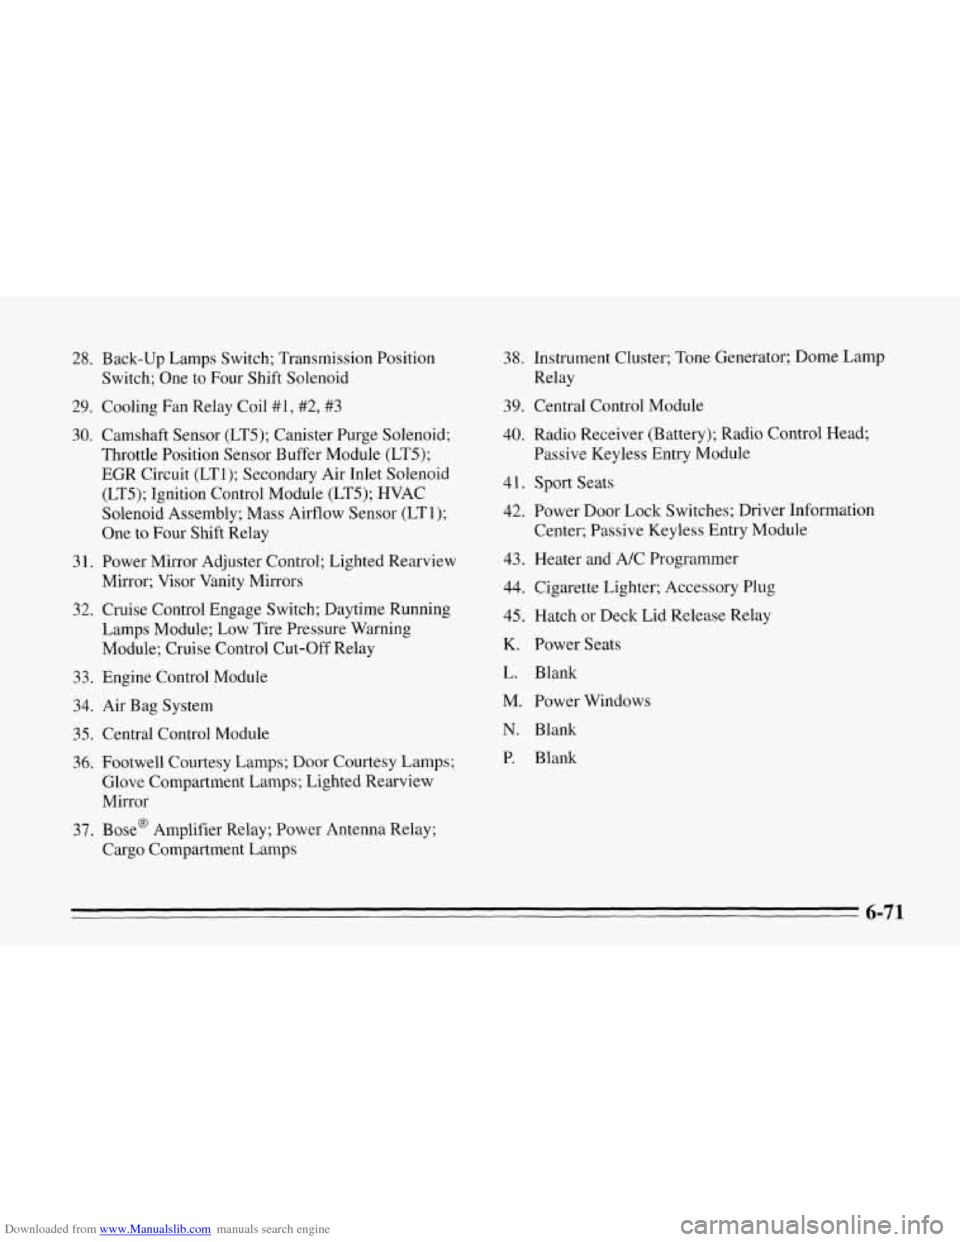
Downloaded from www.Manualslib.com manuals search engine 28. Back-up Lamps Switch; Transmission Position
Switch; One to Four Shift Solenoid
29. Cooling Fan Relay Coil
#I, #2, #3
30. Camshaft Sensor (LT5); Canister Purge Solenoid;
Throttle Position Sensor Buffer Module (LT5);
EGR Circuit (LT1); Secondary Air Inlet Solenoid
(LT5); Ignition Control Module (LT5); HVAC
Solenoid Assembly; Mass Airflow Sensor (LT 1);
One
to Four Shift Relay
3 1. Power Mirror Adjuster Control; Lighted Rearview
Mirror; Visor Vanity Mirrors
32. Cruise Control Engage Switch; Daytime Running
Lamps Module; Low Tire Pressure Warning
Module; Cruise Control Cut-Off Relay
33. Engine Control Module
34. Air Bag System
35. Central Control Module
36. Footwell Courtesy Lamps; Door Courtesy Lamps;
Glove Compartment Lamps; Lighted Rearview
Mirror
37, Bose@ Amplifier Relay; Power Antenna Relay;
Cargo Compartment Lamps
38. Instrument Cluster; Tone Generator; Dome Lamp
Relay
39. Central Control Module
40, Radio Receiver (Battery); Radio Control Head;
Passive Keyless Entry Module
41. Sport Seats
42. Power Door Lock Switches; Driver Information
Center; Passive Keyless Entry Module
43. Heater and A/C Programmer
44. Cigarette Lighter; Accessory Plug
45. Hatch or Deck Lid Release Relay
K. Power Seats
L. Blank
M. Power Windows
N. Blank
P. Blank
6-71
Page 309 of 386
Downloaded from www.Manualslib.com manuals search engine Leaving your hood open and your underhood lamps on
can drain your battery
. If you need to keep the hood
open for an extended period
of time. remove the
underhood lamps fuse
.
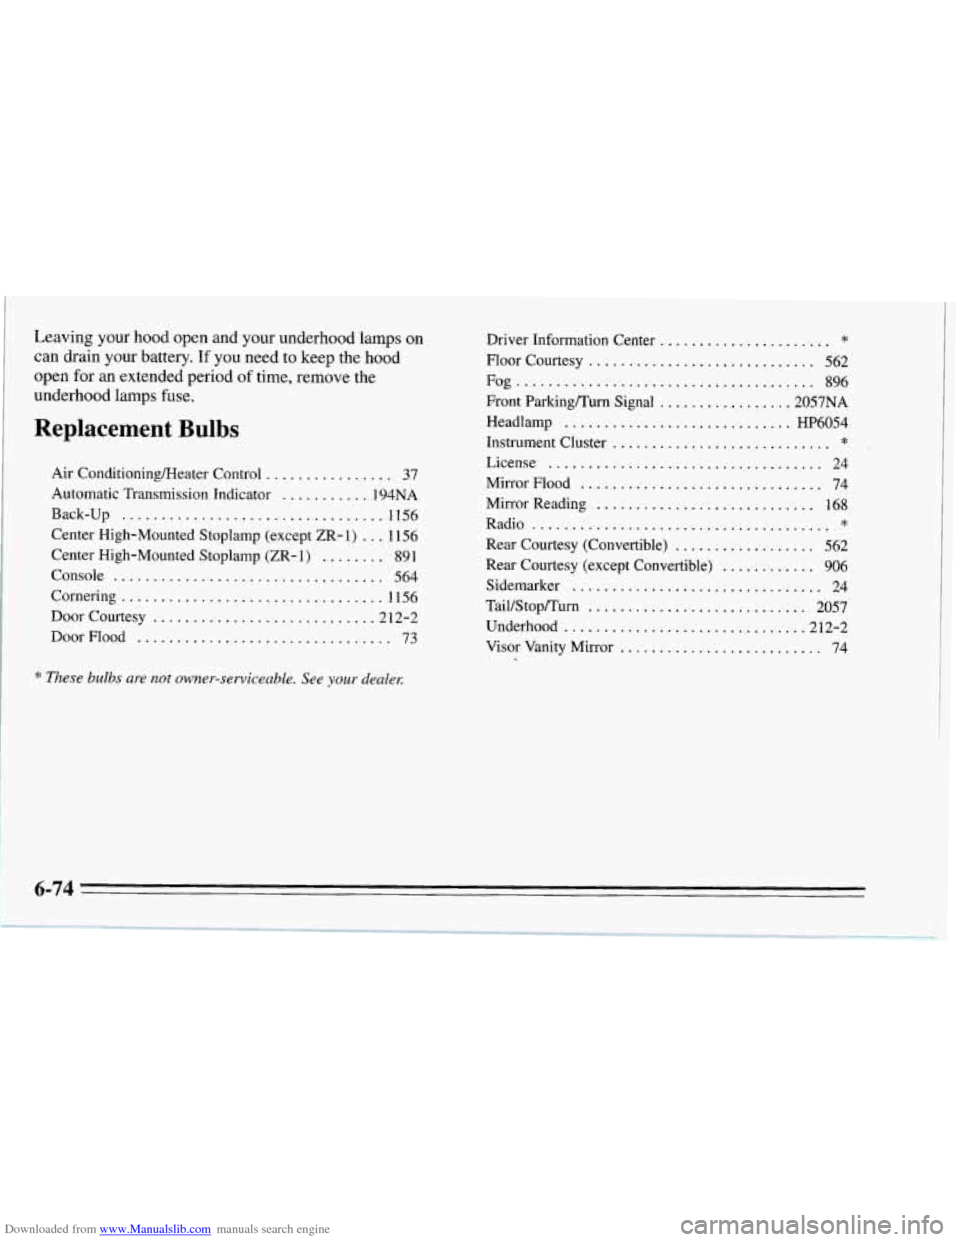
Replacement Bulbs
Air Conditioningmeater Control ................ 37
Automatic Transmission Indicator
........... 194NA
Back-up
................................. 1156
Center High-Mounted Stoplamp (except ZR-
1) ... 1156
Center High-Mounted Stoplamp (ZR-
1) ........ 89 1
Console
.................................. 564
Cornering
................................. 1156
Door Courtesy
........................... .21 2-2
DoorFlood
................................ 73
* These bulbs are not owner.serviceab1e . See your dealer.
Driver Information Center * ......................
Floor Courtesy ............................. 562
Fog
...................................... 896
Front Parkingmurn Signal
................. 2057NA
Headlamp ............................. HP6054
Instrument Cluster
License
................................... 24
MirrorFlood
............................... 74
* ............................
Mirror Reading ............................ 168
Rear Courtesy (Convertible)
.................. 562
Rear Courtesy (except Convertible)
............ 906
Sidemarker
................................ 24
Tail/Stop/Turn
............................ 2057
Visor Vanity Mirror
.......................... 74
Radio
* ......................................
Underhood ................................. 2-2
6-74
Page 313 of 386
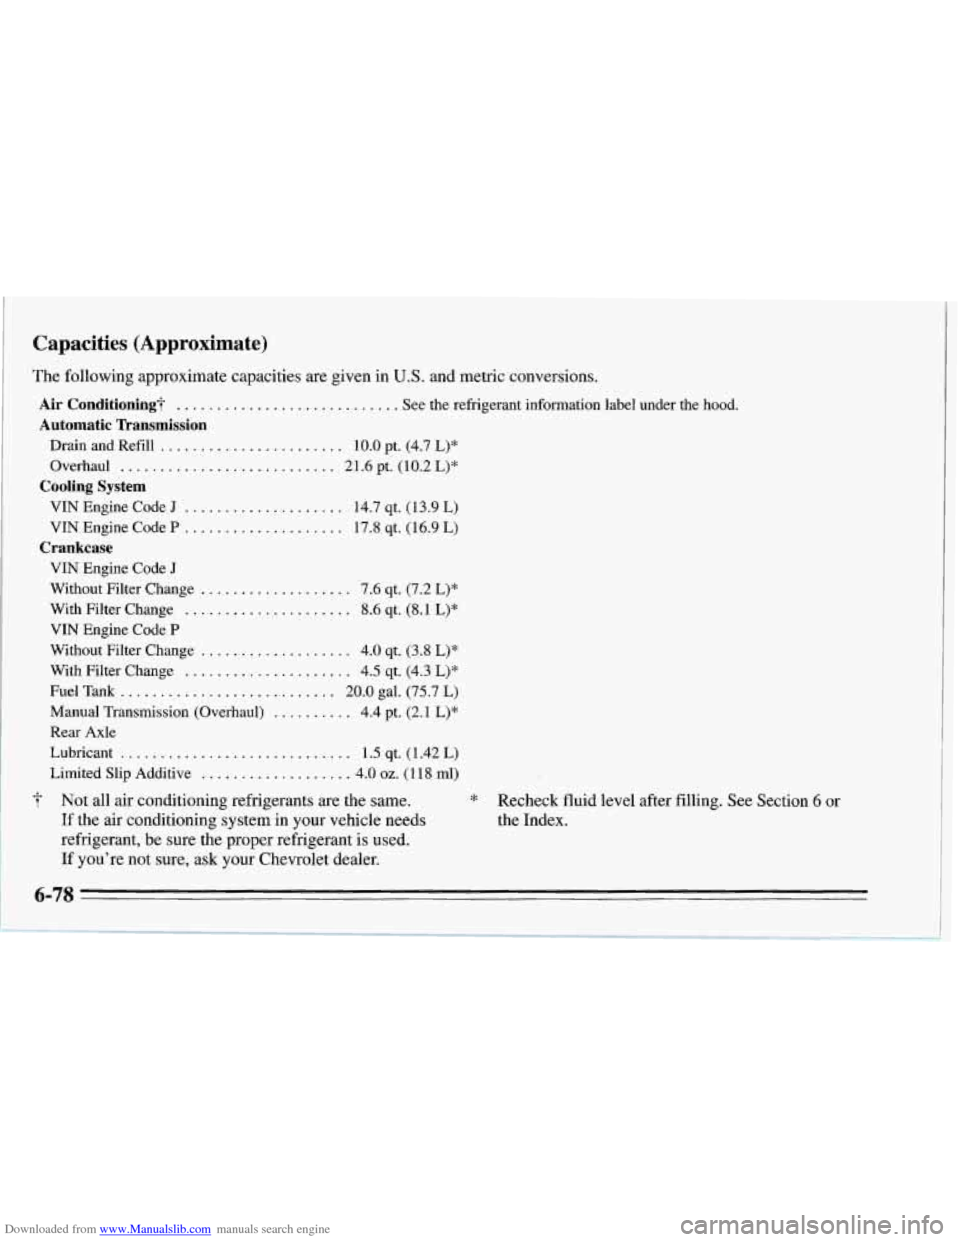
Downloaded from www.Manualslib.com manuals search engine Capacities (Approximate)
Air Conditioning? ............................ See the refrigerant information lab
The following approximate capacities are given in U.S. and metric conversions.
Automatic Transmission
Drain and Refill ....................... 10.0 pt. (4.7 L)*
Overhaul
....... ............. 21.6pt. (10.2L)*
VIN Engine Code J .................... 14.7 qt. (13.9 L)
VIN Engine Code P .................... 17.8 qt. (16.9 L)
Cooling System
Crankcase
VIN Engine Code J
Without Filter Change ................... 7.6 qt. (7.2 L)*
With Filter Change
..................... 8.6 qt. (8.1 L)*
Without Filter Change ................... 4.0 qt. (3.8 L)*
With Filter Change
..................... 4.5 qt. (4.3 L)*
Fuel Tank
........................... 20.0 gal. (75.7 L)
Manual Transmission (Overhaul)
.......... 4.4 pt. (2.1 L)*
Lubricant
............................. 1.5 qt. (1.42 L)
Limited Slip Additive
................... 4.0 oz. (1 18 ml)
VIN
Engine Code
P
Rear Axle
7 Not all air conditioning refrigerants are the same.
If the air conditioning system in your vehicle needs
refrigerant, be sure the proper refrigerant is used.
If you’re not sure, ask your Chevrolet dealer.
el und er
the hood.
* Recheck fluid level after filling. See Section 6 or
the Index.
6-78