1995 CHEVROLET ASTRO CARGO VAN inflation pressure
[x] Cancel search: inflation pressurePage 161 of 342
Downloaded from www.Manualslib.com manuals search engine Loading Your Vehicle
PAYLOAD =-I
PSI/KPA (COLD)
-0
-0 < SEE OWNER'S MANUAL FOR ADDITIONAL INFORMATION
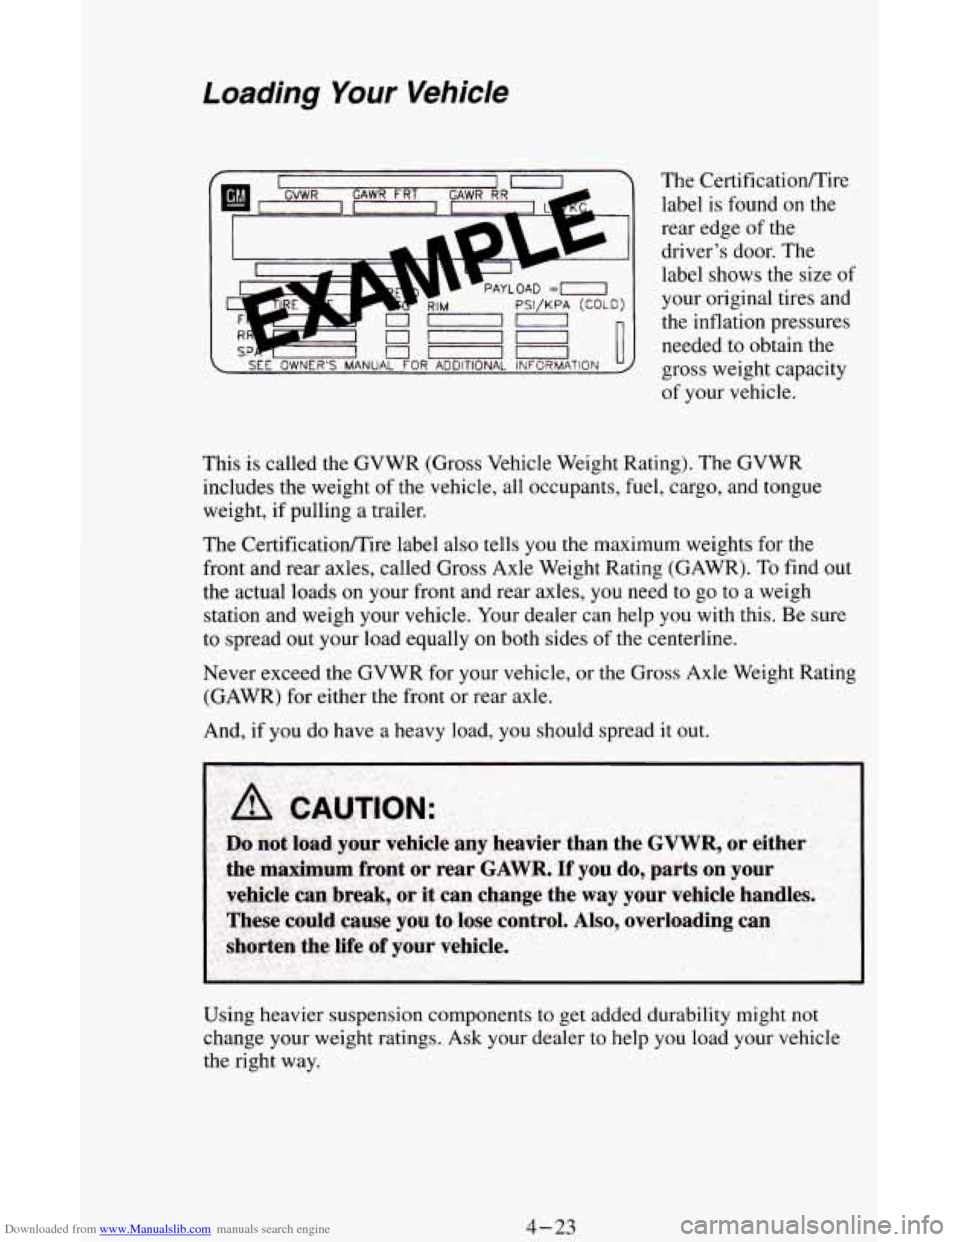
The Certificatioflire
label is found on the
rear edge
of the
driver's door. The
label shows the size
of
your original tires and
the inflation pressures
needed to obtain the
gross weight capacity
of your vehicle.
This is called the GVWR (Gross Vehicle Weight Rating). The GVWR
includes the weight of the vehicle, all occupants, fuel, cargo, and tongue
weight, if pulling a trailer.
The CertificatiodTire label also tells you the maximum weights for the
front and rear axles, called Gross Axle Weight Rating (GAWR).
To find out
the actual loads on your front and rear axles, you need to go to a weigh
station and weigh your vehicle. Your dealer
can help you with this. Be sure
to spread out your load equally on both sides of the centerline.
Never exceed the GVWR for your vehicle, or the Gross Axle Weight Rating
(GAWR) for either the front or rear axle.
And, if you do have a heavy load, you should spread it out.
Using heavier suspension components to get added durability might not
change your weight ratings. Ask your dealer
to help you load your vehicle
the right way.
4-23
Page 206 of 342
Downloaded from www.Manualslib.com manuals search engine Storing The Jack and Spare Tire
1. Put the tire on the ground at the rear of the vehicle, with the valve stem
pointed down.
2. Pull the retaining bar through the center of the wheel, making sure it is
properly attached. Attach the ratchet, with the UP side facing you, to
the extension.
3. Put the flat end of the extension on an angle through the hole in the rear
door frame, above the bumper. Turn the ratchet clockwise until the tire
is against the underside
of the vehicle.
You will hear two“c1icks” when the tire is up all the way. Try to move
the tire with your hands to make sure it is securely in place.
Return the jacking equipment to the proper location. Secure the items and
replace the jack cover.
Compact Spare Tire
Although the compact spare was fully inflated when your vehicle was new,
it can lose air after
a time. Check the inflation pressure regularly. It should
be
60 psi (420 kPa). After installing the compact spare on your vehicle, you
should stop as soon as possible and make sure your spare tire is correctly
inflated. The compact spare is made to perform well at posted speed limits
for distances up to
3,000 miles (5 000 km), so you can finish your trip and
have your full-size tire repaired or replaced where you want. Of course, it’s
best to replace your spare with a full-size tire as soon as you can. Your
spare will last longer and be in good shape in case you need
it again.
I NOTICE:
Don’t take your compact spare through an automatic car wash \
with guide rails. The compact spare can get caught
on the rails.
That can damage the tire and wheel, and maybe other parts
of
your vehicle.
Don’t use your compact spare on some other vehicle.
5-34
Page 250 of 342
Downloaded from www.Manualslib.com manuals search engine lnflation - Tire Pressure
The CertificatiodTire label which is on the rear edge of the driver’s door,
shows the correct inflation pressures for your tires, when they’re cold.
“Cold” means your vehicle has been sitting for at least three hours or driven
no more than a mile.
NOTICE:
Don’t let anyone tell you that underinflation or overinflation is
all right. It’s not. If your tires don’t have enough air
(underinflation) you can get:
Too much flexing
Too much heat
Tire overloading
Bad wear
Bad handling
Bad fuel economy.
If your tires have too much air (overinflation), you can get:
Unusual wear
Bad handling
Rough ride
Needless damage from road hazards.
When to Check
Check your tires once a month or more.
Don’t forget your compact spare tire. It should be at
60 psi (420 kPa).
How to Check
Use a good quality pocket-type gage to check tire pressure. Simply looking
at the tires will not tell you the pressure, especially if you have radial tires
- which may look properly inflated even if they’re underinflated.
If your tires
have valve caps, be sure to put them back on. They help prevent
leaks by keeping
out dirt and moisture.
6-42
Page 251 of 342
Downloaded from www.Manualslib.com manuals search engine Tire lnspection and Rotation
Tires should be inspected every 6,000 to 8,000 miles ( 10 000 to 13 000 km)
for any signs of unusual wear. If unusual wear
is present, rotate your tires as
soon
as possible and check wheel alignment. Also check for damaged tires
or wheels. See “When It’s Time for New Tires” and “Wheel Replacement”
later
in this section for more information.
The purpose
of regular rotation is to achieve more uniform wear for all tires
on the vehicle. The first rotation is the most important. See “Scheduled
Maintenance Services”
in the Index for scheduled rotation intervals.
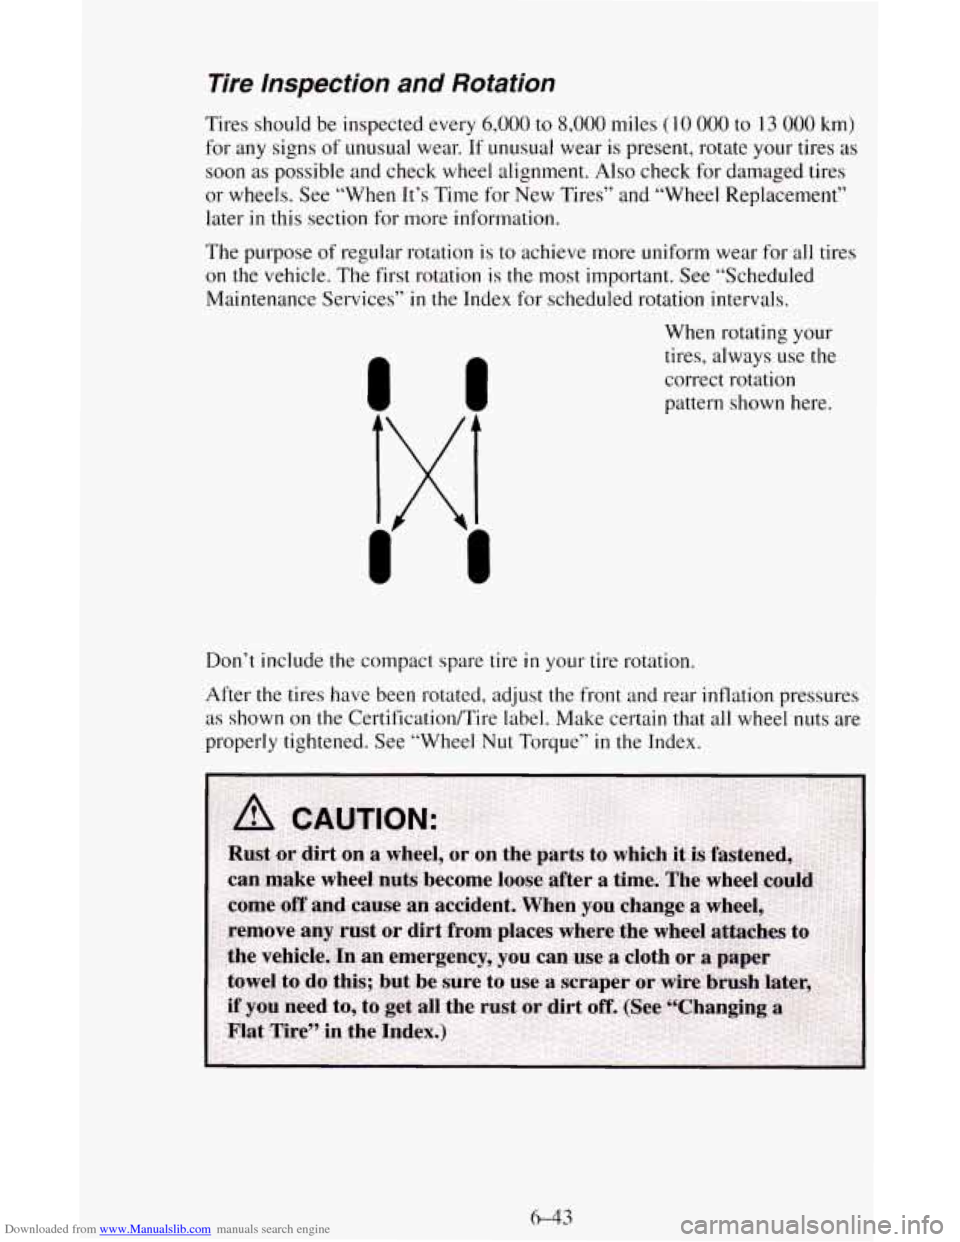
When rotating your tires, always use
the
correct rotation
pattern shown here.
Don’t include the compact spare tire
in your tire rotation.
After the tires have been rotated, adjust the front and rear inflation pressures
as shown on
the Certification/Tire label. Make certain that all wheel nuts are
properly tightened. See “Wheel
Nut Torque” in the Index.
6-43
Page 312 of 342
Downloaded from www.Manualslib.com manuals search engine Engine Coolant Level
Check the engine coolant level and add the proper coolant mix if necessary.
See “Coolant” in the Index for further details.
Windshield Washer Fluid Level
Check the windshield washer fluid level in the windshield washer tank and
add the proper fluid if necessary. See “Windshield Washer Fluid” in the
Index for further details.
At Least Once a Month
Tire lnflation
Check tire inflation. Make sure tires are inflated to the pressures specified
on the CertificatiodTire label located on the rear edge of the driver’s door.
See “Tires” in the Index for further details.
Cassette Deck
Clean cassette deck. Cleaning should be done every 50 hours of tape play.
See “Audio Systems” in the Index for further details.
At Least Once a Year
Key Lock Cylinders
Lubricate the key lock cylinders with the lubricant specified in Part D.
Body Lubrication
Lubricate all body door hinges, the body hood, fuel door and rear
compartment hinges, latches and locks including interior glove box and
console doors, and any moving seat hardware. Lubricate the hood safety
lever pivot and prop rod pivot. Part
D tells you what to use. More frequent
lubrication may be required when exposed to a corrosive environment.
7-36
Page 337 of 342
Downloaded from www.Manualslib.com manuals search engine Hood Checking Under. Hood Release
................................... 6-6
Horn
.......................................................... 2-29
Hydroplaning (See “Driving
in the Rain”)
I
If You’re Stuck in Sand. Mud. Ice. or Snow ........................... 5-35
Ignitionswitch
.................................................. 2-14
Inflation-Tire Pressure
( See “Tires”)
Instrument Cluster
............................................... 2-49
Instrumentpanel
................................................ 2-49
J
Jacking Equipment Storage ........................................ 5-23
Jumpstarting
.................................................... 5-3
K
Key Lock Cylinders ......................................... 6-40. 7-36
Keyless Entry System
............................................ 2-10
Keys ........................................................... 2-1
L
Labels
Lamps Certificationmire (See
“CertificatiodTire Label”)
Dome
....................................................... 2-42
Front Parkingnurn Signal
................................... 6-37
Headlights (See “Headlamps”)
Interior Lamps Override Switch
.................................. 2-43
Lamp and Bulb Data
........................................... 6-63
RearLamps .................................................. 6-38
Replacement (See “Bulb Replacement”)
Air Bag Readiness Light
........................................ 2-52
Anti-Lock Brake System Warning Light
........................... 2-54
Brake System Warning Light
.................................... 2-53
Charging System Light ......................................... 2-56
Daytime Running Lamps
(DRL) Indicator Light ................ 2-41. 2.56
Headlamp High Beam Indicator Light
............................. 2-57
Headlights (See “Headlamps”)
Malfunction Indicator
..................................... 2.55. 6-41
Safety Belt Reminder Light ..................................... 2-52
Service Engine Soon (See “Malfunction Indicator”)
Turn Signal and Lane Change Indicator Light
.................. 2.30. 2.57
LoadingYourVehicle
............................................ 4-23
Add-on Equipment
........................................... 4-25
Reading
..................................................... 2-42
Lights
......................................................... 2-40
Payload
..................................................... 4-24
TraileringPackage
............................................ 4-25
.