Page 17 of 27
30-17
Master cylinder, removing and installing
Special tools, testers and auxiliary items
Removing
Remove E-Box from plenum chamber as follows:
Hose clamp 3094
- If installed, remove cover above plenum chamber.
- Disconnect battery Ground (GND) strap with the ignition switched off.
Repair Manual, Electrical Equipment, Repair Group 97
- Pull off clip -1- and lift wind grill -A- slightly. Now remove screw (arrow -
2-).
- Remove remaining screws (arrows) and remove cover.
- Remove engine control unit and 8-point relay carrier (if fitted)
- Unplug connector in connector station.
- Pull engine wiring harness together with rubber grommet out through
opening in electronics box.
Pa
ge 17 of 27 Clutch mechanism, servicin
g
11/19/2002 htt
p://127.0.0.1:8080/audi/servlet/Dis
play?action=Goto&t
yp
e=re
pair&id=AUDI.B5.TM03.30.1
Page 18 of 27
30-18
Note: - Unscrew both nuts -A-.
- Lift E-box off studs at the rear and then pull it out of securing point -B-.
In the following procedures, make sure that no brake fluid escapes
into the plenum chamber or onto the transmission below. If this does
happen, clean the affected areas thoroughly. When performing work in the footwell, put cloths on the carpet to
protect it from possible brake fluid spills.
- Clamp supply hose -A- from brake fluid reservoir using special tool
3094. Pull hose off master cylinder and plug hose.
- Remove rubber grommet for compensation hose above connecting line
from transverse wall.
- Pry out retaining clip -C- using a screwdriver and pull line -B- out
slightly.
Pa
ge 18 of 27 Clutch mechanism, servicin
g
11/19/2002 htt
p://127.0.0.1:8080/audi/servlet/Dis
play?action=Goto&t
yp
e=re
pair&id=AUDI.B5.TM03.30.1
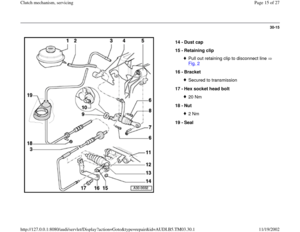
Page 19 of 27
30-19
Repair Manual, Body Interior, Repair Group 68
- Remove both socket head bolts (arrows).
- Remove driver's side storage compartment:
- Remove clutch pedal from master cylinder. To do this, pry out bolt lock
using screwdriver (arrow -1-), remove bolt (arrow -2-) and depress
clutch pedal.
Pa
ge 19 of 27 Clutch mechanism, servicin
g
11/19/2002 htt
p://127.0.0.1:8080/audi/servlet/Dis
play?action=Goto&t
yp
e=re
pair&id=AUDI.B5.TM03.30.1
Page 20 of 27
30-20
Note:
For the following procedures, make sure that the clutch pedal does not
press out switch -1- from securing clip, since the thread of the switch
would be damaged and the switch would have to be replaced. To ensure proper securing, the switch may only be installed once.
- Remove bolts for master cylinder (arrow -2-) and for mounting bracket
(arrow -3-).
- Pull complete pedal assembly somewhat toward seating compartment
and remove clutch master cylinder -4-.
Pa
ge 20 of 27 Clutch mechanism, servicin
g
11/19/2002 htt
p://127.0.0.1:8080/audi/servlet/Dis
play?action=Goto&t
yp
e=re
pair&id=AUDI.B5.TM03.30.1
Page 21 of 27
30-21
Installing
Installation is the reverse order of removal, while
noting the following:
A second technician is necessary for the next work step. - Insert master cylinder so that the so that seal -1- with washer sits
behind bearing mount and tighten bolts -2- to 20 Nm.
- Press connecting line -3- with guide -arrow A- into groove -arrow B- at
mounting bracket.
- Slide complete pedal assembly forward, toward transverse wall, insert
bolt (arrow -3-) and tighten by hand. At the same time, second
technician must insert tube from plenum chamber into master cylinder.
Pa
ge 21 of 27 Clutch mechanism, servicin
g
11/19/2002 htt
p://127.0.0.1:8080/audi/servlet/Dis
play?action=Goto&t
yp
e=re
pair&id=AUDI.B5.TM03.30.1
Page 22 of 27
30-22
- Tighten bolts for brake booster (arrows) to 25 Nm.
- Press securing clip -C- in to stop.
- Insert tube -B- into master cylinder until the tube engages audibly.
- Insert rubber grommet -D- into transverse wall above connecting
tube/after-run hose -A-.
- Slide on after-run hose -A- to brake fluid reservoir to stop.
- Remove special tool 3094.
Pa
ge 22 of 27 Clutch mechanism, servicin
g
11/19/2002 htt
p://127.0.0.1:8080/audi/servlet/Dis
play?action=Goto&t
yp
e=re
pair&id=AUDI.B5.TM03.30.1
Page 23 of 27
30-23
- Tighten socket head bolt (arrow) for pedal assembly to 25 Nm.
- Connect master cylinder to clutch pedal. Engage bolt lock into clutch
pedal.
- Bleed clutch system after installing master cylinder Page 30
-25
.
Note:
Connect clutch master cylinder with clutch pedal. Engage bolt lock in
clutch pedal. - Check adjustment of switch -1- above clutch pedal as follows:
Switch -1- must lie against clutch pedal -3- completely and must be
completely activated.
Adjustment tolerance: gap measurement -a- between retaining clip
and mounting bracket -2- or gap measurement -b- at switch -1-
may be a maximum of 0.5 mm.
To adjust, hold clip and rotate switch -1-.
Pa
ge 23 of 27 Clutch mechanism, servicin
g
11/19/2002 htt
p://127.0.0.1:8080/audi/servlet/Dis
play?action=Goto&t
yp
e=re
pair&id=AUDI.B5.TM03.30.1
Page 24 of 27
30-24
- Remove driver's side storage compartment:
Repair Manual, Body Interior, Repair Group
68
Repair Manual, Electrical Equipment, Repair Group 97
- Always replace seal -C-.
- Make sure seal does not cover chassis opening and elevated edge of
sheet metal.
- Insert E-Box in securing point -B- and tighten nuts -A- to 4 Nm.
- Press cover on by hand and tighten bolts -A- diagonally to 4 Nm (also
see inscription on cover).
- Install engine wiring harness and connect harness connector in
connector station.
- Install engine control module and if necessary, auxiliary relay carrier
and auxiliary fuse holder.
Pa
ge 24 of 27 Clutch mechanism, servicin
g
11/19/2002 htt
p://127.0.0.1:8080/audi/servlet/Dis
play?action=Goto&t
yp
e=re
pair&id=AUDI.B5.TM03.30.1


.
- Remove drivers side storage compartment:
- Remove clutch pedal from master cylinder")


 to 25 Nm.
- Press securing clip -C- in to stop.
- Insert tube -B- into master cylinder until the tube engages audibly.
- Insert rubber")
 for pedal assembly to 25 Nm.
- Connect master cylinder to clutch pedal. Engage bolt lock into clutch
pedal.
- Bleed clutch system after installing")
