Page 982 of 1708

AUDIO I Symptom: No sound can be heard I Possible cause Burnt CIGAR fuse Burnt ROOM fuse Damaged audio unit ROOM 1 OA 35UOTX-077 Open circuit in wiring harness Poor connection of connector Damaged DIN cord Step 1 Check the CIGAR 15A fuse and ROOM 1 OA fuse in the fuse block. I Fuse 1 Action I Step 2 1. Remove the audio unit. (Refer to page T-145.) 2. Check the connectors and the DIN cord of the audio unit. 3. If a connection is poor or loose, repair or replace it. 4. If the connectors are OK, go to Step 3. Burnt OK Step 3 1. Turn the ignition switch to ACC position. 2. Measure voltage at terminals A (UB) and C (UR) of the AM-FM radio unit connector (1 2-pin). Replace fuse after checking and repairing wiring harness Go to Step 2 B+: Battery positive voltage Terminal 1 Voltfe Action Measure terminal C (VR) voltage Repair wiring harness (CIGAR fuse - AMeFM radio unit) Go to Step 4 Repair wiring harness (ROOM fuse - AM-FM radio unit) 1 Step 4 1. Check for continuity between body of the AM-FM radio unit and ground. I No Repair wiring harness (AM-FM radio unit - GND) 1 Continuity Yes Action Replace audio unit Gartner Banana
Page 987 of 1708
T AUDIO Step 14 1. Turn the ignition switch to ACC. 2. Measure the voltage at terminal C (UB) of the auto level controller connector (&pin). .J B+: Battery positive voltage I voltage Action Step 15 1. Disconnect the auto level controller DIN cord (&pin). 2. Measure the voltage at terminal 2 of the DIN cord. B+ Other Go to Step 15 Repair wiring harness CIGAR fuse - Auto level controller B+: Battery positive voltage Step 16 1. Check for continuity between the auto level controller connector (&pin) and the headrest speaker and body- sonic connector (&pin). Voltage B+ Other Action Go to Step 16 Replace AMFM radio unit 2. If correct, replace the auto level controller. 3. If not as specified, repair the wiring. I Speaker Right headrest Left headrest ALC I 'peaker connector connector H (VW) 8-pin +t C (LMI) 6-pin B (UO) &pin ++ D (LO) 6-pin F (RIL) &pin o B (RIL) Gpin A (W) &pin o A (W) 6-pin continuity Yes Yes Yes Yes .- / Gartner Banana
Page 988 of 1708

AUDIO T Symptom: Bodysonic will not play Possible cause Damaged bodysonic Damaged audio unit Damaged DIN cord Open or short circuit in wiring harness Poor connection of connector Open or short circuit in DIN cord 45UOTX-269 Step 1 1. Remove the audio unit. (Refer to page T-145.) 2. Make sure the audio unit connector and DIN cord are properly connected. 3. If the connections are OK, go to Step 2. 4. If a connection is poor, repair it. Step 2 1. TI~ the ignition switch to ACC. .. .-... 2. Measure fhe voltage at terminal C (UB) of the auto level controller connector (8-pin). B+: Battery positive voltage Step 3 1. Disconnect the auto level controller DIN cord (6-pin). Voltage B+ Other 2. Measure the voltage at terminal 2 of the DIN cord. Action Go to Ste~ 3 J Repair wiring harness (CIGAR fuse - Auto level controller) B+: Batterv ~ositlve voltage I Other I Replace AMaFM radio unit . . - Step 4 1. Make sure headrest speaker and bodysonic connectors are properly connected. 2. If the connections are OK, go to Step 5. 3. If a connection is poor, repair it. Voltage B+ Action Go to Stea 4 Gartner Banana
Page 995 of 1708
Ix-osl, FUSE ANTENNA BLOCK 1OA 8 R/B J-3 MAIN FUSE BLOCK .POWER ANTENNA MAIN IGNITION m SWITCH L~W PMR ANTENNA MOTOR BR I I T Y w -13 REAR [R) -POHER ANTENNA ASSEMBLY J-14 POWER ANTENNA RELAY I I I Gartner Banana
Page 996 of 1708
AUDIO Inspection c Fuse ness. ml JHFDB If the antenna fails to raise or lower, make the following checks: 1. Check the antenna fuse (10A). 2. Replace fuse after checking and repairing wiring har- Power antenna 1. Check for continuity between the terminals of the power antenna relay. If there is no continuity, replace the relay. Terminal I M: Continuity 2. If the antenna does not function even though there is continuity, the problem may be either in the wiring har- ness or in the audio component assembly. 3. Apply battery positive voltage to the terminals and check the operation. I I A 1 B 1 DOWN I Function of antenna UP Battery Pos. D Neg. A Gartner Banana
Page 1002 of 1708

SRS AIR BAG SYSTEM T COMPONENT DESCRIPTION Component Air bag module Function Air bag system warning light Deploys air bag when current flows to integrated igniter Light illuminates or flashes if malfunction occurs in air bag system I EE with S-sensor, completes Circuit Clock spring I Ensures uninterrupted electrical connec- tion to air bag module while allowing turning of steering wheel Activated(closed) when crash impact de- Crash sensor Diagnostic module to infktor Activated(closed) when crash impact de- S-sensor 1 Monitors com~onents and harnesses in tected Acting with D-sensor, completes circuit to inflator Remark Located in instrument cluster Location: Driver side . . . . . . . . in steering wheel hub Passenger side . . . above the glove compartment Part of combination switch Located in front part of vehicle(left, right, and center) Located behind heater unit in passenger compartment Contains back-up battery air bag system Indicates system malfunction by flashing or illuminating air bag system warning light If warning light is bunt, sounds warning buzzer Detects short circuit between air bag module and ground or crash sensor rnal- function and melts system fuse to pre- vent unintended air bag deployment Gartner Banana
Page 1008 of 1708

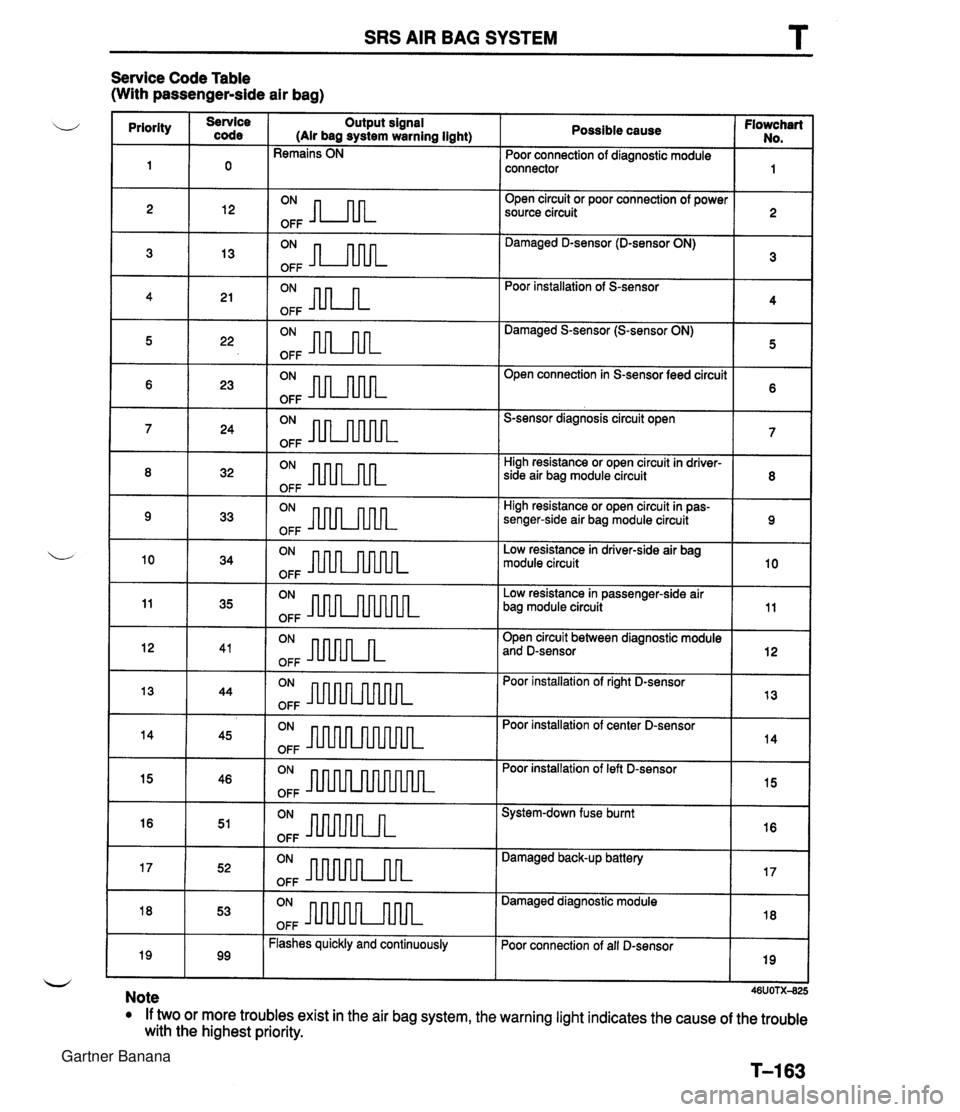
SRS AIR BAG SYSTEM T Service Code Table (With passenger-side air bag) Possible cause Flowchart No. Poor connection of diagnostic module priority connector Open circuit or poor connection of power source circuit code Output signal (Air bag system warning light) Remains ON Damaged D-sensor (D-sensor ON) 2 Poor installation of S-sensor Damaged S-sensor (S-sensor ON) 12 5 22 OFF OFF Open connection in S-sensor feed circuit S-sensor diagnosis circuit open High resistance or open circuit in driver- 8 32 OFF side air bag module circuit High resistance or open circuit in pas- senger-side air bag module circuit Low resistance in driver-side air bag module circuit I 11 1 35 ION- OFF b Low resistance in passenger-side air bag module circuit Open circuit between diagnostic module 10 and D-sensor - Poor installation of right D-sensor 113 144 ION- OFF 34 OFF Poor installation of center D-sensor 14 I 15 1 46 ION- OFF Poor installation of left D-sensor 45 System-down fuse burnt OFF 1 17 1 52 ( ON ml flk OFF Damaged back-up battery Damaged diagnostic module I 18 I 53 IoNm[~ OFF Poor connection of all D-sensor 19 I I I w Note If two or more troubles exist in the air bag system, the warning light indicates the cause of the trouble with the highest priority. T-163 99 Flashes quickly and continuously Gartner Banana
Page 1010 of 1708

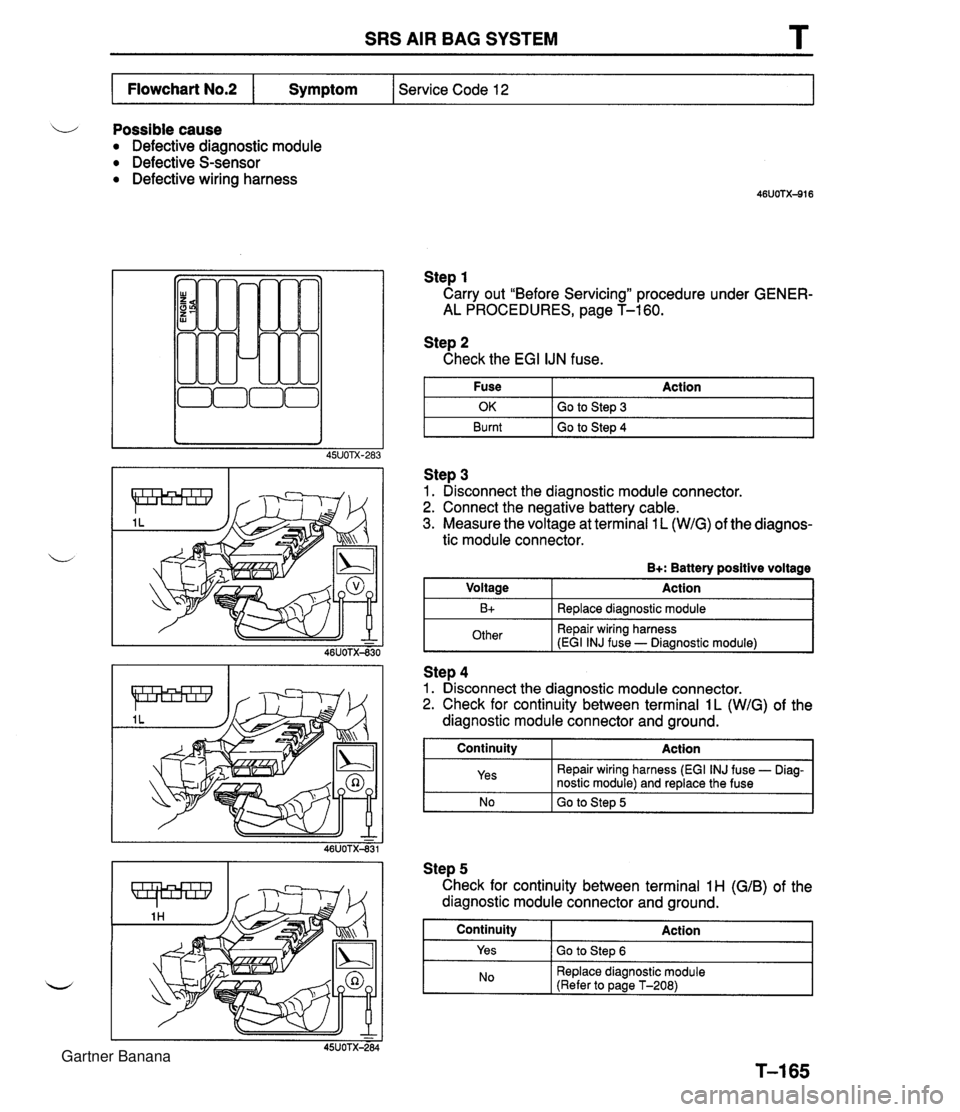
SRS AIR BAG SYSTEM T Possible cause Defective diagnostic module Defective S-sensor Defective wiring harness Step 1 Carry out "Before Servicing" procedure under GENER- AL PROCEDURES, page T-160. Service Code 12 Flowchart No.2 Step 2 Check the EGI IJN fuse. Symptom I Fuse I Action I Step 3 1. Disconnect the diagnostic module connector. 2. Connect the negative battery cable. 3. Measure the voltage at terminal 1 L (WIG) of the diagnos- tic module connector. OK Burnt B+: Battery positive voltage Voltage Action I Go to Step 3 Go to Step 4 Step 4 1. Disconnect the diagnostic module connector. 2. Check for continuity between terminal 1L (WIG) of the diagnostic module connector and ground. B+ Other Replace diagnostic module Repair wiring harness (EGI INJ fuse - Diagnostic module) I NO I GO to Step 5 I Continuity Yes Step 5 Check for continuity between terminal 1H (GIB) of the diagnostic module connector and ground. Continuity I Action Action Repair wiring harness (EGI INJ fuse - Diag- nostic module) and replace the fuse Yes ( Go to Step 6 No Replace diagnostic module (Refer to page T-208) Gartner Banana