Page 1005 of 1708

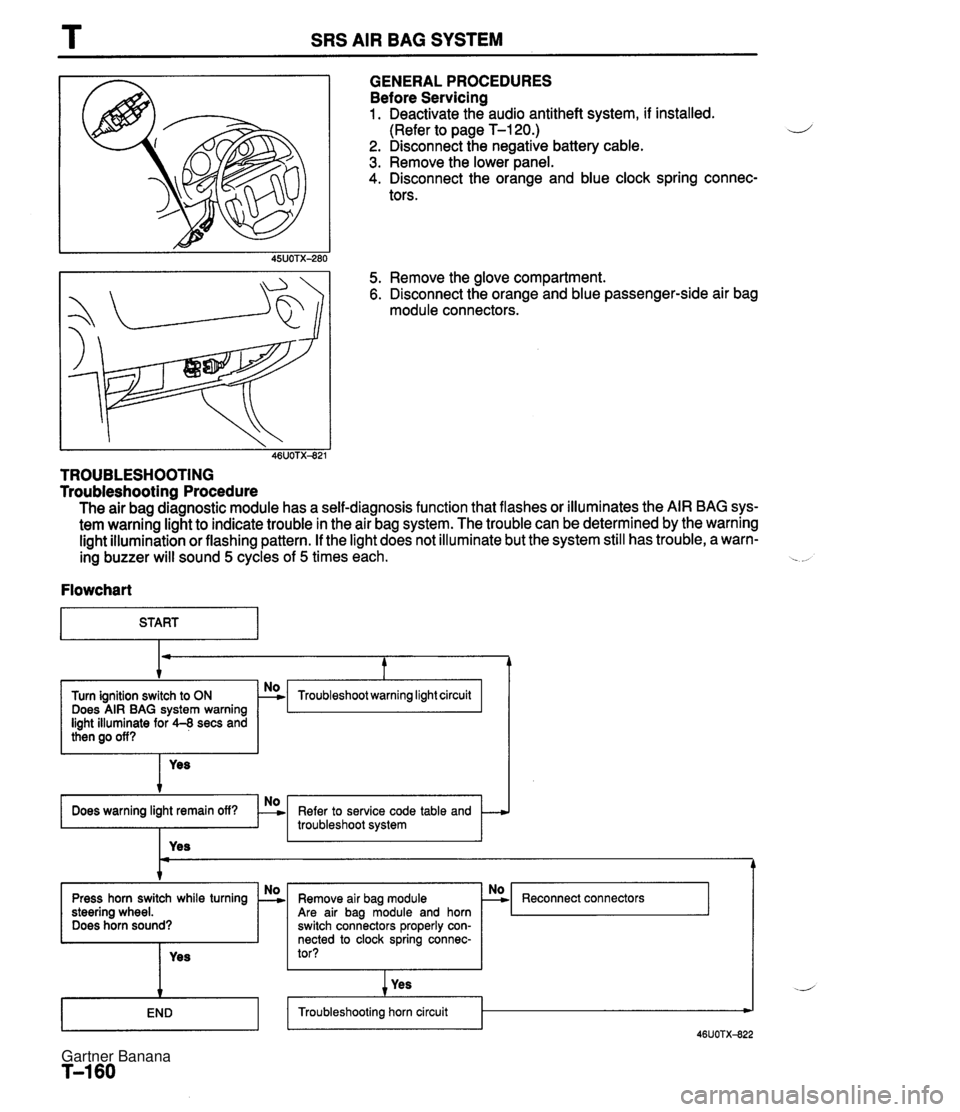
T SRS AIR BAG SYSTEM GENERALPROCEDURES Before Servicing 1. Deactivate the audio antitheft system, if installed. (Refer to page T-120.) 2. Disconnect the negative battery cable. 3. Remove the lower panel. 4. Disconnect the orange and blue clock spring connec- tors. 5. Remove the glove compartment. 6. Disconnect the orange and blue passenger-side air bag module connectors. I , 46UOTXd21 TROUBLESHOOTING Troubleshootinn Procedure The air bag diagnostic module has a self-diagnosis function that flashes or illuminates the AIR BAG sys- tem warning light to indicate trouble in the air bag system. The trouble can be determined by the warning light illumination or flashing pattern. If the light does not illuminate but the system still has trouble, a warn- ing buzzer will sound 5 cycles of 5 times each. . . Flowchart I START Troubleshoot warning light circuit Does AIR BAG system warning light illuminate for 4-8 secs and I I Yes t Refer to service code table and troubleshoot system Press horn switch while turning steering wheel. Does horn sound? I I I Yes Reconnect connectors Are air bag module and horn switch connectors properly con- nected to clock spring connec- tor? Yes I I I I Troubleshooting horn circuit - Gartner Banana
Page 1006 of 1708
SRS AIR BAG SYSTEM T Circuit Diagram Gartner Banana
Page 1007 of 1708
T SRS AIR BAG SYSTEM Connector Locations Gartner Banana
Page 1008 of 1708

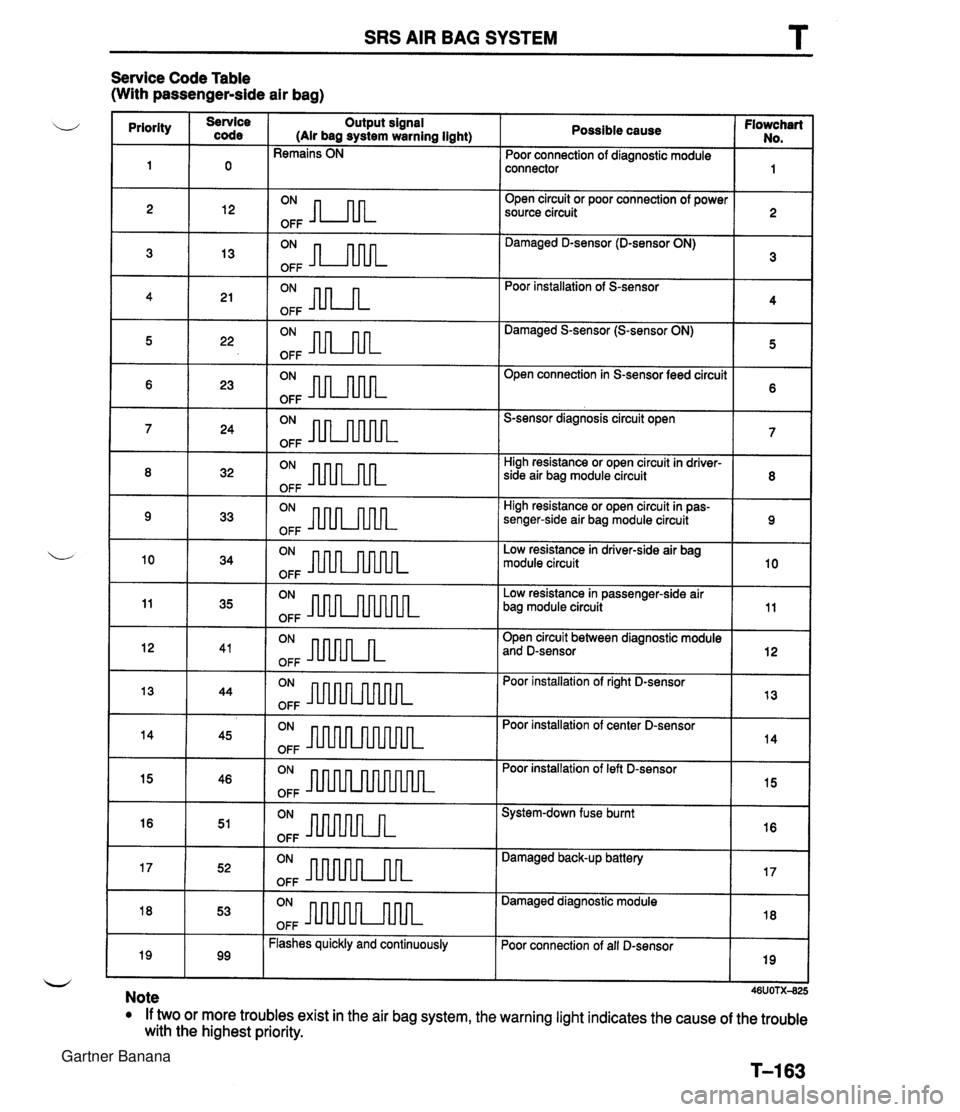
SRS AIR BAG SYSTEM T Service Code Table (With passenger-side air bag) Possible cause Flowchart No. Poor connection of diagnostic module priority connector Open circuit or poor connection of power source circuit code Output signal (Air bag system warning light) Remains ON Damaged D-sensor (D-sensor ON) 2 Poor installation of S-sensor Damaged S-sensor (S-sensor ON) 12 5 22 OFF OFF Open connection in S-sensor feed circuit S-sensor diagnosis circuit open High resistance or open circuit in driver- 8 32 OFF side air bag module circuit High resistance or open circuit in pas- senger-side air bag module circuit Low resistance in driver-side air bag module circuit I 11 1 35 ION- OFF b Low resistance in passenger-side air bag module circuit Open circuit between diagnostic module 10 and D-sensor - Poor installation of right D-sensor 113 144 ION- OFF 34 OFF Poor installation of center D-sensor 14 I 15 1 46 ION- OFF Poor installation of left D-sensor 45 System-down fuse burnt OFF 1 17 1 52 ( ON ml flk OFF Damaged back-up battery Damaged diagnostic module I 18 I 53 IoNm[~ OFF Poor connection of all D-sensor 19 I I I w Note If two or more troubles exist in the air bag system, the warning light indicates the cause of the trouble with the highest priority. T-163 99 Flashes quickly and continuously Gartner Banana
Page 1009 of 1708
T SRS AIR BAG SYSTEM I Flowchart No1 I Symptom I Air bag warning light remains ON I Possible cause Poor connection of diagnostic module connector Defective diagnostic module 0 Defective wiring harness CONNECTOR Step 1 Carry out "Before Servicing" procedure under GENER- AL PROCEDURES, page T-160. Step 2 1. Verify that the diagnostic module connector is securely connected to the diagnostic module. 2. Verify that the shorting bar is in the fully retracted posi- tion. 3. If the connector and shorting bar are OK, go to step 3. Step 3 1. Disconnect the diagnostic module connector. 2. Remove the shorting bar from the diagnostic module connector. 3. Check the air bag system warning light. I Llght condltlon 1 Action I I I Illuminate I Repair wiring harness (Instrument cluster - Diagnostic module) I Not illuminate Replace diagnostic module (Refer to page T-208) Gartner Banana
Page 1010 of 1708

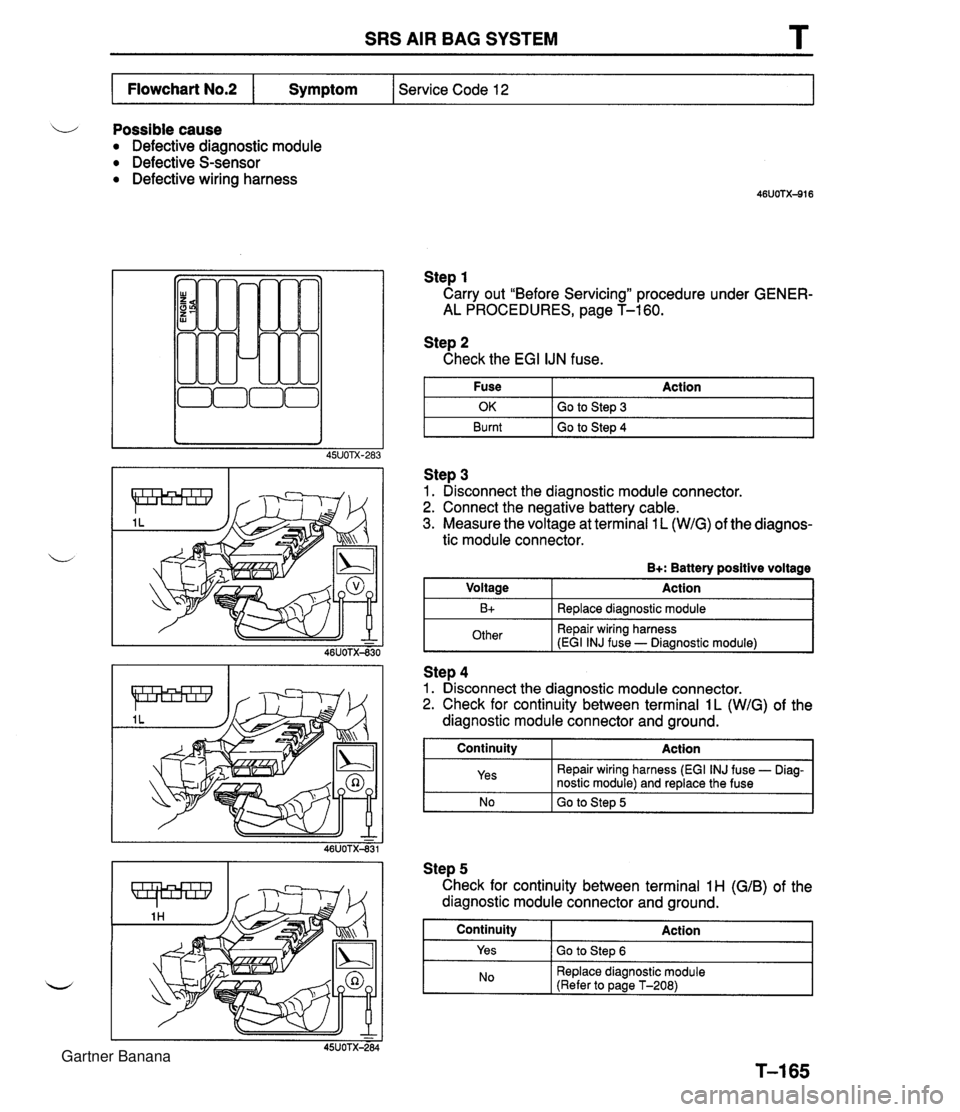
SRS AIR BAG SYSTEM T Possible cause Defective diagnostic module Defective S-sensor Defective wiring harness Step 1 Carry out "Before Servicing" procedure under GENER- AL PROCEDURES, page T-160. Service Code 12 Flowchart No.2 Step 2 Check the EGI IJN fuse. Symptom I Fuse I Action I Step 3 1. Disconnect the diagnostic module connector. 2. Connect the negative battery cable. 3. Measure the voltage at terminal 1 L (WIG) of the diagnos- tic module connector. OK Burnt B+: Battery positive voltage Voltage Action I Go to Step 3 Go to Step 4 Step 4 1. Disconnect the diagnostic module connector. 2. Check for continuity between terminal 1L (WIG) of the diagnostic module connector and ground. B+ Other Replace diagnostic module Repair wiring harness (EGI INJ fuse - Diagnostic module) I NO I GO to Step 5 I Continuity Yes Step 5 Check for continuity between terminal 1H (GIB) of the diagnostic module connector and ground. Continuity I Action Action Repair wiring harness (EGI INJ fuse - Diag- nostic module) and replace the fuse Yes ( Go to Step 6 No Replace diagnostic module (Refer to page T-208) Gartner Banana
Page 1011 of 1708
SRS AIR BAG SYSTEM Step 6 1. Disconnect the S-sensor connector. 2. Check for continuity between terminal 1 H (GIB) of the diagnostic module connector and ground. I No I Replace wiring harness I Continuity Yes Action Replace S-sensor (Refer to page T-213) Gartner Banana
Page 1012 of 1708

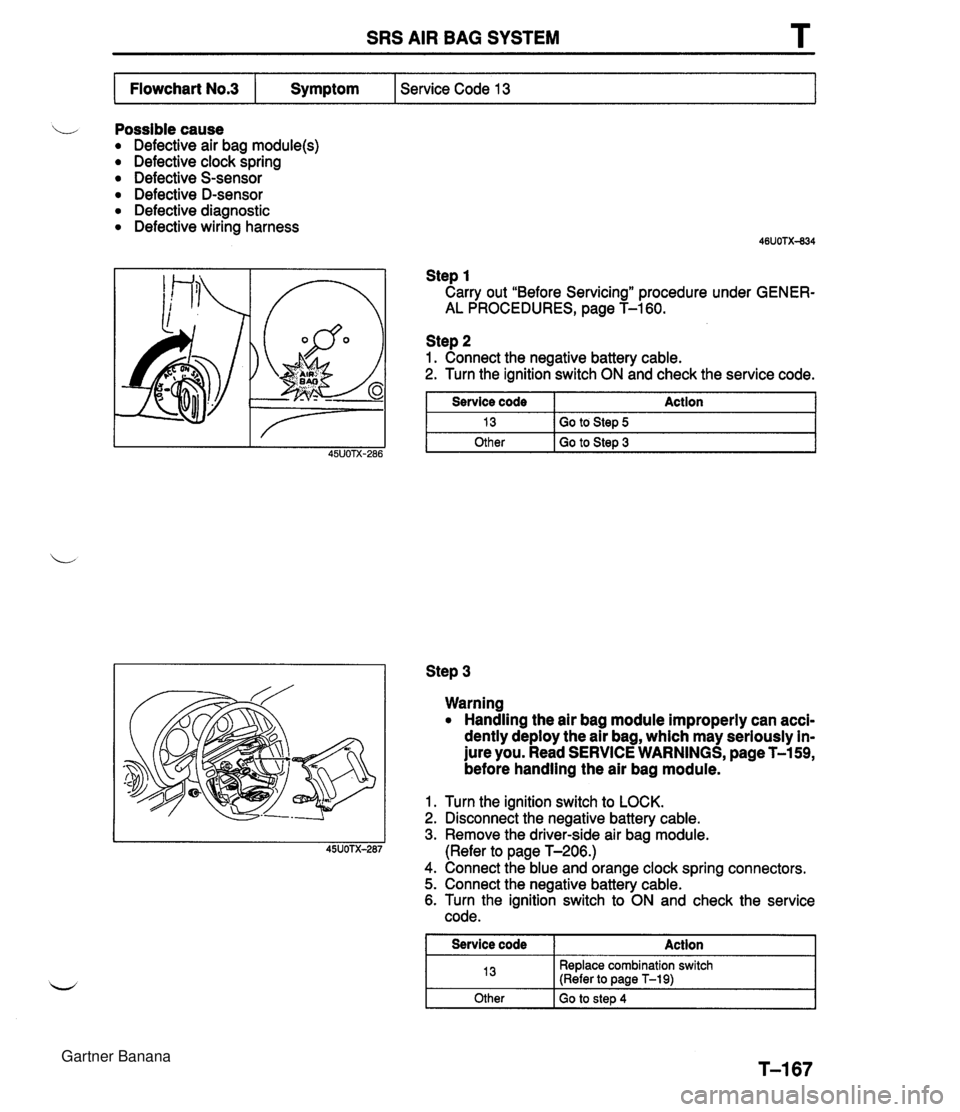
SRS AIR BAG SYSTEM L Possible cause Defective air bag module(s) Defective clock spring Defective S-sensor Defective D-sensor Defective diagnostic Defective wiring harness Step 1 Carry out "Before Servicing" procedure under GENER- AL PROCEDURES, page T-160. Service Code 13 Flowchart No.3 Step 2 1. Connect the negative battery cable. 2. Turn the ignition switch ON and check the service code. Symptom Step 3 Service code 13 Other Warning Handling the air bag module improperly can acci- dently deploy the air bag, which may seriously in- jure you. Read SERVICE WARNINGS, page T-159, before handling the air bag module. Action Go to Step 5 Go to Step 3 1. Turn the ignition switch to LOCK. 2. Disconnect the negative battery cable. 3. Remove the driver-side air bag module. (Refer to page T-206.) 4. Connect the blue and orange clock spring connectors. 5. Connect the negative battery cable. 6. Turn the ignition switch to ON and check the service code. I Service code I Action 1 13 Other Replace combination switch (Refer to page T-19) Go to step 4 Gartner Banana