Page 9 of 29
AIR CONDITIONING AND AUDIO
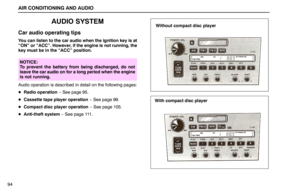
“PWR. VOL” knob
(For turning radio on
and adjusting volume)
“AM” button
(For turning radio on
and selecting AM)
“FM1” button
(For turning radio on
and selecting FM)
“FM2” button
(For turning radio on
and selecting FM)
Radio display
Station selector
buttons (1-6)
“FADER” knob
(For front and rear
sound balance)
“BALANCE” knob
(For right and left
sound balance)
“TREBLE” knob
(For treble control)
“MID” knob
(For mid range control)
“BASS” knob
(For bass control)
“SCAN” button
(For preset scan tuning
and scan tuning)
“TUNE SEEK” button
(For frequency tuning)
Without compact disc player
95
Radio operation
Page 10 of 29
AIR CONDITIONING AND AUDIO
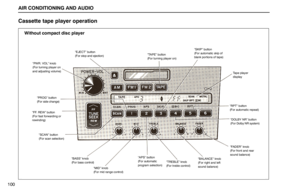
With compact disc player
“PWR. VOL” knob
(For turning radio on
and adjusting volume)
“AM” button
(For turning radio on
and selecting AM)
“FM 1/2” button
(For turning radio on
and selecting FM)
Radio display
Station selector
buttons (1-6)
“FADER” knob
(For front and rear
sound balance)
“BALANCE” knob
(For right and left
sound balance)
“TREBLE” knob
(For treble control)
“MID” knob
(For mid range control)
“BASS” knob
(For bass control)
“TUNE SEEK” button
(For frequency tuning)
“SCAN” button
(For preset scan tuning
and scan tuning)
96
Page 11 of 29
 Listening to the radio
1. Push the (AM), (FM1) or (FM2) button to
turn the radio on and to select either an AM or FM broadcast
(without compact disc player).
2. Pu")
AIR CONDITIONING AND AUDIO
97
(a) Listening to the radio
1. Push the (AM), (FM1) or (FM2) button to
turn the radio on and to select either an AM or FM broadcast
(without compact disc player).
2. Push the
(AM) or (FM1 / 2) button to turn the radio
on and select either an AM or FM broadcast (with compact disc
player).
“AM”, “FM1” or “FM2” will appear on the display.
The radio can also be turned on by pushing the “PWR.VOL”
knob if the radio had been on when the system was turned off.
3. Turn the “PWR.VOL” knob to adjust the volume.
4. Tune in the desired station. (See “(b) Selecting a station”.)
The radio will change automatically to stereo reception when
an FM stereo broadcast is being received. At the same time,
“ST” will appear on the display. When the receiving signal gets
weak, the channel separation will automatically be reduced for
lowest noise. If the signal becomes extremely weak, the radio
will switch over to monaural reception.
5. Adjust the tone and sound balance. (See “(d) Adjusting the
tone” and “(e) Adjusting the sound balance”.)
6. To turn the radio off, push the “PWR.VOL” knob.
(b) Selecting a station
Tune in the desired station using one of the following methods.
The frequency will appear on the display.Preset tuning: Use for tuning-in to a desired preset station.
Push the station selector button to which the desired station
has been preset. The radio will tune in to the station and the
button number will appear on the display. (See “(c) Presetting
a station”.)
Seek tuning: Use for automatic station search and stop.
Push the
(SEEK) button and hold it until a beep is heard. The
radio will begin seeking up or down for a station of the nearest
frequency and will stop on reception. Each time you push the
button, stations will be searched out one after another.
Scan tuning: Use for scanning preset station channels or
station-to-station scanning.
Push the
(SCAN) button for less than 2 seconds. With “P.
SCAN” blinking on the display, the radio will automatically seek
out a preset station of a higher channel number in the AM / FM
mode. If there is a preset station on the channel, then the tuning
is held for 5 seconds. If there is no station on the channel, then
the tuning is only held for 1 second. If the
(SCAN) button
is pushed while listening to a preset station channel, then the
scan proceeds to the next highest channel, proceeding in turn
through the 6 channels of FM1 and then the 6 channels of FM2,
then repeating the process. To continue listening to the
channel of your choice, simply push the
(SCAN) button
once again.
Page 12 of 29
 button for longer than 2 seconds. With
“SCAN” on the display, the radio will automatically seek out a
station of higher frequency, hold it for 5 seco")
AIR CONDITIONING AND AUDIO
98Push the
(SCAN) button for longer than 2 seconds. With
“SCAN” on the display, the radio will automatically seek out a
station of higher frequency, hold it for 5 seconds and scan to
the next. To continue listening to the broadcast of your choice,
simply push the
(SCAN) button once again.
Manual tuning: Push the
(TUNE) button within 0.5 second.
Each time you push the button, the radio will step up or down
to another frequency where stations could exist.
(c) Presetting a station
1. Tune in the desired station. (See “(b) Selecting a station”.)
2. Push one of the station selector buttons and hold it until a
beep is heard. This sets the station to the button and the button
number will appear on the display.
Each button can store one AM station and two FM stations. To
change the preset station to a different one, follow the same
procedure.
The preset station will be cancelled when the power source is
severed (battery disconnected, burnt fuse, etc.).
(d) Adjusting the tone
To adjust the low-pitched tone, push the “BASS” knob (if
depressed) and turn it.
To adjust the middle-pitched tone, push the “MID” knob (if
depressed) and turn it,
To adjust the high-pitched tone, push the “TREBLE” knob (if
depressed) and turn it.
(e) Adjusting the sound balance
To balance the sound between the right and left speakers,
push the “BALANCE” knob (if depressed) and turn it.
To balance the sound between the front and rear speakers,
push the “FADER” knob (if depressed) and turn it.
Radio operating tips
The antenna automatically extends to full height when the
radio and ignition are turned on and retracts when either is
turned off.
CAUTION:
Before extending the antenna, confirm that no one is close
enough to get injured.
NOTICE:
To prevent damage to the antenna, make sure it is
retracted before running your vehicle through an
automatic car wash.
Page 13 of 29

AIR CONDITIONING AND AUDIO
99 FM reception tips
A vehicle is not an ideal place to listen to a radio. Because it
moves, reception conditions are constantly changing.
Buildings, terrain, signal distance and noise from other
vehicles are all working against good reception. Some
conditions of FM may appear to be problems when they are
not. The following characteristics are completely normal for a
given reception area, and they do not indicate any problem
with the radio itself.
�Fading and Drifting:
FM range is limited to about 40 km (25 miles), except for
some high power stations.
If a vehicle is moving away from the desired station’s
transmitter, the signal will tend to fade and / or drift. This
phenomenon is more noticeable with FM than with AM, and
is accompanied by distortion.
Fading and drifting can be minimized to a certain degree by
careful attention to fine tuning, or you should retune the
radio to another stronger station.
�Static and Fluttering:
When the line-of-sight link between a transmitter and
vehicle is blocked by large buildings or the like, the radio
sound may be accompanied with static or fluttering because
of the characteristic of FM. In a similar effect, a fluttering
noise is sometimes heard when driving along a tree-lined
road.
This static and fluttering can be reduced by adjusting the
tone control for greater bass response until the disturbance
has passed.�Multipath:
Because of the reflecting characteristics of FM, direct and
reflected signals may reach the antenna at the same time
(multipath) and cancel each other out. As a vehicle moves
through these electronic dead spots, the listener may hear
a momentary flutter or loss of reception.
�Station swapping:
When two FM stations are close to each other, and an
electronic dead spot, such as static or multipath area,
interrupts the original signal, sometimes the stronger
second signal will be selected automatically until the original
one returns. This swapping can also occur as you drive
away from the selected station and approach another
station with a stronger signal.
Page 14 of 29
AIR CONDITIONING AND AUDIO
100
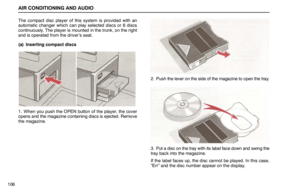
Cassette tape player operation
“PWR. VOL” knob
(For turning player on
and adjusting volume)
“EJECT” button
(For stop and ejection)“TAPE” button
(For turning player on)
“SKIP” button
(For automatic skip of
blank portions of tape)
Tape player
display
“RPT” button
(For automatic repeat)
“DOLBY NR” button
(For Dolby NR system)
“FADER” knob
(For front and rear
sound balance)
“BALANCE” knob
(For right and left
sound balance)“TREBLE” knob
(For treble control)“APS” button
(For automatic
program selection)
“MID” knob
(For mid range control)
“BASS” knob
(For bass control)
“SCAN” button
(For scan selection)
“FF. REW” button
(For fast forwarding or
rewinding)
“PROG” button
(For side change)
Without compact disc player
Page 15 of 29
AIR CONDITIONING AND AUDIO
“PWR.VOL” knob
(For turning player on
and adjusting volume)
“EJECT” button
(For stop and ejection)“TAPE” button
(For turning player on)
“SKIP” button
(For automatic skip of
blank portions of tape)
Tape player
display
“RPT” button
(For automatic repeat)
“DOLBY NR” button
(For Dolby NR system)
“FADER” knob
(For front and rear
sound balance)
“BALANCE” knob
(For right and left
sound balance)
“TREBLE” knob
(For treble control)
“APS” button
(For automatic
program selection)
“MID” knob
(For mid range control)
“BASS” knob
(For bass control)
“SCAN” button
(For scan selection)
“FF. REW” button
(For fast forwarding or
rewinding)
“PROG” button
(For side change)
With compact disc player
101
Page 16 of 29
 Playing a cassette tape
1. Put the cassette into the slot, with the tape side to the right
and lightly push it in. The tape player will grasp the cassette
and slide")
AIR CONDITIONING AND AUDIO
102
(a) Playing a cassette tape
1. Put the cassette into the slot, with the tape side to the right
and lightly push it in. The tape player will grasp the cassette
and slide it into place to play. If the radio is on when the cassette
is inserted, the radio will automatically turn off.
If the cassette is already in the slot, push the
(TAPE)
button.
At this time, “TAPE” will appear on the display.
The tape player can also be turned on by pushing the
“PWR.VOL” knob if the tape player was being used when the
system was turned off.
When a metal or chrome equivalent tape is inserted, the player
will automatically adapt to it and “METAL” will appear on the
display.
2. If using a tape recorded with Dolby NR*, push the
(Dolby B.C NR) button to select the Dolby B NR or Dolby C NR
mode. The display will indicate which Dolby noise reduction
system is operating.
The Dolby B NR mode reduces noise for high-pitched tones.
The Dolby C NR mode is also effective for middle tones. For
best sound reproduction, select the same NR mode that was
used to record the tape. To play a tape recorded without Dolby
NR*, push the button until the Dolby NR indicator disappears.
* Dolby noise reduction manufactured under license from Dolby Laboratories
Licensing Corporation. “DOLBY” and the double-D symbol
are trademarks
of Dolby Laboratories Licensing Corporation.
3. Turn the “PWR.VOL” knob to adjust the volume.
4. Select your program. (See “(b) Selecting a program”.)
5. Adjust the tone and sound balance. (See “(d) Adjusting the
tone” and “(e) Adjusting the sound balance” of radio operation.)
6. If desired, other functions may be used for your
convenience. (See “(c) Other tape player functions”.)
7. To turn the player off, push the “PWR.VOL” knob.
8. To eject the cassette, push the
(EJECT) button. As this
is done, the player will turn off. If the radio was on when the
cassette tape was inserted, it will automatically turn on again.
The key can be at any position to eject the cassette.
(b) Selecting a program
1. Push the (PROG) button to select a side to play. The
tape operation indicator display shows you which side is being
played.
The player will automatically reverse directions at the end of
the tape to play the other side.
2. Have a desired program played using either of the following
methods.


“AM” button
(For turning radio on
and selecting AM)
“FM1” button
(For turning radio on
and selecting")

“AM” button
(For turning radio on
and selecting AM)
“FM 1/2” button
(For tur")

“EJECT” button
(For stop and ejection)“TAPE” button
(For turning")

“EJECT” button
(For stop and ejection)“TAPE” button
(For turning player on)
“SKIP” button
(For au")