1994 JAGUAR XJ6 brake
[x] Cancel search: brakePage 188 of 327

7. Gear position input
a. Examine harness wiring, checking continuity between SC CM pin 18 and transmission decoder module
(6 cylinder) or linear switch (12 cylinder)
b. Examine transmission fault diagnosis.
8. Road speed input
a. Examine harness wiring, checking continuity between SC CM pin 6 and instrument pack.
b. Examine instrument pack fault diagnosis.
9. Traction control input
a.
b.
Examine harness wiring, checking continuity between SC CM pin 9 and ABS TC J CM.
Examine ABS TC
J CM fault diagnosis.
1
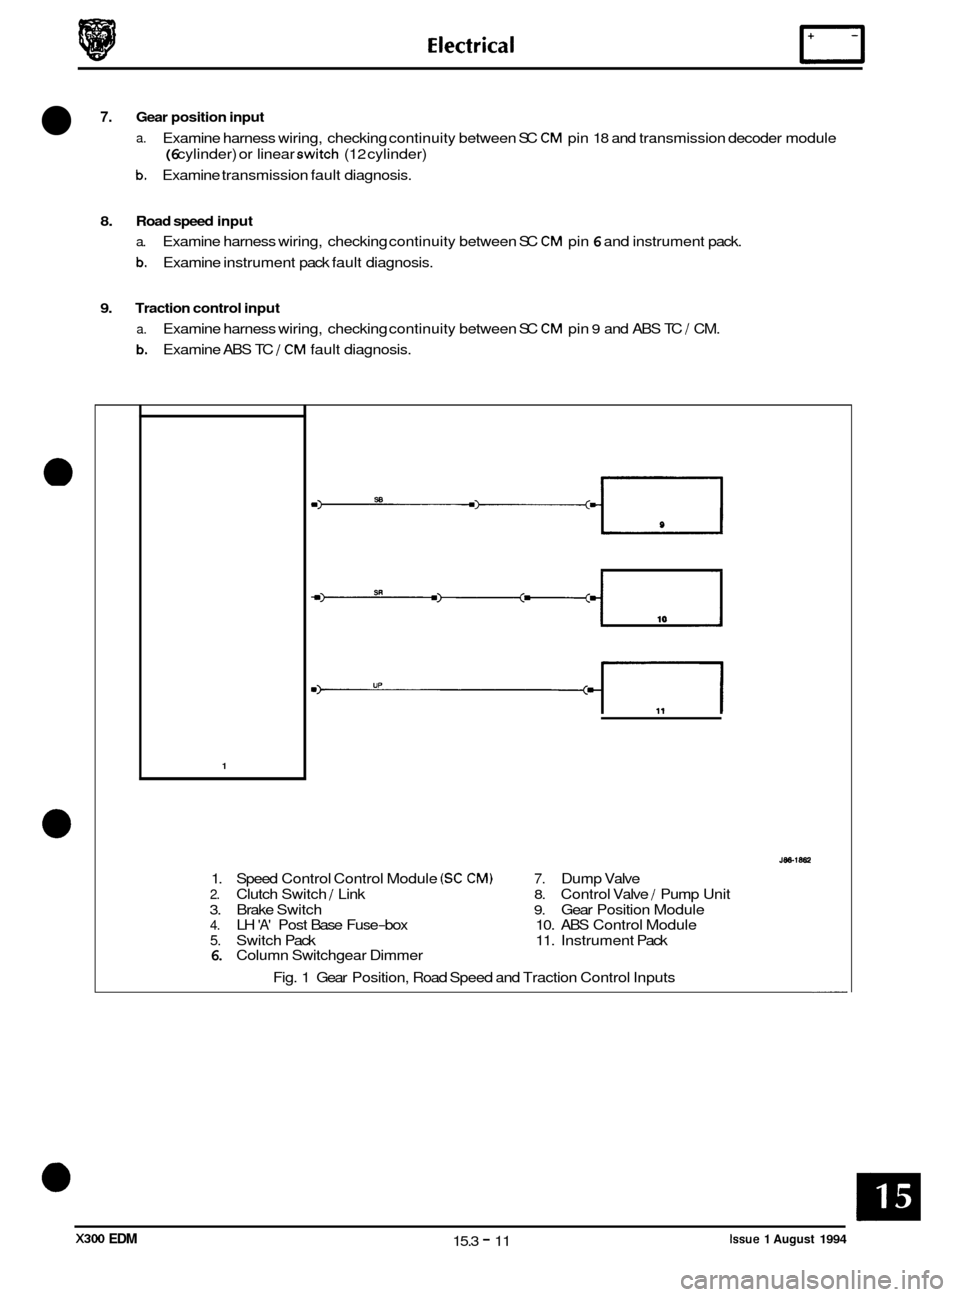
1. Speed Control Control Module (SC CM) 7. Dump Valve
2. Clutch Switch J Link 8. Control Valve / Pump Unit
3. Brake Switch
9. Gear Position Module 4. LH 'A' Post Base Fuse-box 10. ABS Control Module
5. Switch Pack 11. Instrument Pack 6. Column Switchgear Dimmer
Fig. 1 Gear Position, Road Speed and Traction Control Inputs
Issue 1 August 1994 15.3 - 11 X300 EDM
Page 190 of 327

15.4 DRIVER ERGONOMICS
15.4.1 System Description
Adjustment of the seats, steering column and exterior rear view mirrors position is effected by means of control
switches. The switches maintain the adjustment facility while depressed, movement ceasing when the switch is re- leased.
Manual adjustment can be achieved either with the ignition key in place or with the driver‘s door open, or having been
closed within the last
30 seconds.
The system offers the following facilities:
Entry
/ Exit mode; an automatic seat /column position setting for ease of driver entry into / exit from the vehicle.
Driving position set; automatic recall of up to three preferred settings.
Passenger seat set; automatic recall of up to three preferred settings.
Remote recall; automatic recall of up to two memory positions from
a remote transmitter (in key fob).
Reverse mirror dip; automatic adjustment of passenger rear view mirror when reversing.
U: Vehicles intended for the Japanese market are fitted with an additional ‘fold away’ mirror function. This func- tion allows mirrors to fold flat against the car when parking in enclosed areas.
15.4.1.1 Entry/ Exit Mode
Entry / Exit mode is designed to give easier vehicle entry and exit for the driver. The facility is selected by positioning
the mode switch, located on the LH side of the column cowl, to ‘auto’ which designates the current seat / column posi- tion, ie driving positions, as the memorized position. On removal of ignition key or opening of driver‘s door, with igni- tion key still in place, the driver’s seat will move to the rear (current position allowing) and the column will adopt ‘tilt
away’ mode automatically creating additional space for driver exit
/ entry. Insertion of key in ignition or closure of
driver‘s door (with ignition key in place) returns seat / column positions to the memorized (previous) position.
Operation of eitherthe brake pedal or
seat/column manual controls during entry/exit mode execution will abort posi- tional adjustments. Setting the mode switch to OFF disables operation of entry / exit mode.
15.4.1.2 Driving Position Set
Setting of seat, column and external rear view mirrors to preferred driving position is available using the memory but- tons located on the drivers door switch pack. With the ignition key in place enter settings to be memorized as follows:
Adjust seat, column and mirrors to desired positions.
Press the ’memory’ button
so that it becomes illuminated.
Press button
1,2 or 3 to store configuration within four seconds of memory button operation. Memory light will extin- guish and a chime will sound, indicating procedure complete.
The above procedure may be repeated two more times until each button
(1,2 & 3) has a preferred position stored in
memory, accommodating different driver settings. Operation of any push-button (1,2 or 3) will re-position seat col-
umn and mirrors to the stored settings.
Memory recall will operate under the following conditions:
. Ignition key in and gear selector in park.
8 Ignition key in and handbrake on.
8 Ignition key out and driver’s door open (or having been closed within the last 30 seconds).
Re
-setting the preferred position on any setting button automatically erases previously stored information. Memory
information is not erased if power supply to the seat and column / mirror control modules is lost (e.g. battery discon- nected).
15.4.1.3 Passenger Seat Set
The procedure for setting and recalling a preferred passenger seat position is identical to that for a driving position.
Memory recall will only operate with ignition key in auxiliary position or passenger door open, or having been closed
within the last
30 seconds.
X300 EDM 15.4 - 1 Issue 1 August 1994
Page 204 of 327

Electrical rl
CONNECTOR A2 - 22 PIN, WHITE
0 Pin No. I Description [ Input / Output I Signal
1 I Feedback +VE ref O/P I4.5v
2 Feedback -VE ref O/P ov
3 Headrest feedback I/P 140mV - 4.36V
4 Recline feedback I/P 140mV - 4.36V
5 Fore 1 aft feedback I/P 140mV - 4.36V
6 Cushion rear feedback I/P 140mV - 4.36V
7 Cushion front feedback I/P 140mV - 4.36V
8 Recline rearward switch I/P Switch to +12V
9 Fore / aft rearward switch I/P Switch to +12V
10 Fore 1 aft forward switch I/P Switch to +12V
1 11 Switch pack supply O/P +12v supply
- - r 12 Hardware link to 62/19
13
Auxiliary ground to lumbar O/P Switch to OV
14 Headrest lower switch I/P Switch to +12V ~
15 Headrest
raise switch I/P Switch to +12V
' 16 Cushion rear lower switch I/P Switch to +12V
0 17 Cushion rear raise switch I/P Switch to +12V
18 Cushion front lower switch I/P Switch to +12V
19 Cushion front raise switch I/P Switch to +12V
20 Recline forward switch I/P Switch to +12V
I 21 1 Input seat belt switch I I/P I Switch to OV I
I 22 I Hardware link to pin B2/1 I I- I -
0
18 Brake pedal pressed I/P Switch to OV
19
Hardwire link to A2112
20 O/P seat belt switch O/P Switch to OV
- -
21 Memory set I/P Switch to +12V
22 Dooropen I/P Switch to OV
X300 EDM 15.4 - 7 Issue 1 August 1994
Page 208 of 327

0
I I- - I 13 l-
BLOCK B (W-WAY, GREY) continued
' 7 Tiltawayonsignal Input Switched to ground
8 Gear selector not in park Input Switched to ground
9 Park brake ON signal Input
Switched to ground
10 Driver's door open signal Input Switched to ground
11 Remote call active Input
Switched to ground
12 Brake pedal ON signal Input
Switched to ground
I I 16 1- - -
Pin No.
1
2
3
4
Description I In/ out Signal
Power battery i Input 12v
Power ground Input ov
- - -
JDS
L I/O Serial Data
5 IJDSK I/O
13
I I
Serial Data
A B C J86 1902
I j 6
i7
'8
9
10
11
12
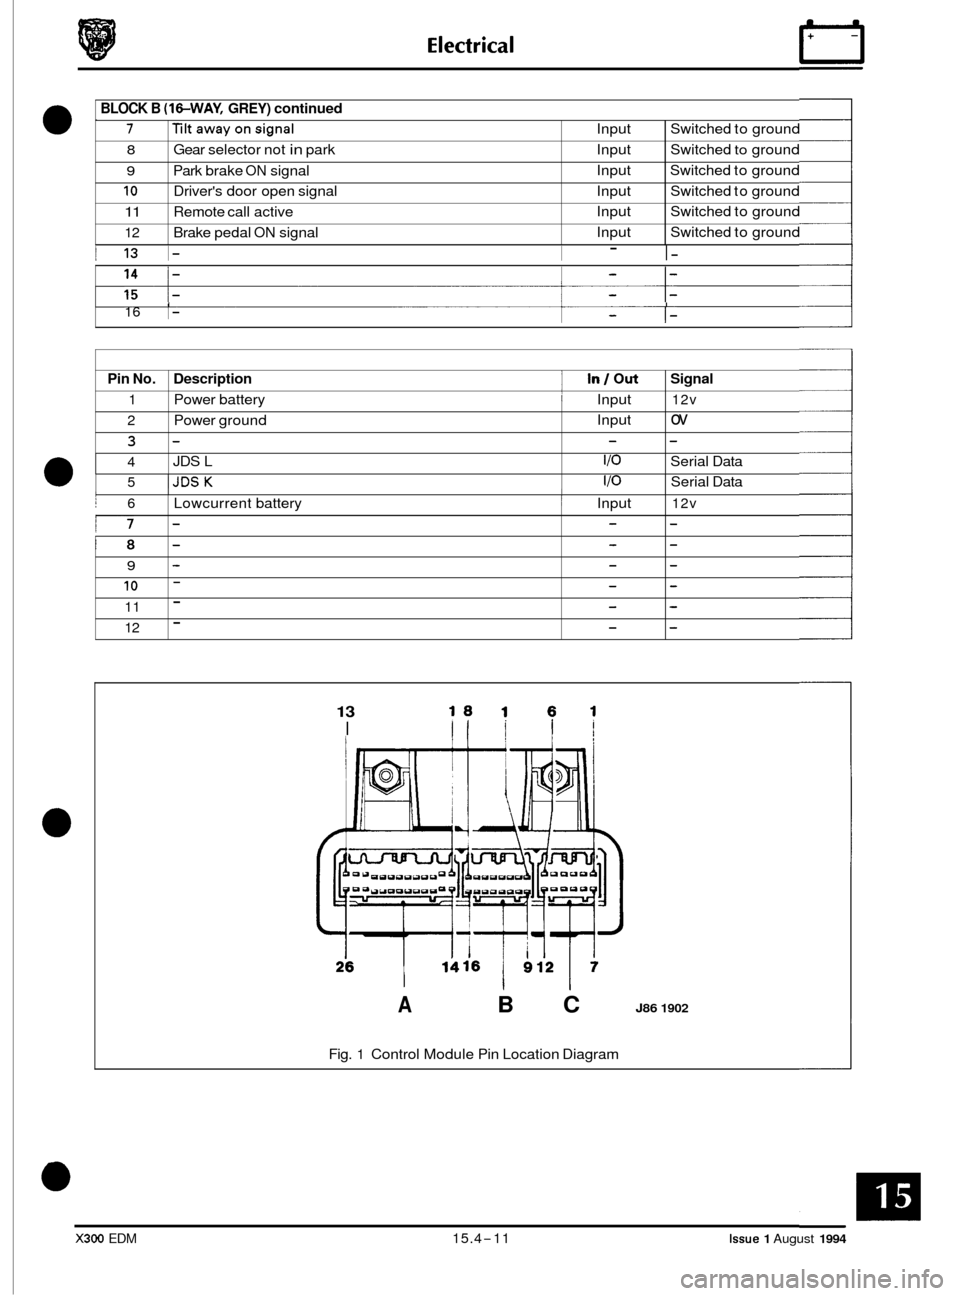
Fig. 1 Control Module Pin Location Diagram
I Lowcurrent battery ~ Input 12v
- - -
- - -
- - -
- - -
- - -
- - -
X300 EDM 15.4-11 Issue 1 August 1994
Page 213 of 327

Electrical rl
Carry out the exit 1 entry mode procedure below under the conditions stated below:
. Key in ignition barrel
. Driver's door closed
. Auxiliary ON
. Park brake ON
. Gear selector in Park.
Exit 1 Entry Mode
1.
2.
3.
From the driver's seat, position the memory mode switch, located on the LH side of the
steering column, to auto.
Operate the seat, column and mirror switches to preferred driving position.
Note:
Remove key from ignition. Check that seat moves backwards and column tilts upwards
and away, creating maximum space for exit.
Yes: Proceed to step
4.
No:
Seat must be a minimum of 50mm from rear end stop.
Abort test and refer to Diagnostic Sub
-Routines.
4.
5.
3.
Refit key in ignition, open driver's door. Check that seat moves backwards and column tilts
upwards and away, creating maximum space for exit.
Yes: Proceed to step
5.
No:
Leave key in ignition and exit the vehicle, closing driver's door. Ensure that column and
seat return to driving position. Re-enter vehicle and ensure that column and seat move to
entry position. Close door and check that seat
/ column return to previously selected
driving positions.
Yes: Test complete.
No: Refer to Diagnostic Sub-Routines.
Abort
test and refer to Diagnostic Sub
-Routines.
Seat heaters (driver and passenger)
1.
2.
Turn ignition ON and locate heater select switch on the center console.
Operate the switch to initiate seat heating. Does the switch surround illuminate?
Yes: Proceed to step
3.
No:
Allow sufficient time for heater to take effect. Does seat heat level increase in all
designated areas?
Abort
test and refer to Diagnostic Sub
-Routines.
4.
5.
Yes: Proceed to step 4.
No:
Allow time span to exceed 12 minutes. Does switch surround light extinguish and heating
cease?
Yes: Proceed to step
5.
No:
Re-select heating, allow cycle to commence then operate switch again. Does switch
surround light extinguish and heating cease?
Yes: Test complete
No: Refer to Diagnostic Sub-Routines.
Abort
test and refer to Diagnostic Sub
-Routines.
Abort test and refer to Diagnostic Sub
-Routines.