1994 HONDA INTEGRA rear bumper
[x] Cancel search: rear bumperPage 16 of 1413

Towing
rl
It the car needs to be towed, call a professional towingservice. Never tow the car behind another car with just
a rope or chain. lt is very dange.ous.
Emergency Towing
There are three popular methods of towing a car:
Flat-bed Equipmont-The operator loads the car on theback of a truck. This is the best way of transporting thecar.
Whsol Lift Equipment-The tow truck uses two oivot-ing arms that go under the tires (front or rear) and liftsthem otf the ground. The other two wheels remain onthe ground.
Sling-type Equipmont-The tow truck uses metal cableswith hooks on the ends. These hooks go around partsof the frame or suspension and the cables lift that endof the car off the ground. The car's suspension and bodvcan be seriously damaged if this method of towing is at-tempted.
It the car cannot be transponed by flat-bed, it should betowed with the tfont wheels oft the ground. lf due todamage. the car must be towed with the front wheelson the ground, do the tollowing:
Manual Transmission
a Release the parking brake,a Shift the transmission to Neutral.
Automatic Transmission
a Release the parking brake.a Start the engine.
a Shift to @ oosition, then to S position.
a Turn off the engine.
NOTICE: lmproper towing preparation will damage thetransmission. Follow the above procedure exactly. lf you
cannot shift the transmission or stan the engine (auto-
matic transmission), your car must be transDorted on aflat-bed.
a lt is best to tow the car no tarther than SO miles lgokm). and keep the speed below 3b mph (bE km/h).
NOTICE: Trying to litt or tow your car by the bumperswill cause serious damage. The bumpers are not designedto support the car's weight.
Front:
Real:
TOWING HOOKS
Page 1010 of 1413
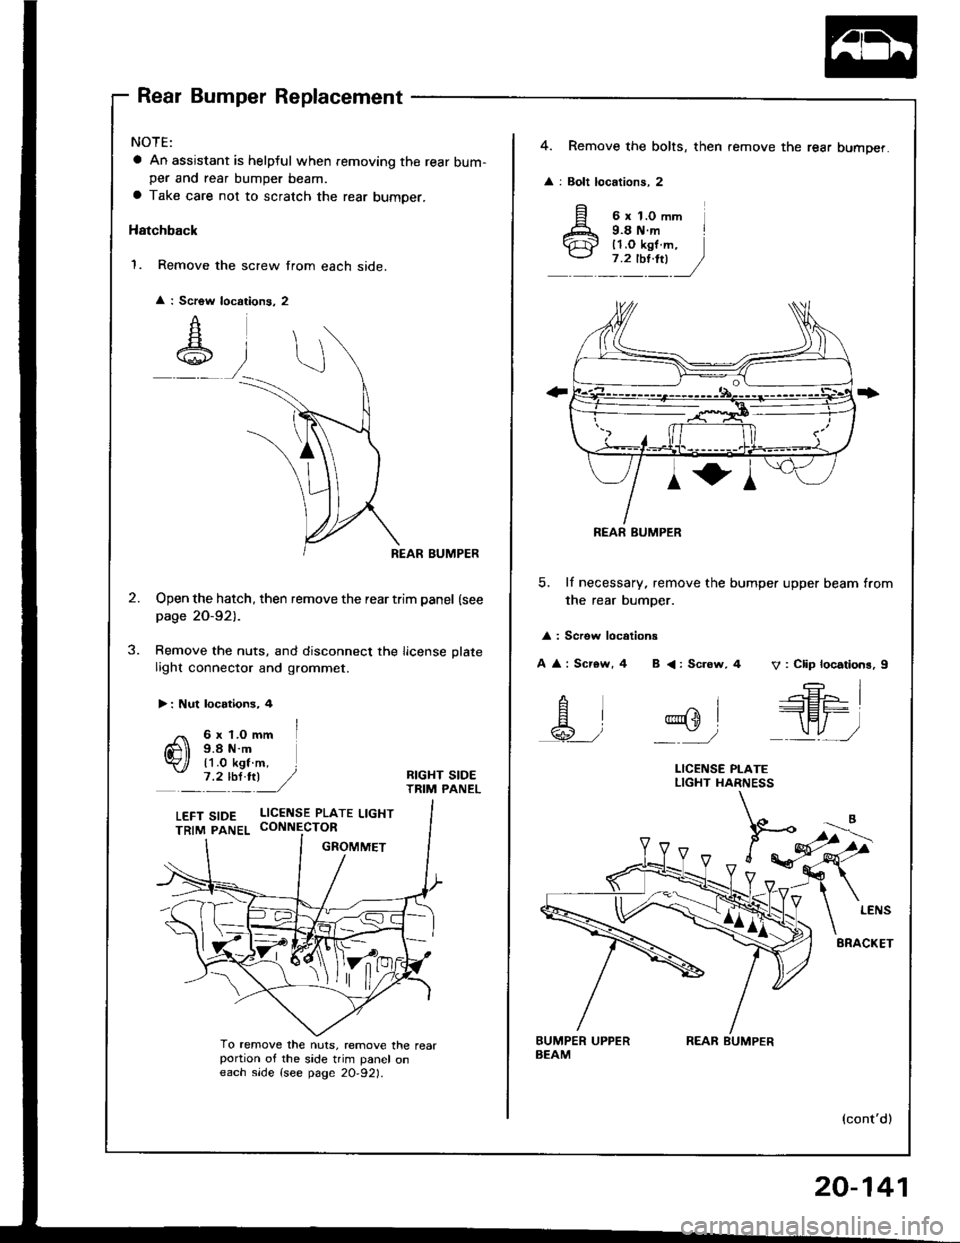
Rear Bumper Replacement
NOTE:
a An assjstant is helpful when femoving the rear bum-per and rear bumper beam.
a Take care not to scratch the rear bumper.
Hatchback
1. Remove the screw from each side.
REAR BUMPER
Open the hatch, then remove the rear trim panel (see
page 20-921-
Remove the nuts, and disconnect the license plate
light connector and grommet.
Scrow I
A
A\
:
J.
> : Nut locotions, 4
/ 6x1.Omm I
Q) i;L'i$-. l
_':'y:) ,/BIGHT SIDETRIM PANEL
To remove the nuts, remove the rearportion of the side trim panel oneach slde {see page 20-921.
LEFT S|DE L|CENSE PLATE LtcHT
4. Remove the bolts, then remove the rear bumper.
: Bolt locations, 2
5. lf necessary, remove the bumper upper beam from
the rear bumper.
: Screw locotions
A : Scr€w, 4 B <: Sc.ow, 4 V: Clip locations, I
REAR BUMPER
--E- I
.--r-Fl^ |--lEr-
_\"., J
^i
@sl
_'/
LICENSE PI-ATELIGHT HARNESS
(cont'd)
REAR BUMPER
20-141
Page 1011 of 1413
Bumpers
Rear Bumper Replacement (cont'dl
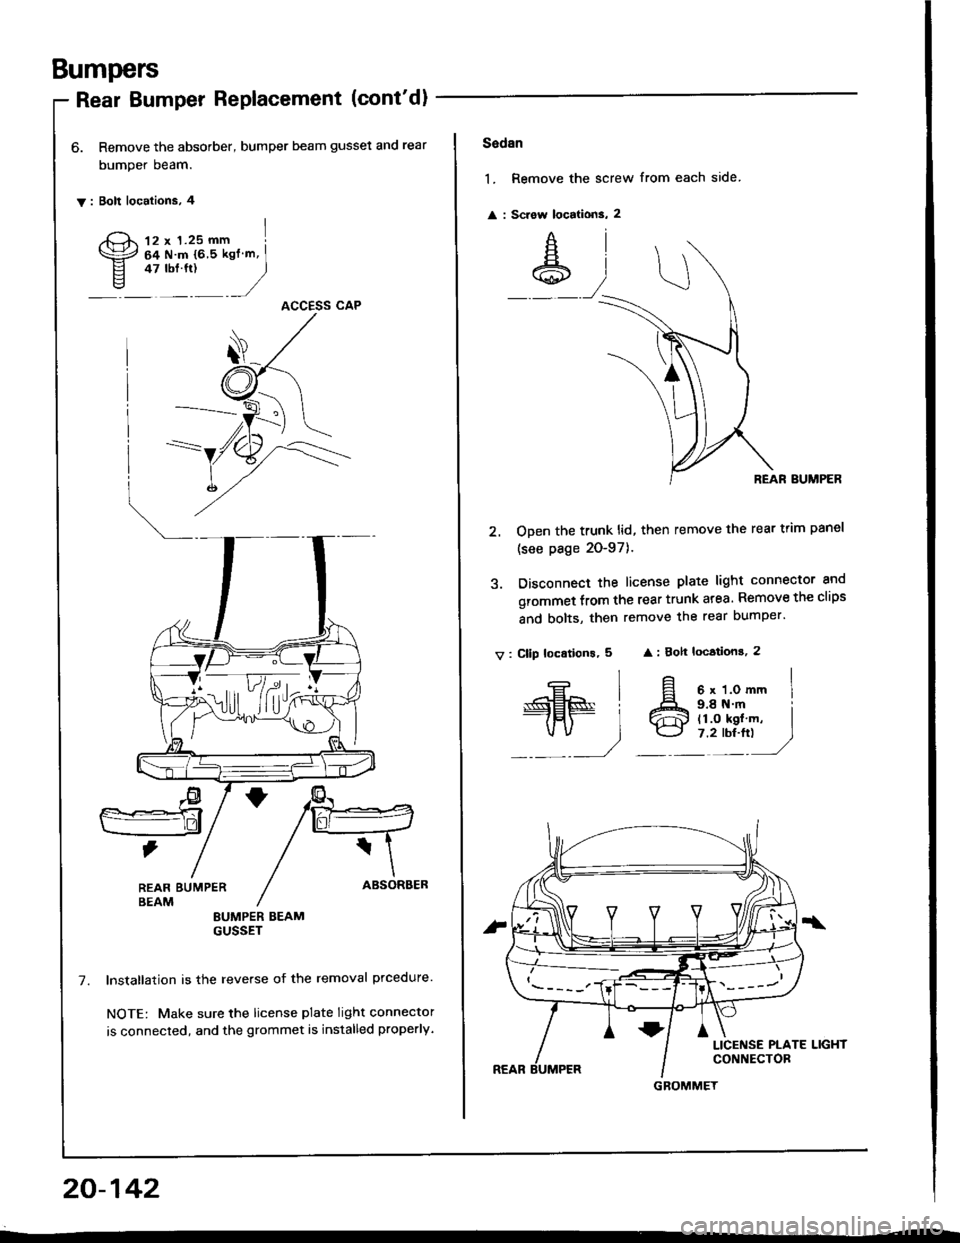
6. Remove the absorber, bumper beam gusset and rear
bumper beam.
y: Bolt localions, 4
12 x 1.25 mm I
64Nm{65kgfm,I* "r:,
)ACCESS CAP
LlF/d,rft
REAR EUMPERBEAMEUMPER BEAMGUSSET
lnstallation is the reverse of the removal prcedure.
NOTE: Make sure the license plate light connector
is connected, and the grommet is installed properly,
20-142
Sadan
1. Remove the screw from each side
: Sciow locations, 2
REAR BUMPER
2. ODen the trunk lid, then remove the rear trim panel
(see page 20-97).
3. Disconnect the license plate light connector and
grommet from the rear trunk atea. Remove the clips
and bolts, then remove the rear bumper'
v: Cllp loc.tions, 5 : 8ok locations, 2
€l
#.,1
9.8 N.m il1.O kgl m, I7.2 rbr.ft) J
6 x 1.0 mm I
GBOMMET
Page 1012 of 1413
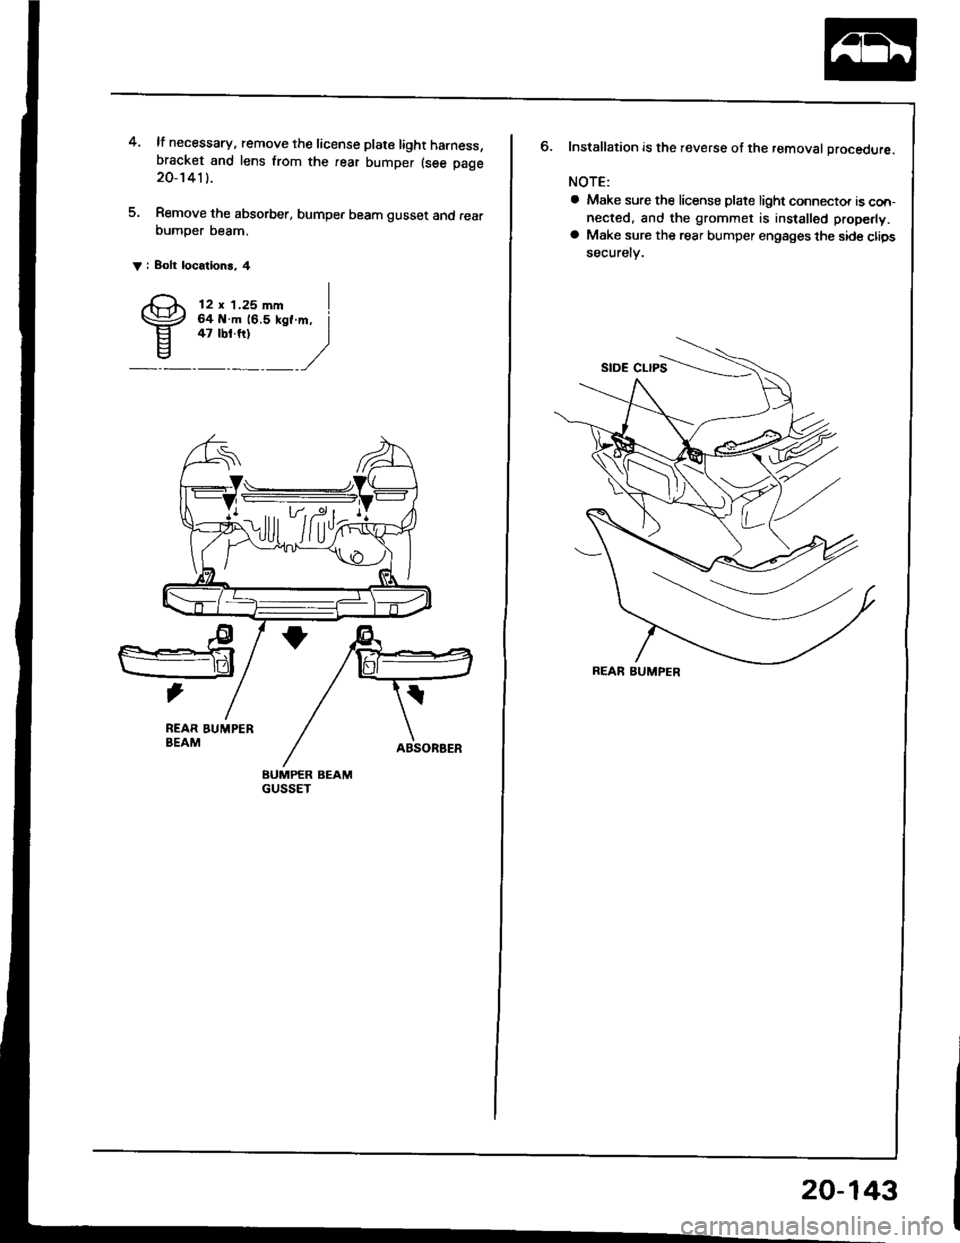
4. lf necessary, remove the license plate light harness,bracket and lens from the rear bumper (see page20-1411.
5. Remove the absorb€r, bumper beam gusset and fearbumper beam.
V i Bolt locatlons, 4
REAR BUMPERBEAM
BUMPER BEAMGUSSET
12 x 1.25 mm64 .m (6.5 kgf47 tbt.ftl
I.m, j
)
6. Installation is the .everse of the removal procedure.
NOTE:
a Make sure the license plate light connector is con-
nected, and the grommet is installed properly.
a Make sure the rear bumper engages the side clips
securelv.
REAR BUMPER
20-143
Page 1126 of 1413
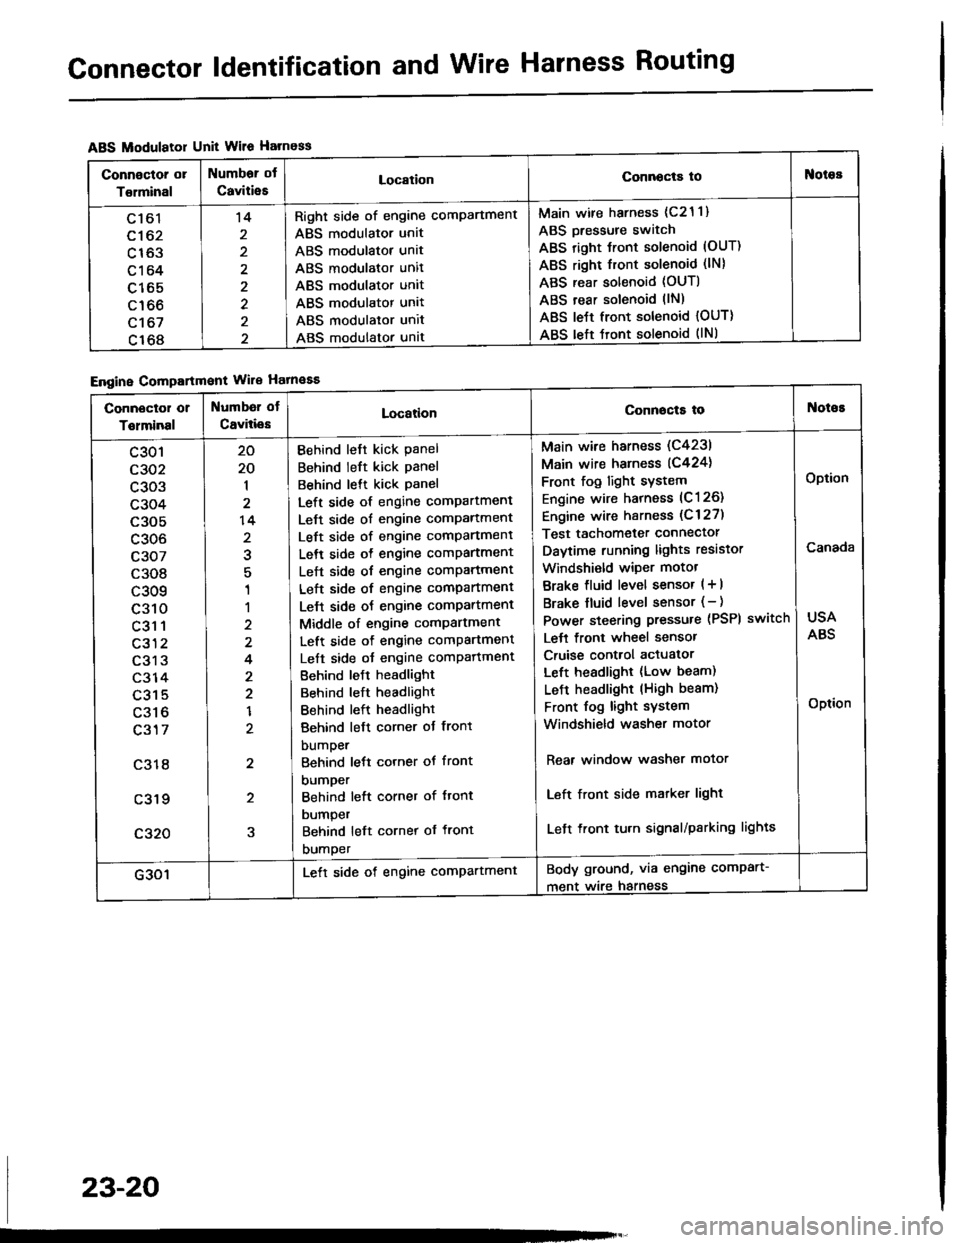
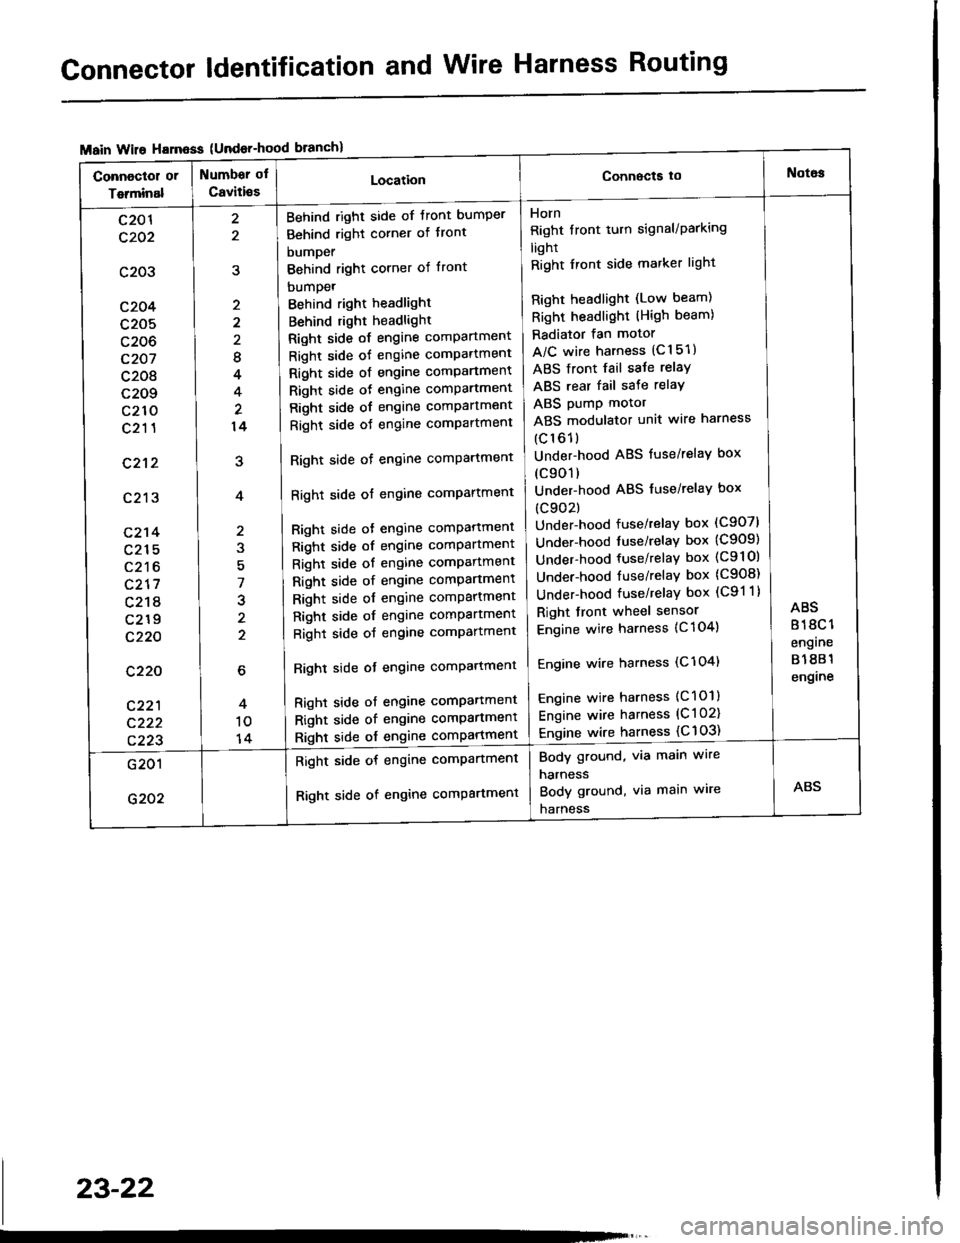
Connector ldentification and Wire Harness Routing
ABS Modulatol Unit Wile Harness
Engine Compartmont Wile Hatnaaa
Connoctor or
Torminal
Numbor ot
CaviiieELocationConnocta tooies
Ltol
c162
c163
c164
c165
c166
c't 67
c168
't4
2
2
Right side of engine comPartment
ABS modulator unit
ABS modulator unit
ABS modulator unit
ABS modulator unit
ABS modulator unit
ABS modulator unit
ABS modulator unat
Main wire harness (c21 1)
ABS Dressure switch
ABS right Jront solenoid (OUT)
ABS right front solenoid (lN)
ABS rear solenoid (OUT)
ABS rear solenoid llN)
ABS le{t front solenoid {OUT)
ABS left tront solenoid (lNl
Connector or
Tolminal
Numbd of
CaviliesLocationConnocta tot{oioE
c301
c302
c303
c304
c305
c306
c307
c308
c309
c310
c31 1
c312
c313
c314
c315
c316
c317
c318
c319
c320
20
20
1
2
14
2
1
1
2
4
2
2
1
2
2
5
Behind left kick Panel
Behind left kick panel
Behind lett kick Panel
Left side of engine compartment
Left side of engine comPartment
Left side of engine comPartment
Left side o{ engine comPartment
Left side of engine comPartment
Left side of engine compartment
Lelt side oJ engine comPartment
Middle of engine comPartment
Left side of engine comPartment
Left side oJ engine comPafiment
Behind leJt headlight
Behind left headlight
Behind left headlight
Behind left corner ot front
bumper
Behind lett corner ot front
DUmper
Behind left corner of ftont
DUmper
Behind left cornet of front
DUmper
Main wire harness (C4231
Main wire harness (C424)
Front fog light sYstem
Engine wire harness (C126)
Engine wire harness (C 127)
Test tachometer connector
Daytime running lights resistor
Windshi€ld wiper motot
Brake fluid level sensor ( + |
Brake fluid level sensor (- )
Power steering pressure (PSPI
Lett front wheel sensor
Cruise control actuator
Left headlight (Low beam)
LeJ-t headlight (High beam)
Front fog light system
Windshield washer motor
switch
Rear window washer motor
Left front side matker light
Left front tu.n signal/parking lights
USA
ABS
Option
Canada
Option
G301Lett side of engine comPartmentBody ground, via engine comPart-
ment wire harness
23-20
Page 1128 of 1413
Connector ldentification and Wire Harness Routing
{Undor-hood
Horn
Right tront turn signal/Parking
light
Right Iront side marker light
Right headlight (Low beam)
Right headlight (High beam)
Radiator fan motor
A/C wire harness (C151)
ABS front fail saJe relay
ABS rear fail sate relay
ABS pump motor
ABS modulator unit wire harness
(c161)
Under-hood ABS fuse/relaY box
(c901)
Under-hood ABS fuse/relaY box
(c902)
Under-hood fuse/relay box (C907)
Under-hood tuse/relaY box (C909)
Under-hood fuse/relay box (C9l Ol
Under-hood fuse/relaY box (C908)
Under-hood fuse/relaY box (C91 1)
Right front wheel sensor
Engine wire harness {C 104)
Engine wire harness (C'l 04)
Engine wire harness (C101)
Engine wire harness (C l 02)
Engine wire harness {C 103)
Behind right side of tront bumper
Behind right corner of tront
bumper
Behind right corner of front
bumpet
Behind right headlight
Behind right headlight
Right side of engine comPartment
Right side of engine comPartment
Right side ot engine comPartment
Right side oJ engine comPartment
Right side of engine comPartment
Right side oJ engine comPartment
Right side of engine comPartment
Right side of engine comPartment
Bight side ot engine comPattment
Right side of engine comPartment
Right side of engine comPartment
Right side of engine comPartment
Right side of engine comPartment
Right side of engine comPartment
Right side of engine comPartment
Righl side ot engine comPartmenl
Right side of engine compartmenl
Right side of engine comPartmen'
Right side of engine comPartment
8
4
14
7
J
2
c201
c202
c203
c204
c205
c206
c207
c208
c209
c210
c211
c212
c213
c214
c215
c216
c217
c218
c219
c220
c220
c221
c222
c223
Body ground, via main wire
harness
Body ground, via main wire
harness
Right side of engine compartment
Right side of engine comPartment
23-22
Page 1369 of 1413
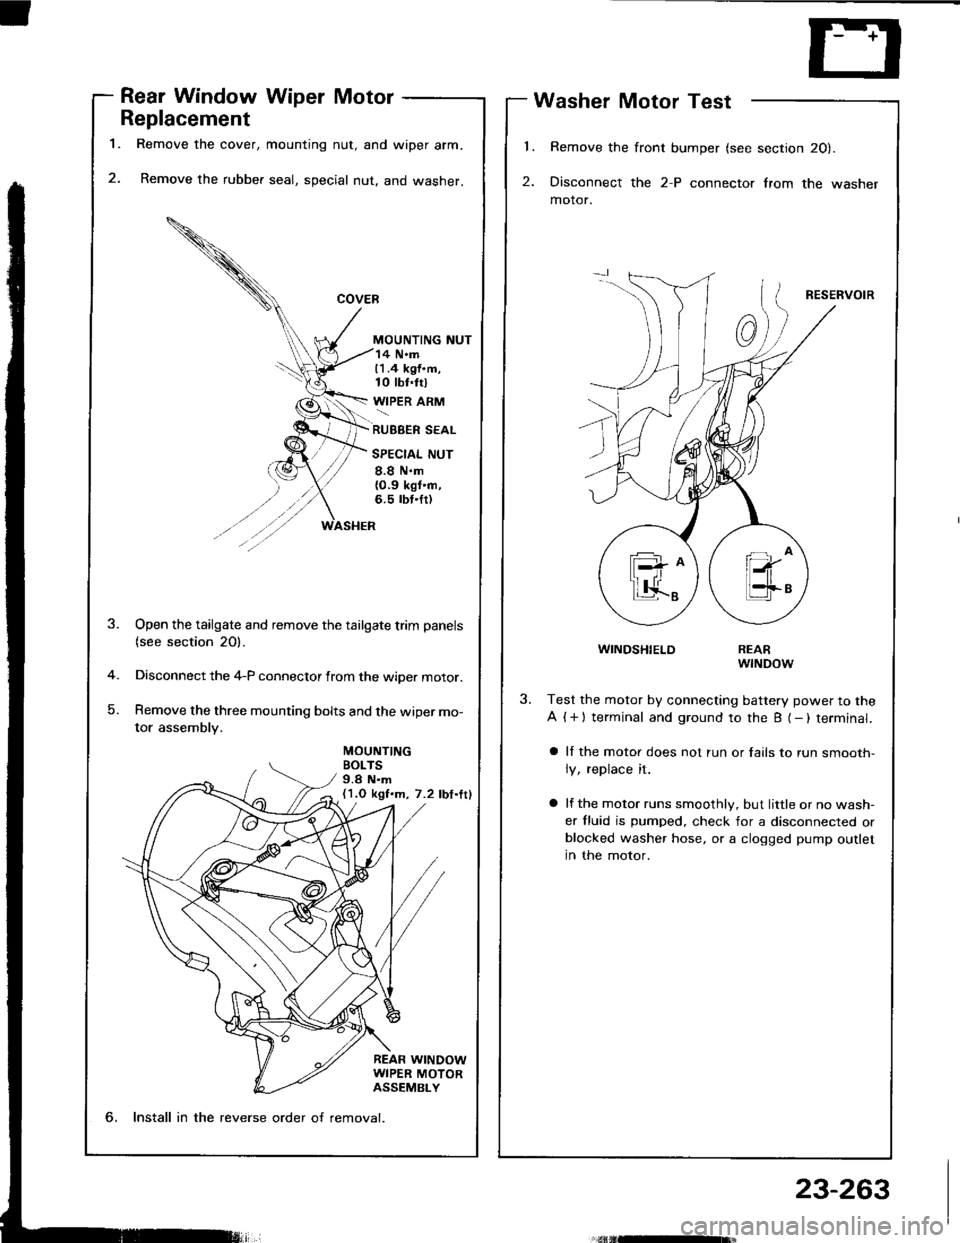
l.
2.
1.
Rear Window Wiper Motor
Replacement
Remove the cover, mounting nut, and wiper arm.
Remove the rubber seal, special nut, and washer.
MOUNTING NUT
Washer Motor Test
Remove the front bumper (see section 20).
Disconnect the 2-P connector lrom the washer
motor.
RESERVOIR
WINDSHIELD
14 N.m11.4 kgf.m,10 tbt.trl
WIPER ARM
RUBBER SEAL
SPECIAL NUT
8.8 N.m{0.9 kgt'n,6.5 rbt.fr)
MOUNTINGBOLTS9.8 N.m(1.O kgf.m, 7.2 lbf.ttl
-4
)
Open the tailgate and remove the tailgate trim panels(see section 20).
Disconnect the 4-P connector from the wiper motor.
Remove the three mounting bolts and the wiper mo-
tor assembly.
REARwrNDow
Test the motor by connecting battery power to the
A ( + ) terminal and ground to the B (- ) terminal.
a ll the motor does not run or fails to run smooth-
ly, replace it.
a lf the motor runs smoothly, but little or no wash-
er fluid is pumped. check for a disconnected orblocked washer hose, or a clogged pump outlet
in the motor.
6, Install in the reverse order o{ removal.
23-263
Page 1370 of 1413
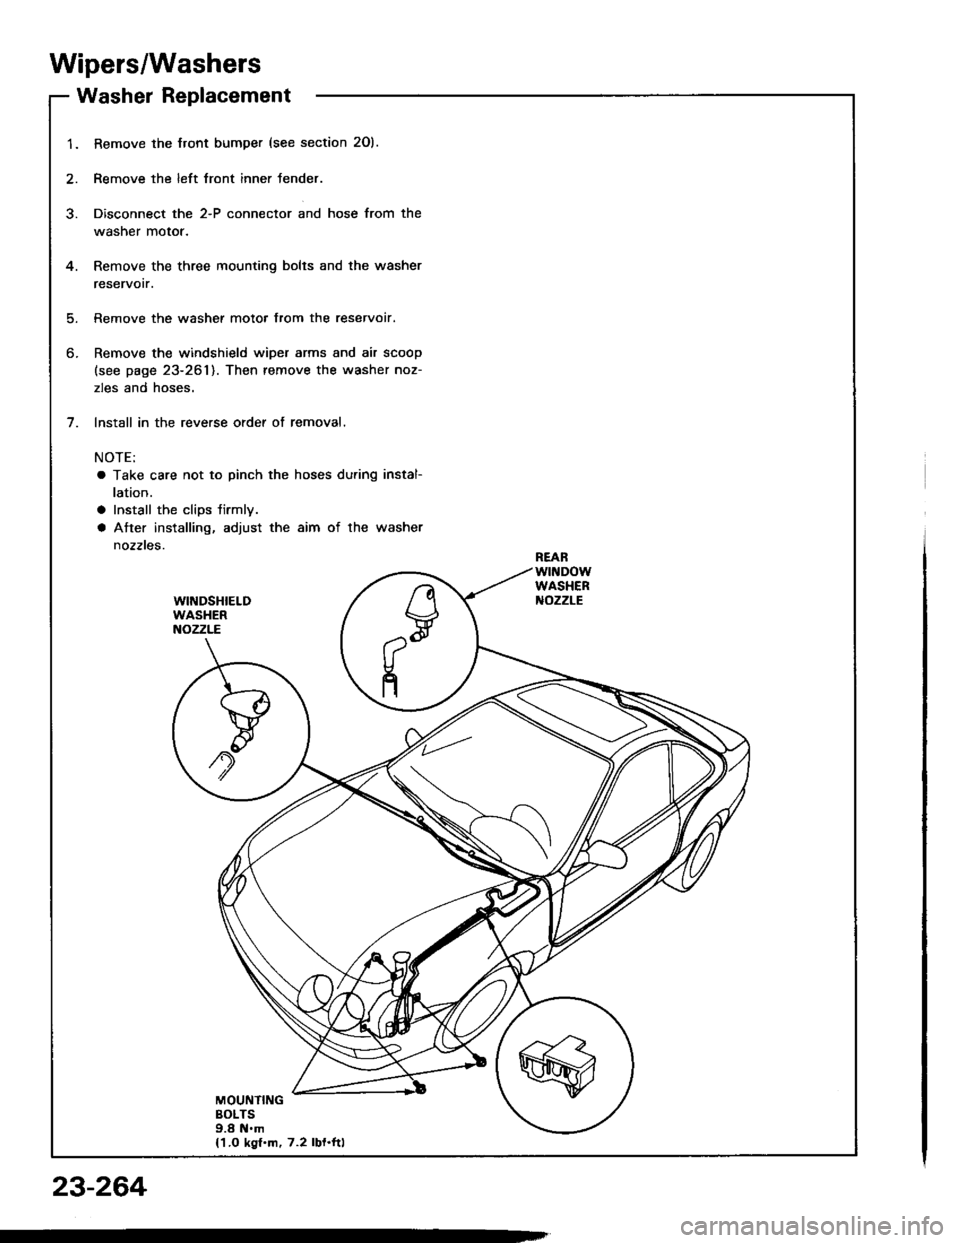
Wipers/Washers
Washer Replacement
1.
5.
6.
Bemove the Jront bumper (see section 2Ol.
Remove the left lront inner fender.
Disconnect the 2-P connector and hose from the
washer motor.
Remove the three mounting bohs and the washer
reservorr.
Remove the washer motor from the reservoir.
Remove the windshield wiper arms and air scoop
(see page 23-261). Then remove the washer noz-
zles and hoses.
lnstall in the reverse order of removal.
NOTE:
a Take care not to pinch the hoses during instal-
lation.
a Install the clips tirmly.
a After installing, adjust the aim of the washer
nozztes.
7.
REARwtt{DowWASHERt{ozzLEWINDSHIELDWASHERNOZZLE
n
V..,.,,@
l(H
n
MOUNTINGBOLTS9.8 N.m{1.O kgf.m, 7.2 lbf.ftl
23-264