Page 1253 of 1413

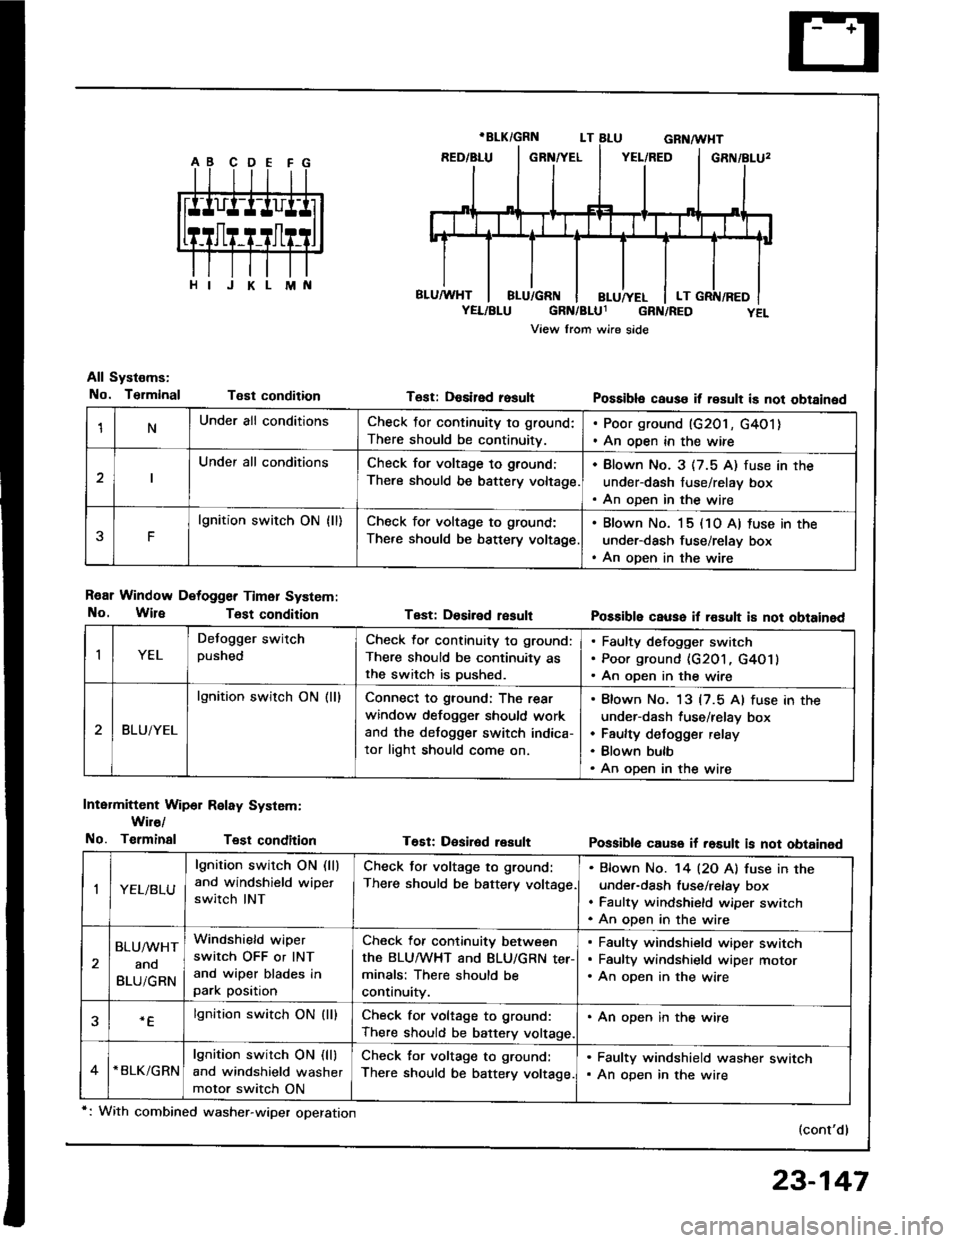
1NUnder all conditionsCheck for continuity to ground:
There should be continuitv.
. Poor ground (G201, G4O1). An open in the wire
Under all conditionsCheck for voltage to ground:
There should be battery voltage.
. Blown No. 3 (7.5 A) fuse in the
under-dash fuse/relay box. An oDen in the wire
F
lgnition switch ON {ll)Check for voltage to ground:
There should be bsttery voltage
. Blown No. 15 (10 A) tuse in the
under-dash fuse/relay box. An open in the wire
All Systems:
No. TsrminalT€st condition
R€ar Window Detogger Timer System:
No. WireTost condition
Intermittent Wip6r Relay System:
Wir€/
No. TerminalTest condition
T6st: Desired rosult
Test: Dosiled result
T€Et: Desir6d result
Possibla cause it result is not obtained
Possible cause il rosult i8 not obtained
Possiblo cause if rosult is not obtained
(cont'd)
IYEL
Defogger switchpushedCheck lor continuity to ground:
There should be continuity asthe switch is Dushed.
Faulty defogger switch
Poor ground {G201, G4O1}
An open in the wire
BLUiYEL
lgnition switch ON (ll)Connect to ground: The rear
window defogger should work
and the detogger switch indica-
tor light should come on.
Blown No. 13 {7.5 Al fuse in the
under-dash fuse/relay box
Faulty defogger relay
Blown bulb
An open in the wire
,|YEL/BLU
lgnition switch ON (ll)
and windshield wipet
switch INT
Check tor voltage to ground:
There should be battery voltage
Bfown No. '14 l2O Al fuse in the
under-dash fuse/relay box
Faulty windshield wiper switch
An oDen in the wire
BLU/WHT
ano
BLUiGRN
Windshield wiper
switch OFF or INT
and wiper blades inpark position
Check for continuity between
the BLUMHT and BLU/GRN ter-minals: There should be
continuity.
Faulty windshield wiper switch
Faultv windshield wiDer motor
An open in the wire
.Elgnition switch ON (lllCheck for voltage to ground:
There should be battery voltage.
. An open in the wire
*BLK/GRNlgnition switch ON (ll)
and windshield washer
motor switch ON
Check for voltage to ground:
There should be battery voltage.
. Faulty windshield washer switch. An open in the wire
*: With combined washer-wiper operation
23-147
Page 1360 of 1413
Wipers/Washers
Component Location Index
WII{DSHIELD/REAR WINDOWWIPERAA'ASHEB SWITCHTest, page 23-258Replacement, oase 23 257_..
wtNosHlELD WIPER 2ARMS/BLADES ___-=4,
Repfacemont, Page 23'261 /tt' /
WINOSHIELDIVIPER MOTORTest, page 23-260Repfacement, paee 23-281
FUSE/RELAY BOX
INTERMITTENT WIPERBELAY CIRCUIT(ln the int€gral.d control onitlInput Test, page 23-146
REAR WII{DOW WIPER MOTORTest, page 23-262Replacemont, pago 23-263
23-254
Page 1361 of 1413
Circuit Diagram
UNOER- DASHFUSE/RELAY BOX
WHT/ll-X -FWHr
GRX/4X
WII{DSHI€ID WIPERAIVASHER S1VITCH
REAR WINOOWWIPER MOTOR
BLK
{
G30l
REARwtN00wWASHERMOTOR
BLK
G20'IG401
l*_(ittwA!
Y
Mor
|-8LK
I
G30l
UNOER - HOOO FUSENEUY 8OX
si 4.t,,1 /'i;",ry)"'.,
REARWINOOWWIPER/WASHERswtTcH
8LK
G503
8tK
G20rG101
23-255
. : whh comtinad wchar-wllbr olrnlirn
,r-
Page 1362 of 1413
Wipers/Washers
Troubleshooting
NOTE: The numbers in the table show the troubleshooting sequence
Item to be insDected
Symptom
i
oo-;i
a.P
:6r!
z)
it
3
o
=
o
E
;
E;
3
E
ID
3
95'6;
>;
eb
rD!otD
;E
cqt
EP
0,(t
i
z
o
=Y.
.9! O
o
t
oo
o
6
i=
.45i5
bE
€3
dOot
Eroc
o
o
o-
o.
:!
-c
oo
Wipers
do not
ln all
positionsI422G301,
G401
GRN/BLK
ln INTI3YEL/BLU,8LU/GRN
In LO or Hl12BLU, BLU/YEL
ln MIST1BLU/YEL
Rear window wiper does
not work.1aG503,
G751
GRN/BLK, GRN
LT GRN/BLK
Blades do not return to
park position when the
switch is turned OFF.
I
BLU/wHT,
LT GRN/BLK
Intermittent cycle is
erratic or wipers do not
work intermiftently.
12
YEL/BLU. BLU/GRN
Little or no washer fluid
is pumped.4?12G301BLK/GRN, BLU/BLK
WiDer snd washer do not
work at the same time.1BLK/GRN
23-256
Page 1363 of 1413
Wipers/Washers Switch Replacement
a All SRS electrical wiring harnesses ale covered withyellow insulation.
a Beloro disconnecting the SRS wif6 harnoss, install theshort connector(sl.a R€place the entire atlscted SRS hamess assombly ilit ha6 an open citcuii ot damaged wiring.
Remove the steering column covers.
UPPER COVER
A-P CONNECTOR
Disconnect the 8-P and 6-p connectors from theswitch.
Remove the two sctews and the switch.
wIPERS^IITASHEBS SWtTCl.t
A-P CONNECTOR 6-P CONNECTOR
4. Install in the reverse order of removal.
23-257
Page 1364 of 1413
Wipers/Washers
Wipers/Washers Switch Test
5
4
CAUTION:
a All SRS electrical wiring harn6ss6s alo covered with
yellow insulation.
a Belore dkconnecting any part ot th6 SRS wire har-
neaa. connect the short connoctor(sl.
a Replac6 the 6ntire affoctod SRS harness assembly it
it has an open cilcuit 01 damaged wiring.
1. Remove the steering column covers.
2. Disconnect the 8-P and 6-P connectors Jrom the
swatch.
It necessary, remove the two screws and the switch.
Check for continuitv between the terminals in each
switch position according to the table.
scREws
SRS iIAIN HARNESS
{Covor.d rvilh yollow inrulation}
IJK ABCD
23-258
Page 1365 of 1413
Windshield WiperAi\laEhel Switch
D
EB
R6ar Window Wip€r/Washol Switch
IL
1 o"/j^o-"-'w*+t+*
I-
i' 4l?u l=f,.
_J M|ST M|ST
OFF/INT
Terminal
il;----__\cDEn
OFFo----o
INT
o-
o-*--o
---o
LOG-*-o
HIo---o
Mist switch "ON'G-----o
Washer switch "0N"o----o
II,i1..___.______,x..
fr."ql|.fr tiT
rermrnal
Position \LN
Washer switch "0N"o----oo----o
OFFo--*o
ONo---o
Washer switch "ON"
(with wiDer'0N")o----oo----o
ll lill ili F'
23-259
Page 1366 of 1413
Wipers/Washers
Windshield Wiper Motor Test
Open the hood and remove the cap nuts and the
wiper arms (see page 23-261).
NOTE: Remove the wiper arms carefully without
damaging the hood.
Remove the hood seal and air scoop by prying out
their trim clips.
Disconnect the 5-P connector from the windshield
wiper motor.
Test the motor by connecting battery power and
ground according to the table.
lf the motor does not run or fails to run smoothly,
replace rr.
Terminal
Pi"i,i""---\
D
{GRN/BLK)
B
{8LU)(BLU/YEL}
LOW SPEED@
HIGH SPEED@
23-260
D IGB /BLK)
A SLUTYEL}
B (BLUI
Reconnect the 5-P connector to the wiper motor as-
sembly.
Connect an analog voltmeter between the E
{BLU/wHT) and the C (BLK) terminals. Run the mo-
tor by turning the wipet switch ON (LO or Hl po-
sition).
The voltmeter should alternately indicate O V and
more than 4 V.
NOTE: Use an analog tester.