1994 CHEVROLET SUBURBAN tires
[x] Cancel search: tiresPage 191 of 385
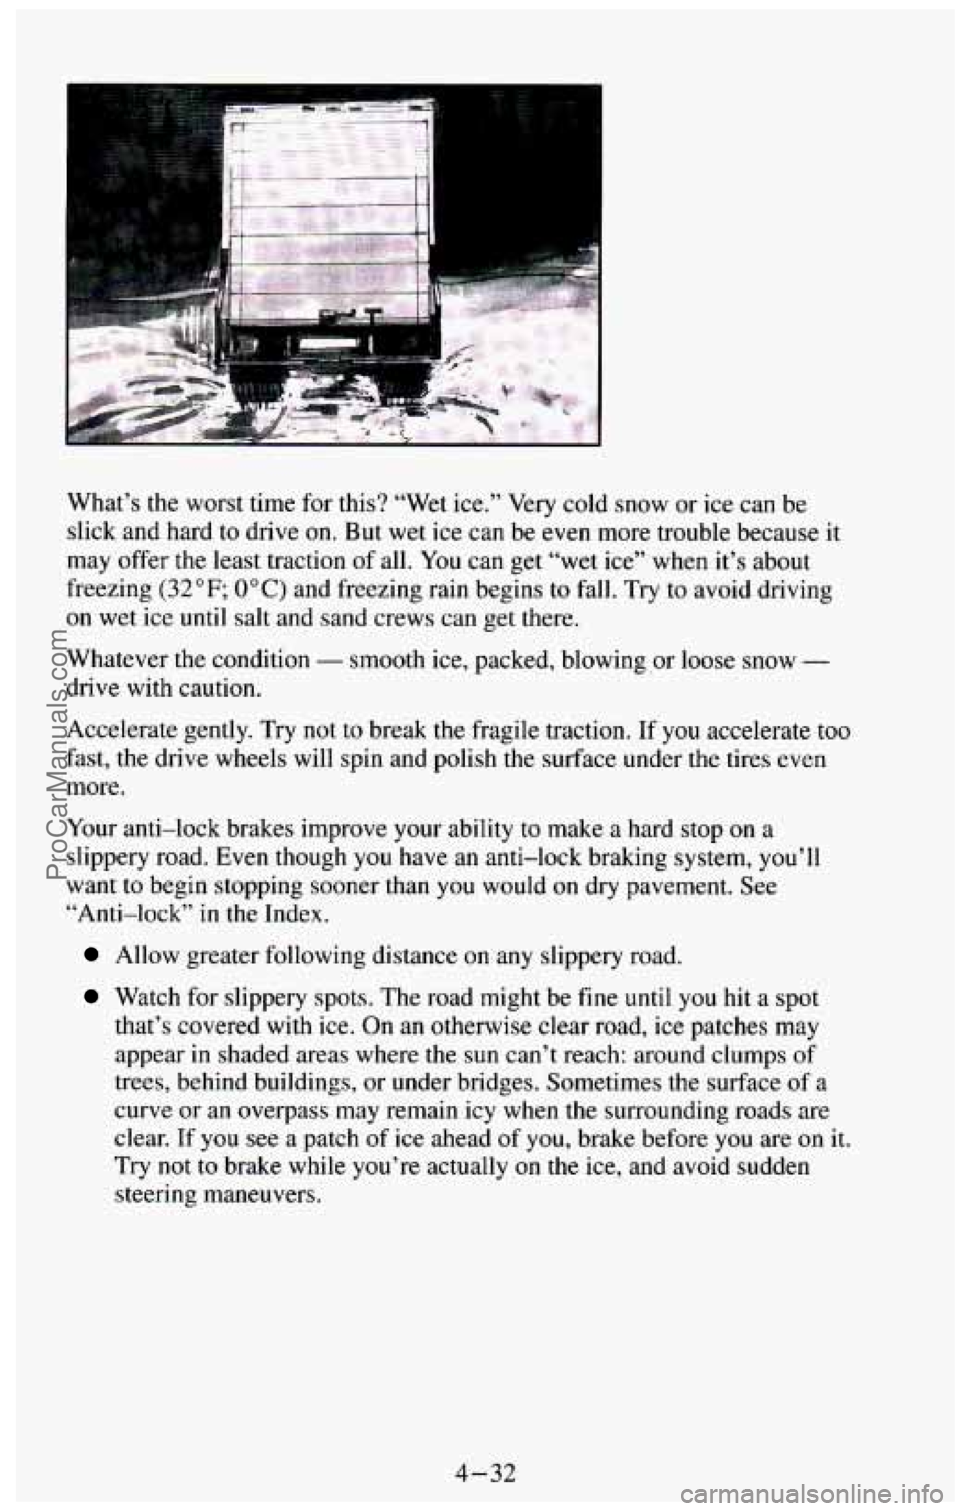
What’s the worst time for this? “Wet ice.” Very cold snow or ice can be
slick and hard to drive on.
But wet ice can be even more trouble because it
may offer the least traction of all. You can get “wet ice” when it’s about
freezing
(32°F; 0°C) and freezing rain begins to fall. Trv to avoid driving
on wet ice until salt and sand crews can get there.
Whatever the condition
- smooth ice, packed, blowing ,or loose snow -
drive with caution.
Accelerate gently. Try not to break the fragile traction. If you accelerate too
fast, the drive wheels will spin and polish the surface under the tires even
more.
Your anti-lock brakes improve your ability
to make a hard stop on a
slippery road. Even though you have an anti-lock braking system, you’ll
want to begin stopping sooner than you would on dry pavement. See
“Anti-lock” in the Index.
Allow greater following distance on any slippery road.
Watch for slippery spots. The road might be fine until you hit a spot
that’s covered with ice. On an otherwise clear road, ice patches may
appear
in shaded areas where the sun can’t reach: around clumps of
trees, behind buildings, or under bridges. Sometimes the surface of a
curve
or an overpass may remain icy when the surrounding roads are
clear. If you see a patch of ice ahead of you, brake before you are on it.
Try not to brake while you’re actually on the ice, and avoid sudden
steering maneuvers.
4-32
ProCarManuals.com
Page 198 of 385
After you’ve loaded your trailer, weigh the trailer and then the tongue,
separately, to
see if the weights are proper. If they aren’t, you may be able to
get them right simply by moving some items around in the trailer.
Total Weight on Your Vehicle’s Tires
Be sure your vehicle’s tires are inflated to the limit for cold tires. You’ll find
these numbers
on the Certification label at the rear edge of the driver’s door
or see “Tire Loading” in the Index. Then be sure you don’t go over the
GVW limit for your vehicle.
Hitches
It’s important to have the correct hitch equipment. Crosswinds, large trucKs
going by, and rough roads are a few reasons why you’ll need the right hitch.
Here are some rules
to follow:
If you use a step bumper hitch, and your trailer tongue has a V-shaped
foot, your bumper could be damaged
in sharp turns. Check the distance
from the front edge of
the foot to the middle of the hitch ball socket. If
the distance is less than 12 inches, take the foot off the trailer tongue.
If you’ll be pulling a trailer with a utility model that, when loaded, will
weigh more than
3,000 pounds (1 361 kg); or with a wagon model that,
when loaded, will weigh more than
4000 pounds (1 800 kg), be sure to
use
a properly mounted, weight-distributing hitch and sway control of
the proper size. This equipment is very important for proper vehicle
loading and good handling when you’re driving.
0 Will you have to make any holes in the body of your vehicle when you
install a trailer hitch? If
you do, then be sure to seal the holes later
when
you remove the hitch. If you don’t seal them, deadly carbon
monoxide
(CO) from your exhaust can get into your vehicle (see
“Carbon Monoxide”
in the Index). Dirt and water can, too.
Safety Chains
You should always attach chains between your vehicle and your trailer.
Cross the safety chains under
the tongue of the trailer so that the tongue will
not drop to the road if it becomes separated from the hitch. Instructions
about safety chains may be provided by
the hitch manufacturer or by the
trailer manufacturer. Follow the manufacturer’s recommendation for
attaching safety chains. Always leave
just enough slack so you can turn with
your rig. And, never allow safety chains to drag on the ground.
4-39
ProCarManuals.com
Page 199 of 385
Trailer Brakes
If your trailer weighs more than 1,000 pounds (450 kg) loaded, then it needs
its own brakes
- and they must be adequate. Be sure to read and follow the
instructions for the trailer brakes
so you’ll be able to install, adjust and
maintain them properly.
Your trailer brake system can tap into your vehicle’s hydraulic brake system,
but consider the following:
Will the trailer brake system use more than 0.02 cubic inch (0.3 cc) of
fluid from your vehicle’s master cylinder? If it will, don’t tap into your
vehicle’s brake system. Both braking systems
won’t work well, and you
could even lose your brakes altogether.
not, the trailer brake system must not be used with your vehicle.
If everything checks
out this far, make the brake tap at the port on the
master cylinder that sends the fluid to the rear brakes. But don’t use copper
tubing for this. if you do, it will bend and finally break
off. Use steel brake
tubing.
Will the trailer brake parts take 3,000 psi (20 650 kPa) of pressure? If
Driving with a Trailer
Towing a trailer requires a certain amount of experience. Before setting out
for the open road,
you’ll want to get to know your rig. Acquaint yourself
with the feel
of handling and braking with the added weight of the trailer.
And always keep
in mind that the vehicle you are driving is now a good
deal longer and not nearly so responsive as your vehicle is by itself.
Before
you start, check the trailer hitch and platform, safety chains,
electrical connector, lights, tires and mirror adjustment. If the trailer has
electric brakes, start your vehicle and trailer moving and then apply the
trailer brake controller by hand to be sure the brakes are working. This lets
you check your electrical connection at the same time.
4-40
ProCarManuals.com
Page 210 of 385
9. Attach the cable at least 18 inches (45 cm) away from the dead battery,
but not near engine parts that move. The electrical connection
is just as
good there, but the chance of sparks getting back to the battery is much
less.
10. Now start the vehicle with the good battery and run the engine for
awhile.
1 1. Try to start the vehicle with the dead battery.
If it won't start after a few tries, it probably needs service.
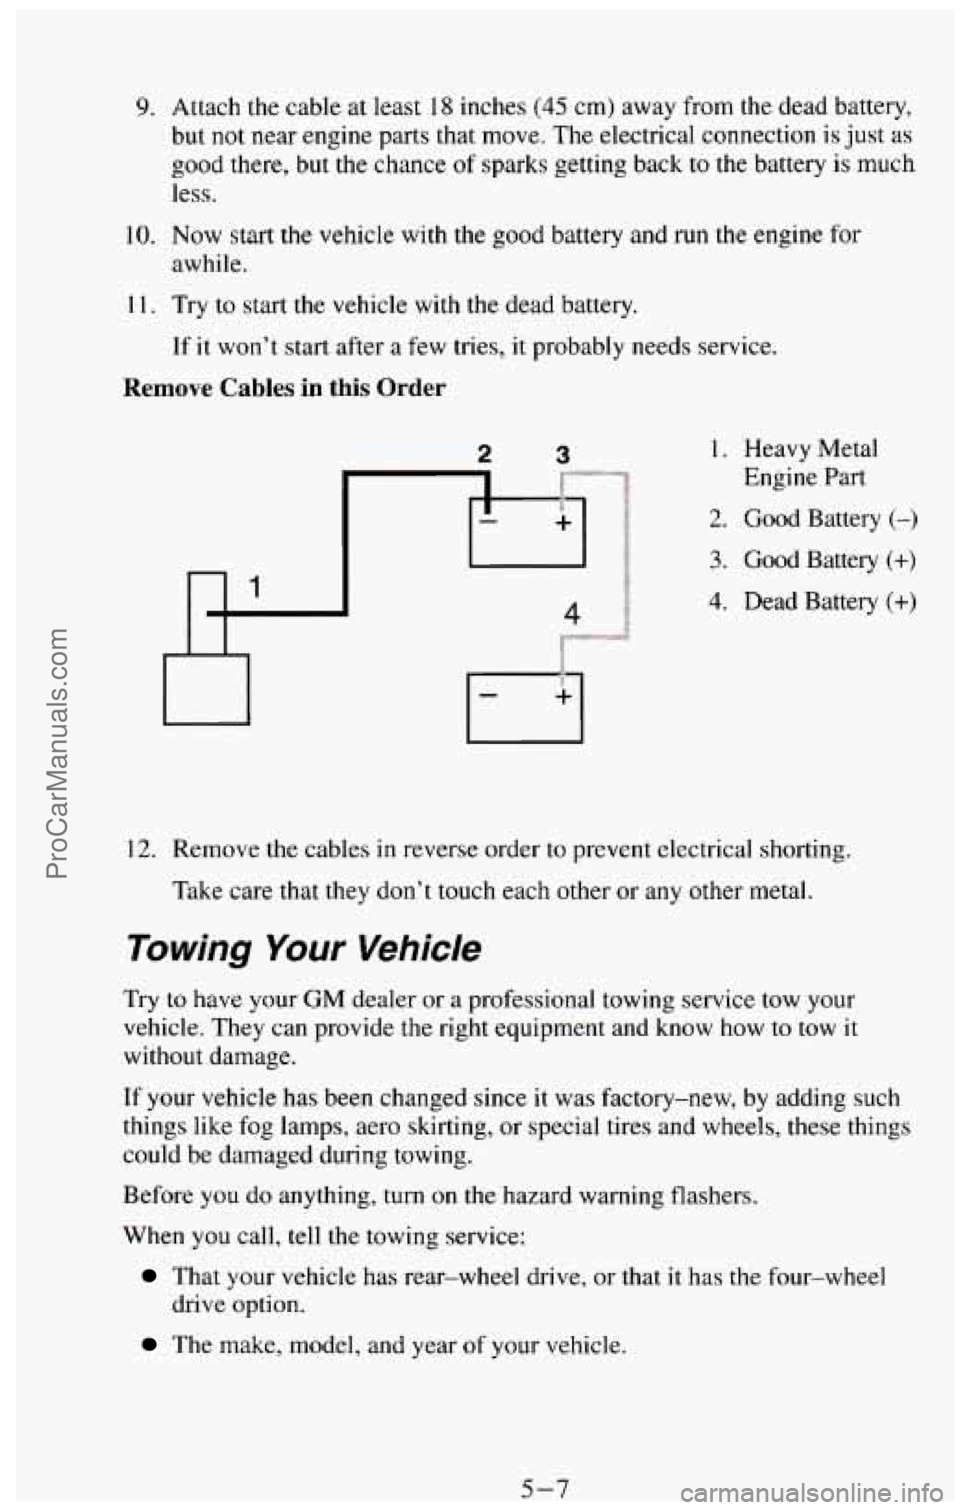
Remove Cables in this Order
1. Heavy Metal
Engine Part
2. Good Battery (-)
3. Good Battery (+)
4. Dead Battery (+)
12. Remove the cables in reverse order to prevent electrical shorting.
Take care that they don't touch each other
or any other metal.
Towing Your Vehicle
Try to have your GM dealer or a professional towing service tow your
vehicle. They can provide the right equipment and know how
to tow it
without damage.
If your vehicle has been changed since
it was factory-new, by adding such
things like fog lamps, aero skirting, or special tires and wheels, these things
could
be damaged during towing.
Before
you do anything, turn on the hazard warning flashers.
When you call,
tell the towing service:
That your vehicle has rear-wheel drive, or that it has the four-wheel
drive option.
The make, model, and year of your vehicle.
5-7 ProCarManuals.com
Page 227 of 385
Engine Fan Noise
Your vehicle has a clutched engine cooling fan. When the clutch is engaged,
the fan spins faster to provide more air to cool
the engine. In most every day
driving conditions the fan
is spinning slower and clutch is not fully engaged.
This improves
fuel economy and reduces fan noise. Under heavy vehicle
loading, trailer towing and/or high outside temperatures, the fan speed
increases as the clutch more fully engages.
So you may hear an increase in
fan noise. This is normal and should not be mistaken as the transmission
slipping or making extra shifts.
It is merely the cooling system functioning
properly. The
fan will slow down when additional cooling is not required
and the clutch partially disengages.
You may also hear this fan noise when you start the engine. It will go away
as the fan clutch partially disengages.
If a Tire Goes Flat
It’s unusual for a tire to “blow out” while you’re driving, especially if you
maintain your tires properly. If air goes out of a tire, it’s much more likely to
leak out slowly. But if you should ever have
a “blowout,” here are a few tips
about what to expect and what
to do:
If a front tire fails, the flat tire will create a drag that pulls the vehicle
toward that side. Take your foot off the accelerator pedal and grip the
steering wheel firmly. Steer to maintain lane position, then gently brake to a
stop well out of the traffic lane.
A rear blowout, particularly on a curve, acts much like a skid and may
require the same correction you’d use in a skid. In any rear blowout, remove
your foot from the accelerator pedal. Get the vehicle under control
by
steering the way you want the vehicle to go. It may be very bumpy and
noisy, but you can still steer. Gently brake to a stop, well off the road if
possible.
If a
tire goes flat, the next section shows how to use your jacking equipment
to change a flat tire safely.
5-24
ProCarManuals.com
Page 242 of 385
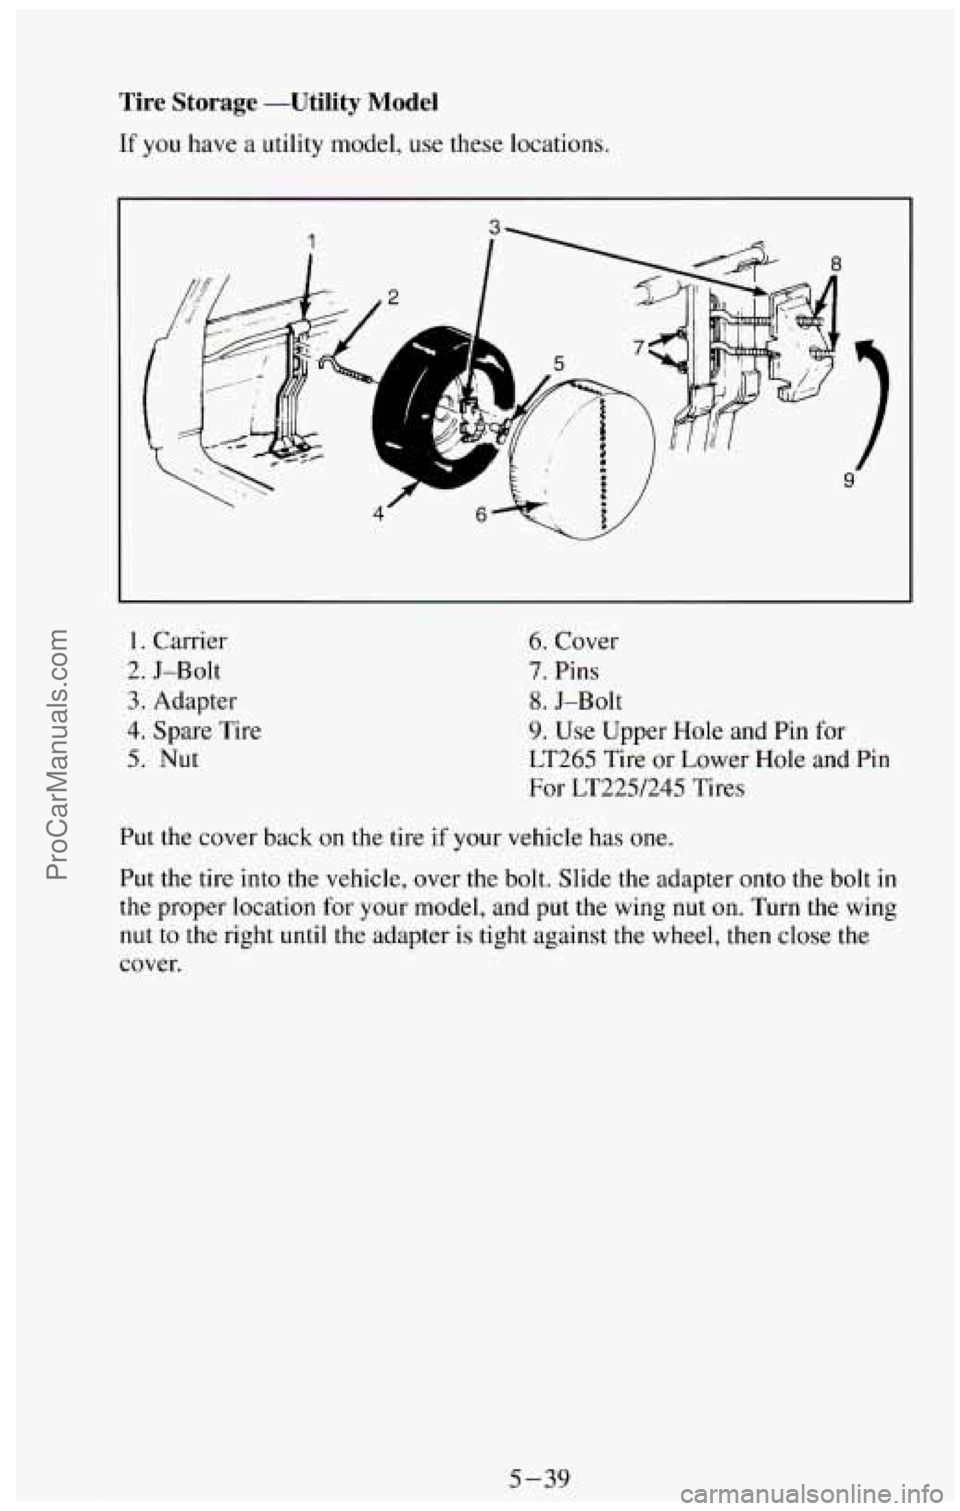
Tire Storage -Utility Model
If you have a utility model, use these locations.
1. Carrier
3. Adapter
4. Spare Tire
5. Nut
2. J-Bolt
6. Cover
7. Pins
9. Use Upper
Hole and Pin for
LT265 Tire or Lower Hole and Pin
For LT225/245 Tires
8. J-Bolt
Put the cover back on the tire if your vehicle has one.
Put the tire into the vehicle, over the bolt. Slide the adapter onto the bolt in
the proper location for your model, and put the wing
nut on. Turn the wing
nut to the right until the adapter is tight against the wheel, then close the
cover.
5-39
ProCarManuals.com
Page 243 of 385
If You’re Stuck: In Sand, Mud, Ice or Snow
What you don’t want to do when your vehicle is stuck is to spin your
wheels. The method known
as “rocking” can help you get out when you’re
stuck, but you must use caution.
NOTICE:
Spinning your wheels can destroy parts of your vehicle as well as
the tires. If you spin the wheels too fast while shifting your
transmission back and forth, you can destroy
your transmission.
Rocking your vehicle to get it out:
First, turn your steering wheel left and right. That will clear the area around
your front wheels. Then shift back and forth between
“R” (Reverse) and a
forward gear (or with a manual transmission, between First or Second gear
and Reverse), spinning the wheels
as little as possible. Release the
accelerator pedal while you shift, and press lightly on the accelerator pedal
when the transmission is in gear. If that doesn’t get you out after a few tries,
you may need to be towed out. Or,
you can use your recovery hooks, if your
vehicle has them.
If you do need to be towed out, see “Towing Your
Vehicle” in the Index.
5-40
ProCarManuals.com
Page 247 of 385
......................
................
Brake Master Cylinder ................................... 6-43
Replacing Brake System Parts .............................. 6-46
Other Maintenance Items .................................... 646
Lubrication ............. ..... 648
Battery ................ ....... 6-49
Bulb Replacement ......................................... 6-50
Fuses and Circuit Breakers ................................ 6-56
Exhaust System ....................................... 6-58
Loading Your Vehicle ...................................... 6-59
Tires .................................................... 6-62
Inflation-Tire Pressure .................................. 6-62
Tire Inspection and Rotation ............................... 6-64
When It’s Time for New Tires ......................... 6-65
Buying New Tires ..................................... 6-66
Uniform Tire Quality Grading ............................. 6-66
Wheel Alignment and Tire Balance ......................... 6-67
Wheel Replacement ..................................... 6-68
Tire Chains ............................................ 6-69
Appearancecare .......................................... 6-69
Cleaning the Inside of Your Vehicle ......................... 6-70
Cleaning the Outside of Your Vehicle ..................... 6-74
Appearance Care Materials .................................. 6-77
Vehicle Identification Number .............................. 6-78
Service Parts Identification Label ............................. 6-80
Specification Charts ...................................... 6-81
6-2
ProCarManuals.com