1994 CADILLAC FLEETWOOD transmission
[x] Cancel search: transmissionPage 228 of 398

I r NOTICE:
Ignoring these steps could result in costly damage to your
vehicle that wouldn’t be covered by your warranty.
ming to start. your Cadillac by pushing or pulling it won’t
work, and
it could damage your vehicle.
TO JUMP START YOUR CXDILLAC:
1. Check the other vehicle. It must have a 12-volt battery with a negative
ground system.
NOTICE:
If the other system isn’t a 12-volt system with a negative ground,
both vehicles can be damaged.
2. Get the vehicies close enough
so the jumper cables can reach, but be
sure the vehicles aren’t touching each other. If they are, it could cause
a ground connection you don’t want. You wouldn’t be able to start
your Cadillac, and the bad grounding could damage the electrical
systems.
You could be injured
if the vehicles roll. Set the parking brake firmly
on each vehicle. Put
an automatic transmission in “P” (Park) or a
manual transmission in
“N” (Neutral).
needed, and radios. This will avoid sparks and help save both
batteries. And it could save your radio!
3. Turn off the ignition on both vehicles. Turn off all lights that aren’t
NOTICE:
If you leave your radio on, it could be badly damaged. The
repairs wouldn’t be covered
by your warranty.
215
Page 233 of 398
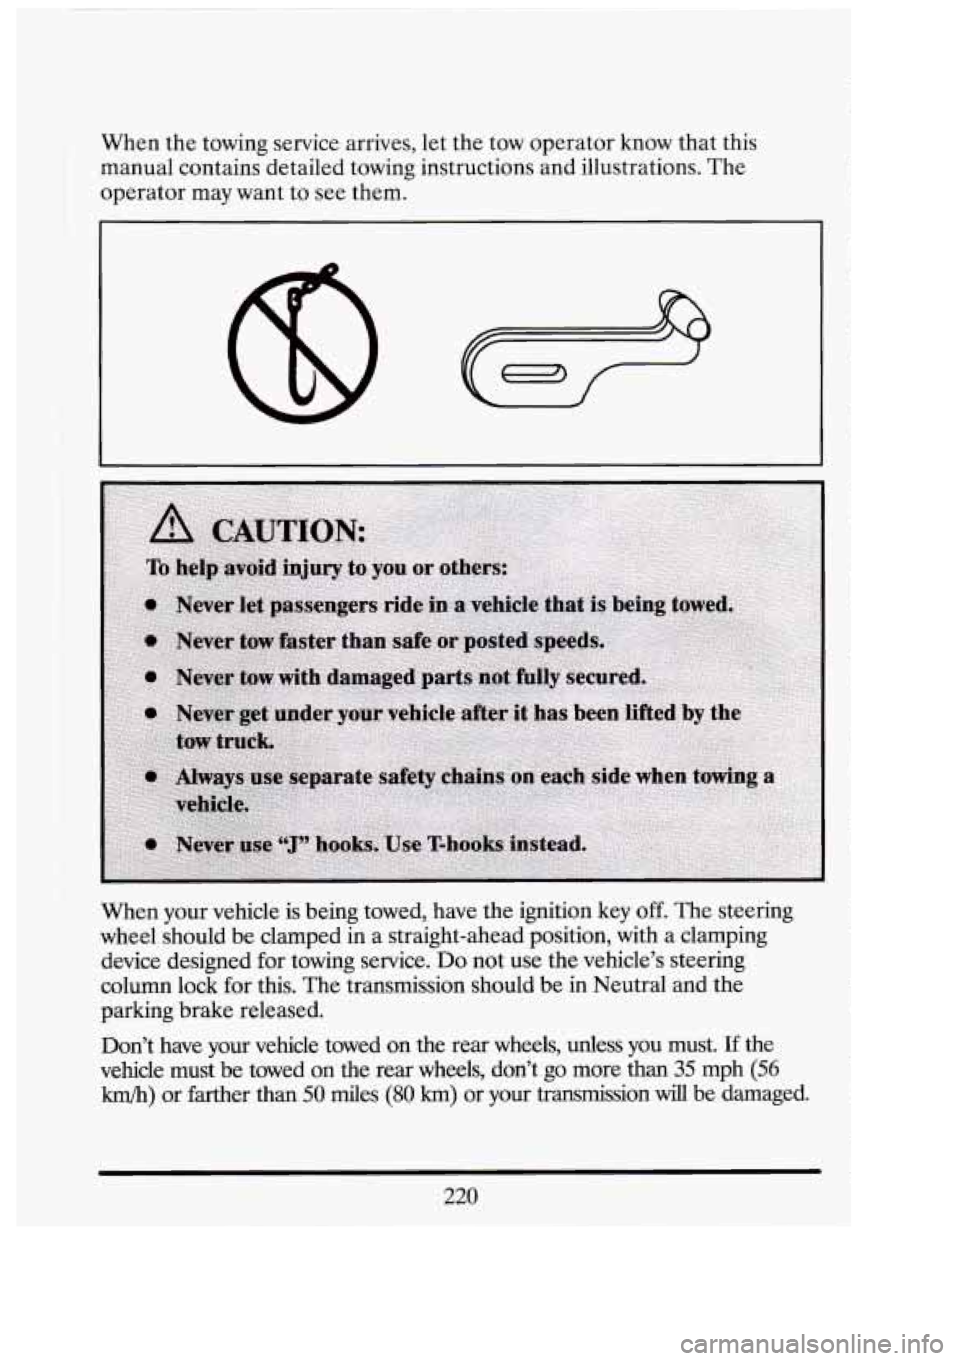
When the towing service arrives, let the tow operator know that this
manual contains detailed towing instructions and illustrations. The
operator may want to see them.
When your vehicle is being towed, have the ignition
key off. The steering
wheel should be clamped in a straight-ahead position, with a clamping
device designed for towing service.
Do not use the vehicle's steering
column lock
for this. The transmission should be in Neutral and the
parking brake released.
Don't have your vehicle towed on the rear wheels, unless you must. If the
vehicle must be towed
on the rear wheels, don't go more than 35 mph (56
km/h) or farther than 50 des (80 km) or your transmission will be damaged.
:!I
u 'I
f
220
Page 257 of 398
I-
IF YOU’RE STUCK: IN SAND, MUD, ICE
OR SNOW
What you don’t want to do when your vehicle is stuck is to spin your
wheels. The method known as “rocking” can help you get out when
you’re stuck, but you must use caution.
I I NOTICE:
Spinning your wheels can destroy parts of your vehicle as well
as the tires. If you spin the wheels too fast while shifting your
transmission back and forth, you can destroy your
transmission.
Rocking your vehicle to get it out:
First, turn your steering wheel left and right. That will clear the area
around your front wheels. You should turn your traction control system
off. (See “Traction Control System”
in the Index.) Then shift back and ’ forth between “R’ (Reverse) and a forward gear, spinning the wheels as
little as possible. Release the accelerator pedal while you shift, and press
lightly on the accelerator pedal when the transmission is in gear.
If that
doesn’t get you out after a few tries, you may need to be towed out.
If you
do need to be towed out, see “Towing Your Vehicle” in the Index.
244
D/
Page 275 of 398
-NOTICE:
If the air cleaner is off, a backfire can cause a damaging engine
fire:And, dirt can easily get into your engine, which will damage
it. Always have the air cleaner in place when you’re driving. I
I AUTOAUTIC .TRANsIMISSION FLUID
‘When to Check and Change
A good time to check your automatic transmission fluid level is when the
engine oil is changed. Refer to the Maintenance Schedule to determine
when to change your fluid. See “Scheduled Maintenance Services” in
the Index.
How to Check
Because this operation can be a little difficult, you may choose to have
this done at .a Cadillac dealership Service Department.
If you do it yourself, be sure to follow all the instructions here, or you
cou.ld get a false reading on the dipstick.
I I Too NOTICE: much or too little fluidcan damage your. transmission. Too
much can mean that some of the fluid could come out and fall
on hot engine parts or exhaust system, starting
a fire. Be sure to
get an accurate reading
if you check your transmission fluid. i
I
Wait at least 30 minutes before checking the transmission fluid level if
you
have been driving:
When outside temperatures are above 90°F (32OC).
At high speed for. quite a while.
tll
il
3‘ I
CI)
262
Page 276 of 398
r
r
ec
In heavy traffic -- especially in hot weather.
0 While pulling a trailer.
To get the right reading, the fluid should be at normal.operating
temperature, which is
180 " F .to -200 " F (82' C to 93 " C).
To check transmission fluid hot: Get the.vehicle warmed up by driving
about
15 miles (24 km) when outside temperatures are above 50°F
(10" C). If it's colder than 50°F (10" C), drive the vehicle in "D" (3rd
Gear) until the engine temperature gage moves and then remains steady
for ten minutes. Then follow the hot check procedures.
To check transmission fluid cold: A cold check is made after the vehicle
has been sitting for eight hours or more with the engine
off and is used
only as a reference. Let the engine run at idle for five minutes
if outside
temperatures are
50 " F (10 " C) or more. If it's colder than 50 " F (10 " C),
you may have to idle the engine longer. Should the fluid level be low
during a cold checkj you must perform a hot check before adding fluid.
This will give you a more accurate reading
of the fluid level.
To check thefluid hot or cold
0 Park your vehicle on a level place.
0 With the parking brake applied, place the shift lever in "P" (Park).
0 With your foot on the brake pedal, move the shift lever through each
gear range, pausing for about three seconds in each range. Then,
position the shift lever in "P" (Park).
0 Let the engine run at idle for three minutes or more.
263
Page 278 of 398
r
How to Add Fluid
Refer to the Maintenance Schedule to determine what kind of
transmission fluid to use. See “Recommended Fluids and Lubricants” in
the Index.
If the fluid level is low, add only enough of the proper fluid to bring the
level up to the COLD area for a cold check
or the HOT area for a hot
check. It doesn’t take much fluid, generally less than a int.
Don’t overfill.
We recommend you use only fluid labeled DEXRON -111 or
DEXRON@-IIE, because fluids with that label are made especially for
your automatic transmission. Damage caused by fluid other than
DEXRON@-I11 or DEXRON@-IIE is not covered by your new vehicle
warranty. 8
0 After adding fluid, recheck the fluid level as described under “HOW to
0 When the correct fluid level is obtained, push the dipstick back in all
Check.”
the way.
REARAXLE
When to Check and Change Lubricant
Refer to the Maintenance Schedule to determine how often to check the
lubricant and when to change it. See “Periodic Maintenance Inspections”
in the Index.
How to Check Lubricant
If the level is below the bottom of the filler plug hole, you’ll need to add
some lubricant. Add enough lubricant to raise the
level to the bottom of
the filler plug hole.
265
Page 380 of 398

.
.
. FLEETWOOD INDEX
.
.
.
.
.
c-
.
.
A
Acc (Ignition Key Position) ........................... 86
Adding
Brake Fluid
..................................... 274
Electrical Equipment ......................... 152. 311
Engine Coolant ............................. 227. 266
Engineoil ...................................... 256
Power Steering Fluid ............................. 271
Transmission Fluid ............................... 265
Additives. Engine Oil ............................... 260
Adjustment. Brake ................................. 178
Adult Safety Belt Usage .............................. 20
Air Bags ........................................... 30
Aircleaner ....................................... 261
Air Cleaner & PCV Filter Replace ......... See Maint . Book
Air Conditioner
.................................... 147
Air Outlets ........................................ 146
Airsystem ........................................ 146
Alarm. How To Turn Off Theft ........................ 82
Alcohol. Driving Under The Influence Of .............. 167
Alcohol& Gasoline ................................. 247
AMAX .......................................... 153
AM Radio Reception ............................... 152
AM Stereo Radio Reception ......................... 153
Antenna. Cleaning Radio ............................ 164
Antifreeze ........................................ 266
Antilock Brakes .................................... 173
Antilock Brake System Warning Light ................. 133
Anti-Theft Tips ..................................... 81
Appearance ....................................... 300
Appearance Care. Service and ........................ 245
Arm. Wearing A Safety Belt Under Your ................ 28
Armrest. Storage ................................... 129
Ashtrays .......................................... 126
Assist Handles ..................................... 128
Astroroof ......................................... 125
Audio Systems. Comfort Controls and ................. 146
Automatic Air Conditioning System ................... 147
Automatic Door Locks ............................... 71
Automatic Overdrive ................................ 92
Automatic Transmission .............................. 90
.
1
Page 381 of 398
Automatic Transmission Fluid ........................ 262
Axle. Rear
........................................ 265
Baby Restraint
...................................... 50
Battery ........................................... 276
Battery Cables. Starting With
......................... 215
Beam. Headlight. High-Low Switch
................... 107
Belt Lap
............................................ 39
Lap-Shoulder
.................................... 21
RearSeat
.................................... 41. 42
Blizzard. If You’re Caught In
A ....................... 199
Block Heater. Engine
................................ 89
BloodAlcoholLevel
................................ 167
Boat. Towing A
.................................... 201
Brake Adjustment
................................. 178. 275
Master Cylinder
................................. 272
Parking
......................................... 94
Pedal Travel
................................ 178. 275
Brake System. Antilock. Warning Light
................ 133
Brake System Warning Light
......................... 132
Brake
To Shift Light ................................ 140
Brakes. Antilock
................................... 173
Brakes. Trailer
..................................... 207
Braking
........................................... 172
Braking
If Your Engine Stops ........................ 172
“Break.1n”. New Vehicle
............................. 85
Break-In Schedule. When Towing
A Trailer ............. 202
Bulb Chart
........................................ 317
Bulb. Center High Mounted Stop Lamp
................ 286
Bulb. Cornering Lamp Removal
...................... 278
Bulbs. Taillight Replacement
......................... 281
Bulbs. Turn Signal
.................................. 317
Fluid
.......................................... 273
Lining Replacement. How To Drive After
............ 276
Brakewear
................................... 177. 274
Brakes. Rear
...................................... 275
Braking in Emergencies
............................. 179
Bulbs. Halogen Removal
............................ 279
C
Cables. Battery. Starting With ......................... 215
Camper. Towing
A .................................. 201
Capacities. Fluid
................................... 322
Car Jack Instructions
............................... 235
I !
i3
I
31
nl
2