Page 86 of 398
Downloaded from www.Manualslib.com manuals search engine J
1. Use round end of
the door key, or a
quarter
to rotate
cover
counterclockwise
1/16 of a turn.
2. Remove battery and replace with
CR2025 or
equivalent. Using
the wrong size
battery can damage the transmitter.
74
Page 87 of 398
Downloaded from www.Manualslib.com manuals search engine 'n
r
r
r
r
F
t
i- t
3. ..-Make sure battery
is positioned with
.-
4. Align notches on
cover
and
transmitter and
rotate clockwise to
reinstall.
75
Page 89 of 398
Downloaded from www.Manualslib.com manuals search engine r- i
r
r
r
r
r
I
r
GL0.W BOX ''. :. '. ..
The glove box is directly in front oflhe front passenger seat. To lock the
glove
box door, insert the oval key into the lock cylinder and turn it
clockwise a.quarter turn and remove the key.
To unlock the door, turn the
key counter clockwise and remove the
key.
REMOTE TRUNK RELEASE
You'll find the button,
here in the glove
box.
4% ._ j
. ..
77
Page 153 of 398

Downloaded from www.Manualslib.com manuals search engine r
!
r
I-
RESET Buttetr I. .
Pressing thisbutton will reset the AVG MPH, MPG AVG, FUEL USED,
OIL LIFE.LEFT;and TIMER when each function is displayed.
TIMER Button
.. .. ’ .I.-. .. 7. . : .., 7.
The TIMERfeature is like a stop watch, in that you can clock the time .it
takes to get $om one point to another.
To operate, press either the TIMER button or successively press the
INFORMATION button until “TIMER
OO:OO:OO’y is displayed on the
Driver InformationCenter. Each of the fields for the HOURS,
MINUTES, and SECONDS ‘are.
two numeric digits.
1 .. . .. ..
Once the “TIMER OO:~OO.:OO” is displayed, press the TIMER button to -.
start the timing feature. Press the TIMER button again to: stop-it. To reset
it, press and hold the, RESET buaton until: the display reads
“TIMER
0O;OO:OO”. Press the INFORMATION button to,exit from the TIMER
function.
AVG MPH (Average Speed)’,ReseQ
Press successively the INFORMATI0,N button to .display the “AVG
MPH”, then press and.hold the RESET button until
“0.0 AVG MPH” is
displayed.
MPG AVG. (Average Fuel Economy) Reset
Press successively the INFORMATION button to display the “MPG-
AVG, then press and hold the RESET button until “0.0 AVG‘MPG” is
displayed. Another method to reset both ‘‘AVG MPG’ is to press the
AVG button on the Fuel-Data Panel until
‘‘0.0 AVG MPGis show in
both display.
Fuel. Used Reset
Press successively the INFORMATION button to display the “FUEL
USED.’’on the Driver Information Center, then press and hold the
RESET button until ‘‘FUEL USED
0.0” is displayed.
Oil Life Left Reset
Press successively the. INFORMATION button to display the “OIL LIFE
LEFT, then press and, hold. the RESET button until
“0.0, OIL LIFE
LEFT” is .displayed.
Page 178 of 398

Downloaded from www.Manualslib.com manuals search engine FWD (Fast Forward)
Press and hold FWD to advance quickly within a track. Release it to
resume playing. Elapsed time will be displayed
to show the forward
progress
of the CD.
Prev (Previous)
Push this button to go back to the beginning of the track or push it again
to
a favorite track.
Next
Push this button to advance to the next track.
ST/PL (StoplPlay)
Press this button and the disc or tape will stop without ejecting it and the
radio will start to play. Press it again and the disc or tape will start to play
again.
EJCT (Eject)
Press this button to eject the disc or tape. If you have both a CD and a
tape in the player, then the other playback media will start to play. Press
it again and the other media will eject.
Comp (Compression)
Pressing COMP makes soft and loud passages more nearly equal in
volume. For example, playing classical or jazz music with very quiet and
very loud passages in the same tune. The COMP display
will light as long
as COMP is on.
Setting The Clock
Turn the ignition on. Then:
To Set the Hour:
Press SET, and within 5 seconds,
Press and hold SEEK. When the clock gets to the correct hour, let go.
-
.. ,
-
166
Page 179 of 398

Downloaded from www.Manualslib.com manuals search engine To Set the Minutes:
F 0 Press SET, and within 5 seconds, 1
Press and hold SCAN. When the clock gets& the correGt minute, Set j
Your clock is set.
go*
I I I
f
Care of Your Cassege .Tape Phyer
-2 , . . . -111.: ,, :
--,= ,: . . , .. . .,,&V?i'.,.r: m.. ... . - ., - c: ,I >$ -72 .. I . ,. .
A tape
player that is qot cl6aiied.r&gctlarly can cause reduad sound
quality, ruined cassettes,
or a..dam&$ed mechanism. Cassette tapes should .
be stored in their cases away ficmici&aninants, direct sunlight, and . '
failure of the tape player. I
,I
L extreme heat. If they aren?, they :may not operate properly or cause
- Your tape player should be cleaned regularly each month or after every
50 hours of use. If you notice a reduction in sound quality, try a known
good cassette to see
if the tape or the tape player is at fault. If this other
Cleaning may be done with a scrubbing action, non-abrasive cleaningi.
~
cassette. This system uses a cleaning cassette with pads which scrub the
tape head 'as the hubs of the cleaner cassette turn. It is-normal for. the
ensure thorough cleaning.
A scrubbing action cleaning cassette is
available through your Cadillac dealership.
-, cassette has no improvement in sound quality, clean the tape player.
.I
(, cartridge to eject while cleaning. Insert the cassette at least 3 times to
r
You may also choose a non-scrubbing action, wet-type cleaner which uses
a cassette with a fabric belt to clean the tape head. This
type of cleaning
cassette
will not eject. It -may not clean as thoroughly as the scrubbing
type cleaner.
Cassettes are subject to wear and the sound quality may degrade over
time. Always make sure that the cassette tape is in good condition before
you have your tape player serviced.
Care of Your Compact Discs
Handle discs carefully. Store them in their original cases or other
protective cases and away from direct sunlight and dust.
If the surface of
a disc
is soiled, dampen a clean, soft cloth in a mild, neutral detergent
solution and clean it, wiping from the center to the edge.
167
Page 193 of 398

Downloaded from www.Manualslib.com manuals search engine ‘I
r td
r
r
!
-
I- t>
Try to adjust your speed so you can ‘‘d&xCY through.thecurve. Maintain a
reasonable,. steady speed, Wait to .accelerate until you are out of the
curve,
and then accelerate-gently into the straightaway.
.. .:r 5.
Steering in Emergencies
There are times when steering canbe more effective.than braking. For
example, you. come over a hill and, find a truck stopped
in your lane, .or a
car suddenly pulls. out from nowhere, ox a child darts out €rm betwe
parked cars and stops right in front of
you. You can avoid these pxoblems
by braking.
-- if you can stop in time. But sometimes you can’t; there isn’t
room. That’s the time for evasive action
-- steering around the problem.
Your Cadillac can perform verywell
in. emergencies like these. First apply
your brakes. It
is better to remove as much speed as you can from a,
possible collision. Then steer around the problem, to the left orright
depending on the space available.
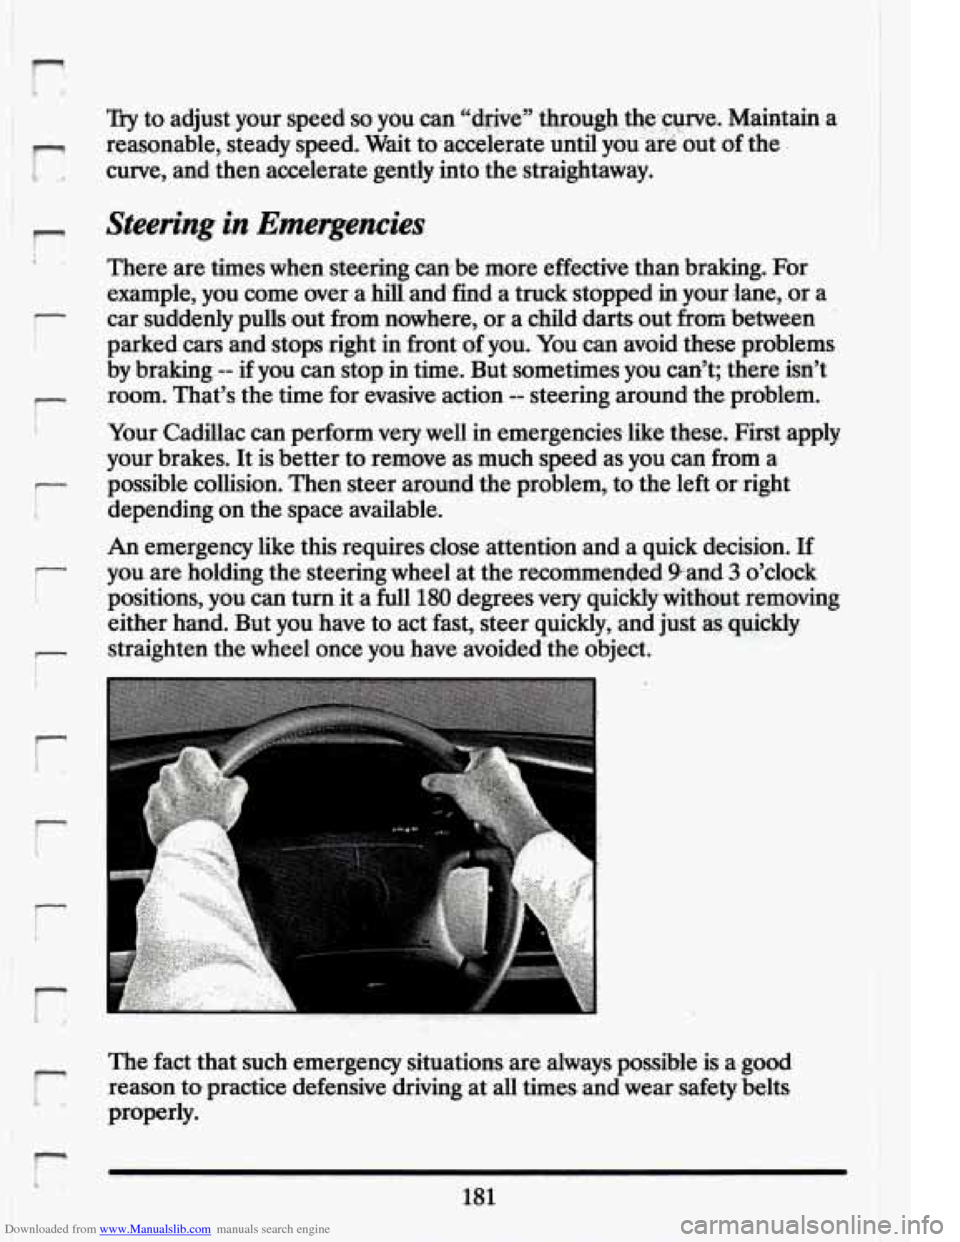
An emergency like this requires close attention and a quick decision. If
you. are holding the steering wheel’ at the recommended Pand-3’o’clock
positions, you can turn
it a full 180 degrees very quickly without removing
either hand. But you have to act fast, steer quickly, and just aslquickly
straighten the wheel once
you have avoided-:the object.
The fact that such emergency situations are always possible
is a.good
reason to practice defensive driving at all times. and wear safety belts
properly.
r c
181.
Page 244 of 398
Downloaded from www.Manualslib.com manuals search engine Attach the wheel
wrench to the jack
bolt and rotate it
clockwise
(to the
right). That will raise
the lift head a little.
There is a. center
aluminium wheel.
wheel cover on your
A
Use the flat end
of
the wheel wrench,
gently pry the cover
off. Be careful not to
scratch the aluminum
wheel edge. Don't try
to remove it with
your hands.
232
7
..