Page 390 of 1413

Transmission Assembly
14. Install the intermediate shaft and the driveshafts(see section 16)-
NOTE: Replace the set rings with new ones.
Installation (cont'd)
-Sl
SET RINGReplace.
INTERMEDIATESHAFT
Replace.10 x 1.25 mm38 N.m (3.9 kgt m,28 tbtft)
15. Install the ball joints onto the lower arm (see sec-
tion 18).
16. Install the right damper fork (see section 18).
10 x 1.25 mm43 N.m {4.o ksf.m.32 lbf.ft)
RIGHTDAMPERFOBK
SELF.LOCKING NUTReplace.12 x 1.25 mm64 N.m {6.5 kgf.m,47 tbtft)
tLOWER ARM
:\
COTTER PIN
CASTLE NUT12 x 1.25 mm49 - 59 N.m 15.0 - 6.0 kgf m. Reptace.36 - 43 tbf.frl
13-44
DNIVESHAFTS
::.t
L
17. lnstall the exhaust pipe A, and the three way cat-
alytic converter (Bl8C'1 engine), and connect theheated oxygen sensor (HO2S) connector.
SELF-LOCKING NUTHO2SCONNECTORReplace.10 x 1.25 mm33 N.m (3.4 kgt.m,2s tbtftt
GASKETReplace.SELF.LOCKING NUTReplace.8 x 1.25 mm
SELF.LOCKING NUTReplace.THREE WAYCATALYTICCONVERTER1818C'l enginel
16 N'm 11.6 kgt m, 10 x 1 25 mm
l2tbt.ftl 54 N.m 15.5 kgt m,iro lbf.ftl
18. Install the engine splash shield.
GASKET
Page 430 of 1413
Description
Lock-up System
Lock-up Clutch
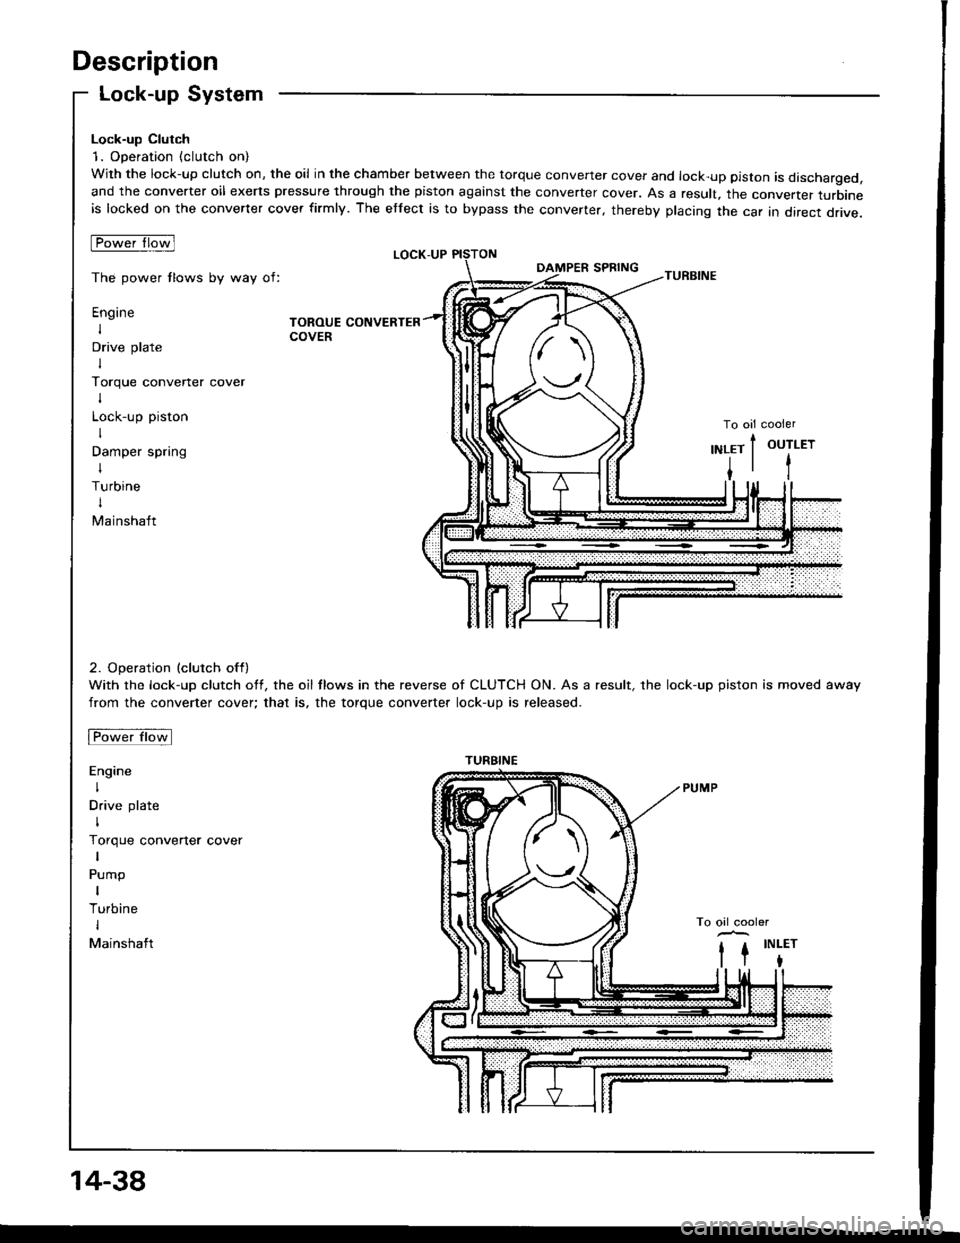
1. Operation (clutch on)
With the lock-up clutch on, the oil in the chamber between the torque convener cover and lock-up piston is discharged,and the converter oil exerts pressure through the piston against the converter cover. As a result, the converter turbineis locked on the converter cover firmly. The etfect is to bypass the converter, thereby placing the car in direct drive.
tpowefJlo-wl
The power tlows by way of:
Engine
I
Drive plate
I
Torque convener cover
I
Lock-up piston
I
Damper spring
I
Turbine
t
Mainshaft
TOROUE CONVERTERCOVER
LOCK-UP
TURBINE
To oil cooler
2. Operation (clutch off)
With the lock-up clutch off, the oil tlows in the reverse of CLUTCH ON. As a result, the lock-up piston is moved away
from the converter cover; that is, the torque converter lock-up is released.
Fowtttowl
Engine
I
Drive plate
I
Torque converter cover
Pump
I
Turbine
I
Mainshaft
OUTLET
t
,\
TURBINE
14-38
Page 492 of 1413
Transmission
Removal {cont'd)
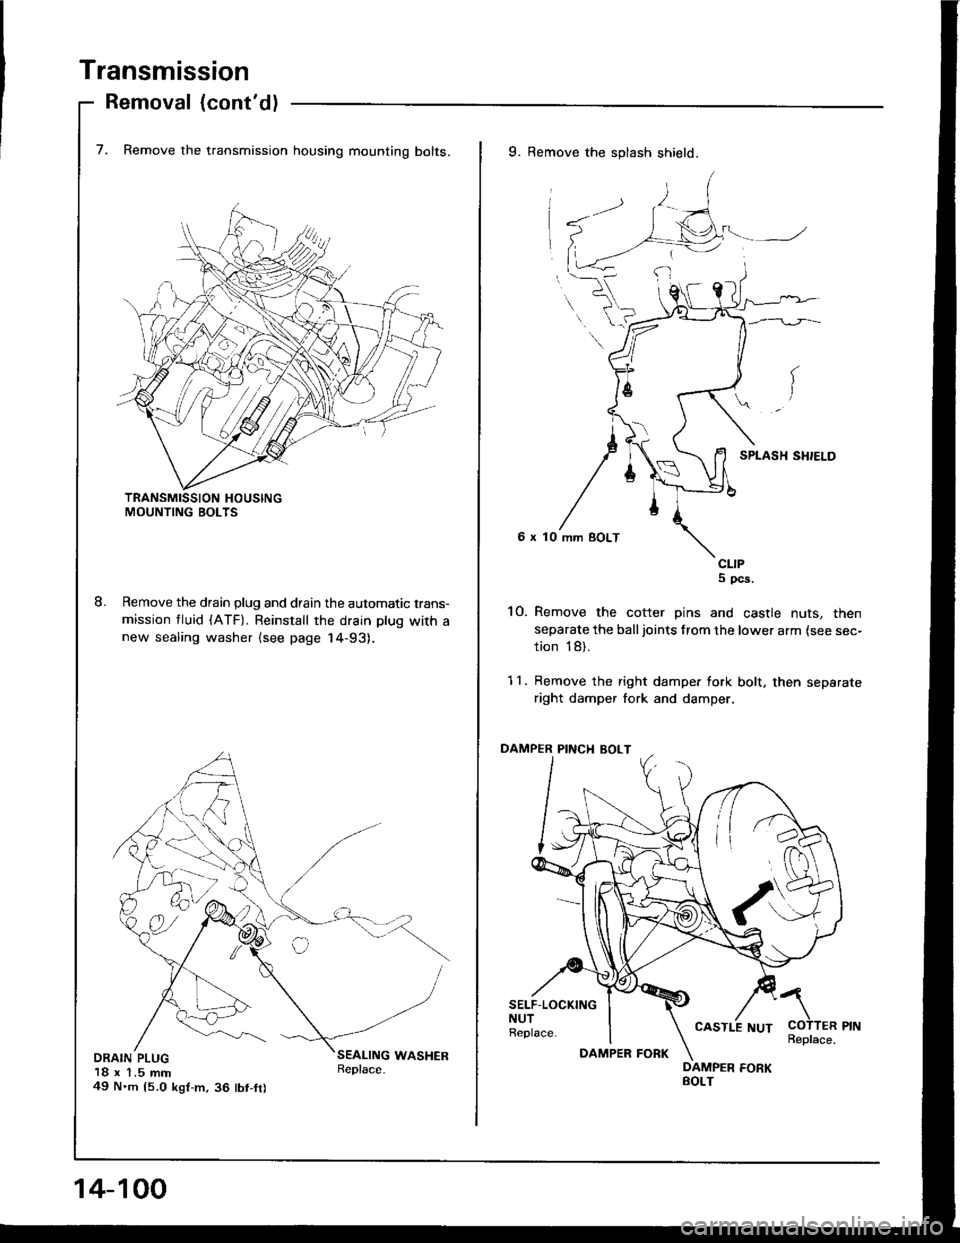
7. Remove the transmission housing mounting bolts.
Remove the drain plug and drain the automatic trans-
mission tluid (ATF). Reinstall the drain plug with anew sealing washer lsee page 14-93).
DRAIN PLUG18 x 1.5 mm49 N'm 15.0 kgt-m,36 tbt-fr)
9. Remove the splash shield.
6 x 10
CLIPS pcs.
10. Remove the cotter pins and castle nuts, then
separate the balljoints from the lower arm {see sec-
tion 18).
11. Remove the right dampe. fork bolt. then separate
right damper fork and damper.
PINCI{ BOLT
SELF.LOCKINGNUTReplace.COTTER PINReplace.
/\
14-100
DAMPER FORK
CASTLE NUT
Page 556 of 1413

Transmission
Installation {cont'd)
14.
15.
Install new set rings on the end of the intermediate
shaft and the driveshaft.
Install the intermediate shaft.
SET RINGBeplace.
16.
10 x 139 N.m14.O kgf.m, 29 lbf.ftl
Install exhaust pipe A. and connect the heated oxv-gen sensor {HO2S) connector.
SELF-LOCKING NUT10 x 1.25 mm54 N.m (5.5 kgl.m,40 rbt.trlReplace.
GASKETReplace.
SELF.LOCKING NUTSI x 1.25 mm22 N.m 12.2 kgl'n,16 lbt.trlRepl6ce.
SHAFT
14-166
DAMPER PINCH BOLT10 x 1.25 mm43 N.m 14.4 kgf.m,32 tbr.ftl
1 7. Install the right and left drivershafts (see section l6l.
NOTE: Turn the right and left steering knuckle fullyoutward, and slide the right driveshaft into the
differential until you feel its spring clip engages theside geaf. Slide the left driveshaft into the intermedi-
ate shaft until you teel the spring clip of the inter-mediate shaft engage the driveshaft.
18. Install right damper fork, then install the right andlett balljoints to each lower arm with the castle nuts
and new cotter Dins.
\
COTTERReplace.CASTLE NUT12 x 1.25 mm49-59 N.m{5.O-6.0 ksf.m, 36-43
SELF.LOCKING NUT12 x 1 .25 mm64 N.m (6.5 kgl.h, 47 lbt.ftlReplace.
rbt'ft1
19. Install the splash shield.
6 x 10 mm BOLT
cltPs, 5
Page 598 of 1413
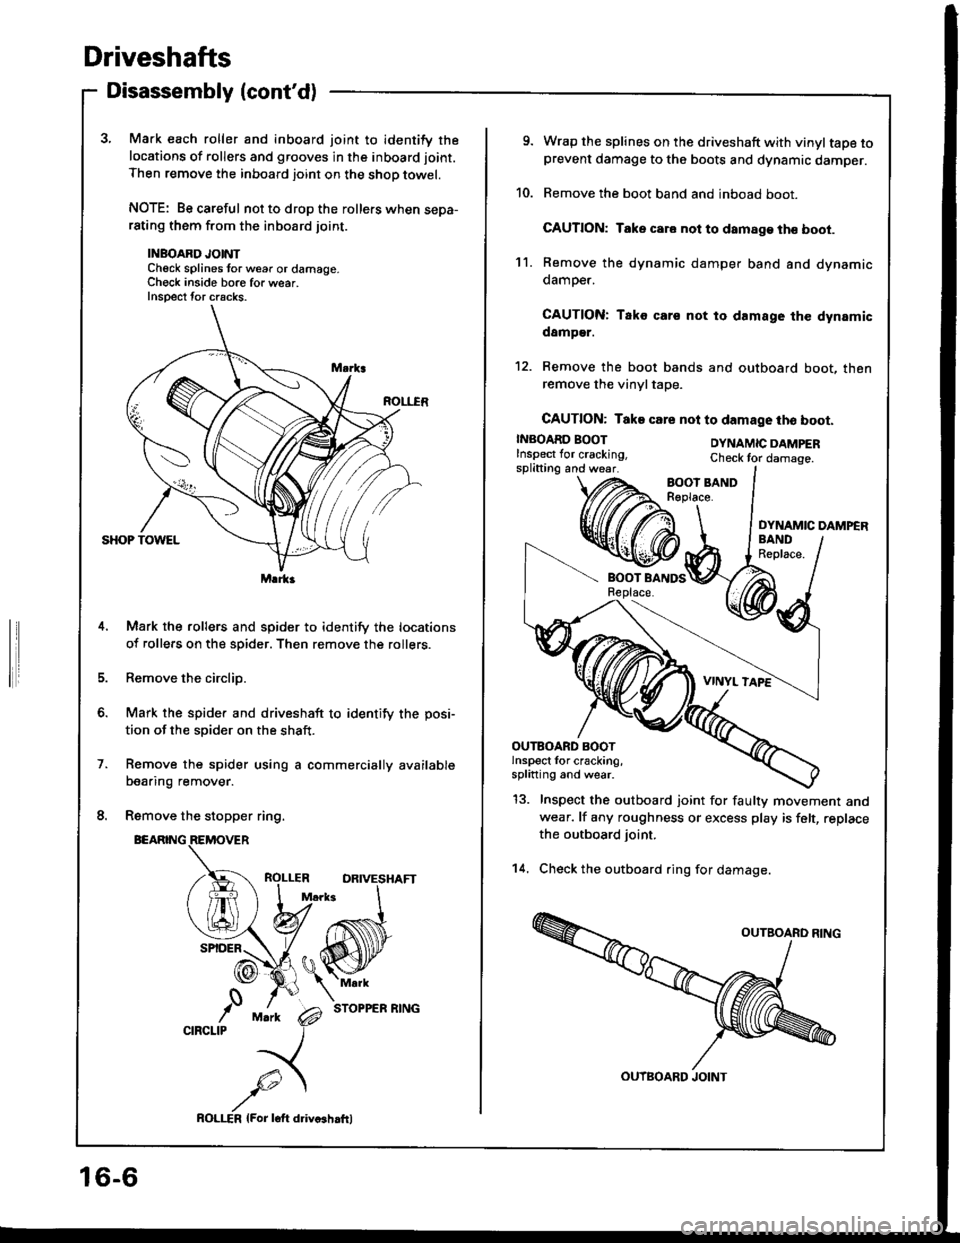
Driveshafts
Disassembly (cont'd)
3, Mark each roller and inboard joint to identify the
locations of rollers and grooves in the inboard joint.
Then remove the inboard joint on the shop towel.
NOTE: Be careful not to drop the rollers when sepa-rating them from the inboard joint.
INBOARD JOINTCheck splines tor w6ar or damage.Ch€ck inside bore for wear.Inspect tor cracks.
Mark the rollers and spider to identify the locations
of rollers on the spider. Then remove the rollers.
Remove the circlip.
Mark the spider and driveshaft to identify the posi-
tion of the spider on the shaft.
Remove the spider using a commercially available
bearing remover.
Remove the stopper ring.
BEARING
STOPPER RING
Marka
o.
,'0CIRCLIP
16-6
ROLI-€R lFor loft ddvcshrfrl
9. Wrap the splines on the driveshaft with vinyltape toprevent damage to the boots and dynamic damper.
10. Remove the boot band and inboad boot.
CAUTION: Take car. not to damage th€ boot.
11. Remove the dynamic damper band and dynamicdamoer.
CAUTION: Tako cars not to damage the dynamicdamper.
12. Remove the boot bands and outboard boot, thenremove the vinyltape.
CAUTION: Take csre nol to damage tho boot.
INBOARD BOOTInspect lor cracking,splitting and wear.
DYNAMIC DAMPERCheck tor damage.
DYNAMIC DAMPER
13. Inspect the outboard joint for faulty movement andwear. lf any roughness or excess play is felt, replace
the outboard joint.
14. Check the outboard ring for damage.
OUTBOARD BOOTlnspect for cracking,splining and wear.
OUTBOARD JOINT
Page 599 of 1413
Reassembly
NOTE:
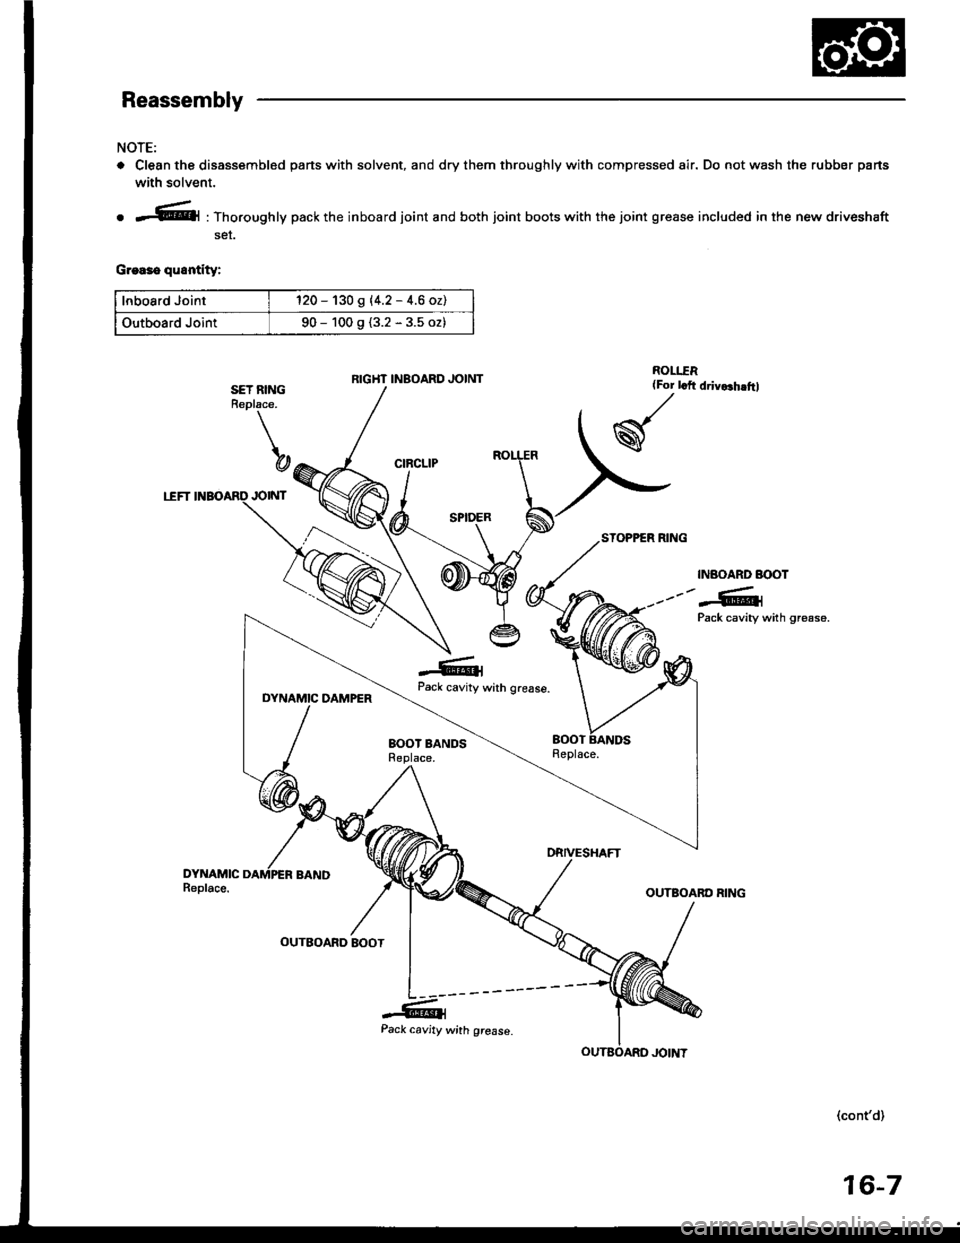
o Clean the disassembled pans with solvent, and dry them throughly with compressed air. Do not wash the rubber parts
with solvent.
ROLI.TR{For lcft
w
o *.'.l|@l : Thoroughly pack the inboard joint and both joint boots with the joint grease included in the new driveshaft
ser.
G.ea3o quontity:
lnboard Joint120 - 130 g |'4.2 - 4.6 ozl
Outboard Joint90 - 100 g {3.2 - 3.5 oz}
INAOARD BOOT
---"-G1Pack cavity with gr€ase.
DYNAMIC DAMPERwrth grease.
SET RINGReplace.
b
,RD JOINT
-GlPack cavity
EOOT BANDSReplace.
(cont'd)
RIGHT INBOARD JOINT
16-7
Page 600 of 1413
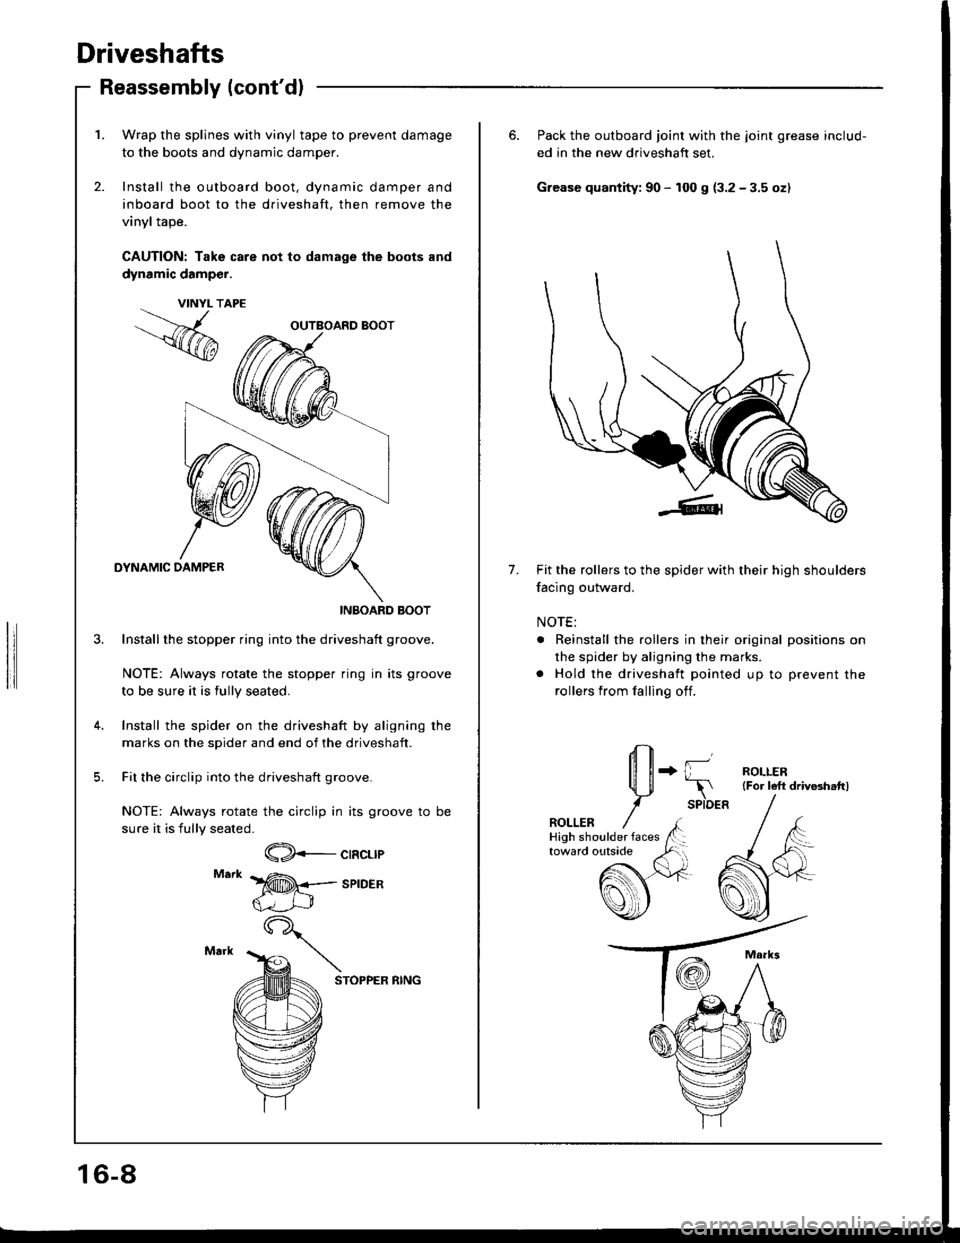
Driveshafts
Reassembly (cont'dl
1. Wrap the splines with vinyl tape to prevent damage
to the boots and dynamic damper.
2. Install the outboard boot, dynamic damper and
inboard boot to the driveshaft, then remove the
vinyl tape.
CAUTION: Take care not to damage the boots and
dynamic damp€r.
DYNAMIC DAMPER
INBOARD BOOT
Installthe stopper ring into the driveshaft groove.
NOTE: Always rotate the stopper ring in its groove
to be sure it is fully seated.
Install the spider on the driveshaft by aligning rhe
marks on the spider and end of the driveshaft.
Fit the circlip into the driveshaft groove.
NOTE: Always rotate the circlip in its groove to be
sure it is fully seated.
VINYL T
,.%
CIRCLIP
SPIDER
STOPPER RING
OUTBOARD BOOT
16-8
6. Pack the outboard joint with the joint grease includ-
ed in the new driveshaft set,
Grease quantity: 90 - 100 g (3.2 - 3.5 oz)
7.Fit the rollers to the spider with their high shoulders
facing outward.
NOTE:
. Reinstall the rollers in their original positions on
the spider by aligning the marks.
. Hold the driveshaft pointed up to prevent the
rollers from falling off.
+ {l--r
SPIDER
ROLLER{For left driv8hattl
ROLLER
Page 602 of 1413
Driveshafts
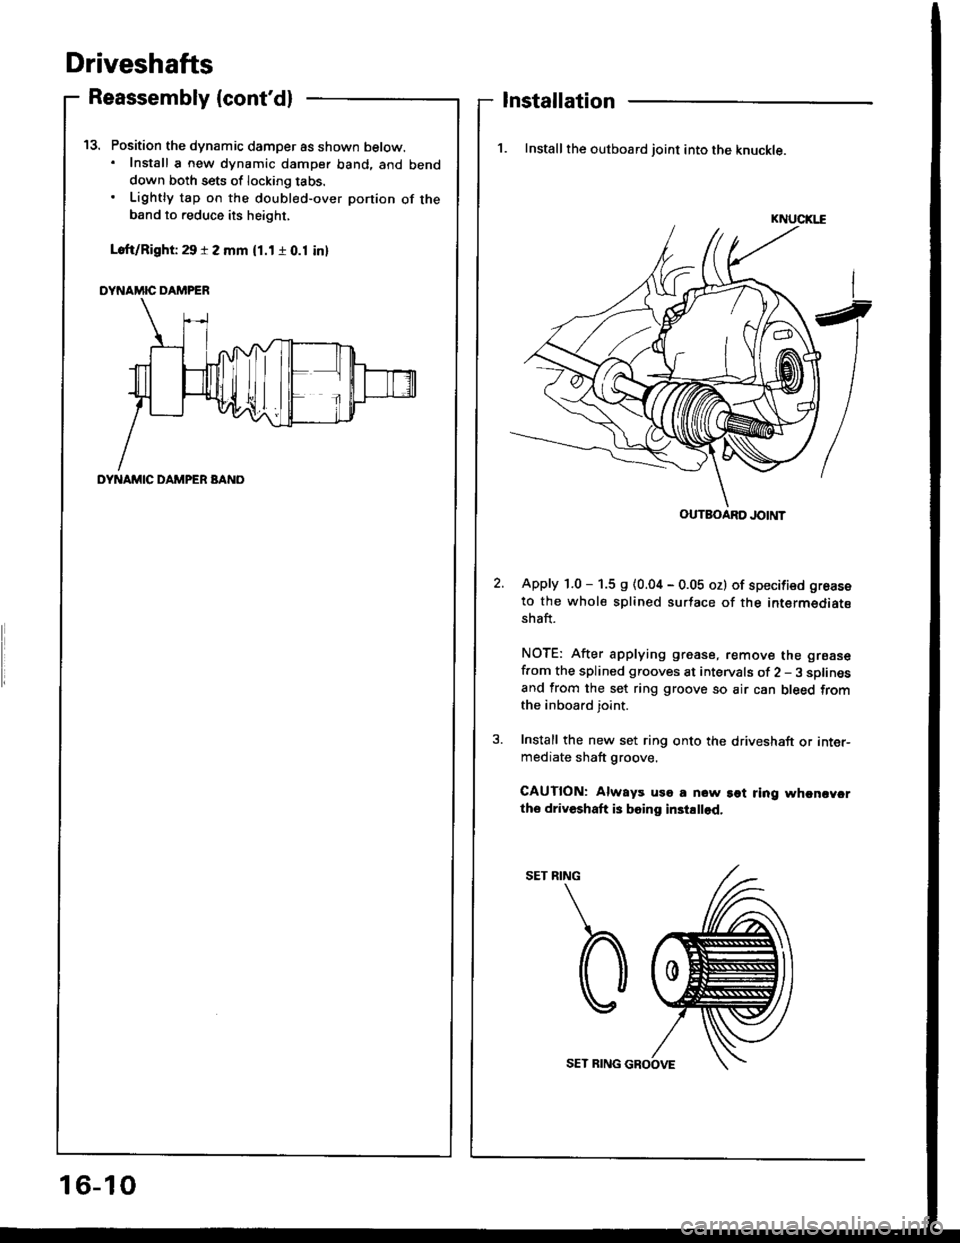
Position the dynamic damper as shown below.. Install a new dynamic damper band. and benddown both sets of locking tabs.
Lightly tap on the doubl€d-over ponion of theband to reduce its height,
Loft/Right 29 r 2 mm (1.1 r 0.1 inl
DYNAMIC DAMPER
t5.
Reassembly (cont'dl
DYNAMIC DAMPER BANO
Installation
1. Install the outboard joint into the knuckle.
KNUCIGE
Apply 1.0 - 1.5 s (0.04 - 0.05 oz) of specified groase
to the whole splined surtace of the intermediatsshaft.
NOTE: After applying grease, remove the grsase
f.om the splined grooves at intervals of 2 - 3 sDlinesand from the set ring groove so air can bleed fromthe inboard joint.
Install the new set ring onto the driveshaft or inter-mediate shaft groove.
CAUTION: Always uso a now sot ring whcncycrtho driveshaft is boing in3tallod.
RING
b
OUTBOARD JOINT
16-10
SET RING GROOVE