1993 PONTIAC GRAND-PRIX wiring
[x] Cancel search: wiringPage 181 of 338

Your Driving and the Road
Driving with a Trailer (CONT.)
Making Turns
When you’re turning with a trailer,
make wider turns than normal. Do this
so your trailer won’t strike soft
sh’oulders, curbs, road signs, trees, or
other objects. Avoid jerky or sudden
maneuvers. Signal well in advance.
Turn Signals When Towing a Trailer
When you tow a trailer, your vehicle has
to have a different turn signal flasher
and extra wiring. The green arrows on
your instrument panel will flash
whenever you signal
a turn or lane
change. Properly hooked
up, the trailer
lights will also flash, telling other
drivers you’re about to turn, change
lanes or stop.
When towing a trailer, the green arrows
on your instrument panel will flash for
turns even if the bulbs on the trailer are
burned out. Thus, you may think
drivers behind you are seeing your
signal when they are not.
It’s important
to check occasionally
to be sure the
trailer bulbs are still working.
Your vehicle has bulb warning lights.
When you plug trailer lights into your
vehicle’s lighting system, its bulb
warning lights may not let you know if
one of your lights goes out.
So, when
you have trailer lights plugged in, be
sure
to check your vehicle and trailer
lights
from time to time to be sure
they’re all working. Once
you
disconnect the trailer lights, the bulb
warning lights again can tell you if one
of your vehicle lights is out.
Driving On Grades
Reduce speed and shift to a lower gear
before you start down a long or steep
downgrade.
If you don’t shift down, you
might have to use your brakes so much
that they would get hot and
no longer
work well.
On a long uphill grade, shift down and
reduce your speed to around
45 mph
(70 kwh) to reduce the possibility of
engine and transaxle overheating.
If you are towing a trailer and you have
an automatic transaxle with Overdrive,
it’s best to drive in
D instead of (or
as you need to, a lower gear). This will
minimize heat build-up and extend the
life of your transaxle.
ProCarManuals.com
Page 240 of 338

1. Start with the horizontal (left and
right) headlight aim. Don’t try
to
adjust the vertical (up and down) aim
first.
2. Check the horizontal aim for each
headlight and adjust it as necessary.
3. Turn the horizontal aiming screw (A)
until the pointer is lined up with the
0 (zero).
4. Now adjust the vertical aim. Check
the vertical
aim for each headlight
and adjust it as necessary.
5. Turn the Vertical aiming screw until
the bubble in the level is centered at
0 (zero).
To Replace a Headlight
(2-DOOR MODELS)
Before replacing a headlight that does
not light, check to make sure that the
wiring connector is securely fastened to
it.
See the
Index under Replacement
Bulbs to check the size and type of
headlight you need to use before you
begin to replace the headlight. You
must replace a headlight with one that
is exactly the same.
1. Open the protective panel above the
headlights.
I_
ProCarManuals.com
Page 242 of 338
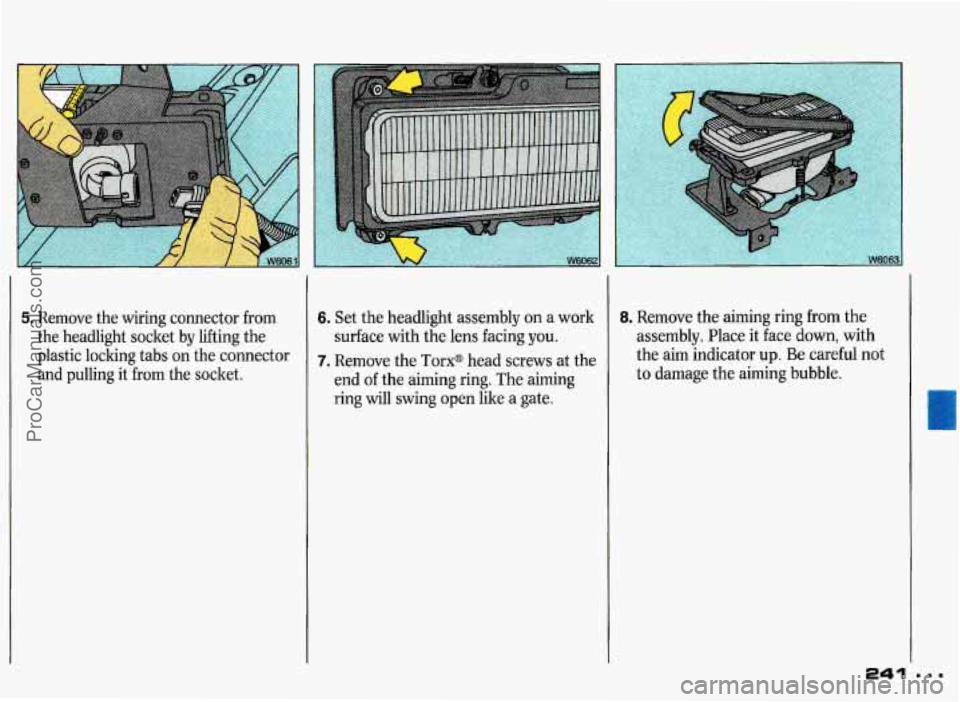
5. Remove the wiring connector from
the headlight socket by lifting the
plastic locking tabs on the connector
and pulling it from the socket. 6. Set the headlight assembly on a work
surface with the lens facing
you.
7. Remove the Torx@ head screws at the
end of the aiming ring. The aiming
ring
will swing open like a gate.
8. Remove the aiming ring from the
assembly. Place it face down, with
the aim indicator up.
Be careful not
to damage the aiming bubble.
241
L
e..
ProCarManuals.com
Page 244 of 338

13. Plug the wiring connector into the
headlight socket. Snap the locking
tabs onto the socket.
14. Lower the headlight assembly into
position. Make sure the two guide
tabs
drop into their holes in the
headlight support panel.
15. Insert the two bottom screws. Make
sure the guide tabs are still in place
before tightening the screws. Use a
magnetic screwdriver or hold the
screw onto the screwdriver with a
small piece
of masking tape.
16. Insert the top screw and tighten
securely. To check
the aim, the vehicle should be
properly prepared as follows:
The vehicle must have all four tires on
a perfectly level surface.
The vehicle should not have any
snow, ice or mud attached to it.
There should not be any cargo or
loading of vehicle, except it should
have a full tank of gas and one person
or
160 pounds (75 kg) on the driver’s
seat.
Tires should be properly inflated.
The horizontal indicator (A) should
read
0 (zero). If
your vehicle
is damaged in an
accident and the headlight aim seems to
be affected, see your Pontiac dealer.
Headlights on damaged vehicles may
require recalibration of the horizontal
aim by your Pontiac dealer.
U
ProCarManuals.com
Page 271 of 338

Service & Appearance Care
nnm i
Fuses & Circuit Breakers
The wiring circuits in your vehicle are
protected
from short circuits by a
combination of fuses, circuit breakers,
and fusible thermal links in the wiring
itself. This greatly reduces the chance
of
fires caused by electrical problems.
Some fuses are located in a fuse block
in the glove box as shown above.
To
locate the fuse block, pull down the
cover. See the diagram later in this
section.
Another set
of fuses is located in the
component center, under the
instrument panel.
Additional fuses are located in the
underhood electrical centers on the
right and left sides of the engine
compartment.
270
Spare fuses and a fuse puller are located
in the glove box fuse block cover.
Place the wide end of the fuse puller
over the plastic end of the fuse. Squeeze
the ends over the fuse and pull it out.
To identify and check fuses, refer to the
charts on the following pages. Look at the silver-colored band inside
the fuse.
If the band is broken or
melted, replace the fuse. Be sure you
replace a bad fuse with a new one of the
identical size and rating.
ProCarManuals.com
Page 276 of 338

Headlight Wiring
The headlight wiring is protected by a
circuit breaker in the component center.
An electrical overload will cause the
lights to go
on and off, or in some cases
to remain off. If this happens, have your
headlight system checked right away.
Windshield Wipers
The windshield wiper motor is
protected by a circuit breaker and a
fuse. If the motor overheats due to
heavy snow, etc., the wiper will stop
until the motor cools. If the overload is
caused by some electrical problem, have
it fixed.
Power Windows and Other Power
Options
Circuit breakers in the fuse panel
protect the power windows and other
power accessories. When the current
load is too heavy, the circuit breaker
opens and closes, protecting the circuit
until the problem is fixed.
r
ProCarManuals.com
Page 330 of 338

Filling Your Tank .................. 215. 277
Fuels with Alcohol
......................... 213
Gage
................................................ 97
In Foreign Countries
...................... 214
Requirements
................................ 213
Fuels in Foreign Countries
............... 214
Low Fuel Warning Light
.................. 98
Fuses & Circuit Breakers ................ 270
Gages Coolant Temperature
...................... 99
Fuel
................................................... 97
Voltmeter
....................................... 102
Gain Control
..................................... 132
Gas Station Information
................. 336
Gasoline ............................................ 213
Gasoline Tank,
Filling Your
........................... 215, 277
Gear Positions (see
Shifting the
Transaxle)
Gearshift Lever
(see
Shifting the Transaxle)
Glove Box ........................................... 50
Graphic Equalizer (see Audio Systems)
Halogen Bulbs ....................... 237. 280
HazarYd Warning Flashers
................. 184
Headlights
........................................... 78
Headlight
& Taillight. Removing
and
Replacing
....................... 239. 244. 280
Aim. Adjusting
............................... 238
Aim. Checking
............................... 237
Flash-to-Pass
.................................... 80
High-Low Beam Changer ............... 79
“On” Reminder ................................ 78
Replacement
........................... 239, 244
Replacement Bulbs ....................... 280
Wiring
............................................. 275
Head Restraints
.................................. 13
Head-Up Display (HUD) ................ 110
Heater
............................................... 117
Heater, Engine Block ................. 56, 223
High Beams
............................... 79, 158
Highway Hypnosis .......................... 167
Hill and Mountain Roads
................ 168
Hills, Parking on .............................. 169
Hood Release
.................................... 216
Safety Warning
.............................. 217
Warning, Overheated Engine
....... 195
Hearing or
Speech Impaired
............ 31 1
Horn ................................................... 69
Hot Engine.
Safety Warnings
..... 193. 195.217. 232
HUD (Head-Up Display) ................ 110
Hydraulic Clutch .............................. 229
Hydroplaning
................................... 161
Identification Engine
............................................. 269
Label. Service
Parts ....................... 269
Number. Vehicle (VIN Code)
....... 268
68
Sand. Mud. Ice or Snow 208
Key
................................................... 44
Positions ........................................... 52
Idling Your Engine
If You’re
Stuck: In
Ignition
.............................
...............
Indicator Lights (see Warning Lights)
Infant Restraint (see Child Restraints)
Inflation. Tires 255
Inside Rearview Mirror
............... 81. 83
Instrument Panel 92
Instrument Panel Clusters
................. 94
Instrument Panel Intensity Control
... 80
Instrument Panel Warning Lights ..... 95
.................................
...............................
ProCarManuals.com