Page 709 of 1254
SERVICE
DATA
AND
SPECIFICATIONS {S.D.S..
TIGTIIENING 1OFOUE Inlectlon
Pump (Cont
d)
Injection Nozle
INSPECNON AND AD.'USIMEM
Injectlon no2rle
a$€mbly
ui r kP! (ba(
ks?cn., F )
lnbt 1.42. (321 1to2,
TIGHTENING TORQUE
EF & EC408
Page 820 of 1254
SERVICE
DATA AND
SPECIFICATIONS s.D.s.
NSPECNON AND Final
aq,uslMEm ft1gtta)Driv€
(Contd)
piiidn pcroad
adjud i9 {a3heE
Drlve pinion
prcl@d
adjusrmem
- Additional erulce
lor limited
DilGEntial torque
adiuetment
Si(b bedng adlusttEnt
Totrl pr€load
adiustin€nt
PD.54
Page 825 of 1254
ON-VEHICLE
SERVICE
Frcnt Axle End Froni Susoension Parts
Check tonl ax€ and lrcnt
.!.p€nsion pad.
for loos€n6.6,
dacks, wear or olher damage.
. Shake each lrcnt wheel to check lof ex€ss ve olav.
. Make su@ ihal @lter oi. ol lower ball ioinl is insened.
. Botighlsn
all nuls and bolis lo th€ sp€cili€d loqu€,
'llghtening
torque:
Feter ro FFONT SUSPEiFTON.
Ch€ck strut (sho.k
absober) lor oilleakage or other dam-
Check lore. ball joinl
lor grease
l€akage and ball joint
dust
@v.f lof.Ecks or
olher damage.
FA4
Page 1193 of 1254

WIPER
AND WASHER
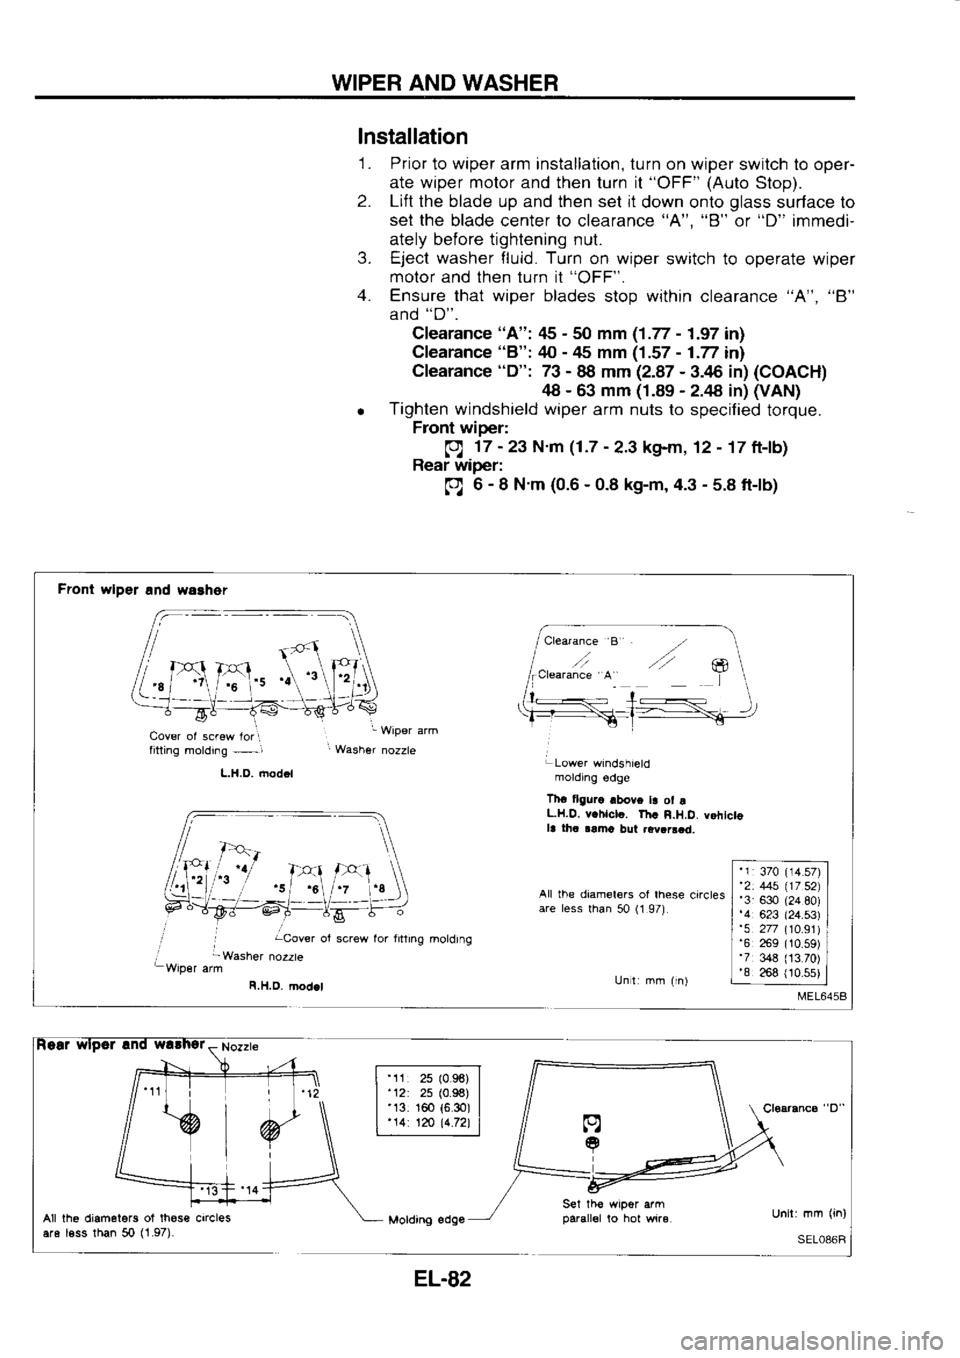
lnstallation '1 . Prior
to wiper arm installation, turn
on wiper
switch to oper-
ate wiper motor and then
turn it "OFF"
(Auto
Stop).
2. Lift
the blade up and then set it
down onto glass
surface lo
set the
blade center to clearance "A", "8"
or "D"
immedi-
ately belore tightening nut.
3. Eject washer fluid. Turn
on wiper
switch to operate wiper
molor and then turn it "OFF".
4. Ensure that wiper
blades stop within clearance "A",
"B"
and "D".
Clearance "A": tl5
-
50 mm (1.77 -
1.97 in)
Clearance "8": zl0 -
rts
mm (1.57 -
1.77 in)
Cfearanc€ "D":
73 -
88 mm (2.87 -
!6 in) (COACH)
48 -
63 mm (1.89 -
2.rA in) (VAN)
o Tighten
windshield wiper
arm nuts to
specified torque.
Front wiper:
g 17 -
23 N.m (1.7 -
2.3 kg-m, 12 - '17
ft-lb)
Rear wiper:
g 6 -
8 N'm (0.6 -
0.8 kg-m, 4.3 -
s.8 tt-lb)
Front wlDer and waaher
rl
Cover of screw lor
I
fitting molding -i
L.H.O.6od.l '
Wiper arm
LLower wtndshield
motdrng €dg€
Thr tlgurc abovc ta
ot r
L.H.O. vchlclc. Th. R.H.D. vohtcto
la lha
aamo bul .evrrsad.
,/ iwasher
nozzte All
lhe diamel€rs
ol lhese
circtes
are less
than 50 (1
97)
Unl: mm (in)
R.H.D. lnoalel \
I
tA
ol screw lor
ntlrng
moldrng '1:
370 (14.57)
'2: 445 \17 S2j
'3 630 (24
80)
'4 623 (24.s3)
'5 277 (10.91)
'6 269 t10.59)
'7 348 (13.70)
'8 268 (10.5s)
All the diamelers of
these crrcles
are less than 50 (1.97).
EL.82
Page 1198 of 1254
WIPER
AND WASHER
Headlamp Wiper Motor
Check
When wiper motor
is locked, a protective
circuit built into
wiper
motor activates to
stop wiper
motor.
lf wiper motor will not
restart even after cause of problems
has been eliminated, turn
ignition swilch
OFF and leave it off for approx. 1 to 3 minutes.
'| . Turn headlamo wioer switch OFF.
2. Connect ohmmeter
and check continuitv.
Headlamp Wiper Installation
Tighten nut
to secure wiper
arm with
wiper blade held
below-
rower sloooer.
After installing wiper
arm, position
wiper blade on slopper
upper
surface.
o Tighten
headlamp wiper
arm nut
to the specifierd
torque.
pl: 2.9 -
4.4 N.m
(0.30 -
0.45 kg-m, 2.2 -
3.3 ftlb)
Headiamp
wrper
molor Ohmrneler
probe
Conlrnurly
() ()
Stop position J
J .3_ Yes
Yes
Yes No
p /z.s
- ..n i"'
(0.30 -
0.45 kg-m,
I | 2.2
-,
3.3 trrbl
E1.87
Page 1239 of 1254
SUPER
MULTIPLE
JUNCTION
rMah ha.ness-Fronl
comoartfient harnesst
MEL6578 Installation
To install
S.M.J., tighten
lo specified torque
as required.
p):3-5N.m
(0.3 -
0.5 kg-m,2.2 -
3.6 ft-lb)
CAUTION:
Do not
overtighten bolts, otherwise,
they may
be damaged.
EL-129