1993 CHEVROLET PLYMOUTH ACCLAIM service schedule
[x] Cancel search: service schedulePage 683 of 2438

RESTRAINT SYSTEMS
CONTENTS
page page
AIR BAG MODULE ....................... 4
AIR BAG SERVICE AND TEST PROCEDURES . 1
AIR BAG SYSTEM CHECK ................. 3
AIR BAG SYSTEM DIAGNOSTIC MODULE (ASDM) .............................. 5
CLOCKSPRING .......................... 6
CLOCKSPRING CENTERING PROCEDURE .... 6 GENERAL INFORMATION
.................. 1
LEFT FRONT IMPACT SENSOR ............. 4
RIGHT FRONT IMPACT SENSOR ........... 5
SCHEDULED MAINTENANCE INSPECTION .... 3
STEERING COLUMN SWITCHES ............ 7
STEERING WHEEL ....................... 7
AIR BAG SERVICE AND TEST PROCEDURES
WARNING: THIS SYSTEM IS A SENSITIVE, COM-
PLEX ELECTRO-MECHANICAL UNIT. BEFORE AT-
TEMPTING TO DIAGNOSE, REMOVE OR INSTALL
THE AIR BAG SYSTEM COMPONENTS, YOU MUST
FIRST DISCONNECT AND ISOLATE THE NEGATIVE
(GROUND) BATTERY CABLE. FAILURE TO DO SO
COULD RESULT IN ACCIDENTAL DEPLOYMENT
AND POSSIBLE PERSONAL INJURY. WHEN AN UNDEPLOYED AIR BAG ASSEMBLY
IS TO BE REMOVED FROM THE STEERING
WHEEL, DISCONNECT BATTERY GROUND CA-
BLE AND ISOLATE. ALLOW SYSTEM CAPACI-
TOR TO DISCHARGE FOR TWO MINUTES THEN
BEGIN AIR BAG SYSTEM COMPONENT RE-
MOVAL. Vehicles equipped with a Air Bag System must be
inspected every three years or 30,000 miles / 48,000
Km. To inspect system use Passive Restraint System
Diagnostic Procedures Manual. If the Air Bag Module Assembly is defective and
non-deployed, refer to Chrysler Motors current re-
turn list for proper handling procedures.
WARNING: REPLACE AIR BAG SYSTEM COMPO-
NENTS WITH CHRYSLER MOPAR TSPECIFIED RE-
PLACEMENT PARTS. SUBSTITUTE PARTS MAY
VISUALLY APPEAR INTERCHANGEABLE, BUT IN-
TERNAL DIFFERENCES MAY RESULT IN INFERIOR
OCCUPANT PROTECTION.
THE FASTENERS, SCREWS, AND BOLTS, ORIG-
INALLY USED FOR THE AIR BAG COMPO-
NENTS, HAVE SPECIAL COATINGS AND ARE
SPECIFICALLY DESIGNED FOR THE AIR BAG
SYSTEM. THEY MUST NEVER BE REPLACED
WITH ANY SUBSTITUTES. ANYTIME A NEW
FASTENER IS NEEDED, REPLACE WITH THE CORRECT FASTENERS PROVIDED IN THE SER-
VICE PACKAGE OR FASTENERS LISTED IN THE
PARTS BOOKS.
GENERAL INFORMATION
AIR BAG MODULE
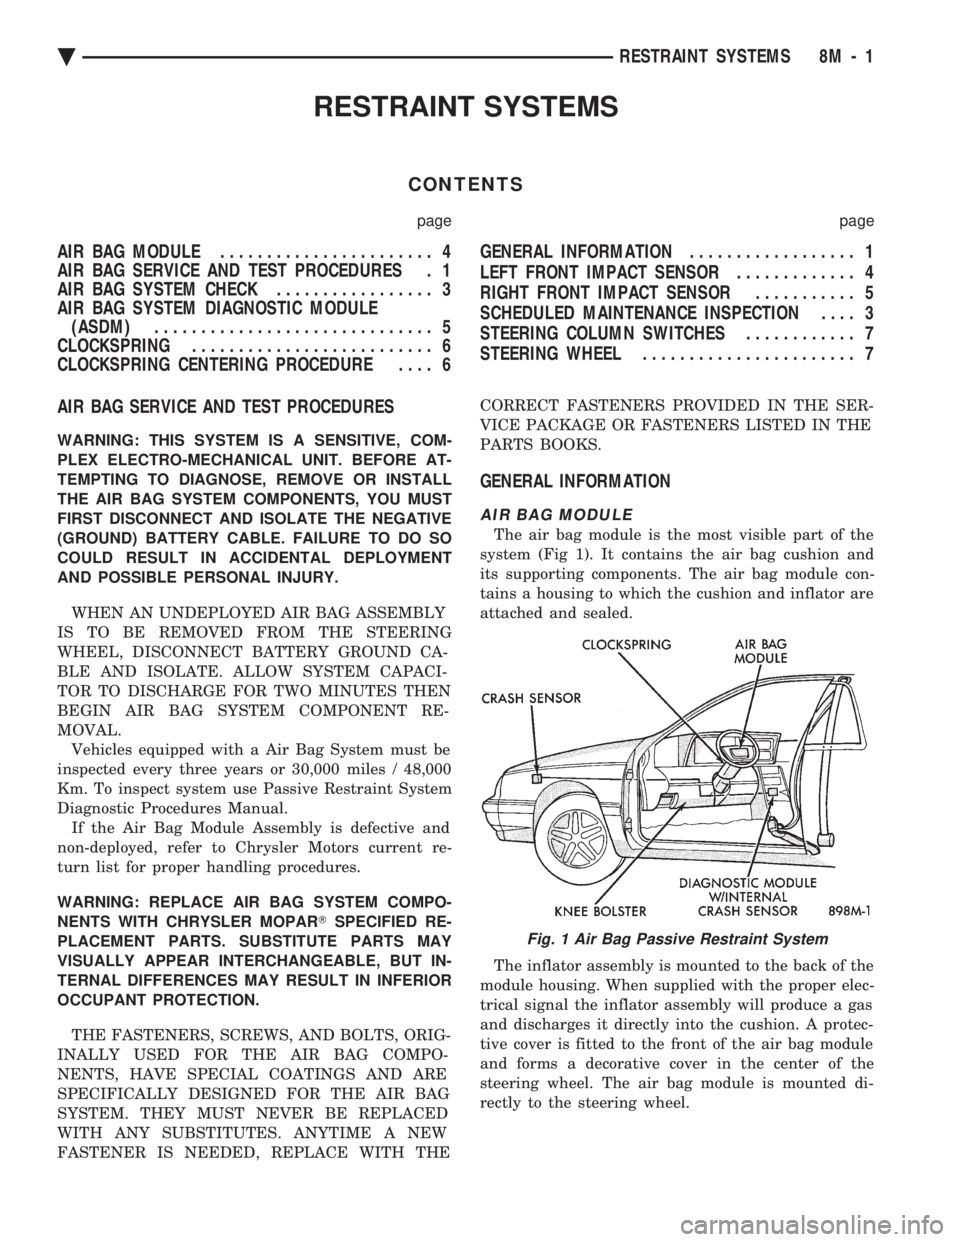
The air bag module is the most visible part of the
system (Fig 1). It contains the air bag cushion and
its supporting components. The air bag module con-
tains a housing to which the cushion and inflator are
attached and sealed.
The inflator assembly is mounted to the back of the
module housing. When supplied with the proper elec-
trical signal the inflator assembly will produce a gas
and discharges it directly into the cushion. A protec-
tive cover is fitted to the front of the air bag module
and forms a decorative cover in the center of the
steering wheel. The air bag module is mounted di-
rectly to the steering wheel.
Fig. 1 Air Bag Passive Restraint System
Ä RESTRAINT SYSTEMS 8M - 1
Page 685 of 2438

SERVICE OF DEPLOYED AIR BAG MODULE
After an air bag has been deployed, the air bag
module and clockspring must be replaced because
they cannot be reused. Other air bag system compo-
nents are replaced if damaged.
SCHEDULED MAINTENANCE INSPECTION
Vehicles equipped with a Air Bag System must be
inspected every three years or 30,000 miles / 48,000
Km. The following items should be inspected. (1) Inspect components for damage or deteriora-
tion. (a) If the air bag module housing shows signs of
physical damage or abuse, replace the module. (b) Check that both front impact sensors are
properly installed to the upper crossmember of the
radiator closure panel. Repair as required.
(2) Check the air bag warning lamp for proper op-
eration as follows: (a) Turn ignition switch to the ON position, the
air bag warning lamp should light. If not, test the system using the DRB II and Passive Restraint
System Diagnostic Procedures Manual. Repair as
required.
(b) The air bag warning lamp lights, but fails to go
out after ten seconds. Test the system using the DRB
II and Passive Restraint System Diagnostic Proce-
dures Manual. Repair as required. (c) Erasing of fault codes is not required.
AIR BAG SYSTEM CHECK
WARNING: BEFORE BEGINNING ANY AIR BAG SYS-
TEM CHECK PROCEDURES, REMOVE AND ISOLATE
THE BATTERY NEGATIVE (-) CABLE (GROUND)
FROM THE VEHICLE BATTERY. THIS IS THE ONLY
SURE WAY TO DISABLE THE AIR BAG SYSTEM.
FAILURE TO DO THIS COULD RESULT IN ACCIDEN-
TAL AIR BAG DEPLOYMENT AND POSSIBLE PER-
SONAL INJURY.
WHEN AN UNDEPLOYED AIR BAG ASSEMBLY IS
TO BE REMOVED FROM THE STEERING WHEEL,
DISCONNECT BATTERY GROUND CABLE AND
ISOLATE. ALLOW SYSTEM CAPACITOR TO DIS-
CHARGE FOR TWO MINUTES, THEN BEGIN AIR
BAG REMOVAL. (1) Disconnect the battery negative cable and iso-
late. (2) Remove forward console or cover as necessary.
(3) Connect DRB II to ASDM diagnostic 6-way con-
nector, located at right side of module. (4) Turn the ignition key to ON position. Exit vehicle
with DRB II. Use the latest version of the proper
cartridge. (5) After checking that no one is inside the vehicle,
connect the negative battery cable. (6) Using the DRB II, read and record active fault
data. (7) Read and record any stored faults.
(8) Refer to the Passive Restraint Diagnostic Test
Manual if any faults are found in steps 6 and 7. (9) Erase stored faults if there are no active fault
codes. If problems remain, fault codes will not erase. (10) With the ignition key in the ON position, make
sure no one is in the vehicle. (11) From the passenger side of vehicle, turn the
ignition key to OFF then ON and observe the instru-
ment cluster air bag lamp. It should go on for 6 to 8
seconds, then go out; indicating system is functioning
normally. If air bag warning lamp either fails to light,
blinks on and off or goes on and stays on, there is
a system malfunction. Refer to the Passive Re-
straint Diagnostic Test Manual to diagnose the
problem.
Fig. 3 Seal the Air Bag Exhaust Vents
Fig. 4 Vacuum Heater and A/C Outlets
Ä RESTRAINT SYSTEMS 8M - 3
Page 1697 of 2438

EXHAUST SYSTEM AND INTAKE MANIFOLD
CONTENTS
page page
GENERAL INFORMATION .................. 1
SERVICE PROCEDURES ................... 4 TORQUE SPECIFICATION
................. 25
GENERAL INFORMATION
Throughout this group, references may be made to
a particular vehicle by letter or number designation.
A chart showing the breakdown of these designations
is included in the Introduction Section at the front of
this service manual.
EXHAUST SYSTEMS
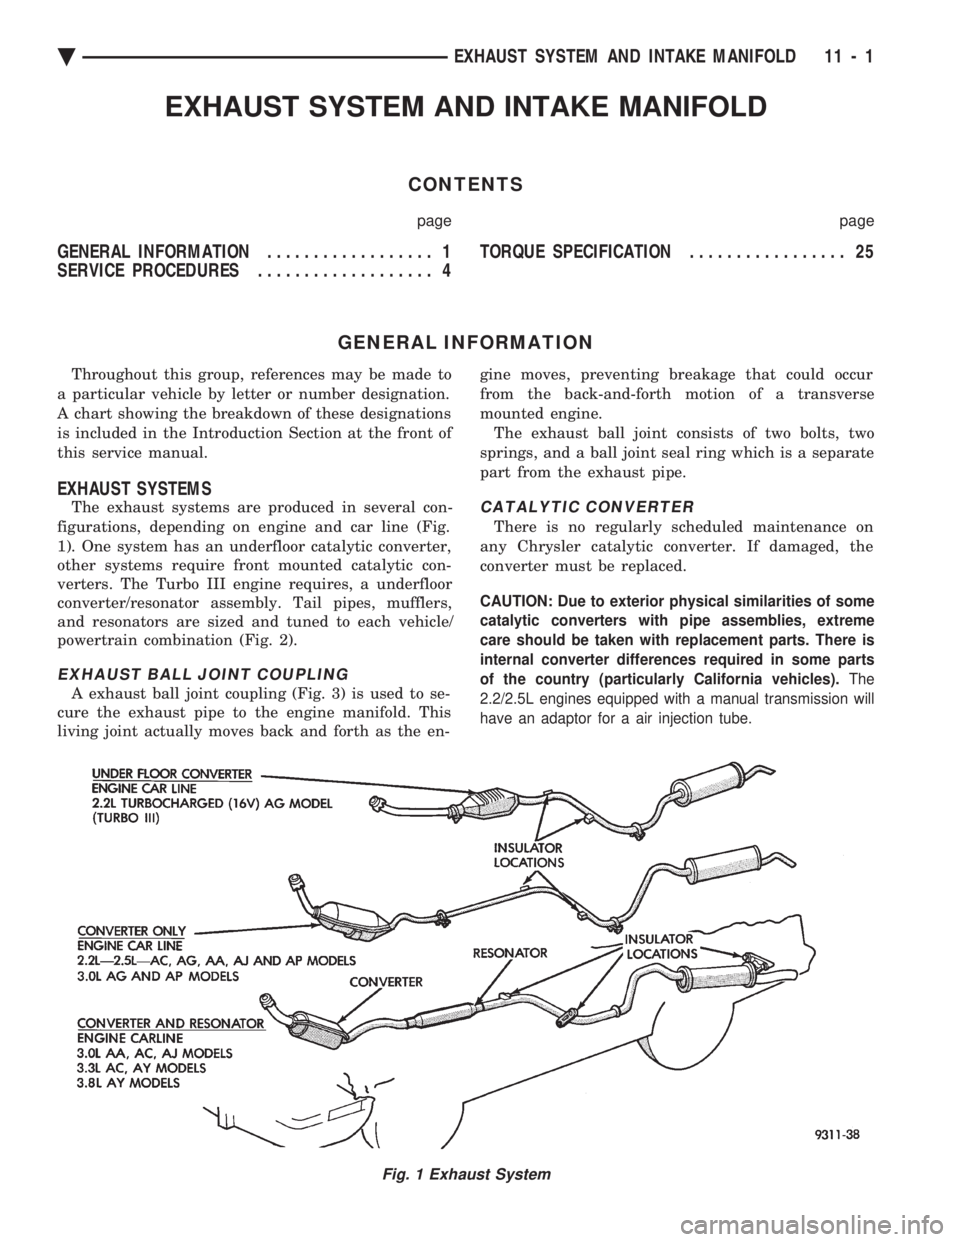
The exhaust systems are produced in several con-
figurations, depending on engine and car line (Fig.
1). One system has an underfloor catalytic converter,
other systems require front mounted catalytic con-
verters. The Turbo III engine requires, a underfloor
converter/resonator assembly. Tail pipes, mufflers,
and resonators are sized and tuned to each vehicle/
powertrain combination (Fig. 2).
EXHAUST BALL JOINT COUPLING
A exhaust ball joint coupling (Fig. 3) is used to se-
cure the exhaust pipe to the engine manifold. This
living joint actually moves back and forth as the en- gine moves, preventing breakage that could occur
from the back-and-forth motion of a transverse
mounted engine. The exhaust ball joint consists of two bolts, two
springs, and a ball joint seal ring which is a separate
part from the exhaust pipe.
CATALYTIC CONVERTER
There is no regularly scheduled maintenance on
any Chrysler catalytic converter. If damaged, the
converter must be replaced.
CAUTION: Due to exterior physical similarities of some
catalytic converters with pipe assemblies, extreme
care should be taken with replacement parts. There is
internal converter differences required in some parts
of the country (particularly California vehicles). The
2.2/2.5L engines equipped with a manual transmission will
have an adaptor for a air injection tube.
Fig. 1 Exhaust System
Ä EXHAUST SYSTEM AND INTAKE MANIFOLD 11 - 1
Page 1826 of 2438

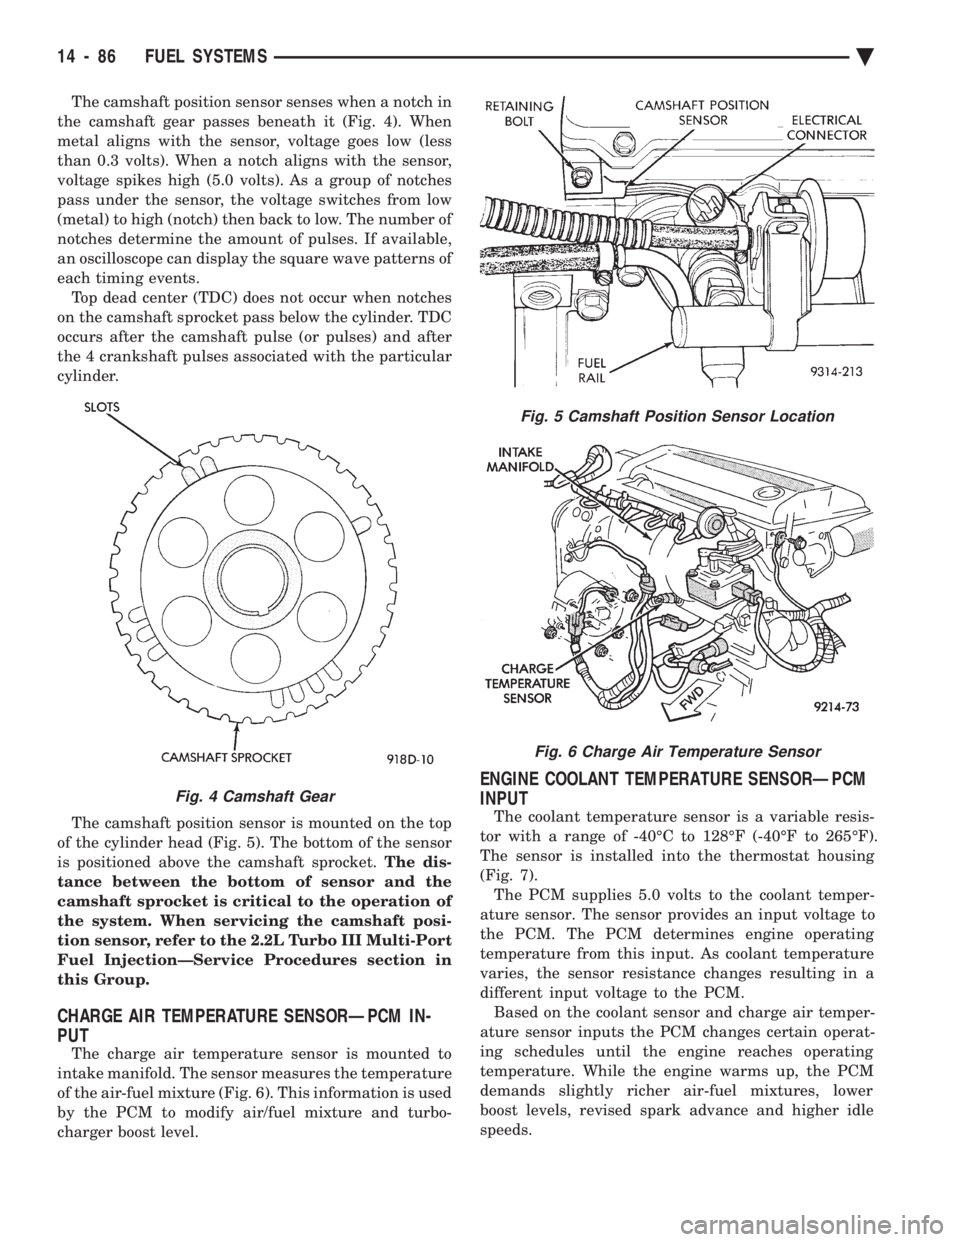
The camshaft position sensor senses when a notch in
the camshaft gear passes beneath it (Fig. 4). When
metal aligns with the sensor, voltage goes low (less
than 0.3 volts). When a notch aligns with the sensor,
voltage spikes high (5.0 volts). As a group of notches
pass under the sensor, the voltage switches from low
(metal) to high (notch) then back to low. The number of
notches determine the amount of pulses. If available,
an oscilloscope can display the square wave patterns of
each timing events. Top dead center (TDC) does not occur when notches
on the camshaft sprocket pass below the cylinder. TDC
occurs after the camshaft pulse (or pulses) and after
the 4 crankshaft pulses associated with the particular
cylinder.
The camshaft position sensor is mounted on the top
of the cylinder head (Fig. 5). The bottom of the sensor
is positioned above the camshaft sprocket. The dis-
tance between the bottom of sensor and the
camshaft sprocket is critical to the operation of
the system. When servicing the camshaft posi-
tion sensor, refer to the 2.2L Turbo III Multi-Port
Fuel InjectionÐService Procedures section in
this Group.
CHARGE AIR TEMPERATURE SENSORÐPCM IN-
PUT
The charge air temperature sensor is mounted to
intake manifold. The sensor measures the temperature
of the air-fuel mixture (Fig. 6). This information is used
by the PCM to modify air/fuel mixture and turbo-
charger boost level.
ENGINE COOLANT TEMPERATURE SENSORÐPCM
INPUT
The coolant temperature sensor is a variable resis-
tor with a range of -40ÉC to 128ÉF (-40ÉF to 265ÉF).
The sensor is installed into the thermostat housing
(Fig. 7). The PCM supplies 5.0 volts to the coolant temper-
ature sensor. The sensor provides an input voltage to
the PCM. The PCM determines engine operating
temperature from this input. As coolant temperature
varies, the sensor resistance changes resulting in a
different input voltage to the PCM. Based on the coolant sensor and charge air temper-
ature sensor inputs the PCM changes certain operat-
ing schedules until the engine reaches operating
temperature. While the engine warms up, the PCM
demands slightly richer air-fuel mixtures, lower
boost levels, revised spark advance and higher idle
speeds.
Fig. 5 Camshaft Position Sensor Location
Fig. 6 Charge Air Temperature Sensor
Fig. 4 Camshaft Gear
14 - 86 FUEL SYSTEMS Ä
Page 1827 of 2438

CRANKSHAFT POSITION SENSORÐPCM INPUT
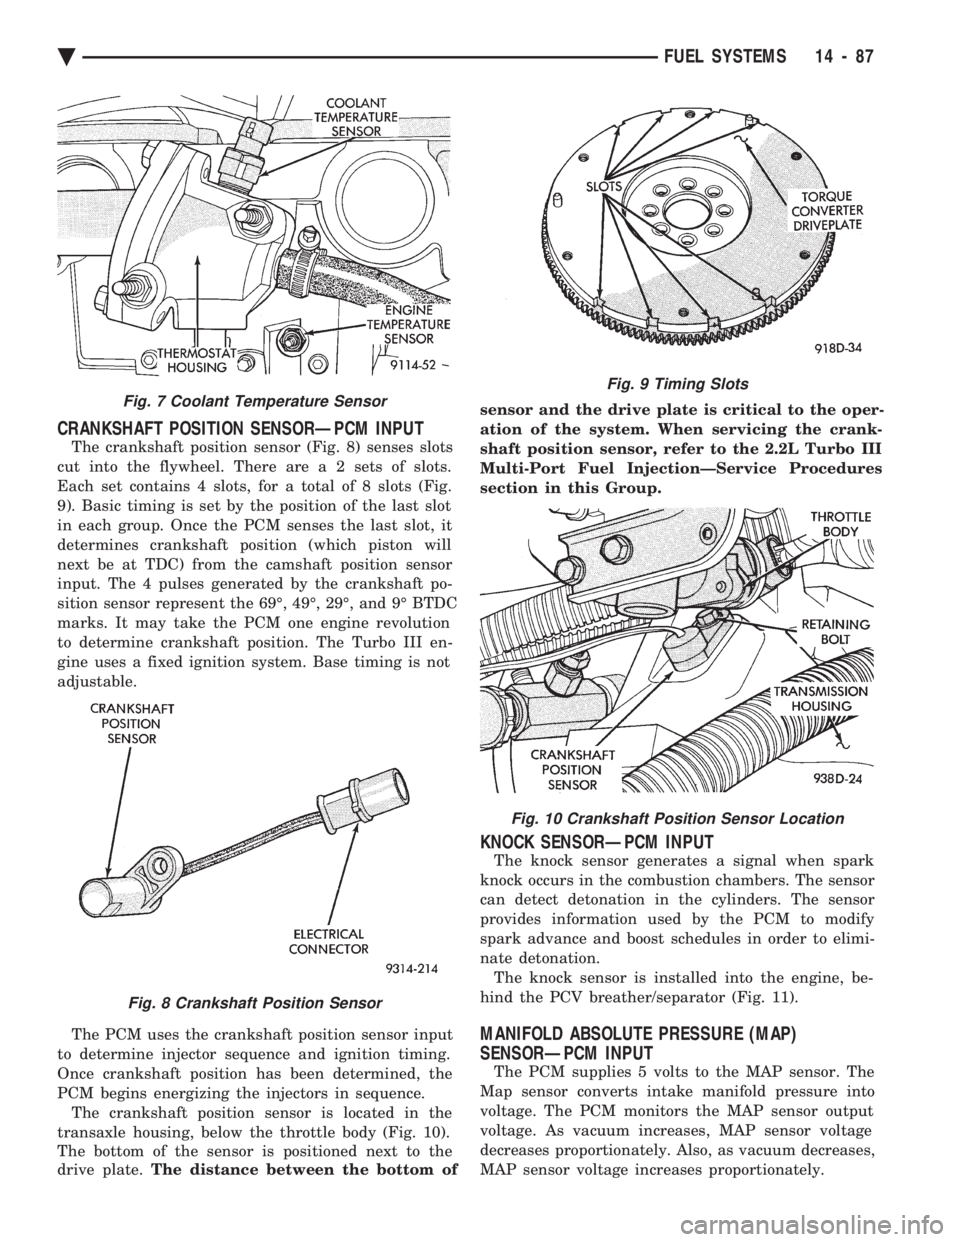
The crankshaft position sensor (Fig. 8) senses slots
cut into the flywheel. There ar e a 2 sets of slots.
Each set contains 4 slots, for a total of 8 slots (Fig.
9). Basic timing is set by the position of the last slot
in each group. Once the PCM senses the last slot, it
determines crankshaft position (which piston will
next be at TDC) from the camshaft position sensor
input. The 4 pulses generated by the crankshaft po-
sition sensor represent the 69É, 49É, 29É, and 9É BTDC
marks. It may take the PCM one engine revolution
to determine crankshaft position. The Turbo III en-
gine uses a fixed ignition system. Base timing is not
adjustable.
The PCM uses the crankshaft position sensor input
to determine injector sequence and ignition timing.
Once crankshaft position has been determined, the
PCM begins energizing the injectors in sequence. The crankshaft position sensor is located in the
transaxle housing, below the throttle body (Fig. 10).
The bottom of the sensor is positioned next to the
drive plate. The distance between the bottom of sensor and the drive plate is critical to the oper-
ation of the system. When servicing the crank-
shaft position sensor, refer to the 2.2L Turbo III
Multi-Port Fuel InjectionÐService Procedures
section in this Group.
KNOCK SENSORÐPCM INPUT
The knock sensor generates a signal when spark
knock occurs in the combustion chambers. The sensor
can detect detonation in the cylinders. The sensor
provides information used by the PCM to modify
spark advance and boost schedules in order to elimi-
nate detonation. The knock sensor is installed into the engine, be-
hind the PCV breather/separator (Fig. 11).
MANIFOLD ABSOLUTE PRESSURE (MAP)
SENSORÐPCM INPUT
The PCM supplies 5 volts to the MAP sensor. The
Map sensor converts intake manifold pressure into
voltage. The PCM monitors the MAP sensor output
voltage. As vacuum increases, MAP sensor voltage
decreases proportionately. Also, as vacuum decreases,
MAP sensor voltage increases proportionately.
Fig. 7 Coolant Temperature Sensor
Fig. 8 Crankshaft Position Sensor
Fig. 9 Timing Slots
Fig. 10 Crankshaft Position Sensor Location
Ä FUEL SYSTEMS 14 - 87