Page 210 of 358
Problems on the Road
The following steps will tell you how to
use the jack and change a tire.
The equipment you'll need
is in the rear
area.
... 206
Find the plastic screw heads in the trim
panel over the spare tire. Use a coin or a
key to turn the screw heads until the slots
point front and back. Lift the trim panel
and move it
out of the way,
If you have speakers in the trim panel,
the speaker wire should be long enough
to remove
the trim panel without
disconnecting the wire.
To remove the jack and wheel wrench,
loosen and remove the bolt
and remove the
plastic cover.
ProCarManuals.com
Page 214 of 358
Problems on the Road
Raising your vehicle with the jack improperly positioned
will damage
the
vehicle or may allow the vehicIe
to fall
off the jack. Be sure to fit
the jack lift head into the proper
location before raising your vehicle.
I
- 210
Raise the vehicle by rotating the wheel
wrench clockwise. Raise the vehicle far
mough off the ground
so there is enough
room for the spare tire to
fit.
Remove all the wheel nuts and take off
the flat tire.
ProCarManuals.com
Page 216 of 358
Problems on the Road
Lower the vehicle by rotating the wheel
wrench counterclockwise. Lower the jack
completely.
, .:
il
Tighten the wheel nuts firmly in a
criss-cross sequence as shown.
CAUTION:
,A improperly tightened wheel
nuts can cause the wheel to become
loose and even come off. This could
lead to an accident. Be sure to use
the correct wheel nuts. If you have
to replace them, be sure to get the
right kind.
Stop somewhere as soon as you can
and have the nuts tightened with a
torque wrench to 100 pound-feet
( 140 Nmm).
I I Ill
Don't try to put a wheel cover on your
compact spare tire.
It won't fit. Store the
wheel cover
in the rear area until you
have the flat tire repaired or replaced.
NOTICE:
-elcovers won't fit on your
:ompact spare.
If you try to put a
wheel cover on your compact si re,
you
could damage the wer the
spare.
ProCarManuals.com
Page 217 of 358
J
Replace the jack, wheel wrench and flat
tire using the storage instructions. When
you replace the trim panel, be sure to tuck
it under the weatherstrip.
1. Trim Panel
2. Bolt
3. Cover
4. Jack
5. Wing Nut
6. Adapter
7. Compact Spare Tire
8. Full-Size Tire
9. Carpet Flap
IO. Tire Storage Bolt
2
ProCarManuals.com
Page 218 of 358

Problems on the Road
II , Storing aJacK, a tlre or otner I
4 equipment in the passenger
Ldmpartment of the vehicle could
cause injury. In a sudden
stop or
collision, loose equipment could
strike someone. Store all these
in the
proper place.
Compact Spare
Although the compact spare was fully
inflated when your vehicle was new, it
can lose air after a time. Check the
inflation pressure regularly.
It should be
60 psi (420 kPa). The compact spare is
made to go up to 3,000 miles (5 000 km),
so you can finish your trip and have your
full-size tire repaired or replaced where
you want. Of course,
it’s best to replace
your spare
with a full-size tire as soon as
you can. Your spare
will last longer and
be
in good shape in case you need it
again.
NOTICE:
lr tne compact spare 1s use0 as a
rear tire, do not drive faster than
50 mph (80 km/h). Damage to the
rear axle may occur
if the compac
snare
is driven faster than 50 mnh
( 0 km/h). This speed limitatia
does
not apply when the COI
ware is used as a front tire.
ProCarManuals.com
Page 219 of 358
Don’t take your compact spare rire chains won’t fit your CI - :t
through an automatic car wash with
guide rails. The compact spare can
get caught on the rails. That can
damage the tire and wheel, and
maybe other parts
of your vehicl I
Don‘t use your compact spare on some
other vehicle.
And don‘t
mix your compact spare or
wheel
with other wheels or tires. They
won‘t
fit. Keep your spare and its wheel
together.
w If You’re Stuck: In
Sand, Mud, Ice or
Snow
What you don’t want to do when your
vehicle
is stuck is to spin your wheels.
The method known as “rocking” can help
you get out when you’re stuck, but you
must use caution.
ProCarManuals.com
Page 260 of 358

Service 81 Appearl nee Care
NOTICE: 11 CAUTION:
Your warranty does not cover parts
or components that fail because of
overloading.
If you put things inside your vehicle
-
like suitcases, tools, packages, or
anything else
- they will go as fast as the
vehicle goes.
If you have to stop or turn
quickly, or if there is a crash, they’ll keep
going.
A
Things you put inside your
vehicle can strike and injure
people in a sudden stop or tu&, or
in a crash.
a Put things in the rear area of
your vehicle. Try to spread the
weight evenly.
m Never stack heavier things,
like suitcases, inside the
vehicle so that some of them
are above the tops of the seats. ~
When you carry something
inside the vehicle, secure it
whenever you can.
a Don’t leave a seat folded down
unless
you need to.
Tires
We don’t make tires. Your new vehicle
comes with high quality tires made by
a
leading tire manufacturer. These tires are
warranted by the tire manufacturers and
their warranties are delivered with every
new Chevrolet.
If your spare tire is a
different brand than your road tires, you
will have a tire warranty folder from each
of these manufacturers.
9 256
ProCarManuals.com
Page 262 of 358

Service & Appearance Care
9 9 9 258
When to Check: Check your tires once a
month
or more. Don’t forget your
compact spare tire. It should be at
60 psi
(420 kPa).
How to Check: Use a good quality
pocket-type gage to check tire pressure.
Simply looking at the tires will not tell
you the pressure, especially if you have
radial tires
- which may look properly
inflated even if they’re underinflated.
If your tires have valve caps, be sure to
put them back on. They help prevent
leaks by keeping out
dirt and moisture.
L
’
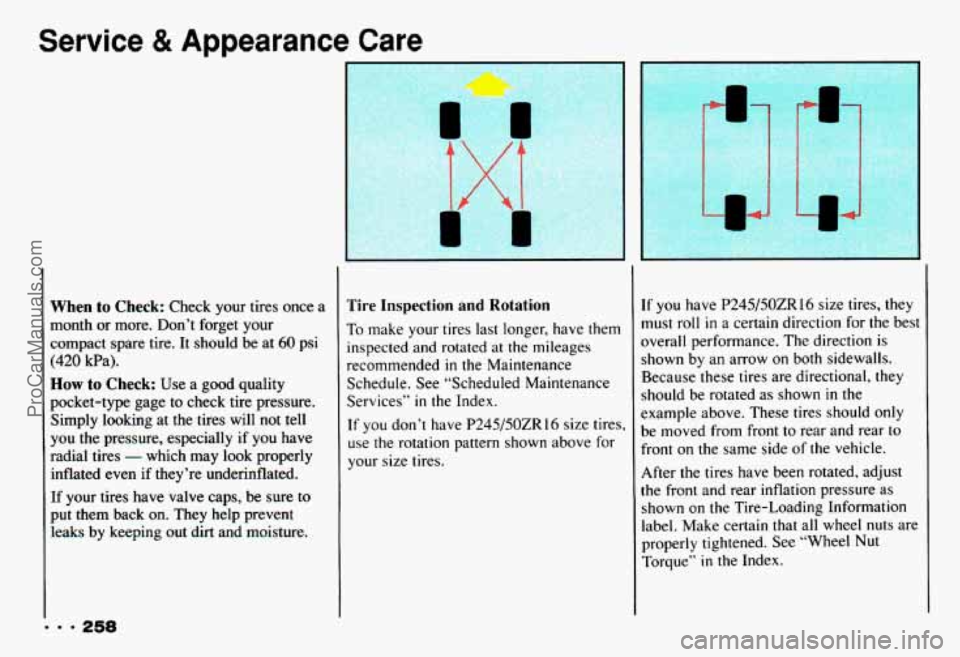
Tire Inspection and Rotation
To make your tires last longer, have them
inspected and rotated at the mileages
recommended
in the Maintenance
Schedule. See “Scheduled Maintenance
Services”
in the Index.
If you don’t have
P245/50ZR 16 size tires,
use the rotation pattern shown above for
your size tires. If
you have P245/50ZR16 size tires, they
must roll
in a certain direction for the best
overall performance. The direction is
shown by an arrow on both sidewalls.
Because these tires are directional, they
should
be rotated as shown in the
example above. These tires should only
be moved from front to rear and rear to
front on the same side of the vehicle.
After the tires have been rotated, adjust
the front and rear inflation pressure as
shown on the Tire-Loading Information
label. Make certain that all wheel nuts are
properly tightened. See “Wheel
Nut
Torque” in the Index.
ProCarManuals.com