1993 CHEVROLET CAMARO lock
[x] Cancel search: lockPage 255 of 358
I
r 1
3.
4.
5.
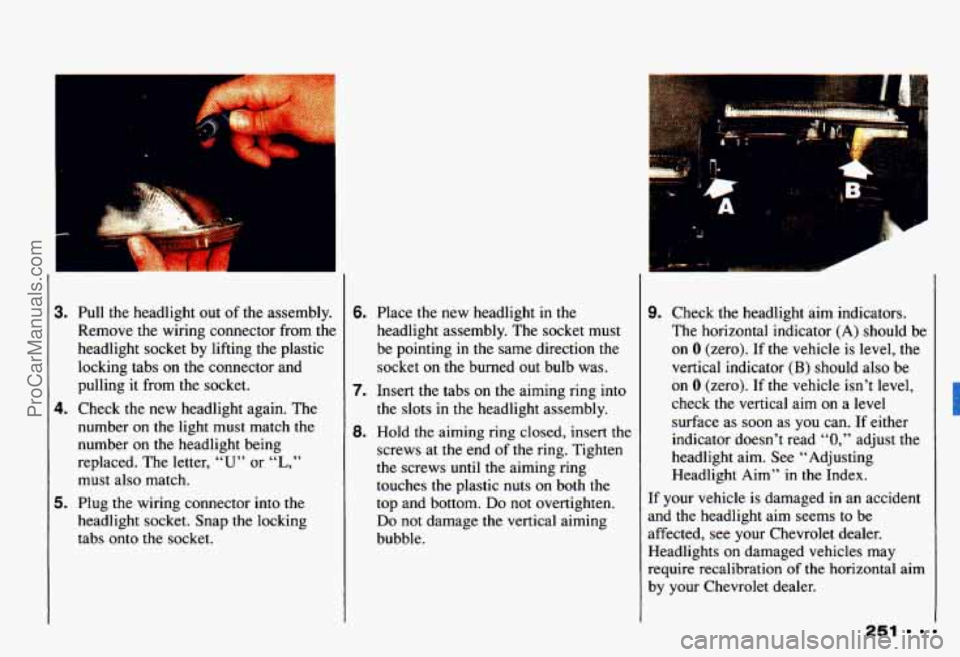
Pull the headlight out of the assembly.
Remove
the wiring connector from the
headlight socket by lifting the plastic
locking tabs on the connector and
pulling it from the socket.
Check
the new headlight again. The
number on
the light must match the
number on
the headlight being
replaced. The letter,
“U” or “L,”
must also match.
Plug the wiring connector into the
headlight socket. Snap the locking
tabs onto the socket.
6.
7.
8.
Place the new headlight in the
headlight assembly. The socket must
be pointing
in the same direction the
socket on the burned out bulb was.
Insert the tabs on the aiming ring into
the slots in the headlight assembly.
Hold the aiming ring closed, insert the
screws at the end of the ring. Tighten
the screws
until the aiming ring
touches the plastic nuts on both the
top and bottom.
Do not overtighten.
Do not damage the vertical aiming
bubble.
. ..
9. Check the headlight aim indicators.
The horizontal indicator (A) should be
on
0 (zero). If the vehicle is level, the
vertical indicator
(B) should also be
on 0 (zero). If the vehicle isn’t level,
check the vertical aim on a level
surface as soon as you can. If either
indicator doesn’t read
“0,” adjust the
headlight aim. See “Adjusting
Headlight Aim”
in the Index.
If your vehicle
is damaged in an accident
and the headlight aim seems to be
affected, see your Chevrolet dealer.
Headlights on damaged vehicles may
require recalibration
of the horizontal aim
by your Chevrolet dealer.
251
ProCarManuals.com
Page 258 of 358
Service Station Information
L
h
U
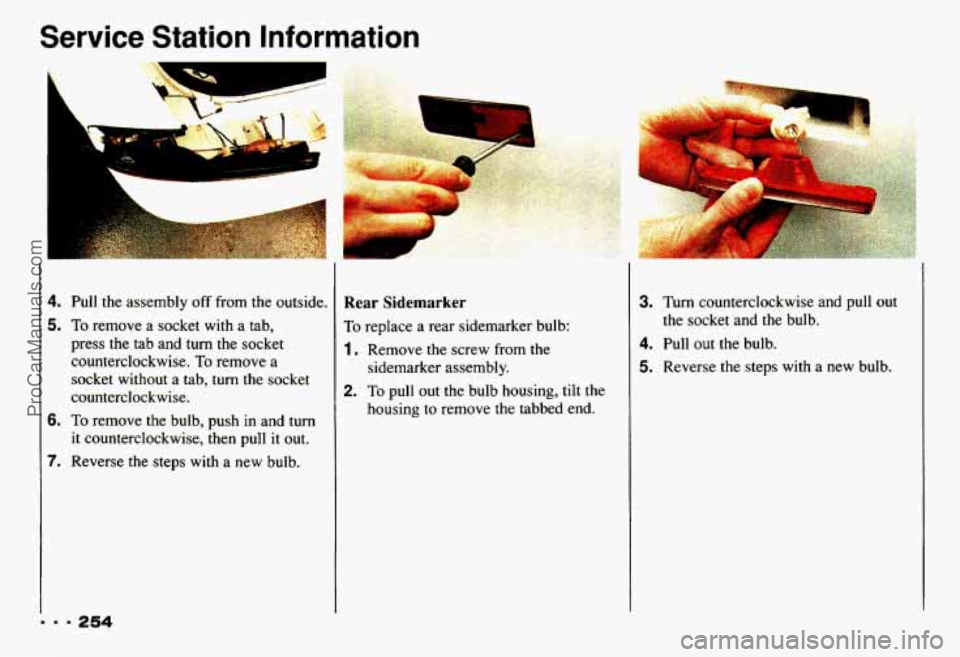
4. Pull the assembly off from the outside.
5. To remove a socket with a tab,
press the tab and turn the socket
counterclockwise.
To remove a
socket without a tab, turn the socket
counterclockwise.
6. To remove the bulb, push in and turn
7. Reverse the steps with a new bulb.
it
counterclockwise, then pull it out.
Rear Sidemarker
To replace a rear sidemarker bulb:
1, Remove the screw from the
sidemarker assembly.
2. To pull out the bulb housing, tilt the
housing
to remove the tabbed end.
3. Turn counterclockwise and pull out
4. Pull out the bulb.
5. Reverse the steps with a new bulb.
the
socket and the bulb.
ProCarManuals.com
Page 278 of 358
Service Station Information
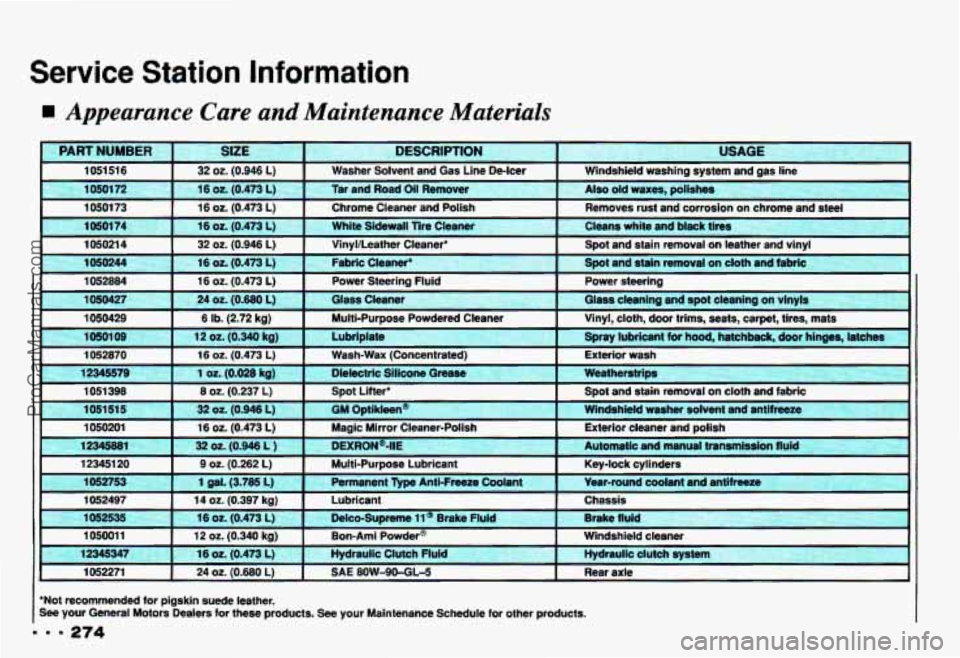
Appearance Care and Maintenance Muterials
~
PART NUMBER
USAGE DESCRIPTION SIZE
1051 51 6
Removes rust and corrosion on chrome and steel
Chrome Cleaner
and Polish 16 oz. (0.473 L) 10501 73
Also old waxes, polishes
Tar and Road Oil Remover 16 oz. (0.473 L) 1 0501 72
Windshield washing system and gas line
Washer Solvent and Gas Line De-lcer 32 02. (0.946 L)
lo501 74 Cleans white and black tires
White Sidewall Tire Cleaner 16 02. (0.473 L)
105021 4
Vinyl, cloth, door trims, seats, carpet, tires, mats
Multi-Purpose Powdered Cleaner 6 Ib. (2.72 kg) 1050429
Glass cleaning and
spot cleaning on vinyls
Glass Cleaner 24 oz. (0.680 L) 1050427
Power
steering
Power Steering Fluid 16 oz. (0.473 L) 1052884
Spot and stain removal on cloth and fabric
Fabric Cleaner' 16 02. (0.473 L) 1050244
Spot and stain removal on leather and vinyl
VinyVLeather Cleaner' 32 02. (0.946 L)
lo501 09 Spray lubricant for hood, hatchback, door hinges, latches
Lubriplate 12 02. (0.340 kg)
1052870
Weatherstrips
Dielectric
Silicone Grease 1 oz. (0.028 kg) 12345579
Exterior wash
Wash-Wax (Concentrated) 16 02. (0.473 L)
1 051 398 Spot and stain removal on cloth and fabric
Spot Lifter' 8 02. (0.237 L)
1050201 16 oz. (0.473 L)
Key-lock cylinders
Multi-Purpose Lubricant
9 02. (0.262 L) 123451 20
Automatic and manual transmission
fluid DEXRON@-IIE 32 02. (0.946 L ) 12345881
Exterior cleaner and polish
Magic Mirror Cleaner-Polish
1051 51 5 Windshield washer solvent and antifreeze
GM Optikleen" 32 oz. (0.946 L)
1052753
Brake fluid Delco-Supreme 11 @ Brake Fluid 16 02. (0.473 L) 1052535
Chassis
Lubricant 14 02. (0.397 kg) 1052497
Year-round coolant and antifreeze
Permanent Type Anti-Freeze Coolant 1 gal. (3.785 L)
105001 1 Windshield cleaner Eon-Ami Powder@ 12 02. (0.340 kg)
12345347
1052271 Hydraulic clutch system
Hydraulic Clutch
Fluid 16 oz. (0.473 L)
Rear axle SAE 80W-9O-GLb 24 02. (0.680 L) J
*Not recommended for pigskin suede leather.
See your General Motors Dealers for these products. See your Maintenance Schedule for other products.
ProCarManuals.com
Page 281 of 358
Power Windows and Other Power
Options
Circuit breakers protect the power
windows and other power accessories.
When the current load is
too heavy, the
circuit breaker opens and closes,
protecting the circuit
until the problem is
fixed or goes away.
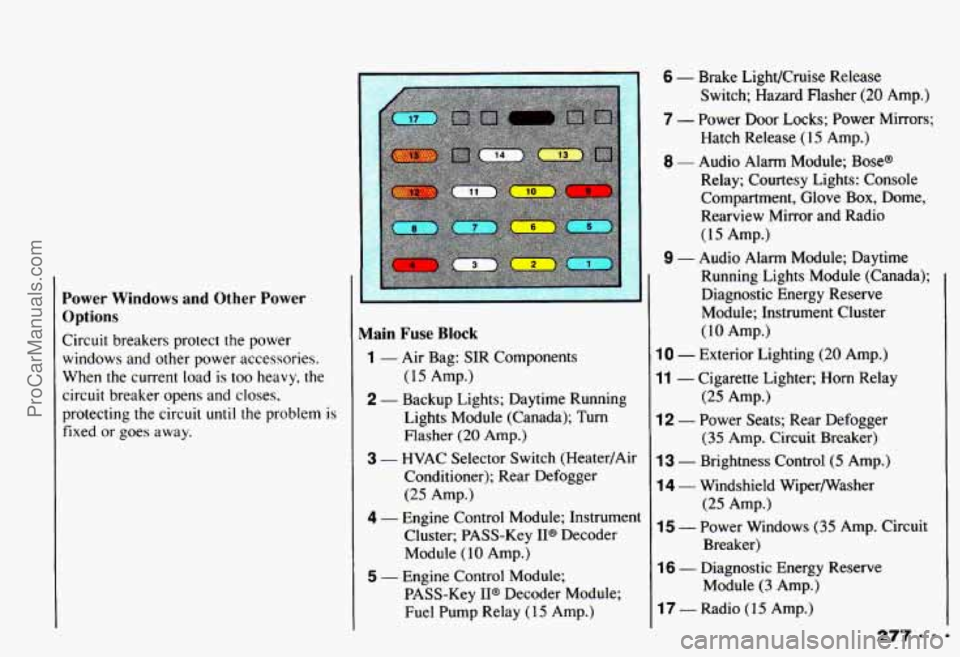
Main Fuse Block
(15 Amp.)
Lights Module (Canada); Turn Flasher
(20 Amp.)
3 - HVAC Selector Switch (Heater/Air
Conditioner); Rear Defogger
(25 Amp.)
4 - Engine Control Module; Instrument Cluster; PASS-Key IP Decoder
Module
( 10 Amp.)
1 - Air Bag: SIR Components
2 - Backup Lights; Daytime Running
I
5 - Engine Control Module; PASS-Key
II@ Decoder Module;
Fuel Pump Relay
(1 5 Amp.)
6 - Brake LighVCruise Release
Switch; Hazard Flasher
(20 Amp.)
7 - Power Door Locks; Power Mirrors; Hatch Release (15 Amp.)
8 - Audio Alarm Module; Base@
Relay; Courtesy Lights: Console
Compartment, Glove Box, Dome,
Rearview Mirror and Radio
(15 Amp.)
9 - Audio Alarm Module; Daytime
Running Lights Module (Canada); Diagnostic Energy Reserve
Module; Instrument Cluster
(10 Amp.)
10 - Exterior Lighting (20 Amp.)
11 - Cigarette Lighter; Horn Relay
12 - Power Seats; Rear Defogger
13 - Brightness Control (5 Amp.)
14 - Windshield Wipermasher
15 - Power Windows (35 Amp. Circuit
(25 Amp.)
(35 Amp. Circuit Breaker)
(25 Amp.)
Breaker)
16 - Diagnostic Energy Reserve Module
(3 Amp.)
17 - Radio (15 Amp.)
ProCarManuals.com
Page 282 of 358

Service & Appearance Care
278
Underhood Electrical Center
Fuses
1 - Electronic Brake Control Module
(5 Amp.)
2 - Fog Lamps (20 Amp.)
3 - Not Used
4 - Not Used
5 - Anti-Lock Brake System (5 Amp.)
6 - Coolant Fan Relays; EVAP
Canister Purge Solenoid; Exhaust
Gas Recirculation; Low Coolant
Relay; Reverse Lockout Solenoid
(10 Amp.)
7 - Air Injection Pump Assembly;
8 - Not Used
9 - Fuel Injectors (7.5 Amp.)
10 - Fuel Injectors (7.5 Amp.)
11 - VIN Engine Code S: Camshaft
Air
Pump Relay
(20 Amp.)
Position Sensor; Crankshaft
Position Sensor; Electronic
Ignition Module
(10 Amp.)
VIN Engine Code P: Ignition
Coil; Ignition Coil Driver
(10 Amp.)
12 - Air Conditioning Compressor
Relay; Cruise Control Switches
and Module
(20 Amp.)
Relays
B - Air Conditioning Compressor
C - Anti-Lock Brake System
D - Primary Coolant Fan (Driver Side)
E - Air Pump
F - Secondary Coolant Fan
(Passenger Side)
G - Low Coolant
H - Fog Lamps
J - High Blower
ProCarManuals.com
Page 304 of 358
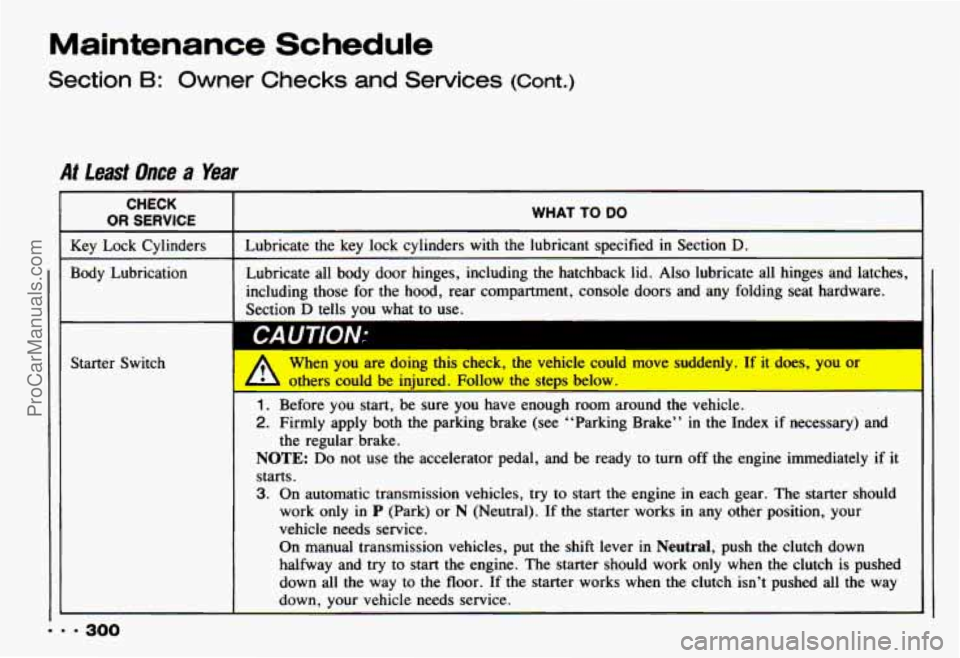
Maintenance Schedule
Section B: Owner Checks and Services (Cont.)
At lead Once a Year
CHECK
OR SERVICE WHAT TO DO
Lubricate the key lock cylinders with the lubricant specified in Section D.
Lubricate all body door hinges, including the hatchback lid. Al\
so lubricate all hinges and latches,
including those for the hood, rear compartment, console doors a\
nd
any folding seat hardware.
Section
D tells you what to use.
’.
1. Before you start, be sure you have enough room around tne vehicle.
2. Firmly apply both the parking brake (see “Parking Brake” \
in the Index if necessary) and
NOTE: Do not use the accelerator pedal, and be ready to turn off the engin\
e immediately if it
starts.
3. On automatic transmission vehicles, try to start the engine in each gear. The starter should
the regular brake.
work
only in P (Park) or N (Neutral). If the starter works in any other position, your
vehicle needs service.
On manual transmission vehicles, put the shift lever
in Neutral, push the clutch down
halfway and try to start
the engine. The starter should work only when the clutch is pushed
down all
the way to the floor. If the starter works when the clutch isn’t pushed all the way
down. your vehicle needs service.
... 300
ProCarManuals.com
Page 305 of 358
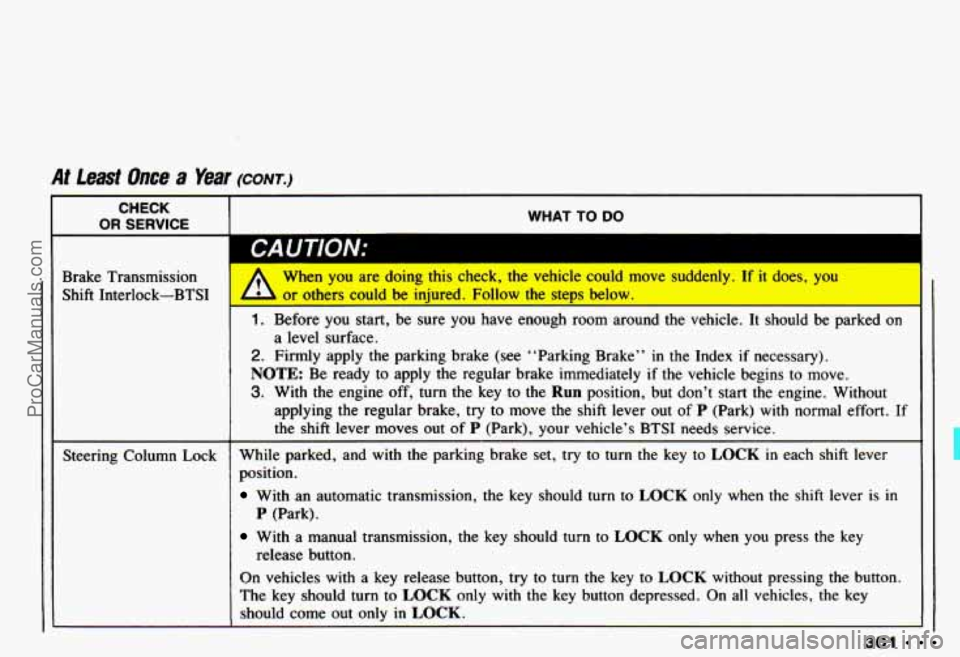
At feast Once a Year (CONT.)
CHECK
I OR SERVICE I WHAT TO DO
Brake Transmission
Shift Interlock-BTS:
Steering Column Lock
1 CA UTlON: I
When .you are doing this check, the vehicle could move suddenly. If it does, you I
or others could be iniured. Follow the steps below.
1. Before you start, be sure you have enough room around the vehicle. It should be parked \
on
2. Firmly apply the parking brake (see “Parking Brake” in the Index if necessary).
NOTE: Be ready to apply the regular brake immediately if the vehicle begins to move.
3. With the engine off, turn the key to the Run position, but don’t start the engine. Without
a
level surface.
applying the regular brake,
try to move the shift lever out of P (Park) with normal effort. If
the shift lever moves out of P (Park), your vehicle’s BTSI needs service.
While parked, and
with the parking brake set, try to turn the key to LOCK in each shift lever
position.
With an automatic transmission, the key should turn to LOCK only when the shift lever is in
With a manual transmission, the key should turn to LOCK only when you press the key
On vehicles with a key release button,
try to turn the key to LOCK without pressing the button.
The key should turn to
LOCK only with the key button depressed. On all vehicles, the key
should
come out only in LOCK.
P (Park).
release button.
I
301 ProCarManuals.com
Page 308 of 358
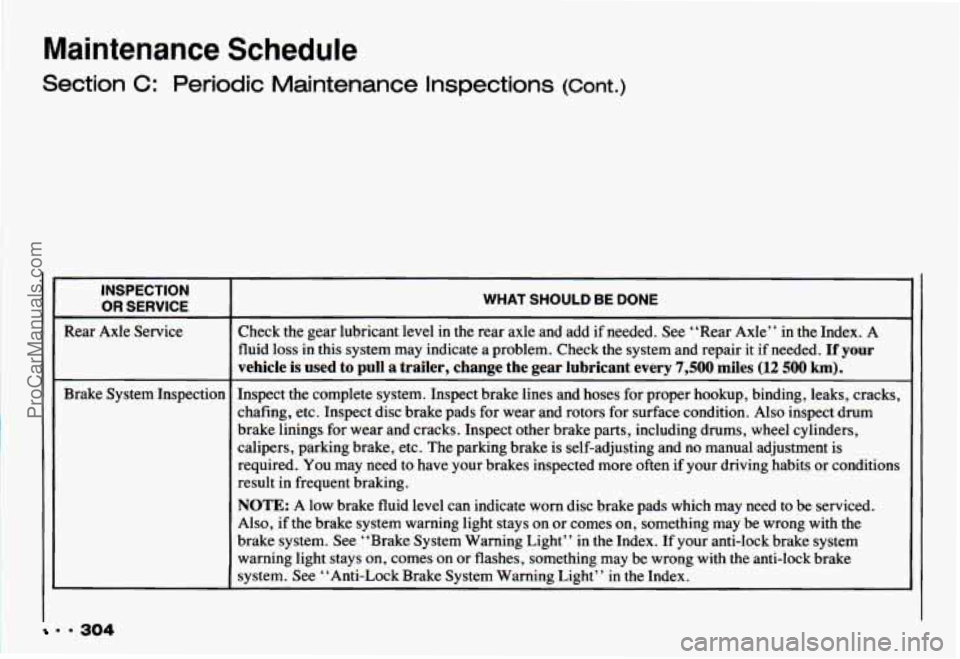
Maintenance Schedule
Section C: Periodic Maintenance Inspections (Cont.)
INSPECTION
OR SERVICE
Rear Axle Service
Brake System Inspection
WHAT SHOULD BE DONE
Check the gear lubricant level in the rear axle and add if needed. See “Rear Axle” in the Index. A
fluid
loss in this system may indicate a problem. Check the system and repair it if needed. If your
vehicle
is used to pull a trailer, change the gear lubricant every 7,500 miles (12 500 km).
Inspect the complete system. Inspect brake lines and hoses for proper hookup, binding, leaks, cracks,
chafing, etc. Inspect disc brake pads for wear and rotors for surface condition. Also inspect drum
brake linings for wear and cracks. Inspect other brake parts, including drums, wheel cylinders,
calipers, parking brake, etc. The parking brake is self-adjusting and no manual adjustment is
required. You may need to have your brakes inspected more often if your driving habits or conditions
result in frequent braking.
NOTE: A low brake fluid level can indicate worn disc brake pads which may need to be serviced.
Also, if the brake system warning light stays on
or comes on, something may be wrong with the
brake system. See “Brake System Warning Light” in
the Index. If your anti-lock brake system
warning light stays on, comes on or flashes, something may be wrong with the anti-lock brake
system. See “Anti-Lock Brake System Warning Light” in
the Index.
~~
. * 304
ProCarManuals.com