1993 CHEVROLET ASTRO PASSENGER manual radio set
[x] Cancel search: manual radio setPage 142 of 345

Downloaded from www.Manualslib.com manuals search engine Comfort Controls & Audio Sysfems
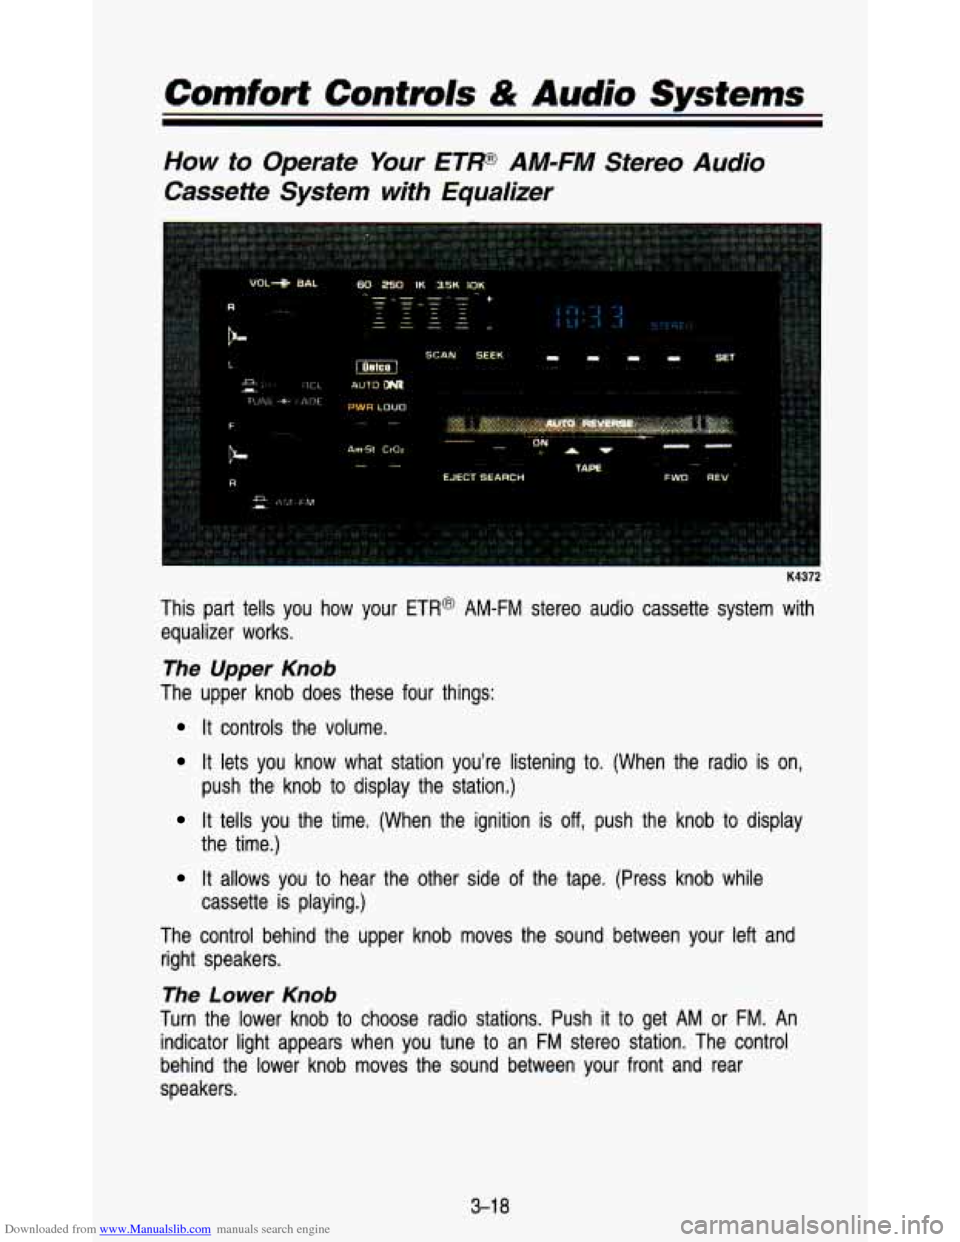
How to Operate Your ETF AM-FM Stereo Audio
Cassette System with Equalizer
K4372
This part tells you how your ETR@ AM-FM stereo audio cassette system with
equalizer works.
The Upper Knob
The upper knob does these four things:
It controls the volume.
It lets you know what station you’re listening to. (When the \
radio is on,
It tells you the time. (When the ignition is off, push the knob to display
It allows you to hear the other side of the tape. (Press knob while
The control behind the upper knob moves the sound between your left and
right speakers.
The Lower Knob
Turn the lower knob to choose radio stations. Push it to get AM or FM. An
indicator light appears when you tune to an
FM stereo station. The control
behind the lower knob moves the sound between your front and \
rear
speakers. push the knob to display the station.)
the time.)
cassette is playing.)
3-1 8
Page 143 of 345

Downloaded from www.Manualslib.com manuals search engine Tone Levers (Equalizer)
The 5 levers near the upper knob control the tone of your radio.
Use the levers to set the bass, midrange, and treble until you get th\
e sound
you prefer. The
60 and 250 levers adjust the bass; 1K is midrange; and 3.5K
and 10K adjust the treble.
PWR (Power)
The PWR button turns your system on and off.
Loud Button
Press this for more bass sound; press again to remove it.
AM-ST Button
Push this button if you want AM stereo. (“STEREO’ will be displayed when
you are receiving an
AM stereo station.)
Cr02 Button
The Cr02 button lets you set the system for the type of cassette being used.
If you are using chrome or metal tapes, push the Cr02 button in. If you are
using standard iron tapes, make sure the button is out.
DN@
Your audio system has automatic Dynamic Noise Reduction. It helps remove
background hiss noise from the radio or tape player.
DNR@ is a registered trademark of the National Semiconductor Corporation.
Pushbuitons
The four pushbuttons let you return to favorite stations.
You can set the pushbuttons for up to eight favorite stations
(4 AM and
4 FM). Just:
1. Tune in the station.
2. Push SET. (SET will be displayed.)
3. Within 5 seconds, push one of the four pushbuttons. Whenever you push
that button, the preset station
will return.
Repeat these steps for each pushbutton.
3-1 9
Page 144 of 345

Downloaded from www.Manualslib.com manuals search engine Comfort Controls & Audio Systems
You can preset 3 more stations on each band by pushing a pair of buttons
next to each other at the same time. Just:
1. Tune in the station.
2. Push SET. (SET will be displayed.)
3. Within 5 seconds, push two buttons next to each other at the same
time. Whenever you push that pair
of buttons, the preset station will
return.
Repeat these steps
for each pair of buttons.
Scan Button
When you push this, the radio will go to the next station an\
d stay there a
few seconds. Then it will go to the next station and pause, and keep doing
that. Press
SCAN again to stop scanning.
Seek Button
This chooses stations also, but it doesn’t keep moving as SCAN does. When
you push
SEEK, the radio goes to the next station
Clock
To set the clock, just:
1. Push SET. (SET will be displayed.)
2. Within 5 seconds, push and hold SCAN until 1 :t-
ahd stays there.
le correct hour appears.
3. Press and hold SEEK until the correct minute appears.
To display the clock with the ignition
off, push the upper knob. The time will
be displayed for a few seconds.
3-20
Page 145 of 345

Downloaded from www.Manualslib.com manuals search engine Cassette Tape Player
Your tape player is built to work best with tapes that are 30 to 45 minutes
long on each side. Tapes longer than that are
so thin they might not work
well in this player.
To play a cassette tape:
Have the radio on.
Insert the tape squarely through the tape door.
The longer side with the tape visible goes in first. If you hear nothing or hear
just garbled sound,
it may not be in squarely.
Push
EJECT to remove the tape and start over.
Once the tape is playing, use the upper and lower knobs for volume
and balance, just as you
do for the radio. The arrows show which side
of the tape is playing.
To go forward to another part of the tape, push FWD.
To go backward, push REV. To stop the tape push the other button
To go from one side of the tape to the other, push in the upper knob
The
SEARCH button lets you play a selection again, or skip ahead to the
next selection. lightly.
on your radio. To remove or stop the tape, push
EJECT.
To play the selection again:
Push SEARCH button to the right. (The ON light will come on.)
Push REV to go back to the beginning of the selection that is playing.
To play the next selection:
Push SEARCH button to the right. (The ON light will come on.)
Push FWD. The tape will go to the next selection.
Press
EJECT to remove the cassette and start the radio.
3-21
Page 148 of 345

Downloaded from www.Manualslib.com manuals search engine It enables you to alternate between AM and FM stations by pressing the
BAND knob. Your selection will be briefly displayed.
RighVFront Speaker Control
The control behind the lower knob fades the sound between your\
front and
rear speakers. Fade levels will be briefly displayed.
SEEK
Pressing the SEEK b button will cause the receiver to seek the next higher
station and stop.
Pressing the
4 SEEK button will cause the receiver to seek the next lower
station and stop.
SCAN
When you press SCAN, the radio will go to the next station and pause, and
will keep scanning until you press
SCAN again. SC will be displayed when
using this control.
Pushbuttons
The five pushbuttons let you return to favorite stations. They are also used
when you play
a disc. (See “To Play A Compact Disc”.)
To set the pushbuttons for up to ten favorite stations
(5 AM and 5 FM):
Tune in the desired station.
Push the SET button. (SET is displayed briefly.)
Within 5 seconds, push one of the five pushbuttons to store the station.
Whenever you press that button, the preset station will return.\
Clock
To set the clock, just:
Press the SET pushbutton. The radio may be on or off.
Within 5 seconds, press and hold either SEEK b increase the minutes
or
4 SEEK to decrease the minutes until the correct minute appears on
the display.
Press and hold SCAN until the correct hour appears pn the display.
RCL
Press the RCL button to alternate between time and radio station on the
display.
RCL may be pressed when the ignition is off to see the time.
3-24
Page 151 of 345

Downloaded from www.Manualslib.com manuals search engine 4. Press the 1 and 4 buttons together. Hold them down until “- - -” shows
on the display.
You are now ready
to enter your secret code. Don’t wait more than 15
seconds between steps.
5. Press SET and 000 will appear on the display.
6. Press the SEEK b button to make the first number appear.
7. Rotate the TUNE knob right or left to make the last two numbers agree
with your code.
8. Press BAND and 000 will appear again. Now you are ready to enter the
last three digits of your code.
9. Repeat steps 6 and 7 for the last three digits of your code.
10. Press BAND and rEP will appear for 5 seconds and then 000 will
11. Repeat steps 6 through IO. This time SEC will appear-indicating that
appear.
the radio is secure.
To Unlock The System After A Power Loss
When battery power is reapplied to a secured radio, the radio won’t turn on
and
LOC will appear on the display.
Enter your secret code
as follows: pause no more than 15 seconds between
steps.
1. Turn the ignition on. (Radio off.)
2. Depress the SET button. The display will show 000.
3. Enter the six digits of the code following steps 6-9 above. The display
4. Depress the BAND knob and the time appears-indicating that the
will show the numbers as entered.
disabling sequence
was successful.
If the display indicates SEC, the
numbers did not match and the unit is still secured.
Disabling The Theft System
1. Depress presets 1 and 4 for 5 seconds with ignition on and radio power
off. The display will show SEC, indicating the unit is in the secure mode.
2. Depress the SET button. The display will show 000.
3. Enter the first three digits of the code following steps 6 and 7 of the
preceding paragraphs. The display will show the numbers as entered.
3-27
Page 208 of 345

Downloaded from www.Manualslib.com manuals search engine 2. Get the vehicles close enough so the jumper cables can reach, but be
sure the vehicles aren’t touching each other.
If they are, it could cause a
ground .connection you don’t want. You wouldn’t be able
to start your
vehicle, and the bad grounding could damage the electrical syst\
ems.
1 CAUTION
I
A You could be injured if the vehicles roll. Set the parking brake firmly
b on each vehicle. Put an automatic transmission in P (Park) or a
I manual transmission in N (Neutral).
3. Turn off the ignition on both vehicles. Turn off all lights that aren’t
needed, and radios. This will avoid sparks and help save both \
batteries.
And
it could save your radio!
1’ NOTICE
Iv dar li 1. The Pairs f you leave your radio on, it could be t
Nouldn’t be covered bv vour warrallLv I
4. Open the hoods and locate the batteries. Find the positive (t) and the
negative
(-) terminals on each battery.
1 CAUTION
A Using a match near a battery can cause battery gas to explode.
People have been hurt doing this, and some have been blinded. \
Use
a flashlight
if you need more light.
You don’t need
to add water to the Delco Freedom@ battery installed
in every new
GM vehicle. But if a battery has filler caps, be sure the
right amount of fluid is there.
If it is low, add water to take care of
that first. If you don’t, explosive gas could be present.
Battery fluid contains acid that can burn you. Don’t get
it on you. If
you accidentally get it in your eyes or on your skin, flush the place
I with water and get medical help immediately.
5. Check that the jumper cables don’t have loose or missing in\
sulation. If
they do, you could get a shock. The vehicles could be damaged\
, too.
Before you connect the cables, here are some things you should\
know.
Positive
(t) will go to positive (+) and negative (-) will go to negative
(-) or a metal engine part. Don’t connect (t) to (-) or you’ll get a
short that would damage the battery and maybe other parts,
too.
5-4
Page 337 of 345

Downloaded from www.Manualslib.com manuals search engine INDEX
A
Air Cleaner .................................... 6-1 9
Air Conditioning
.............................. 3-6
Fan Lever
.................................... 3-6
Function Lever
............................ 3-6
Maintenance
.............................. 6-39
Rear
............................................. 3-8
Refrigerant Capacity
................. 6-65
Temperature Lever
...................... 3-6
All-Wheel Drive
............................. 6-23
Antenna, Fixed Mast
.................... 3-29
Antilock Brakes (See “Brakes”) Appearance Care
......................... 6-52
Materials
.................................... 6-59
Ashtrays
........................................ 2-50
Assist Handles
.............................. 2-68
Audio Systems
................................ 3-9
AM Radio
.................................. 3-11
AM-FM Stereo Audio Cassette
AM-FM Stereo Audio
AM-FM Stereo Audio
AM-FM Stereo Audio System
.. 3-1 3
Anti-Theft Feature
..................... 3-26
Compact Disc Care
.................. 3-28
Automatic Transmission
............... 2-1 7
Fluid ........................................... 6-20
Arbitration Program
........................ 8-3
System with Equalizer
.......... 3-1 8
Cassette System
................... 3-1 5
Compact Disc (CD) System .... 3-23
Cassette Tape Player
..... 3-21, 3-22
.
. I
Axle
Front.
.......................................... 6-24
Rear
........................................... 6-23
B
Battery ........................................... 6-34
Belts (See “Safety Belts”) Better Business Bureau Mediation
..................................... 8-3
Blizzard
.......................................... 4-42
Brakes Adjustment
................................. 4-17
Antilock
...................................... 4-14
Fluid
...........................................
Hydro-Boost System (Hydraulic Pump)
................... 6-34
Master Cylinder
......................... 6-32
Parking
....................................... 2-20
Pedal Travel
.............................. 4-17
Rear Drum
................................. 4-17
Replacing Parts
......................... 6-33
Trailer
......................................... 4-46
Wear Indicators ......................... 4-17
In Emergencies
......................... 4-18
Break-In, New Vehicle
.................. 2-13
Bulb Replacement
........................ 6-35
Halogen.
..................................... 6-35
Replacement Chart
................... 6-66
6-32
System Warning Light
.... 2-58, 4-16
Braking
.......................................... 4-12
9-1