1993 CADILLAC FLEETWOOD Cassette
[x] Cancel search: CassettePage 136 of 386

Downloaded from www.Manualslib.com manuals search engine FRONT STORAGEARMREST
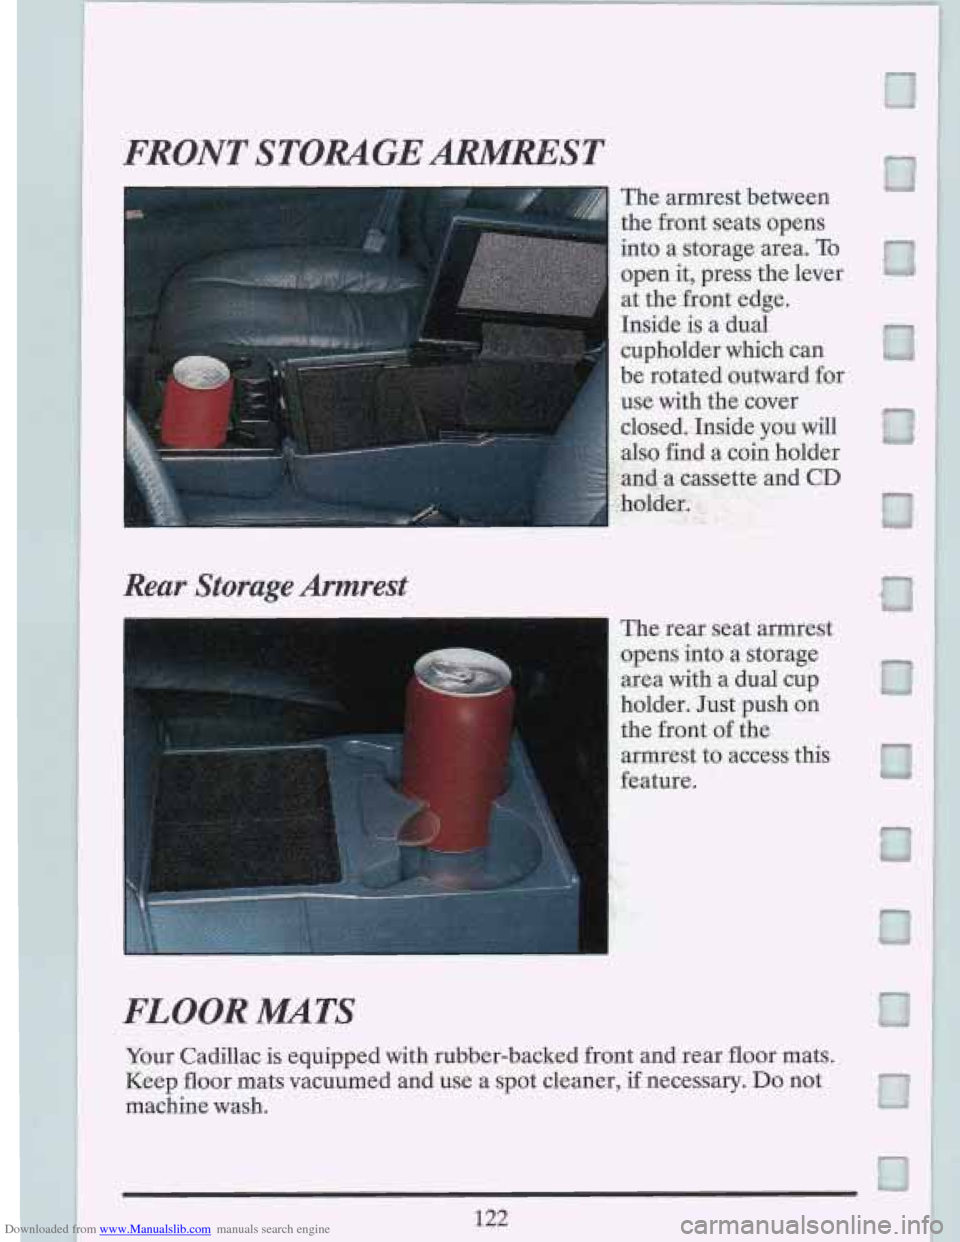
The armrest between
the front seats opens
into a storage area.
To
open it, press the lever
cupholder which can
be rotated outward for
use with the cover
closed. Inside
you will
nd a coin holder
-%cassetteand
CD
Reur Storage Armrest
The rear seat armrest
opens into a storage area with a dual cup
holder. Just push on
the front
of the
armrest to access this
feature.
FLOOR MMTS
Your Cadillac is equipped with rubber-backed front and rear floor mats.
Keep floor mats vacuumed and use a spot cleaner,
if necessary. Do not
machine wash.
122
Page 161 of 386

Downloaded from www.Manualslib.com manuals search engine PUSH BUTTONS
r
,
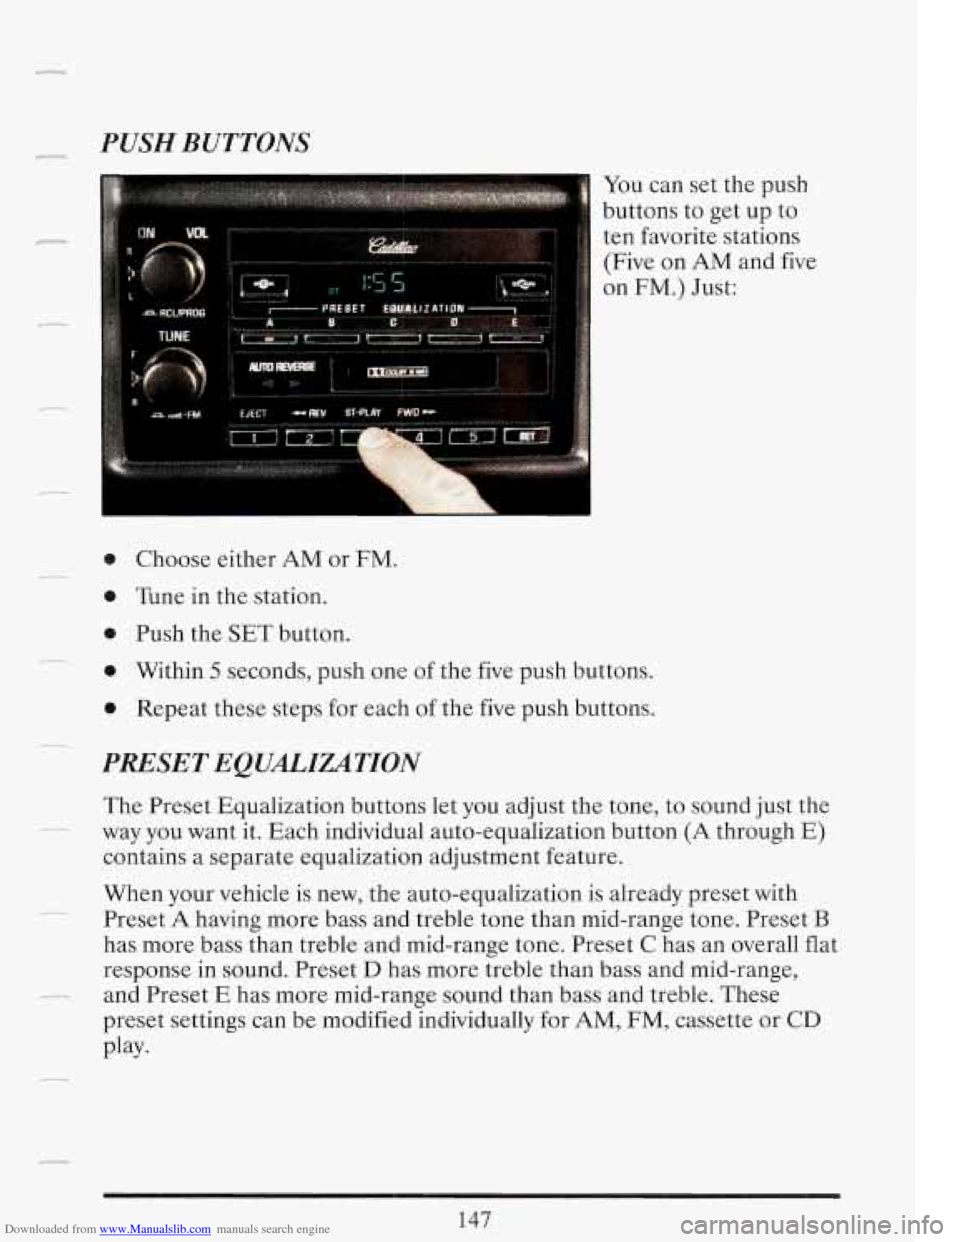
You can set the push
buttons to get up to
ten favorite stations (Five on AM and five
on FM.) Just:
0 Choose either AM or FM.
0 Tune in the station.
0 Push the SET button.
0 Within 5 seconds, push one of the five push buttons.
0 Repeat these steps for each of the five push buttons.
PRESET EQUALIZATION
The Preset Equalization buttons let you adjust the tone, to sound just the
way you want it. Each individual auto-equalization button (A through
E)
contains a separate equalization adjustment feature.
When your vehicle is new, the auto-equalization is already preset with
Preset
A having more bass and treble tone than mid-range tone. Preset B
has more bass than treble and mid-range tone. Preset C has an overall flat
response in sound. Preset
D has more treble than bass and mid-range,
preset settings can be modified individually for AM, FM, cassette or
CD
-~ -
c_ and Preset E has more mid-range sound than bass and treble. These
Play-
Page 165 of 386

Downloaded from www.Manualslib.com manuals search engine r The tape equalization is automatically sensed and set. Inserting the
cassette also automatically disables
DNR@ * and activates DOLBY @
noise reduction.
DNR@ is the Dynamic Noise Reduction. It helps remove background hiss
noise from the radio.
0
0
0
.-
Once the tape is playing, use the upper and lower knobs to adjust the
volume and balance, just as you do for the radio. Push the upper knob
to change tape direction. The arrows show which direction the tape is
being played.
To go forward rapidly to another part of the tape push FWD. To go
backward, push REV.
To stop the tape, push the same button lightly or
any
of the other buttons. The radid will play during fast forward or
reverse.
To go from one side of the tape to the other, push in the upper knob
on your radio. To remove the tape, push EJECT. The tape can be
ejected when the ignition is turned off.
SCAN
Push the SCAN button up to jump quickly to the next selection or down
to return to the beginning of the selection you just heard. The tape
will
play for approximately 15 seconds to sample a selection before going on
again or the upper knob. If the selection is at the end of the tape, the tape
will reverse directions and begin playing at a normal speed.
- to the next selection. To stop the SCAN function, just press it up or down
.-.
SEEK
Push the SEEK button up to quickly go to the beginning of the next
selection. Push the SEEK button down to go back to the beginning of the
selection you are listening to.
During the SCAN and SEEK functions the radio will not play. -.-
*DNR@ is a registered trademark of National Semiconductor
Corporation.
--
151
Page 166 of 386

Downloaded from www.Manualslib.com manuals search engine ST-PLAY (Stop-Play)
Press ST-PLAY to switch back to the radio without ejecting the tape. In
ST-PLAY function
only the tuning knob can be used for selecting stations.
To Eject A Tape
To remove the tape once it is stopped, push EJECT
The Delco Cassette And Compact Disc Music System
This optional sound system combines an AM/FM stereo radio with a
cassette tape player and a compact disc player in a single unit.
To operate the radio and cassette tape player portion of this music
system, please read the beginning of this section, “How To Operate Your
Sound System” and “Your Cassette Tape Player”.
To Play the Disc Player
Before you begin, please note: don’t use the mini-discs that are called
“singles”
. They won’t eject. Use full-size compact discs only.
Turn the radio on.
2
U a,
Insert a disc (label side up) partway into the slot. The player will pull it in.
Wait a few seconds and the disc will play.
The DNR@ will be disabled and -
I
the display will show Track “ 1 TRKCD” for about 5 seconds, then “CD”
will show in the display.
1F
If the disc comes back out, check to see if
The disc is upside down.
The disc is dirty, scratched, or wet.
There’s too much moisture in the air. (If there is, wait about one hour
and try again).
I
RCLIPROG (RecalllProgram)
Press once to see which track is being played. (It also allows for disc
programming.)
n
-
152
Page 168 of 386

Downloaded from www.Manualslib.com manuals search engine - t
REV (Reverse)
Push and hold REV to return rapidly to a favorite passage. Release it to
play the passage. The elapsed time will be displayed to show the reverse
progress of the
CD.
FWD (Fast Forward)
Press and hold FWD to advance quickly within a track. Release it to
resume playing. Elapsed time will be displayed to show the forward
progress
of the CD.
ST-EJECT (Stop-Eject)
Press ST-EJECT The disc or tape will stop without ejecting it and the
radio will start to play. Press it again and the disc
or tape will eject.
PLAY
Press PLAY to restart the disc or tape. It will begin playing at the point
where it had stopped. If the CD and cassette tape are inserted at the
same time, pressing the play button will switch between CD and the Tape.
COMP (Compression)
r-) U
1 I. L
Pressing COMP makes soft and loud passages more nearly equal in
volume. For example, playing classical or jazz music with very quiet and
very loud passages in the same tune. The COMP display will light as long
as COMP
is on. E
Setting The Clock
Turn the ignition and radio on. Then:
To Set the Hour:
Press SET, and within 5 seconds,
"I Lr/ 'i
Press and hold SEEK up or down. When the clock gets to the correct
hour, let go. -
Page 169 of 386

Downloaded from www.Manualslib.com manuals search engine r
C.
To Set the Minutes:
0 Press SET, and within 5 seconds,
0 Press and hold SCAN up or down. When the clock gets to the correct
minute, let go.
Your clock is set.
Care of Your Cassette Tape Player
A tape player that is not cleaned regularly can cause reduced sound
quality, ruined cassettes, or a damaged mechanism. Cassette tapes should
be stored in their cases away from contaminants, direct sunlight, and
extreme heat.
If they aren’t, they may not operate properly or cause
failure
of the tape player.
Your tape player should be cleaned regularly each month or after every
15 hours of use. If you notice a reduction in sound quality, try a known
good cassette to see if the tape or the tape player is at fault.
If this other
cassette has no improvement in sound quality, clean the tape player.
Clean your tape player with a wiping-action, non-abrasive cleaning
cassette, and follow the directions provided with it.
~
Cassettes are subject to wear and the sound quality may degrade over
time. Always make sure that the cassette tape is in good condition before
you have your tape player serviced.
Care of Your Compact Discs
Handle discs carefully. Store them in their original cases or other
protective cases and away from direct sunlight and dust.
If the surface of
- a disc is soiled, dampen a clean, soft cloth in a mild, neutral detergent
solution and clean it, wiping from the center to the edge.
Be sure never to touch the signal surface
when handling discs. Pick up
edge.
I discs by grasping the outer edges or the edge of the hole and the outer
7 Power Antenna Mast Care
Your power antenna will look its best and work well if it’s cleaned from
time to time.
155
Page 369 of 386

Downloaded from www.Manualslib.com manuals search engine In
Cables. B
Camper. Towing A
.................................. 208
Capacities. Fluid ................................... 324
C& Jack I&tructions ............................... 237
Carbon Monoxide In Exhaust ...................... 93. 207
Cassette Tape Player. Care Of Your ................... 155
Cassette Tape Systems .............................. 150
Cautions. Safety ...................................... 1
CB Radio. Adding A ............................. 143. 312
Cellular lklephone. Adding A ..................... 143. 312
Center High Mounted Stop Lamp Bulb Replacement .... 287
Chains. Tire ....................................... 300
Change Oil Light ................................... 131
Changing A Flat Tire ............................... 237
Chassis Lubrication ................. See Maint . Book. p.15
checking
Service Station
................... See Maint . Book, p.8
The Power Steering Fluid ......................... 273
Central Door Unlocking Feature ....................... 67
Change The Oil. When To ........................... 263
Charge Light ...................................... 130
The Brake Fluid ................................. 276
The Engine Oil Level ............................ 259
The Transmission Fluid ........................... 266
Things Under The Hood ........................... 257
Your Restraint Systems ............................ 61
Your Safety Belt Systems ........................... 61
Che&al Paint Spotting ............................. 309
Child Restraint. Securing ............................. 48
Child Restraints ..................................... 43
Cigarette Lighter ................................... 120
Circuit Breakers ................................... 313
City Driving ....................................... 193
Cleaner. Air ....................................... 265
Cleaning
Fabric
....................................... 303. 304
Glass .......................................... 306
Leather And Vinyl ............................... 305
Photocells ...................................... 116
SafetyBel ts ..................................... 306
The Inside Of Your Cadillac ....................... 302
The Outside Of Your Cadillac ..................... 307
The Power Antenna .............................. 155
The Top of the Instrument Panel ................... 305
The Underbody Of Your Car ...................... 309
Page 370 of 386

Downloaded from www.Manualslib.com manuals search engine The Windshield ................................. 306
Weatherstrips
................................... 308
White Sidewall Tires
............................. 308
Wood Panels
.................................... 305
Clock. Setting The
.................................. 154
Climate Control. Electronic
.......................... 139
Closed-In Places. Don’t Idle In
........................ 94
CO In Your Exhaust
.............................. 93. 207
Comfort Controls and Audio Systems
.................. 138
Compact Disc Music System
......................... 152
Compact Disc Player. Care Of Your
................... 155
Compact Spare Tire
................................ 248
Contents. Table Of
...... See “Front of Owner Info . Manual”
Control Of
A Vehicle ............................... 170
Control.
Loss Of ................................... 184
Controls. Features And
............................... 63
Convex Outside Mirror
.............................. 117
Coolant. Engine: Proper Solution To Use
............ 231. 269
Coolant. Engine. Warning Light
...................... 128
Coolant. Safety Warnings About
...................... 227
Cooling System
.................................... 229
Cooling System Service
.............. See Maint . Book. p.20
Corrosion Protection ........................ See Warranty
Cruise Control
..................................... 103
Cruise Control. Change Speed With
................... 106
Cruise Control. Get Out Of
.......................... 107
Cruise Control On Hills
............................. 107
Cruise Control. Turning Off
.......................... 108
Cruise Engaged Light
............................... 133
Curves. Driving On
................................. 179
D
Damage To Finish .................................. 308
Damage To Sheet Metal
............................. 308
Damage Warnings
.................................... 2
Daytime Running Lights (Canada Only)
............... 111
Dead Battery. What To Do If You Have A .............. 218
Defensive Driving
.................................. 166
Defogger. Rear Window
............................. 142
Defogging
......................................... 142
Defroster
......................................... 141
Delco System ...................................... 142
DEXRONIIEa
................................... 268
Dimensions. Vehicle
................................ 324
Disabled. How
To Have Your Cadillac Towed If It Is ..... 223
Delco Cassette and Compact
Disc Music System
........ 152
n
i
13
1
n
L
r
. 1
.
1
r
-1