1992 VOLKSWAGEN TRANSPORTER light
[x] Cancel search: lightPage 96 of 164
Downloaded from www.Manualslib.com manuals search engine
GENERAL
MAINTENANCE
Bonnet
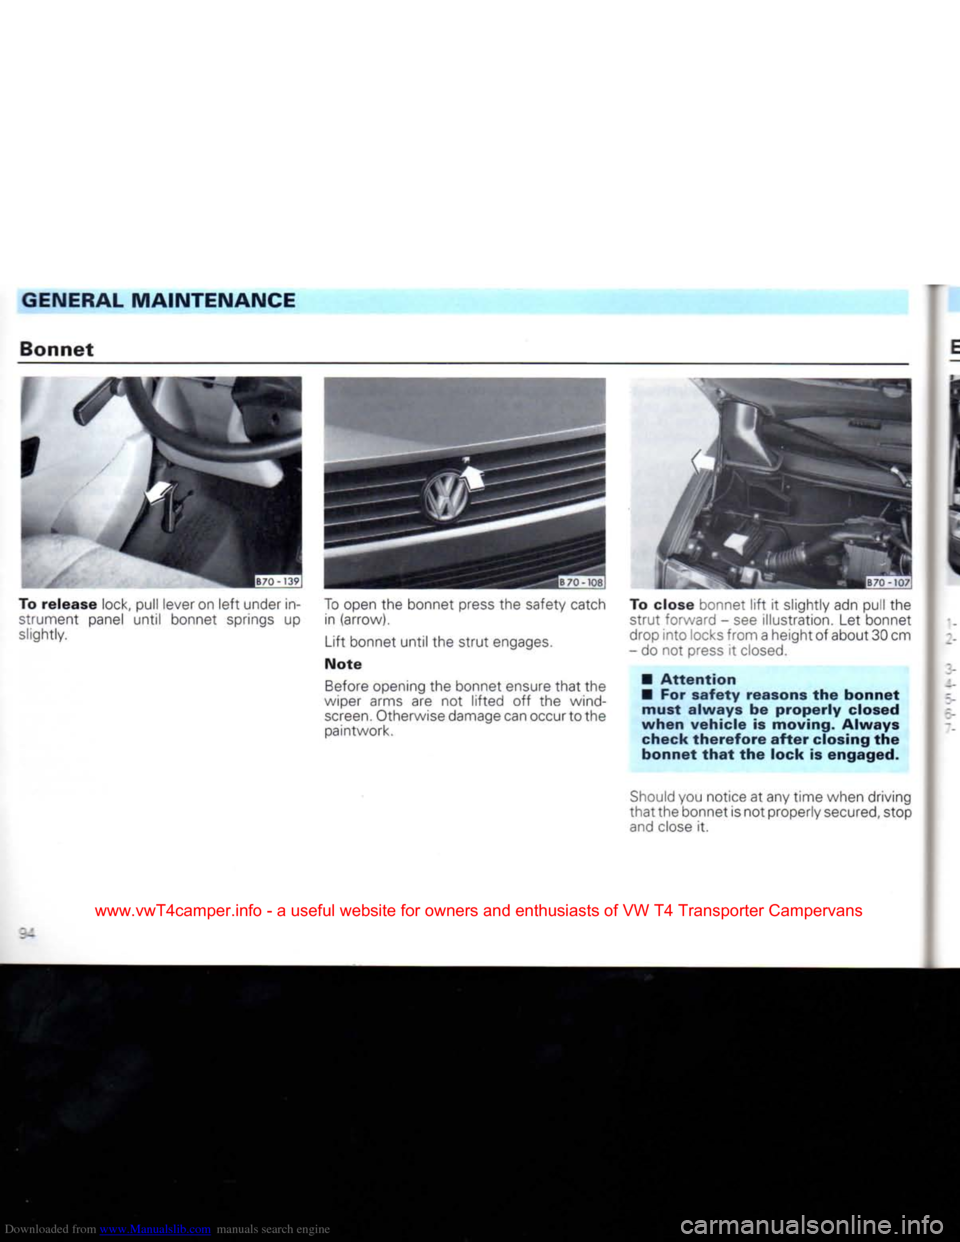
To
release
lock, pull lever on
left
under in strument panel until bonnet springs up
slightly.
To
open the bonnet press the safety catch
in (arrow).
Lift bonnet until the strut engages.
Note
Before
opening the bonnet ensure that the
wiper arms are not lifted off the wind
screen.
Otherwise damage can occurto the paintwork. To close bonnet
lift
it slightly adn pull the
strut forward - see illustration. Let bonnet
drop into locks from a height of about 30 cm
- do not press it
closed.
•
Attention
• For
safety
reasons the
bonnet
must
always
be
properly
closed
when
vehicle is moving. Always
check
therefore
after
closing the
bonnet
that
the lock is engaged.
Should
you notice at any time when driving
that the bonnet is not properly
secured,
stop
and
close it.
www.vwT4camper.info - a useful website for owners and enthusiasts of VW T4 Transporter Campervans
Page 104 of 164
Downloaded from www.Manualslib.com manuals search engine
GENERAL
MAINTENANCE
Checking
coolant
level
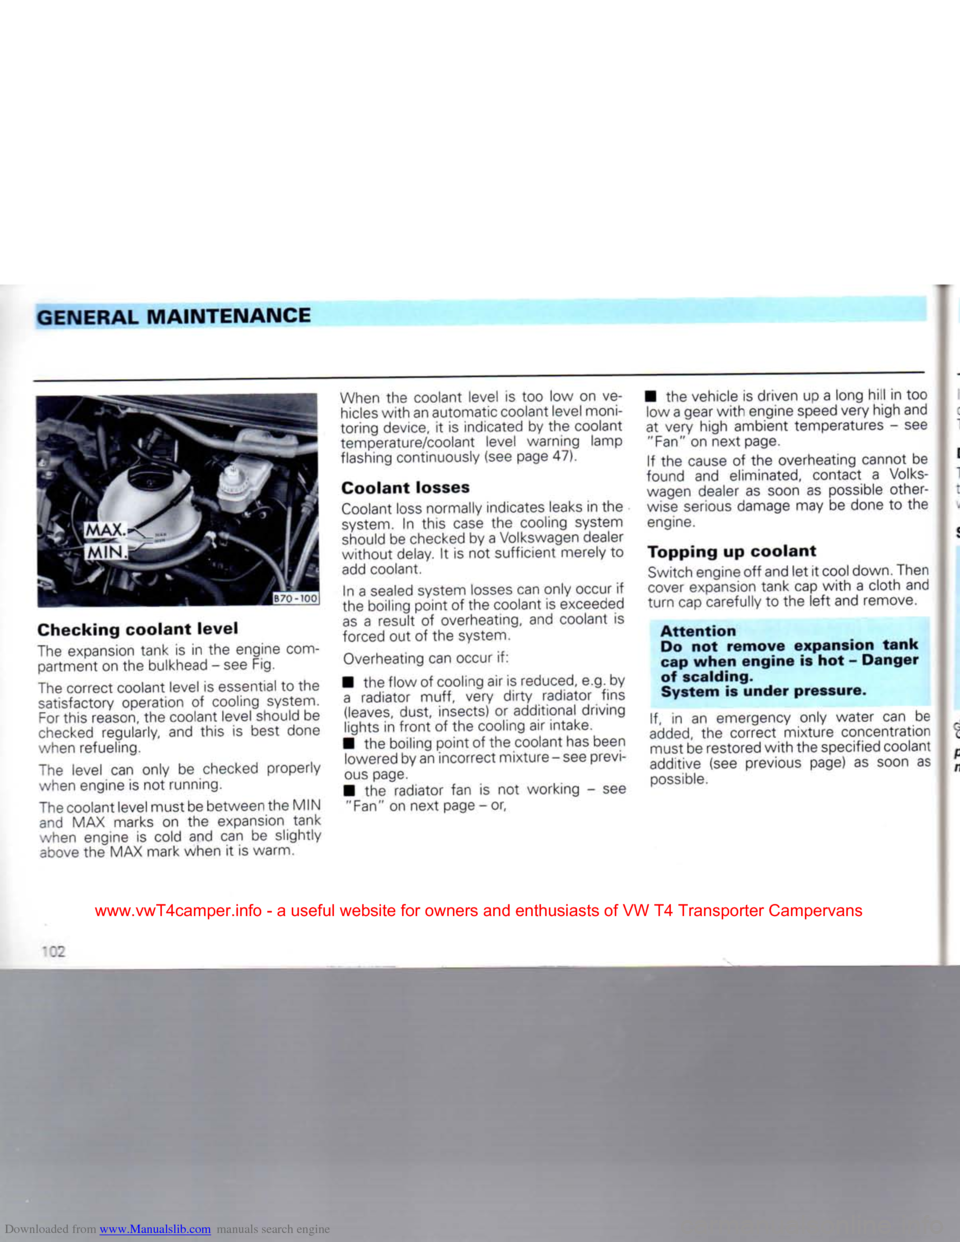
The
expansion tank
is in the
engine
com
partment on the bulkhead
-
see Fig.
The
correct coolant level
is
essential
to
the satisfactory operation
of
cooling system.
For
this reason, the coolant level should
be
checked
regularly,
and
this
is
best done
when refueling.
The
level
can
only
be
checked properly
when engine
is
not running.
The
coolant level must be between the MIN
and
MAX marks
on the
expansion tank
when engine
is
cold
and can be
slightly
above
the MAX mark when
it
is warm.
When
the
coolant level
is too low on ve
hicles
with
an automatic coolant level moni
toring device,
it is
indicated by the coolant
temperature/coolant level warning lamp
flashing continuously (see page 47).
Coolant
losses
Coolant
loss normally indicates leaks in the
system.
In
this
case
the
cooling system
should
be checked by a Volkswagen dealer
without
delay.
It is
not sufficient merely
to
add
coolant.
In
a
sealed system
losses
can only occur
if
the boiling point
of
the coolant is exceeded
as
a
result
of
overheating, and coolant
is
forced out
of
the system.
Overheating can occur
if:
• the flow
of
cooling air is reduced, e.g.
by
a
radiator
muff,
very
dirty
radiator fins
(leaves,
dust, insects)
or
additional driving
lights
in
front
of
the cooling air intake.
• the boiling point
of
the coolant has been lowered by an incorrect mixture
-
see previ
ous
page.
•
the
radiator
fan is not
working
- see
"Fan"
on next page
-
or, • the vehicle
is
driven up
a
long hill
in too
low a gear
with
engine speed very high and
at very high ambient temperatures
-
see
"Fan"
on
next page.
If
the
cause
of the
overheating cannot
be
found
and
eliminated, contact
a
Volks
wagen dealer
as
soon
as
possible other
wise
serious damage may
be
done
to the
engine.
Topping
up
coolant
Switch
engine
off
and let
it
cool down. Then
cover
expansion tank cap
with
a
cloth and
turn
cap carefully
to
the
left
and remove.
Attention
Do
not
remove
expansion
tank
cap
when
engine
is
hot
-
Danger
of scalding.
System
is
under
pressure.
If, in an
emergency only water
can be
added,
the
correct mixture concentration must be restored
with
the specified coolant
additive (see previous page)
as
soon
as
possible.
•02
www.vwT4camper.info - a useful website for owners and enthusiasts of VW T4 Transporter Campervans
Page 107 of 164
Downloaded from www.Manualslib.com manuals search engine
GENERAL
MAINTENANCE
'necking fluid level
Pe :orrect fluid level is essential to the sat-
:~=
:tory operation of the brake system. The
fc. Z level must always be between the
AX"
and "MIN" marks.
~- a "evel of fluid tends to sink slightly when
"a vehicle is used due to the automatic ad- ::ment of brake linings. This is quite nor-
-rwever, if the level sinks noticeably in a
srorttime or drops below the "MIN" mark
re system may be leaking. A low fluid level " the reservoir is indicated by the brake
w.arning lamp lighting up (see page 48 also), .nen this happens take car to a Volks
wagen dealer immediately and have the
cake system checked. Renewing brake fluid
Brake fluid absorbs moisture. In the course
of time it takes in water from the ambient
air. Too high a content of water in the brake
fluid can in time cause corrosion damage in
the system. Furthermore the boiling point of
the brake fluid is reduced considerably. For
this reason the brake fluid must be renewed every two years.
Attention
When the brake fluid becomes
too old vapour bubbles can form in the brake system when the
brakes are used hard. The
effi
ciency of the brakes and thus the
vehicle safety is then seriously
affected.
Only use our genuine brake fluio (see: - ra
tion to US standard FMVSS 116 DO~-
.
~-e
fluid must be new.
Attention Brake fluid is poisonous!
It must therefore only be stored in the closed original container
out of reach of children.
Remember also that brake fluid will
attack the paintwork. Because of the disposal
prob
lems,
the special tools necessary
and the specialist knowledge re
quired,
the brake fluid changing
should preferably be done by a
Volk
swagen
dealer.
It is advisable to have the fluid change car
ried out during an Inspection Service.
www.vwT4camper.info - a useful website for owners and enthusiasts of VW T4 Transporter Campervans
Page 110 of 164
Downloaded from www.Manualslib.com manuals search engine
GENERAL
MAINTENANCE
Windscreen
washer
system
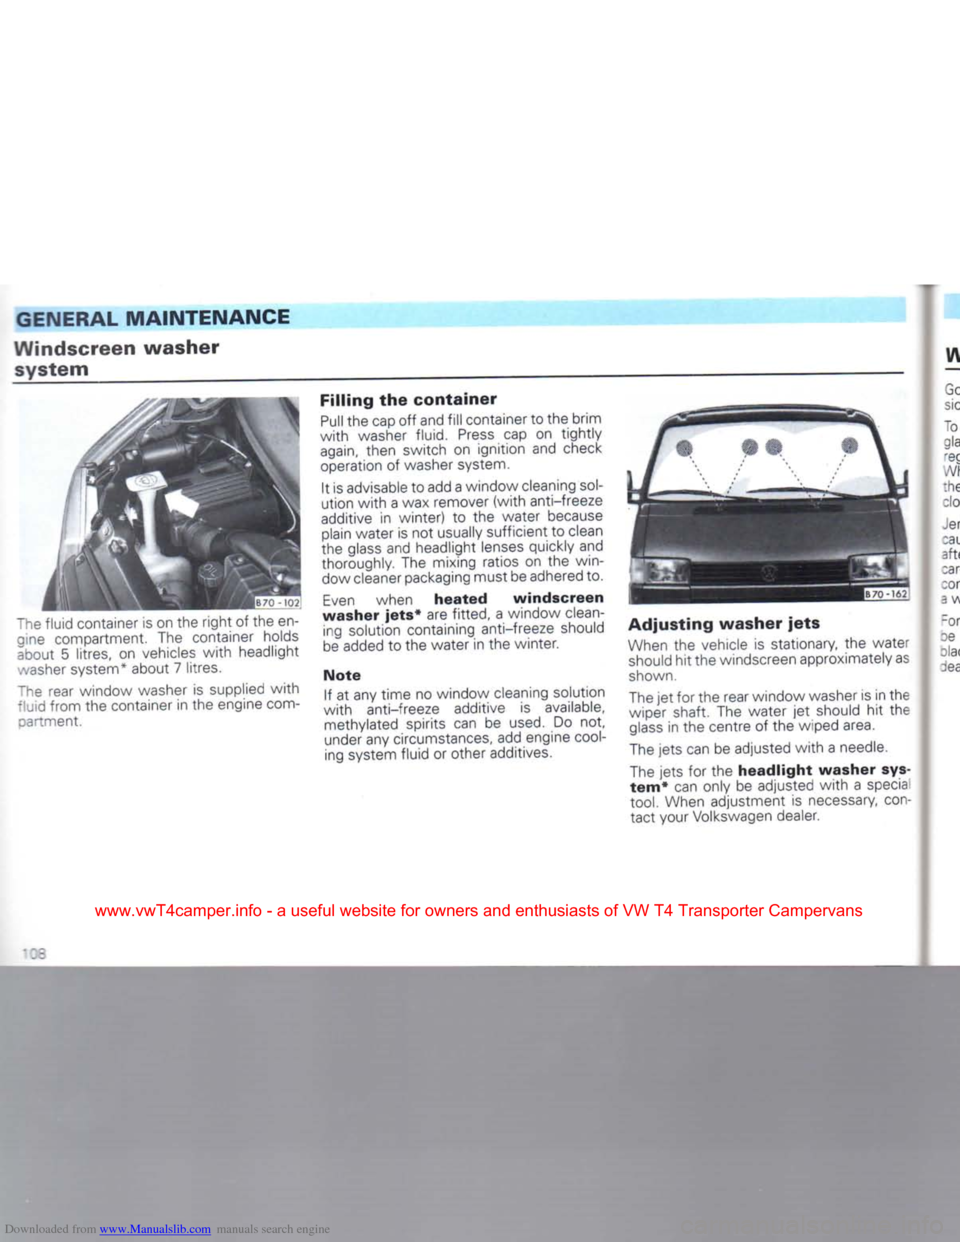
"he fluid container is on the
right
of the en gine compartment. The container holds
about 5 litres, on vehicles
with
headlight
washer
system* about 7 litres.
The
rear window washer is supplied
with
fluid from the container in the engine com-oartment. Filling the
container
Pull
the cap off and
fill
container to the brim
with
washer fluid.
Press
cap on
tightly
again,
then switch on ignition and check
operation of washer system.
It is advisable to add a window cleaning
sol
ution
with
a wax remover
(with
anti-freeze
additive in winter) to the water because plain water is not usually sufficient to clean
the glass and headlight lenses quickly and
thoroughly. The mixing ratios on the win dow cleaner packaging must be adhered to.
Even
when
heated
windscreen
washer
jets*
are fitted, a window clean ing solution containing anti-freeze should
be
added to the water in the winter.
Note
If at any time no window cleaning solution
with
anti-freeze additive is available, methylated spirits can be
used.
Do not,
under any circumstances, add engine
cool
ing system fluid or other additives.
Adjusting
washer
jets
When
the vehicle is stationary, the water
should
hit the windscreen approximately as
shown.
The
jet for the rear window washer is in the
wiper shaft. The water jet should hit the
glass
in the centre of the wiped area.
The
jets can be adjusted
with
a needle.
The
jets for the
headlight
washer
sys
tem*
can only be adjusted
with
a specia
tool.
When adjustment is necessary,
con
tact your Volkswagen dealer.
:=
www.vwT4camper.info - a useful website for owners and enthusiasts of VW T4 Transporter Campervans
Page 117 of 164
Downloaded from www.Manualslib.com manuals search engine
GENERAL
MAINTENANCE
Arduous
operating
conditions
ne vehicle construction and equipment is
resigned for normal operating conditions.
his also applies to the frequency and the
extent of the maintenance laid down in the
service
Schedule.
f the vehicle is used in arduous operating
conditions (e.g. continuous trailer towing,
exceptionally high or low ambient tempera-
:ures,
very dusty conditions, poor quality
ruel,
etc.) it may be necessary to carry out
special
technical preparations, such as ;hanging the oil to the appropriate viscosity, ^stalling special air cleaners, modifying the
ignition timing etc. Furthermore, the main
tenance must also be matched to the oper
ating conditions - see also page 93.
Driving
abroad
If the vehicle is to be taken abroad, the fol
lowing must also be borne in mind:
• If the vehicle has a catalytic converter, one must ensure
that
unleaded petrol will be available during the journey - see
page 86.The automobile clubs offer infor mation about the unleaded filling station
network.
• Although there are more than 10 000
Volkswagen
dealers all over the world to
service
Volkswagen vehicles there are
countries in which only a limited amount of
service
is available or none at all.
• In certain countries it is also possible
that
your vehicle model is not soid so
that
certain
spare
parts will not be available or
that
the
Volkswagen
personnel are not familiar
with
the repair procedure should anything go
wrong.
The Volkswagen
Sales
Centres in Germany or the
Importer
concerned will be only too
pleased
to give advice on the necessary
technical preparation of the vehicle, on the maintenance required and on the repair
possibilities.
The addresses are given in the vehicle wallet. • When the vehicle is used in a country
which drives on the opposite side of the road to the home country the wedge
shaped
areas on the headlight lenses must be masked - see page 129.
Driving
on
holiday
Before starting off note the following
points:
• The roadworthiness and driving safety are particularly important when on holiday-
see
page 78.
• With a fully laden vehicle and/or roof rack, the handling changes. The driving
style must be adapted to the different condi
tions - more information on loading is given
on page 28.
The
tyre
pressures must be checked - see
page147.
• When a trailer is to be towed, there are many special points to note - see page 81.
• If an oil change or an Inspection Service
is
probably going to become necessary dur
ing the
trip,
it is advisable to have this work
done before going on holiday if possible.
115
www.vwT4camper.info - a useful website for owners and enthusiasts of VW T4 Transporter Campervans
Page 121 of 164

Downloaded from www.Manualslib.com manuals search engine
DO-IT-YOURSELF
Spare
wheel
The spare wheel is secured under the rear of the vehicle in a special hinged carrier.
Lowering
spare
wheel
carrier
Attention
When
loosening the screws it is
essential
to
keep
to the
following
sequence:
• Loosen safety screw B
until
it turns freely.
Note
The safety screw B is held at the end
with
a
clip so
that
it cannot be screwed out
com
pletely. • Remove securing screw A completely.
The spare wheel carrier then rests on the safety screw B.
Attention
If the screws are loosened in the
opposite
sequence, the
carrier
can
fall
off
screw
B.
• Then insert the wheel spanner in the carrierto the stop as shown in illustration on
the
right.
• Grip wheel spanner
firmly
with
both
hands,
lift
slightly and swing to the
right
until
the large hole in the carrier can be swung
over the safety screw and down.
• Take spare wheel out.
Lifting
spare
wheel
carrier
•
Insert
wheel spanner in spare carrier.
•
Place
wheel on carrier
with
well up wards, swing carrier up
with
wheel spanner
and hook it on the safety screw.
• Screw in securing screw A
first,
then
.safety screw B.
• Then tighten both screws fully.
Attention
For
safety
reasons the
spare
wheel
carrier
must
always
be
firmly
secured so
that
the
spare
wheel
cannot
fall
down
acciden
tally.
Note
The rear mounting of the spare wheel
carrier can be adjusted in height to cater for
tyres of different widths.
www.vwT4camper.info - a useful website for owners and enthusiasts of VW T4 Transporter Campervans
Page 122 of 164
Downloaded from www.Manualslib.com manuals search engine
DO-IT-YOURSELF
Changing
wheels
Park
the vehicle as far as possible away
from the
traffic
flow, if necessary switch on emergency warning lights and place the
warning triangle in position - note legal re
quirements.
• All vehicles occupants should leave the vehicle and move to a safe area (e.g. behind
the barrier).
• Apply handbrake firmly. If the car is on a
slope,
block one of the wheels on the oppo
site side
with
a stone or some similar object.
• Take the tools out of the vehicle.
• Take spare wheel out of carrier at rear of vehicle - see previous page.
JB70
- 121J
•
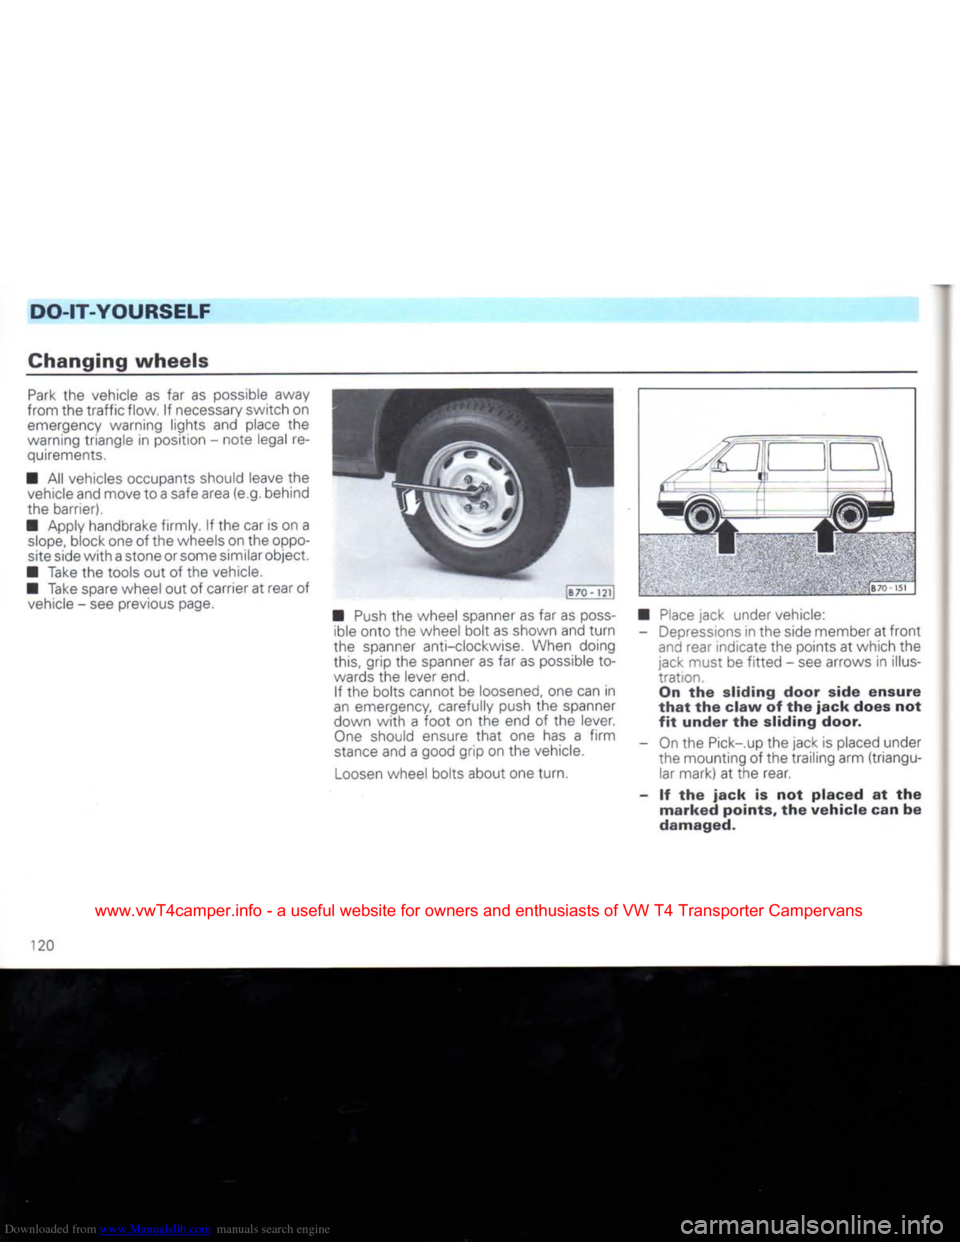
Push
the wheel spanner as far as
poss
ible onto the wheel bolt as shown and
turn
the spanner anti-clockwise. When doing this, grip the spanner as far as possible to
wards the lever end.
If the bolts cannot be loosened, one can in
an emergency, carefully push the spanner
down
with
a
foot
on the end of the lever.
One
should ensure
that
one has a
firm
stance
and a good grip on the vehicle.
Loosen
wheel bolts about one turn. 8"" 1 •>!
•
Place
jack under vehicle: - Depressions in the side member at
front
and rear indicate the points at which the
jack must be
fitted
- see arrows in illus
tration. On the sliding door side
ensure
that
the
claw
of the
jack
does not
fit
under
the sliding door.
- On the Pick-.up the jack is placed under the mounting of the trailing arm (triangular mark) at the rear.
- If the
jack
is not
placed
at the
marked
points, the
vehicle
can be
damaged.
120
www.vwT4camper.info - a useful website for owners and enthusiasts of VW T4 Transporter Campervans
Page 123 of 164
Downloaded from www.Manualslib.com manuals search engine
DO-IT-YOURSELF
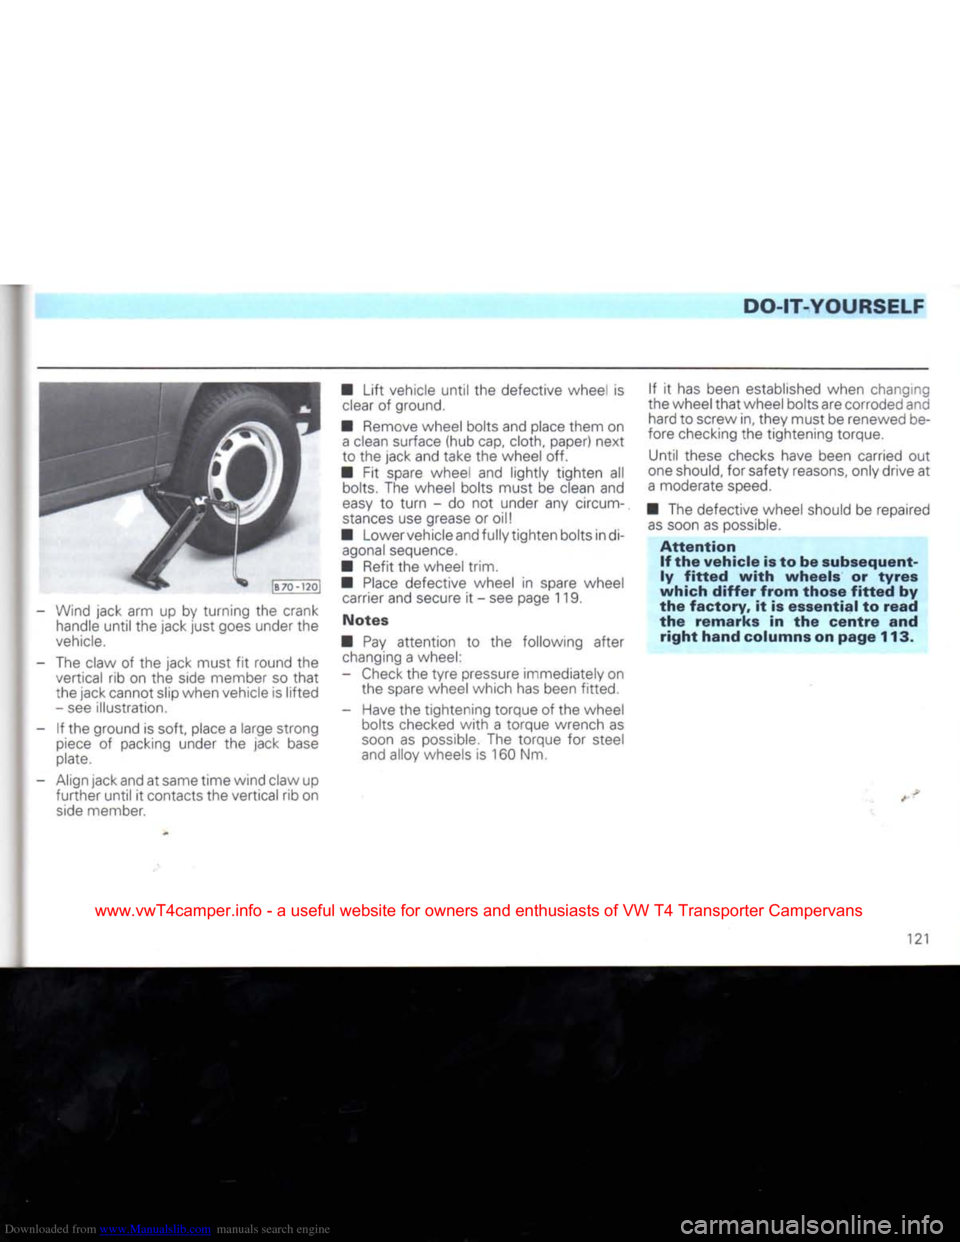
- Wind jack arm up by turning the crank handle
until
the jack
just
goes under the
vehicle.
- The claw of the jack must fit round the vertical rib on the side member so
that
the jack cannot slip when vehicle is
lifted
- see illustration.
- If the ground is soft, place a large strong
piece
of packing under the jack base
plate.
- Align jack and at same time wind claw up
further
until
it contacts the vertical rib on
side
member. •
Lift
vehicle
until
the defective wheel is
clear
of ground.
• Remove wheel bolts and place them on
a
clean surface (hub cap, cloth, paper) next
to the jack and take the wheel off.
• Fit spare wheel and lightly tighten all bolts. The wheel bolts must be clean and
easy
to
turn
- do not under any circum
stances
use grease or oil!
• Lowervehicleand fully tighten bolts indi- agonal sequence.
• Refit the wheel trim.
•
Place
defective wheel in spare wheel carrier and secure it - see page 119.
Notes
• Pay attention to the following after changing a wheel:
- Check the
tyre
pressure immediately on the spare wheel which has been fitted.
- Have the tightening torque of the wheel bolts checked
with
a torque wrench as
soon
as possible. The torque for steel
and alloy wheels is 160 Nm. If it has been established when changing
the wheel
that
wheel bolts are corroded and hard to screw in, they must be renewed be
fore checking the tightening torque.
Until these checks have been carried out
one should, for safety reasons, only drive at
a
moderate
speed.
• The defective wheel should be repaired
as
soon as possible.
Attention
If the
vehicle
is to be
subsequent
ly
fitted
with
wheels
or
tyres
which
differ
from
those
fitted
by
the
factory,
it is
essential
to
read
the
remarks
in the
centre
and
right
hand
columns on
page
113.
121
www.vwT4camper.info - a useful website for owners and enthusiasts of VW T4 Transporter Campervans