1992 VOLKSWAGEN CARAVELLE wheel
[x] Cancel search: wheelPage 103 of 164
Downloaded from www.Manualslib.com manuals search engine
GENERAL
MAINTENANCE
nere are two marks
with
which the oil level
:an be
checked.
• Outside on container (Fig.) • Inside on dipstick attached to the cap. ~he oil level should always be between the
MAX."
and "MIN" marks. When the level
"as
dropped down below the "MIN" mark
:^e
power assisted steering should be
:necked
at a Volkswagen dealer. It is not
sufficient merely to top up
with
hydraulic oil.
Note
f the power assisted steering fails at any
: me or when engine is not running (vehicle on tow) the vehicle remains fully steerable cut more force must be used to
turn
the
steering wheel. Cooling
system
Under
normal conditions the cooling
sys
tem is almost maintenance-free.
The vehicle is
fitted
with
a hinged radiator
which can be folded forward when required
- see page 104.
The cooling system is filled at the factory
with
a permanent coolant which is not
changed.
The coolant consists of water and
a
40 % concentration of our coolant additive
G
11 V8B (anti-freeze on glycol basis
with
anti-corrosion additives). This mixture not
only gives the necessary frost protection
down to -25 degrees C but also protects the
alloy parts in the cooling system against cor
rosion.
In addition it prevents scaling and ra
ises
the boiling point of the coolant.
The concentration of the coolant therefore must not be reduced in the summer or in
warm countries, by topping up
with
plain
water. The
coolant
additive
propor
tion
must
be at
least
40 %.
If greater protection against frost is re
quired, the proportion of G 11 V8B additive
can
be increased, but only up to 60 % other
wise the anti-freeze protection is reduced
and furthermore the cooling effect is im
paired.
Vehicles
for export to cold countries -s~a .
have frost protection down to -35 decrees
C.
Only
our G 11 V8B or an additive v/rs :~e
specification
TL-VW 774 B (markea or
container) should be added to the coolant.
The additives can be obtained from
Volks
wagen dealers.
Other
additives
can be
very
detri
mental
to the
anti-corrosion
effect
in
particular.
The
subsequent
corrosion
damage
can
lead
to
coolant
loss
resulting
in
major
engine
damage.
www.vwT4camper.info - a useful website for owners and enthusiasts of VW T4 Transporter Campervans
Page 112 of 164
Downloaded from www.Manualslib.com manuals search engine
GENERAL
MAINTENANCE
Wheels
General
notes
• New tyres do not give maximum grip straight away and should therefore be run in
at moderate speeds and a careful style of
driving for about the
first
100 km. This will help to make the tyres last longer.
• Check tyres for damage from time to time (cuts, splits, cracks and lumps) and remove any foreign bodies embedded in the
treads.
• To avoid damage to tyres and wheels crive over curbs and similar obstacles very
slowly and as nearly at
right
angles as
poss
ible.
Damage
to wheels and tyres is not always
easy
to see, so if you
think
that
a wheel is
damaged,
it must be checked by a Volks
wagen dealer.
• Keep grease, oil and fuel off the tyres.
• Replace missing dust caps as soon as
possible.
• Mark wheels before taking them off so
that
they rotate in the same direction when put back on again. • When taken off, the tyres should be
stored in a
cool,
dry and preferably dark
place.
Tyres
which are not on wheels should be stored in a vertical position.
Tyre
life
Tyre life depends to a considerable extent on the following factors:
Inflation
pressure
The inflation pressure is very important par
ticularly at high
speeds.
Therefore, the pres
sures
should be checked at least once a month and before every long journey.
At this opportunity do not forget the spare
wheel:
• The spare wheel should always be in flated to the highest pressure required on
the vehicle.
Always
check the pressures when the tyres are cold.
When
warm,
the pressure is
higher
but do not
reduce.
The pressur
es
are given on page 147 and on a sticker on
the driver's door lock pillar.
Pressures
which are too high or too low
shorten
tyre
life - quite apart from the detri mental influence on vehicle handling.
Attention
At
continuous
high
speeds a
tyre
in
which
the pressure is too low
flexes
more
and
heats
up excess
ively.
This can cause
tread
separ
ation
and
tyre
blow
out.
pCU
A
pressure
which
is too low in- oo
creases
the
fuel
consumption
and
this
burdens
the
environment
unnecessarily.
Mode
of
driving
Fast
cornering, hard acceleration and viol
ent braking also increase
tyre
wear.
'0
www.vwT4camper.info - a useful website for owners and enthusiasts of VW T4 Transporter Campervans
Page 113 of 164
Downloaded from www.Manualslib.com manuals search engine
GENERAL MAINTENANCE
Balancing
wheels
iThe wheels on new vehicles are balanced, however when the vehicle is running vari-:
JS
influences can cause the wheels to be
come unbalanced and this causes steering . ibration.
As
imbalance also increases steering,
sus
pension and
tyre
wear the wheels should be
calanced
again. Furthermore a wheel snould always be rebalanced when the
tyre
"as
been repaired or when a new
tyre
has
!been
fitted.
Incorrect
wheel
alignment
"correct wheel alignment not only causes
jexcessive,
usually uneven
tyre
wear but can
also
impair the car's safe handling. If un usual
tyre
wear is noticed, contact a Volks-
jv.agen dealer.
Wear
indicators
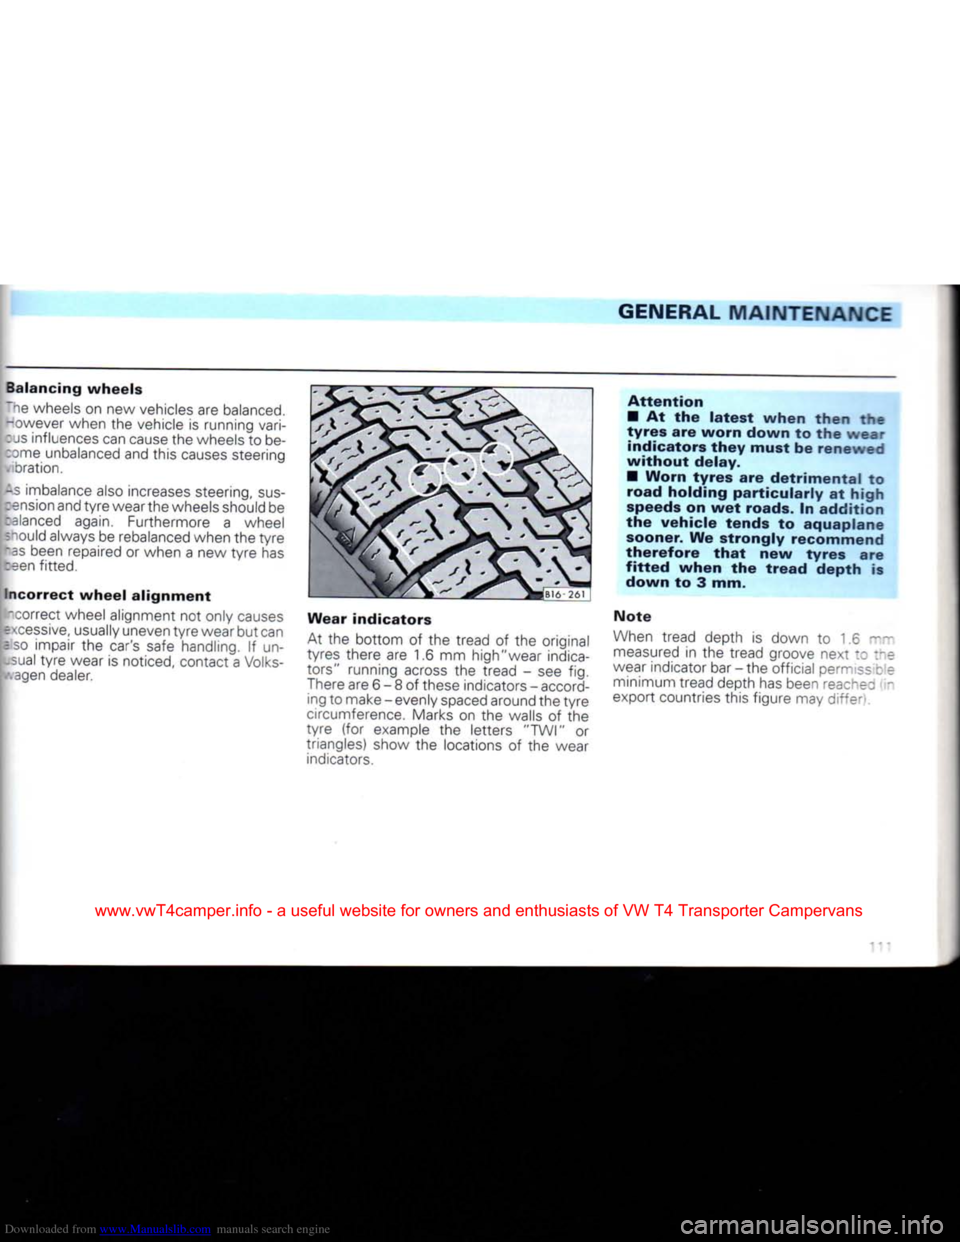
At the
bottom
of the tread of the original
tyres there are 1.6 mm high"wear indica
tors" running across the tread - see fig.
There are 6 - 8 of these indicators - accord
ing to make - evenly spaced around the
tyre
circumference. Marks on the walls of the
tyre
(for example the letters "TWI" or
triangles) show the locations of the wear indicators.
Attention
• At the
latest
when
then
the
tyres
are
worn
down
to the
wear
indicators
they
must
be
renewed
without
delay.
•
Worn
tyres
are
detrimental
to
road
holding
particularly
at
high
speeds on wet roads. In
addition
the
vehicle
tends
to
aquaplane
sooner. We
strongly
recommend
therefore
that
new
tyres
are
fitted
when
the
tread
depth
is
down
to 3 mm.
Note
When tread depth is down to 1.6 ~~ measured in the tread groove next to the
wear indicator bar - the official permiss c e minimum tread depth has been reachec -
export countries this figure may
differ''.
www.vwT4camper.info - a useful website for owners and enthusiasts of VW T4 Transporter Campervans
Page 114 of 164
Downloaded from www.Manualslib.com manuals search engine
GENERAL
MAINTENANCE
*
^
v
J
l B43
-
155~|
Changing
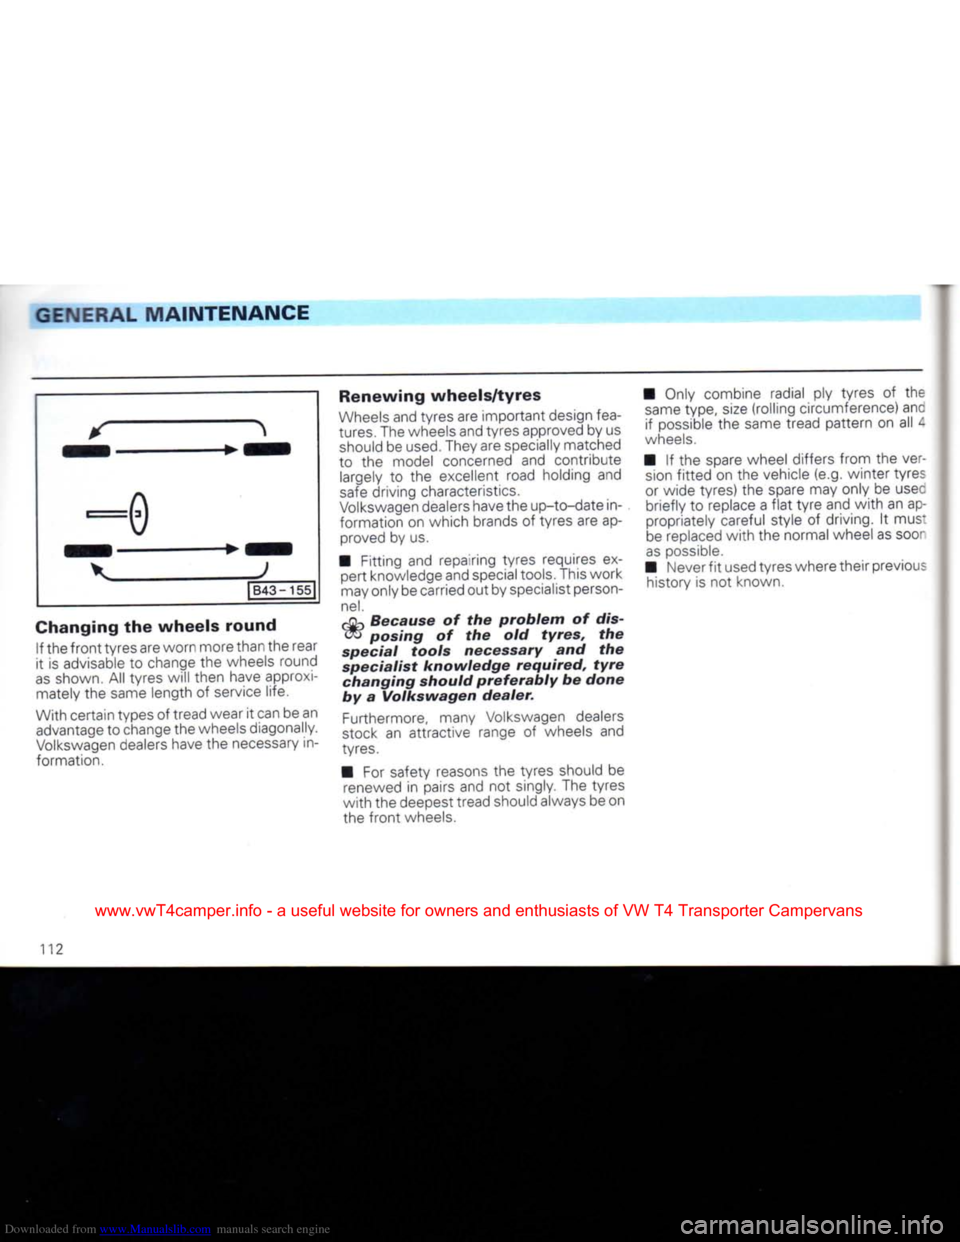
the wheels round If
the
front
tyres are worn more than the rear
it
is
advisable
to
change
the
wheels round
as
shown.
All
tyres will then have approxi mately
the
same length
of
service life.
With certain types
of
tread wear
it
can be an advantage
to
change the wheels diagonally.
Volkswagen
dealers have
the
necessary
in
formation.
Renewing wheels/tyres
Wheels
and tyres are important design
fea
tures. The wheels and tyres approved by us should be
used.
They are specially matched
to
the
model concerned
and
contribute largely
to the
excellent road holding
and
safe
driving characteristics.
Volkswagen
dealers have the up-to-date in
formation
on
which brands
of
tyres are ap proved
by us.
• Fitting
and
repairing tyres requires
ex
pert knowledge and special tools. This work
may only be carried out by specialist person
nel.
djn
Because
of the
problem
of dis-
<^>
posing
of the old
tyres,
the
special
tools
necessary
and the
specialist
knowledge
required,
tyre
changing
should
preferably
be
done
by
a
Volkswagen
dealer.
Furthermore, many Volkswagen dealers
stock
an
attractive range
of
wheels
and
tyres.
•
For
safety reasons
the
tyres should
be
renewed
in
pairs and
not
singly. The tyres
with
the deepest tread should always be on
the
front
wheels. • Only combine radial
ply
tyres
of the
same
type,
size
(rolling circumference) anc if possible
the
same tread pattern
on all 4
wheels.
•
If the
spare wheel differs from
the
ver
sion
fitted
on the
vehicle (e.g. winter tyres
or wide tyres)
the
spare may only
be
usee briefly
to
replace
a
flat
tyre
and
with
an
appropriately careful style
of
driving.
It
mus:
be replaced
with
the
normal wheel as soor
as
possible.
• Never
fit
used tyres where their previous history
is not
known.
112
www.vwT4camper.info - a useful website for owners and enthusiasts of VW T4 Transporter Campervans
Page 115 of 164

Downloaded from www.Manualslib.com manuals search engine
GENERAL
MAINTENANCE
•
Knowing
the
tyre
lettering and its
meaning
makes
the
selection
of the correct
tyres
easier.
Radial
ply tyres
have
the
fol
lowing
lettering on the
sidewall:
e.g.:
195 / 70 R 15 97 S reinforced
195 =
Tyre
width in mm
70 = Height/width ratio in %
R
=
Radial
construction
code
letter
=
Radial
15 =
Wheel
diameter in
inches
97 =
Carrying
capability
code
S
=
Speed
code
letter
rein =
Reinforced
version
The manufacturing date is
also
to be
seen
on the tyre wall
(possibly
only on inner
side
of
wheel):
DOT
... 120 ...
means
that the tyre was
pro
duced
in the 12th
week
of 1990.
Attention
Tyres
which are more than 6 years old should only be used in
an emergency and then
with
a particularly careful style of driv
ing.
If you wish to fit your car
with
non
standard wheels or tyres please note:
Attention
•
For technical reasons it is not normally possible to use wheels
from other vehicles - in certain
circumstances
not even wheels
from the same vehicle model!
•
Wheels and wheel bolts are matched to one another.
On
changing to a different type
of wheel (e.g. alloy wheels or
wheels
with
winter
tyres) the cor rect bolt
with
the proper length
and conical shape must be
used.
The security of the wheels and
the functioning of the brake
sys
tem depend on this!
•
Using types of wheel and or
tyres which have not been ap
proved
by us for your vehicle
model can be detrimental tc thi
safety of the vehicle. It can also
affect the vehicle under the
Con
struction and Use regulations.
•
If wheel
trim
discs
are
subse
quently installed it is essential to
ensure
that
the air flow remains
adequate to cool the brakes.
Volkswagen
dealers
have
a :ne
~e:e;5;~
information
about the
poss
;e :
~
of
wheels,
tyres and
wheel
trims.
www.vwT4camper.info - a useful website for owners and enthusiasts of VW T4 Transporter Campervans
Page 116 of 164

Downloaded from www.Manualslib.com manuals search engine
GENERAL
MAINTENANCE
Winter
tyres
In winter conditions winter tyres will dis
tinctly improve the vehicle's handling. This
applies
in particular to vehicles that are
equipped
with wide tyres.
Because
of their
construction (width, rubber mixture, tread
formation etc.) these tyres provide
less
trac
tion on ice and snow.
When
fitting
winter tyres note the follow
ing:
• Only radial ply winter tyres may be fitted.
The
factory recommended tyre
sizes
are
givenonpagel
46.
• To obtain the best possible handling
characteristics,
winter tyres must be
fitted
on all four wheels. • Winter tyres are no longer fully effective
when the tread has worn down to a depth
of 4 mm.
• All-weather tyres can also be used in
stead
of winter tyres.
• If you have a
flat
tyre the remarks on
using
the spare wheel on page 112 should
be
noted.
• Do not leave winter tyres
fitted
for an un
necessary
long period because when the
roads
are free of snow and ice the handling
with summer tyres is better.
For
environmental
reasons
summer
tyres
should
be
fitted
again
as soon as possible
because
normally
they
are
quieter
in
running,
tyre
wear
is
reduced
and the
fuel
consumption is
lower.
Snow chains
Snow chains may only be
fitted
on
the
front
wheels.
Snow
chains must not be
fitted
on 215/65 F
16
tyres. When
necessary
the vehicle mus:
be
equipped with smaller tyres - see
Wheels,page146.
Only
use thin chains which do not stanc
clear
more than 15 mm (including ten-
sioner).
When
using snow chains wheel
trim
plates
and
trim
rings must be taken off. For safet
reasons
the wheel bolts must then be f ittec
with caps which are available from
Volks
wagen
dealers.
When
driving over roads which are free of
snowyou
must remove the
chains.
On such
roads
they are detrimental to vehicle handl
ing,
damage the tyres and wear out quickly.
In Germany, the maximum permissible
speed
with snow chains is 50 km/h.
114
www.vwT4camper.info - a useful website for owners and enthusiasts of VW T4 Transporter Campervans
Page 121 of 164

Downloaded from www.Manualslib.com manuals search engine
DO-IT-YOURSELF
Spare
wheel
The spare wheel is secured under the rear of the vehicle in a special hinged carrier.
Lowering
spare
wheel
carrier
Attention
When
loosening the screws it is
essential
to
keep
to the
following
sequence:
• Loosen safety screw B
until
it turns freely.
Note
The safety screw B is held at the end
with
a
clip so
that
it cannot be screwed out
com
pletely. • Remove securing screw A completely.
The spare wheel carrier then rests on the safety screw B.
Attention
If the screws are loosened in the
opposite
sequence, the
carrier
can
fall
off
screw
B.
• Then insert the wheel spanner in the carrierto the stop as shown in illustration on
the
right.
• Grip wheel spanner
firmly
with
both
hands,
lift
slightly and swing to the
right
until
the large hole in the carrier can be swung
over the safety screw and down.
• Take spare wheel out.
Lifting
spare
wheel
carrier
•
Insert
wheel spanner in spare carrier.
•
Place
wheel on carrier
with
well up wards, swing carrier up
with
wheel spanner
and hook it on the safety screw.
• Screw in securing screw A
first,
then
.safety screw B.
• Then tighten both screws fully.
Attention
For
safety
reasons the
spare
wheel
carrier
must
always
be
firmly
secured so
that
the
spare
wheel
cannot
fall
down
acciden
tally.
Note
The rear mounting of the spare wheel
carrier can be adjusted in height to cater for
tyres of different widths.
www.vwT4camper.info - a useful website for owners and enthusiasts of VW T4 Transporter Campervans
Page 122 of 164
Downloaded from www.Manualslib.com manuals search engine
DO-IT-YOURSELF
Changing
wheels
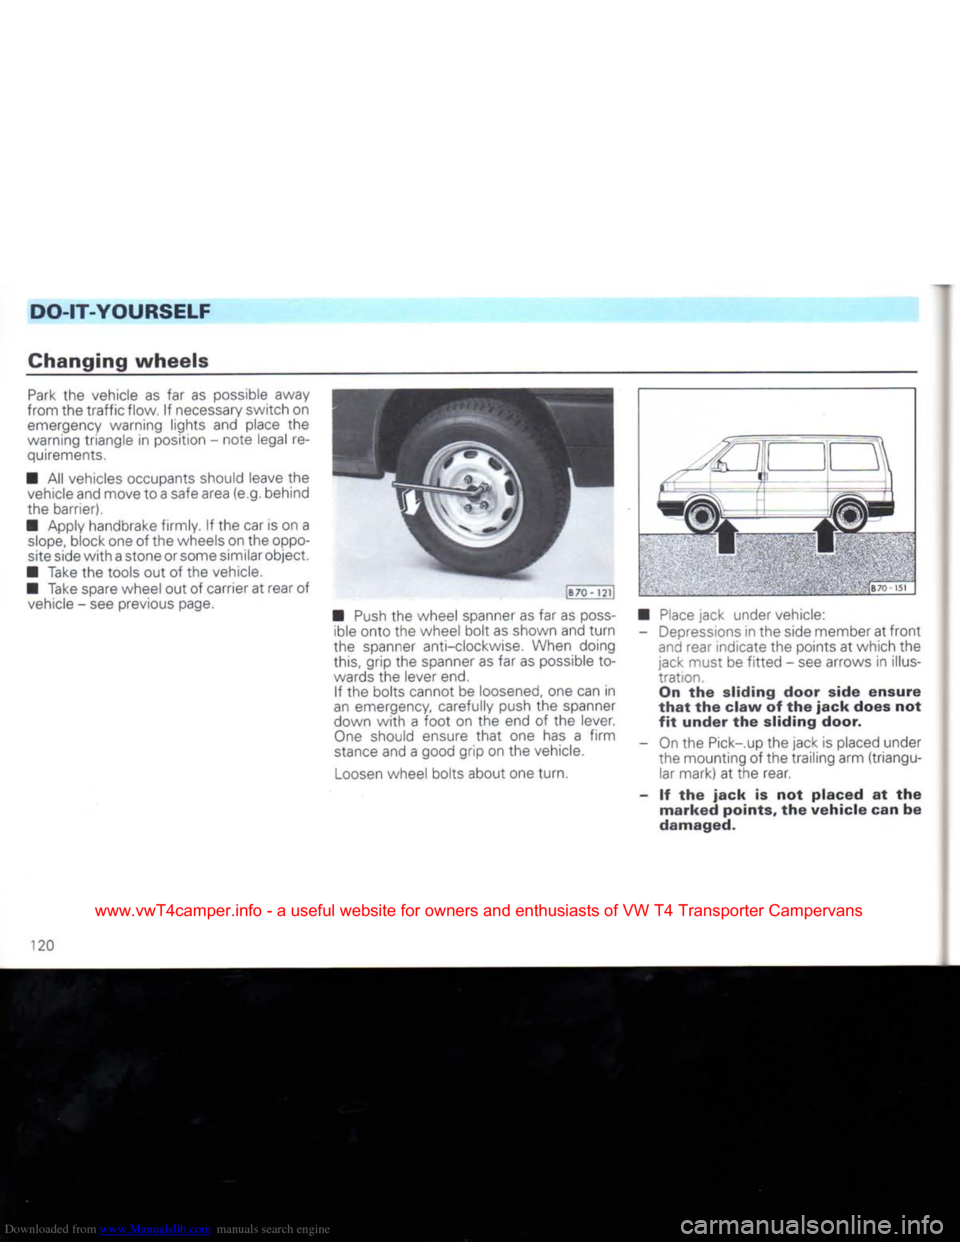
Park
the vehicle as far as possible away
from the
traffic
flow, if necessary switch on emergency warning lights and place the
warning triangle in position - note legal re
quirements.
• All vehicles occupants should leave the vehicle and move to a safe area (e.g. behind
the barrier).
• Apply handbrake firmly. If the car is on a
slope,
block one of the wheels on the oppo
site side
with
a stone or some similar object.
• Take the tools out of the vehicle.
• Take spare wheel out of carrier at rear of vehicle - see previous page.
JB70
- 121J
•
Push
the wheel spanner as far as
poss
ible onto the wheel bolt as shown and
turn
the spanner anti-clockwise. When doing this, grip the spanner as far as possible to
wards the lever end.
If the bolts cannot be loosened, one can in
an emergency, carefully push the spanner
down
with
a
foot
on the end of the lever.
One
should ensure
that
one has a
firm
stance
and a good grip on the vehicle.
Loosen
wheel bolts about one turn. 8"" 1 •>!
•
Place
jack under vehicle: - Depressions in the side member at
front
and rear indicate the points at which the
jack must be
fitted
- see arrows in illus
tration. On the sliding door side
ensure
that
the
claw
of the
jack
does not
fit
under
the sliding door.
- On the Pick-.up the jack is placed under the mounting of the trailing arm (triangular mark) at the rear.
- If the
jack
is not
placed
at the
marked
points, the
vehicle
can be
damaged.
120
www.vwT4camper.info - a useful website for owners and enthusiasts of VW T4 Transporter Campervans