1992 MAZDA PROTEGE wheel
[x] Cancel search: wheelPage 283 of 1164

OUTLINE
Component Function Remark
Engine control unit (ECU) Controls operation of the following:
(Cont’d)
1. A/C (Cut-off) 1. A/C relay
2. Fail-safe function 2. Self-Diagnosis Checker and MIL
3. Fuel injection system 3. Injector
4. idle speed control 4. Idle speed control (ISC) valve
5. Ignition timing control system 5. Igniter
6. Monitor function 6. Monitor lamp (Self-Diagnosis Checker)
7. Pressure regulator control system 7. Solenoid valve
(Pressure regulator control) (BP)
8. Purge control system 8. Purge control solenoid valve
9. VICS 9. Solenoid valve (WCS) (DOHC) Fuel filter
Filters particles from fuel Fuel pump
Provides fuel to injectors l Operates while engine running l Installed in fuel tank Igniter
Receives spark signal from ECU and gener-
ates high voltage in ignition coil Ignition switch
Engine cranking signal sent to ECU (START position)
Inhibitor switch (ATX)
Detects in-gear condition; sends signal to Switch ON in N or P range
ECU Injector
Intake air thermosensor
Idle speed control (ISC)
valve
Main relay
(FUEL INJ relay)
MIL (Malfunction
indicator lamp)
Neutral switch (MTX)
Oxygen sensor
PCV valve
P/S pressure switch
Pressure regulator
Resonance chamber
Resonance duct
Separator
Stoplight switch
Solenoid valve
(Purge control)
Shutter valve actuator
(DOHC)
Throttle body
Throttle sensor
Injects fuel into intake port l Controlled by signals from ECU
l High-ohmic injector
Detects intake air temperature; sends signal Installed on dynamic chamber
to ECU
Controls bypass air amount Controlled by duty signal from ECU
Supplies electric current to injectors, ECU,
etc.
Lamp flashes to indicate malfunction code
number of input and output devices
Detects in-gear condition; sends signal to
ECU
Detects oxygen concentration; sends signal
to ECU
Controls blowby gas introduced into engine
Detects P/S operation; sends signal to ECU
Adjusts fuel pressure supplied to injectors
Reduces intake air noise
Reduces intake air noise
Prevents fuel from flowing into charcoal
canister
Detects braking operation (deceleration),
sends signal to ECU
Controls evaporative fumes from canister to
intake manifold
Closes/opens shutter valve to improve
torque characteristics
Controls intake air quantity
l Detects throttle valve fully closed/fully
opened condition (MTX) TEN terminal grounded
Switch ON in neutral
Zirconia ceramic and platinum coating
P/S: ON when steering wheel turned right or
left
Controlled by duty signal from ECU
For Variable inertia charging system (VICS*)
Integrated throttle sensor, dashpot, and ISC
valve
l Detects throttle valve opening angle
(A-W
l Sends signals to ECU
F-l 7
Page 439 of 1164

CONTROL SYSTEM F
23UOFX-151
WASHER,
REPLACE
9MUOF2-24
05UOFX-25
9MUOF2-24
NEUTRAL SWITCH (MTX)
Inspection
1. Disconnect the neutral switch connector.
2. Connect an ohmmeter to the switch.
3. Check continuity of the switch.
Transmission Continuity
Neutral Yes
Other ranges No
4. If not as specified, replace the neutral switch.
Replacement
Replace the neutral switch as shown in the figure.
POWER STEERING PRESSURE SWITCH
Inspection
1. Disconnect the P/S pressure switch connector.
2. Connect an ohmmeter to the switch.
3. Start the engine and let it idle. Check continuity of the switch
while turning the steering wheel.
P/S
Turning
Not turning Continuity
Yes
No
4. If not as specified, replace the P/S pressure switch.
Replacement
Replace the P/S pressure switch as shown in the figure.
F-l 73
Page 473 of 1164

H
CLUTCH
INDEX ......................................................
OUTLINE ..................................................
SPECIFICATIONS .................................... H- 3
TROUBLESHOOTING GUIDE.. .................... H- 3
CLUTCH FLUID ......................................... H- 4
PREPARATION ....................................... H- 4
REPLACEMENT ...................................... H- 4
CLUTCH PEDAL ....................................... H- 5
ADJUSTMENT ........................................ H- 5
REMOVAL / INSPECTION / INSTALLATION.. H- 6
CLUTCH MASTER CYLINDER.. ................... H- 7
PREPARATION ....................................... H- 7
REMOVAL / INSPECTION / INSTALLATION.. H- 7
AIR BLEEDING ....................................... H- 6
OVERHAUL ............................................ H-10
CLUTCH RELEASE CYLINDER ................... H-l 2
PREPARATION ....................................... H-12
REMOVAL / INSTALLATION ...................... H-l 2
AIR BLEEDING (REFER TO PAGE H-8)
OVERHAUL ............................................ H-13
CLUTCH UNIT .......................................... H-14
PREPARATION ....................................... H-14
REMOVAL I INSTALLATION.. .................... H-15
RELEASE BEARING .................................. H-17
INSPECTION .......................................... H-17
CLUTCH COVER ....................................... H-17
INSPECTION .......................................... H-17
CLUTCH DISC .......................................... H-17
INSPECTION .......................................... H-17
PILOT BEARING ....................................... H-16
INSPECTION .......................................... H-16
FLYWHEEL ............................................... H-16
INSPECTION .......................................... H-16
23UOHX-001
Page 474 of 1164

H INDEX
NDEX
CLUTCH SWITCH
SERVICE, SECTION F
23UOHX-00:
2
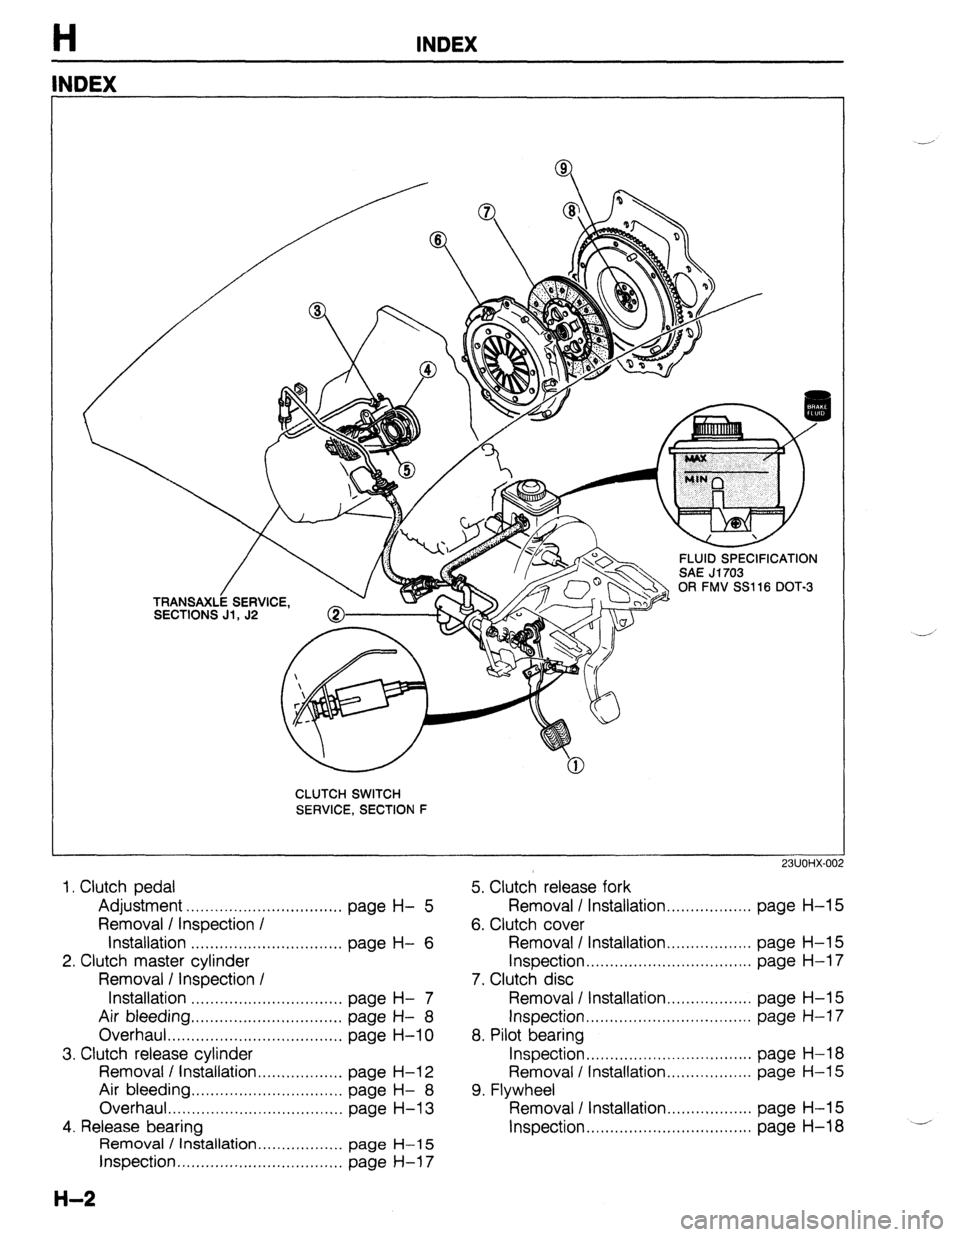
5. Clutch release fork
Removal / Installation . . . . . . . . . . . . . . . . . . page
H-l 5
6. Clutch cover 1. Clutch pedal
Adjustment . . . . . . . . . . . . . . . . . . . . . . . . . . . . . . . . .
page H- 5
Removal / Inspection /
installation . . . . . . . . . . . . . . . . . . . . . . . . . . . . . . . .
page H- 6
2. Clutch master cylinder
Removal I Inspection I
Installation . . . . . . . . . . . . . . . . . . . . . . . . . . . . . . . .
page H- 7
Air bleeding ,............,..... I ,.,........, page H- 8
Overhaul . . . . . . . . . . . . . . . . . . . . . . . . I ,,.,........
page H-10
3. Clutch release cylinder
Removal / Installation.. . . . . . . . . . . . . . . . . page
H-l 2
Air bleeding . . . . . . . . . . . ..*..................
page H- 8
Overhaul . . . . . . . . . . . . . . . . . . . . . . . . . . . . . . . . . . . . .
page
H-l 3
4. Release bearing
Removal / installation . . . . . . . . . . . . . . . . . . page
H-l 5
Inspection ,.....,..,.,~.,..........,.,,..,,.. page H-l 7
H-2
Removal / Installation .,.......,..,..... page H-l 5
Inspection . . . . . . . . . . . . . . . . . . . . . . . . . . . . . . . . . . .
page H-l 7
7. Clutch disc
Removal I Installation . . . . . . . . . . . . . . . . . . page
H-l 5
Inspection . . . . . . . . . . . . . . . . . . . . . . . . . . . . . . . . . . .
page H-l 7
8. Pilot bearing
Inspection . . . . . . . . . . . . . . . . . . . . . . . . . . . . . . . . . . .
page H-l 8
Removal / Installation.. . . . . . . . . . . . . . . .
page H-l 5
9. Flywheel
Removal I Installation . . . . . . . . . . . . . . . . . . page
H-l 5
Inspection . . . . . . . . . . . . . . . . . . . . . . . . . . . . . . . . . . . page H-18
Page 475 of 1164

OUTLINE, TROUBLESHOOTING GUIDE
OUTLINE
SPECIFICATIONS
-
-
Item
Clutch control Engine/Transaxle B6 SOHC BP SOHC BP DOHC
F!Wl-R GBM-R Hvdraulic
Clutch cover
Clutch disc Type
Set load Diaphragm spring
N
(kg, lb) 1 3,630 (370, 814) 1 3,826 (390, 858) 1 3,846 (392, 862)
30 17.48)
200 (7.87) 215 (8.46) Outer diameter mm (in)
Inner diameter mm (in)
Pressure plate
side mm (in)
Thickness
Flywheel side
mm lit-d
1! , I
130 (5.12) ’ ’
150 i5.91 j
3.5 (0.138) 3.8 (0.150)
3.5 (0.138)
Type Suspended
Clutch pedal
Master cylinder
Release cylinder
Clutch fluid Pedal ratio 6.55
Full stroke mm (in) 135 (5.32)
Height (With carpet)
mm (in) 196-204 (7.72-8.03)
Inner diameter mm (in) 15.87 (0.625)
Inner diameter
mm (in) 19.05 (0.750)
SAE J1703 or FMVSS116 DOT-3
23UOHX-003
TROUBLESHOOTING GUIDE Problem Possible Cause Remedy Page
Slipping
Clutch disc facing worn excessively Replace H-15, 17
Clutch disc facing surface hardened or oil on surface Repair or replace H-15
Pressure plate damaged Repair or replace H-15
Diaphragm spring damaged or weakened Replace H-15
Insufficient clutch pedal play Adjust H- 5
Clutch pedal sticking Repair or replace H- 6
Flywheel damaged Repair or replace H-15, 17 Faulty disen-
Excessive runout or damaged clutch disc Replace H-15, 17 gagement Clutch disc splines rusted or worn Remove rust or replace H-15
Oil on facing Repair or replace H-15
Diaphragm spring weakened Replace H-15
Excessive clutch pedal play Adjust H- 5
Insufficient clutch fluid
Add fluid H- 3
Leakage of clutch fluid Locate and repair or -
replace Clutch vibrates
Oil on facing Repair or replace H-15 when accelerating Torsion rubbers weakened Replace H-15
Clutch disc facing hardened or damaged Repair or replace H-15
Clutch disc facing rivets loose Replace H-15
Pressure plate damaged or excessive runout Replace H-15
Flywheel surface hardened or damaged Repair or replace H-15
Loose or worn engine mount Tighten or replace - Clutch pedal
Pedal shaft not properly lubricated Lubricate or replace H- 6 sticking
Abnormal noise
Clutch release bearing damaged Replace H-15, 17
Poor lubrication of release bearing sleeve Lubricate or replace H-15
Torsion rubbers weakened Replace H-15
Excessive crankshaft end play Repair Refer to Section E
Pilot bearing worn or damaged Replace H-15, 18
Worn pivot points of release fork Repair or replace H-15
^^. .^. I~, ^r
H-3
Page 476 of 1164

H CLUTCH FLUID
CLUTCH FLUID
PREPARATION
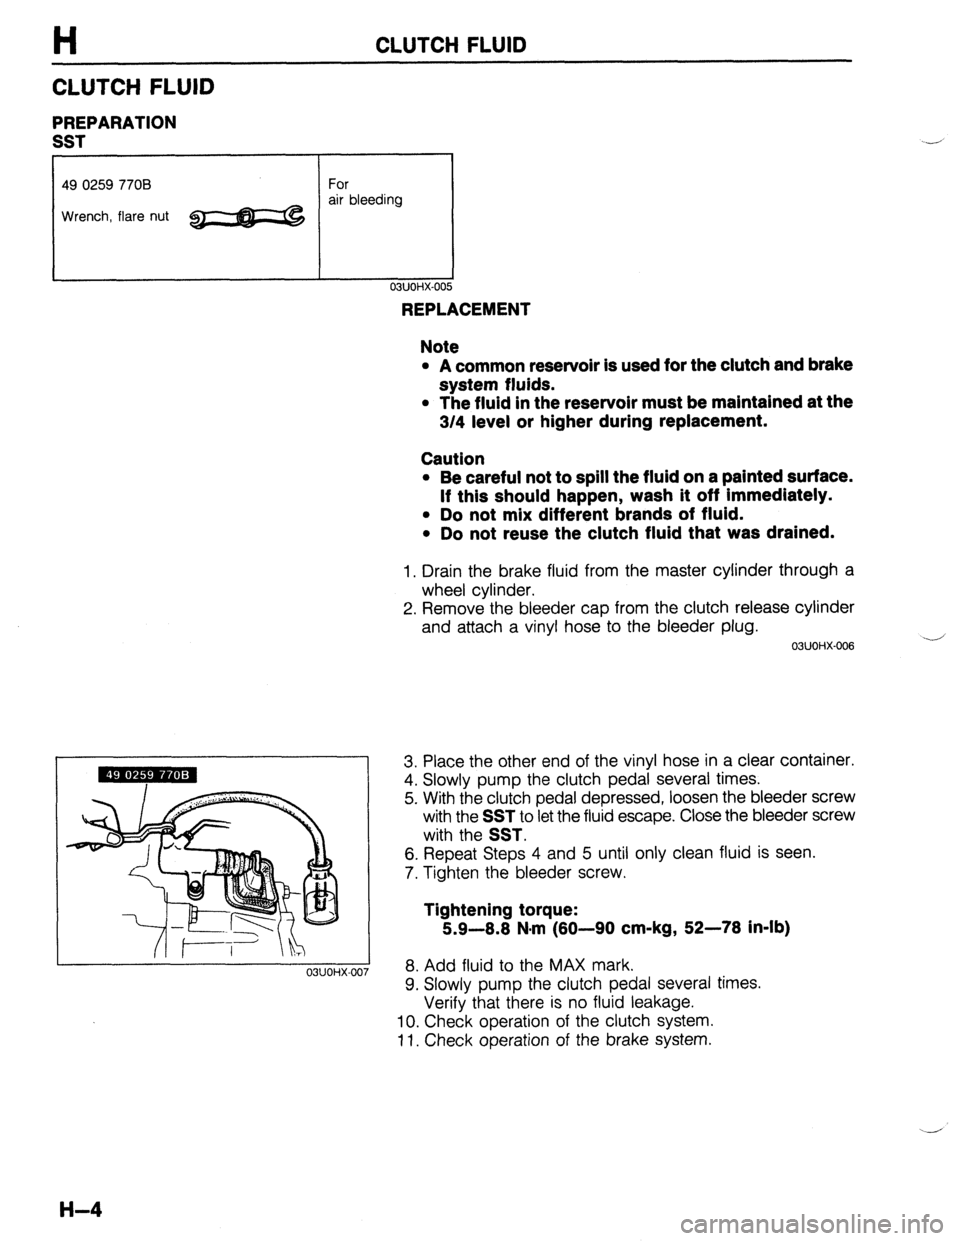
SST
49 0259 7708 For
Wrench, flare nut ~ air bleeding
03UOHX-007
REPLACEMENT
Note
l A common reservoir is used for the clutch and brake
system fluids.
l The fluid in the reservoir must be maintained at the
3/4 level or higher during replacement.
Caution
l Be careful not to spill the fluid on a painted surface.
If this should happen, wash it off Immediately.
l Do not mix different brands of fluid.
l Do not reuse the clutch fluid that was drained.
1. Drain the brake fluid from the master cylinder through a
wheel cylinder.
2. Remove the bleeder cap from the clutch release cylinder
and attach a vinyl hose to the bleeder plug.
03UOHX-006 -
3. Place the other end of the vinyl hose in a clear container.
4. Slowly pump the clutch pedal several times.
5. With the clutch pedal depressed, loosen the bleeder screw
with the
SST to let the fluid escape. Close the bleeder screw
with the
SST.
6. Repeat Steps 4 and 5 until only clean fluid is seen.
7. Tighten the bleeder screw.
Tightening torque:
5.9-8.8 N.m (80-90 cm-kg, 52-78 in-lb)
8. Add fluid to the MAX mark.
9. Slowly pump the clutch pedal several times.
Verify that there is no fluid leakage.
10. Check operation of the clutch system.
11. Check operation of the brake system.
H-4
Page 487 of 1164

CLUTCH UNIT
REMOVAL / INSTALLATION
Note
l Remove the clutch release cylinder with the clutch pipe connected.
l Do not remove the pilot bearing if not necessary.
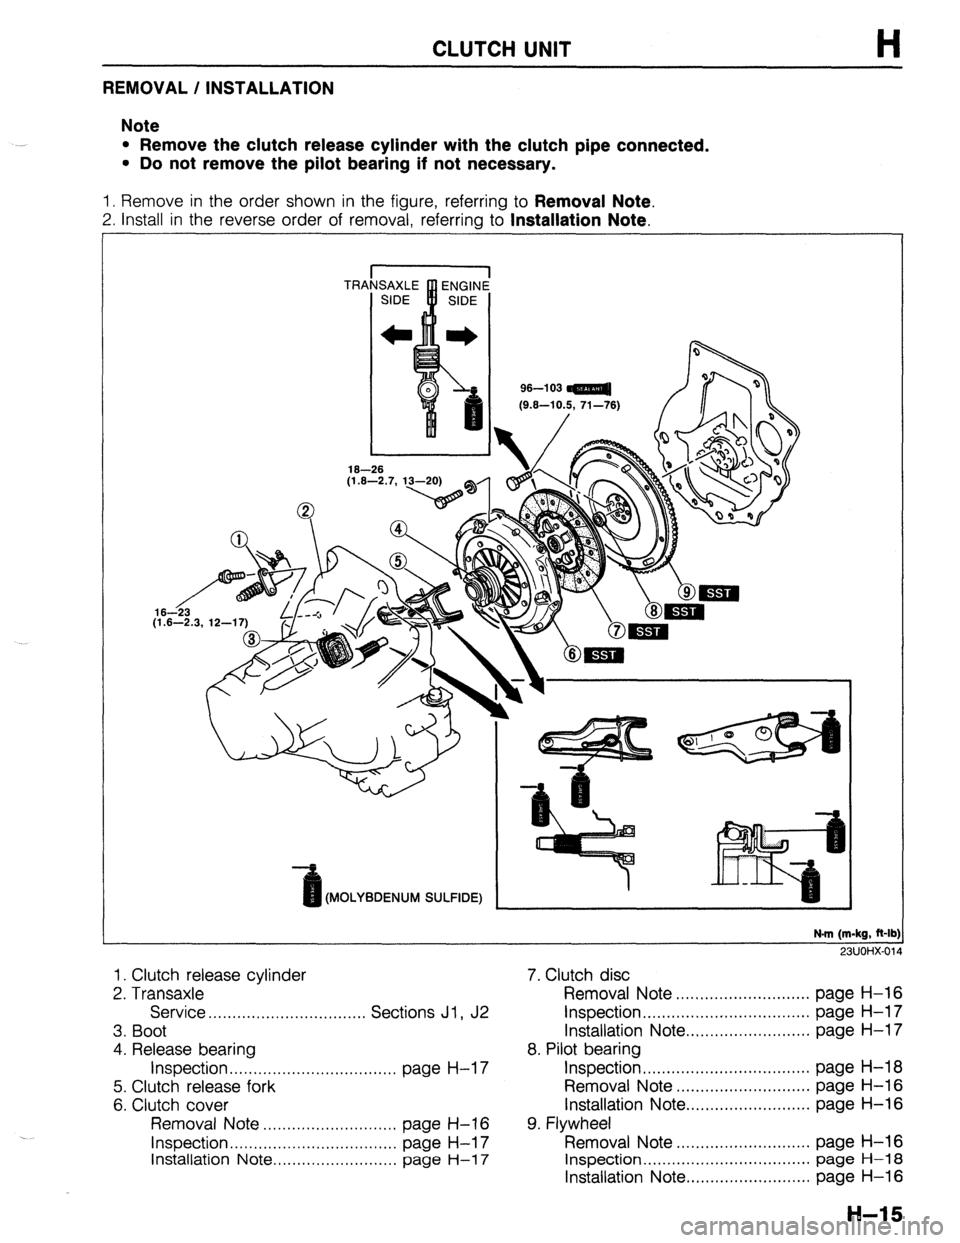
1. Remove in the order shown in the figure, referring to Removal Note.
2. Install in the reverse order of removal, referring to Installation Note.
96-l 03
Kt.6-10.5. 71-761
(MOLYBDENUM SULFIDE)
N-m (m-kg, R-lb:
911 Im-4Y.fi,r
1. Clutch release cylinder
2. Transaxle
Service . . . . . . . . . . . . . . . . . . . . . . . . . ,....... Sections Jl , J2
3. Boot
4. Release bearing
Inspection . . . . . . . . . . . . . . . . . . . . . . . . . . . . . . . . . . . page H-l 7
5. Clutch release fork
6. Clutch cover
Removal Note ..,...........,,,.........,, page H-16
Inspection . . . . . . . . . . . . . . . . . . . . . . . . . . . . . . . . . . . page H-l 7
Installation Note .,......................., page
H-l 7
7. Clutch disc
Removal Note ............................ page H-16
Inspection.. ................................. page H-l 7
Installation Note .......................... page H-l 7
8. Pilot bearing
Inspection ................................... page H-18
Removal Note ............................ page H-16
Installation Note.. ........................ page H-16
9. Flywheel
Removal Note ............................ page H-16
Inspection ................................... page H-18
Installation Note .......................... page H-16
H-15
Page 488 of 1164

H CLUTCH UNIT
/ 6fs 23UOHX-015
Removal Note
Clutch cover and disc
1. Install the SST or equivalent.
2. Loosen each bolt one turn at a time in a crisscross pattern
until spring tension is released. Then remove the clutch COV-
er and disc.
‘6
I
23UOHX-016
23UOHX-01
Pilot bearing
1. Remove the pilot bearing with the SST if necessary.
Flywheel
Note
l After removing the flywheel, inspect for oil leakage
past the crankshaft rear oil seal.
If necessary, replace the oil seal.
(Refer to Section B.) -J
1. Hold the flywheel with the SST or equivalent.
2. Remove the flywheel.
Installation Note
Flywheel
1. Wipe the bolts clean and apply sealant to the bolt threads.
2. Install the flywheel and the
SST or equivalent.
3. Tighten the bolts in the pattern shown.
Tightening torque:
96-103 N,m (9.6-10.5 m-kg, 71-76 ft-lb)
Pilot bearing
Note
l Install the pilot bearing flush with the flywheel.
1. Install the new bearing with a suitable pipe.
Bearing outer diameter: 35mm (1.376 in) .-’