1992 HONDA PRELUDE lights
[x] Cancel search: lightsPage 66 of 225

Interior Lights
Ceiling Light
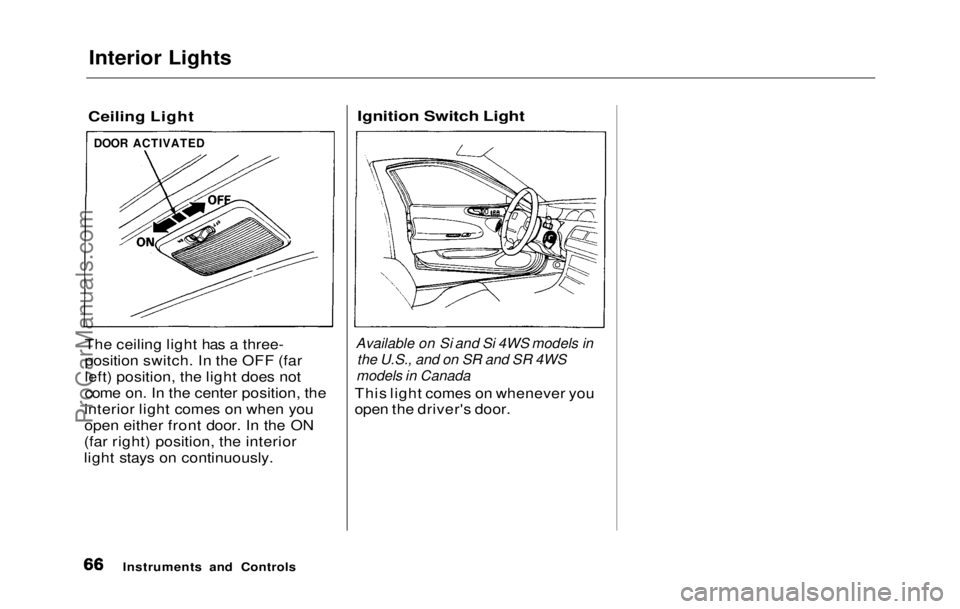
The ceiling light has a three-
position switch. In the OFF (far
left) position, the light does not
come on. In the center position, the
interior light comes on when you
open either front door. In the ON
(far right) position, the interior
light stays on continuously.
Ignition Switch Light
Available on Si and Si 4WS models in
the U.S., and
on
SR and
SR
4
WS
models in Canada
This ligh t
comes on whenever you
open the driver's door.
Instruments and Controls
DOOR ACTIVATEDProCarManuals.comMain Menu Table of Contents s t
Page 70 of 225

Heating and Cooling
What Each Control Does
Fan Control Lever
Sliding this lever to the right
increases the fan speed, which
increases air flow.
Temperature Control Lever
Sliding this lever to the right
increases the temperature of air
flowing through the system.
Mode Buttons
These buttons control the direction of air flow. The indicator light
shows which button is controlling
air flow.
Air Conditioner (A/C) Switch
This switc h
turns the air condi-
tioner ON and OFF. The indicator in the switch lights when the A/C is
ON. MODE BUTTONS
REAR WINDOW
DEFROSTER BUTTON
RECIRCULATION
BUTTON
TEMPERATURE
CONTROL LEVER
Recirculation Button
This button controls the source of
air going into the system. When the indicator in this button is lit, the
system is recirculating the interior air (the Recirculation mode). When
the indicator is off, fresh air is
brought in from outside the car (the Fresh Air mode). Push the
FAN CONTROL
LEVER AIR CONDITIONER
ON/OFF SWITCH
button to change between recircu-
lated and fresh air.
Rear Window Defroster
Button
This button turns the rear window defroster on and off (see page 56).
Comfort and Convenience FeaturesProCarManuals.comMain Menu Table of Contents s t
Page 76 of 225

Audio System (S)
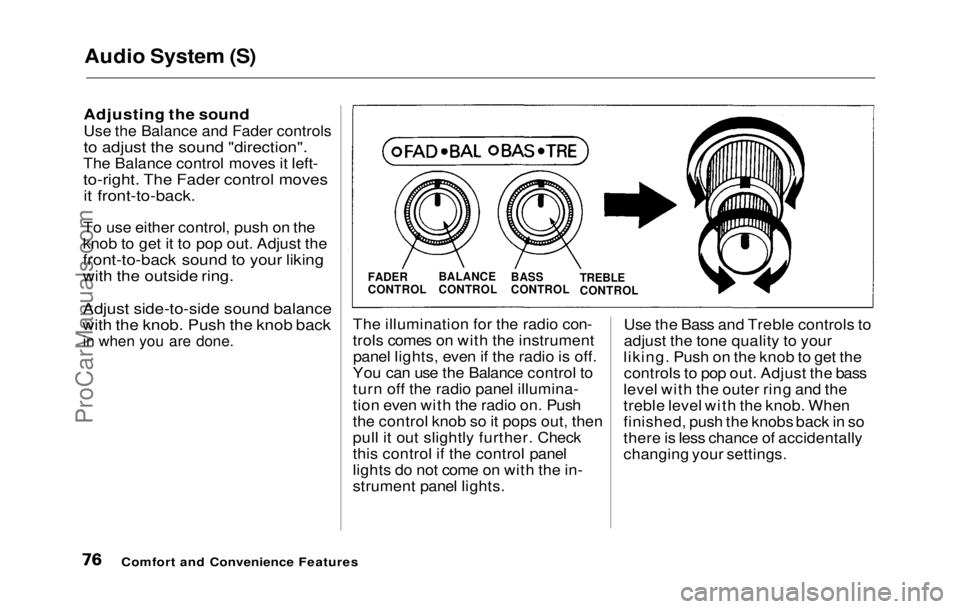
Adjusting the soundUse the Balance and Fader controls
to adjust the sound "direction".
The Balance control moves it left-
to-right. The Fader control moves it front-to-back.
To use either control, push on the
knob to get it to pop out. Adjust the
front-to-back sound to your liking
with the outside ring.
Adjust side-to-side sound balance
with the knob. Push the knob back
in when you are done.
The illuminatio n
for the radio con-
trols comes on with the instrument panel lights, even if the radio is off.
You can use the Balance control to
turn off the radio panel illumina-
tion even with the radio on. Push
the control knob so it pops out, then
pull it out slightly further. Check
this control if the control panel
lights do not come on with the in-
strument panel lights. Use the Bass and Treble controls to
adjust the tone quality to your
liking. Push on the knob to get the controls to pop out. Adjust the bass
level with the outer ring and the
treble level with the knob. When
finished, push the knobs back in so
there is less chance of accidentally
changing your settings.
Comfort and Convenience Features
FADER
CONTROL
BALANCE
CONTROL
BASS
CONTROL
TREBLE
CONTROLProCarManuals.comMain Menu Table of Contents s t
Page 85 of 225

Audio System (Si, SR)
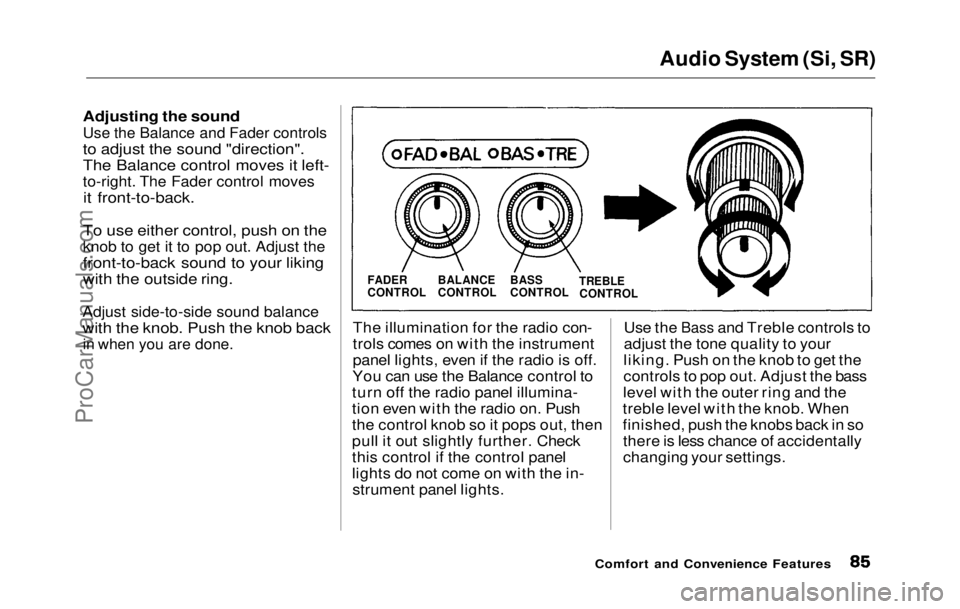
Adjusting the soundUse the Balance and Fader controls
to adjust the sound "direction".
The Balance control moves it left-
to-right. The Fader control moves
it front-to-back.
To use either control, push on the
knob to get it to pop out. Adjust the
front-to-back sound to your liking
with the outside ring.
Adjust side-to-side sound balance
with the knob. Push the knob back
in when you are done.
The illuminatio n
for the radio con-
trols comes on with the instrument
panel lights, even if the radio is off.
You can use the Balance control to
turn off the radio panel illumina-
tion even with the radio on. Push
the control knob so it pops out, then
pull it out slightly further. Check
this control if the control panel
lights do not come on with the in- strument panel lights. Use the
Bass and Treble controls to
adjust th e
tone quality to your
liking. Push on the knob to get the
controls to pop out. Adjust the bass
level with the outer ring and the
treble level with the knob. When
finished, push the knobs back in so there is less chance of accidentally
changing your settings.
Comfort and Convenience Features
FADER
CONTROL
BALANCE
CONTROL
BASS
CONTROL
TREBLE
CONTROLProCarManuals.comMain Menu Table of Contents s t
Page 107 of 225

Preparing to Drive
You should do the following checks and adjustments every day before
you drive your car.
1. Make sure all windows, mirrors, and outside lights are clean and
unobstructed. Remove frost,
snow, or ice.
2. Check that the hood and trunk are fully closed.
3. Check that any items you may be carrying with you inside are
stored properly or fastened down
securely. 4. Check the adjustment of the seat
(see page 51 ).
5. Check the adjustment of the
inside and outside mirrors (see
page 59 ).
6. Chec k
the adjustment of the
steering wheel (see page 43 ).
7. Make sure the doors are securely
closed and locked.
8. Fasten your seat belt. Check that your passengers have fastened
their seat belts (see page 7 ). 9. Turn the ignition ON (II). Check
the indicator lights in the instru-
ment panel.
10.Start th
e
engine.
11.Check the gauges and indicator
lights in the instrument panel
(see page 31 ).
Driving
ProCarManuals.comMain Menu Table of Contents s t
Page 115 of 225

The Braking System
Your Honda is equipped with disc brakes at all four wheels. The
braking system is power-assisted to
reduce the effort needed on the
brake pedal.
Put your foot on the brake pedal
only when you intend to brake.
Resting your foot on the pedal
keeps the brakes applied lightly,
causing them to build up heat. Heat
build-up can reduce how well your
brakes work. It also keeps your
brake lights on all the time, confusing drivers behind you.
Constant application of the brakes
when going down a long hill builds
up heat and reduces their effective-
ness. Use the engine to assist the
brakes by downshifting to a lower
gear and taking your foot off the
accelerator pedal. Check your brakes after driving
through deep water. Apply the
brakes moderately to see if they feel normal. If not, apply them
gently and frequently until they do. Since a longer distance is needed to
stop with wet brakes, be extra
cautious and alert in your driving.
Brake Wear Indicators
All four brakes have audible brake
wear indicators. When the brake pads need re-placing, you will hear a distinctive
metallic "screeching" sound when
you apply the brakes. If you do not
have the brake pads replaced, they
will begin screeching all the time.
Your brakes may sometimes squeal
or squeak when you apply them
lightly. Do not confuse this with the
brake wear indicators. They make a very audible "screeching".
Brake System Design
The hydraulic system that operates
the brakes has two separate cir- cuits. Each circuit works diago-
nally across the car (the left-front
brake is connected with the right-
rear brake, etc.). If one circuit
should develop a problem, you will
still have braking at two wheels.
Driving
FrontProCarManuals.comMain Menu Table of Contents s t
Page 119 of 225

Driving in Bad Weather
Driving Technique — Always
drive slower than you would in dry
weather. It takes your car longer to react, even in conditions that may
seem just barely damp. Apply
smooth, even pressure to all the
controls. Abrupt steering wheel
movements or sudden, hard appli-
cation of the brakes can cause loss
of control in wet weather. Be extra
cautious for the first few miles of
driving while you adjust to the change in driving conditions. This
is especially true in snow. A person
can forget some snow-driving tech- niques during the summer months.
Practice is needed to relearn those
skills.
Exercise extra caution when
driving in rain after a long dry spell.
After months of dry weather, the
first rains bring oil to the surface of
the roadway, making it slippery. Visibility — Being able to see
clearly in all directions and being
visible to other drivers are impor-
tant in all weather conditions. This is more difficult in bad weather. To
be seen more clearly during day-
light hours, turn on your headlights.
Inspect your windshield wipers and
washers frequently. Keep the wind- shield washer reservoir full of the
proper fluid. Replace the wind-
shield wiper blades if they start to
streak the windshield or leave parts
unwiped. Use the defrosters and air conditioner to keep the windows
from fogging up on the inside (see
page 73).
Traction — Check your tires
frequently for wear and proper pressure. Both are important in
preventing "hydroplaning" (loss of
traction on a wet surface). In the
winter, mount snow tires on all four
wheels for the best handling.
Watch road conditions carefully, they can change from moment to
moment. Wet leaves can be as slip-
pery as ice. "Clear" roads can have
patches of ice. Driving conditions
can be very hazardous when the
outside temperature is near freez-
ing. The road surface can become
covered with areas of water pud-
dles mixed with areas of ice, so
your traction can change without
warning.
Be careful when downshifting. If
traction is low, you can lock up the
drive wheels for a moment and
cause a skid.
DrivingProCarManuals.comMain Menu Table of Contents s t
Page 122 of 225

Towing a Trailer
Mirrors
Many states and provinces have
laws requiring special outsidemirrors when you are towing a
trailer. Check the laws in your area.
You may want to install mirrors, even if they are not required. Hook
up the trailer and see how much it obscures your ability to see behind
you with the standard mirrors. Ifyou cannot see directly behind you,
or have a large blind spot next to
the trailer or the car, you should
install mirrors intended for towing.
Connecting the Trailer
Most trailers that have a gross
weight of 450 kg (1,000 Ibs) do not
have their own braking system. If you are thinking of getting a trailer
that does have brakes, make sure
they are electrically-operated.
There are no provisions in your car
to tap into its hydraulic braking
system. Any attempt to attach the
trailer's brakes to your car's
hydraulic system, no matter how successful it may seem, will lower
braking effectiveness and create a potential hazard.
Always use a safety chain when towing a trailer. Connect the safety
chain securely at both ends. Make
sure the chain crosses under the
tongue so it will catch the trailer if
it becomes unhitched. Leave
enough slack in the chain so it can't
bind in a sharp turn. Do not let it drag on the ground.
Before Starting Out
As you are preparing to tow your
trailer, do the following:
Measure the trailer's tongue load.
You can do this with a bathroom
scale.
Verify that the hitch and safety chain are securely fastened.
Check the condition and air
pressure of all tires on the trailer
and your car. Low tire pressure
can seriously affect the handling.
Also check the spare tires.
With everything loaded and the
trailer connected, check that the
rear of the car is not sagging. If
so, redistribute the load in the
car.
Check that all lights on the car
are working properly.
DrivingProCarManuals.comMain Menu Table of Contents s t