1992 FORD SIERRA jacking
[x] Cancel search: jackingPage 6 of 16

21Fit the small spring, valve, diaphragm
(ensuring that it locates correctly), large
spring, and the spring cup.
22Carefully place the ball into position on
the spring cup, and ensure that it locates
correctly.
23Refit the regulator housing, taking great
care to avoid disturbing the ball, and once
correctly in position, tighten the screws evenly
to avoid distorting the diaphragm.
24Refit the CFI unit.
25On completion, the fuel system pressure
should be checked by a Ford dealer at the
earliest opportunity.
1.8 litre
26Disconnect the battery negative lead.
27Remove the air cleaner assembly.
28Depressurise the fuel system and
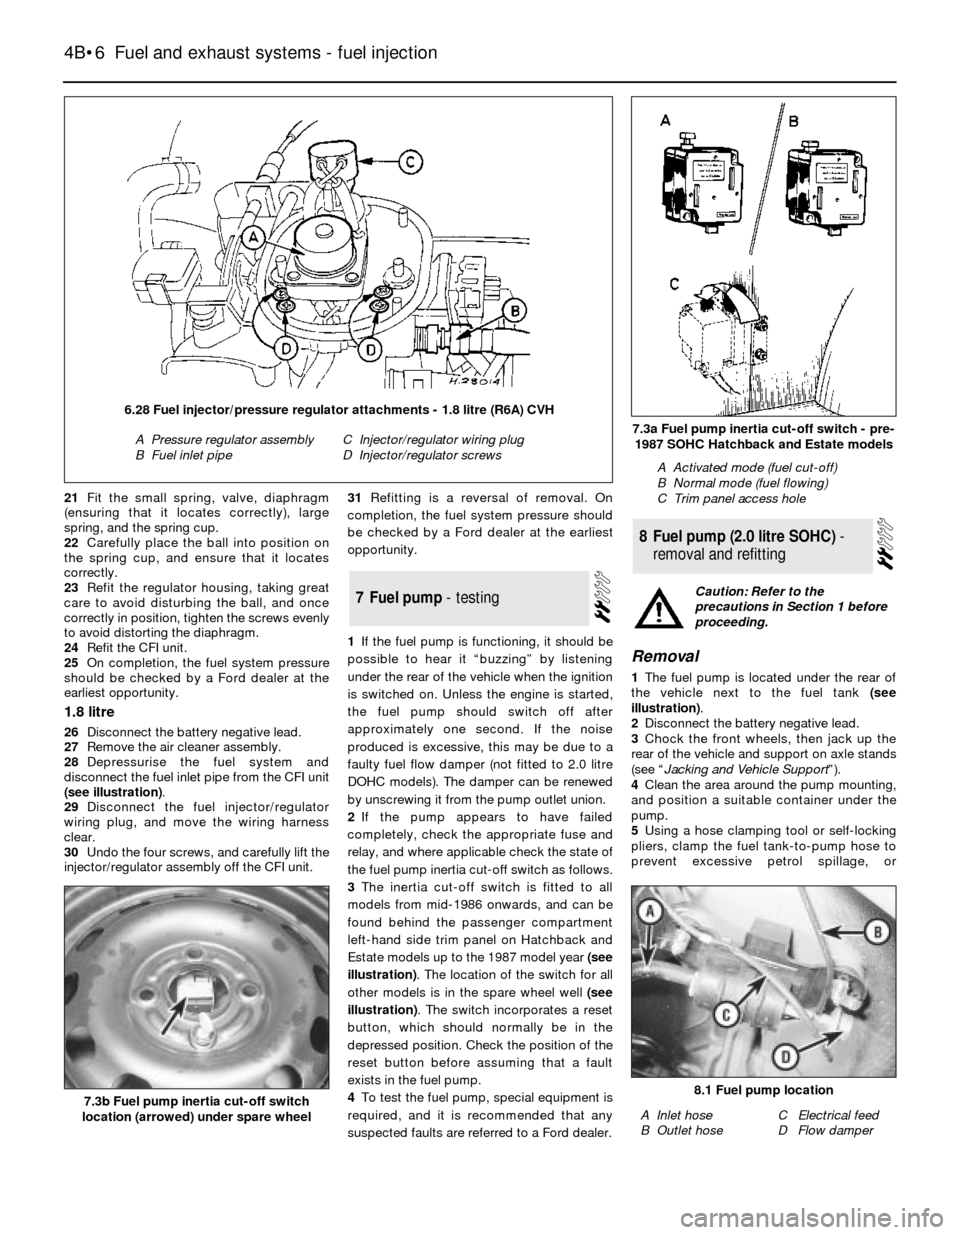
disconnect the fuel inlet pipe from the CFI unit
(see illustration).
29Disconnect the fuel injector/regulator
wiring plug, and move the wiring harness
clear.
30Undo the four screws, and carefully lift the
injector/regulator assembly off the CFI unit.31Refitting is a reversal of removal. On
completion, the fuel system pressure should
be checked by a Ford dealer at the earliest
opportunity.
1If the fuel pump is functioning, it should be
possible to hear it “buzzing” by listening
under the rear of the vehicle when the ignition
is switched on. Unless the engine is started,
the fuel pump should switch off after
approximately one second. If the noise
produced is excessive, this may be due to a
faulty fuel flow damper (not fitted to 2.0 litre
DOHC models). The damper can be renewed
by unscrewing it from the pump outlet union.
2If the pump appears to have failed
completely, check the appropriate fuse and
relay, and where applicable check the state of
the fuel pump inertia cut-off switch as follows.
3The inertia cut-off switch is fitted to all
models from mid-1986 onwards, and can be
found behind the passenger compartment
left-hand side trim panel on Hatchback and
Estate models up to the 1987 model year (see
illustration). The location of the switch for all
other models is in the spare wheel well (see
illustration). The switch incorporates a reset
button, which should normally be in the
depressed position. Check the position of the
reset button before assuming that a fault
exists in the fuel pump.
4To test the fuel pump, special equipment is
required, and it is recommended that any
suspected faults are referred to a Ford dealer.
Removal
1The fuel pump is located under the rear of
the vehicle next to the fuel tank (see
illustration).
2Disconnect the battery negative lead.
3Chock the front wheels, then jack up the
rear of the vehicle and support on axle stands
(see “Jacking and Vehicle Support”).
4Clean the area around the pump mounting,
and position a suitable container under the
pump.
5Using a hose clamping tool or self-locking
pliers, clamp the fuel tank-to-pump hose to
prevent excessive petrol spillage, or
8Fuel pump (2.0 litre SOHC) -
removal and refitting
7Fuel pump - testing
4B•6Fuel and exhaust systems - fuel injection
7.3a Fuel pump inertia cut-off switch - pre-
1987 SOHC Hatchback and Estate models
A Activated mode (fuel cut-off)
B Normal mode (fuel flowing)
C Trim panel access hole
8.1 Fuel pump location
A Inlet hose
B Outlet hoseC Electrical feed
D Flow damper7.3b Fuel pump inertia cut-off switch
location (arrowed) under spare wheel
6.28 Fuel injector/pressure regulator attachments - 1.8 litre (R6A) CVH
A Pressure regulator assembly
B Fuel inlet pipeC Injector/regulator wiring plug
D Injector/regulator screws
Caution: Refer to the
precautions in Section 1 before
proceeding.
Page 15 of 16

4Note the locations of the two solenoid
pipes, and the orientation of the solenoid, to
assist with refitting.
5Disconnect the two pipes from the
solenoid, and withdraw the solenoid from its
location.
6Refitting is a reversal of removal. Ensure
that the solenoid pipes are correctly
reconnected, and that the solenoid is
correctly orientated, as noted before removal.
1.6 and 1.8 litre (R6A type) CVH
models
7On 1.6 litre engines, the purge solenoid is
located to the rear of the carbon canister, on
the right-hand side of the engine
compartment. On 1.8 litre engines, the
location varies according to model and
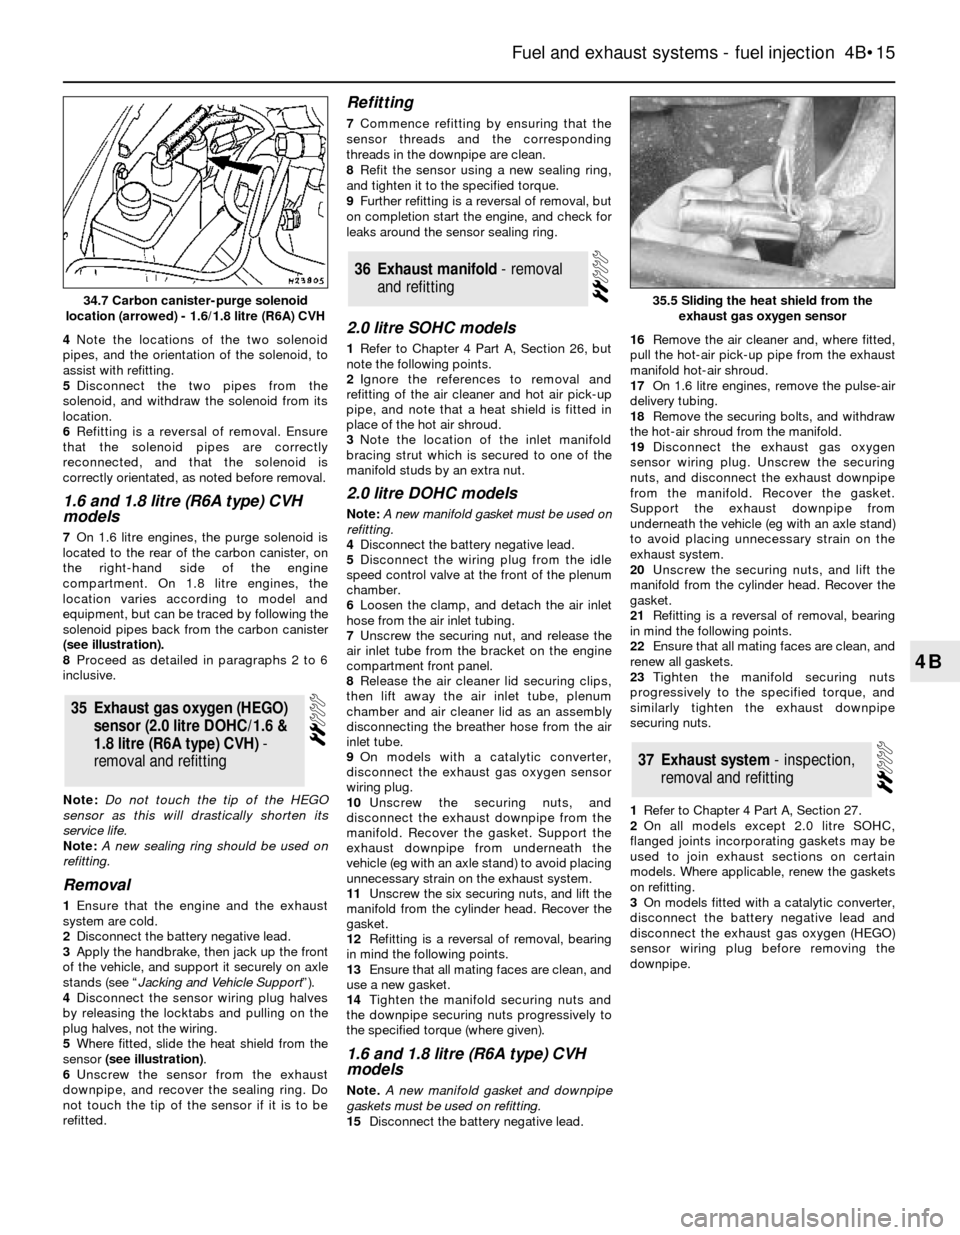
equipment, but can be traced by following the
solenoid pipes back from the carbon canister
(see illustration).
8Proceed as detailed in paragraphs 2 to 6
inclusive.
Note: Do not touch the tip of the HEGO
sensor as this will drastically shorten its
service life.
Note: A new sealing ring should be used on
refitting.
Removal
1Ensure that the engine and the exhaust
system are cold.
2Disconnect the battery negative lead.
3Apply the handbrake, then jack up the front
of the vehicle, and support it securely on axle
stands (see “Jacking and Vehicle Support”).
4Disconnect the sensor wiring plug halves
by releasing the locktabs and pulling on the
plug halves, not the wiring.
5Where fitted, slide the heat shield from the
sensor (see illustration).
6Unscrew the sensor from the exhaust
downpipe, and recover the sealing ring. Do
not touch the tip of the sensor if it is to be
refitted.
Refitting
7Commence refitting by ensuring that the
sensor threads and the corresponding
threads in the downpipe are clean.
8Refit the sensor using a new sealing ring,
and tighten it to the specified torque.
9Further refitting is a reversal of removal, but
on completion start the engine, and check for
leaks around the sensor sealing ring.
2.0 litre SOHC models
1Refer to Chapter 4 Part A, Section 26, but
note the following points.
2Ignore the references to removal and
refitting of the air cleaner and hot air pick-up
pipe, and note that a heat shield is fitted in
place of the hot air shroud.
3Note the location of the inlet manifold
bracing strut which is secured to one of the
manifold studs by an extra nut.
2.0 litre DOHC models
Note: A new manifold gasket must be used on
refitting.
4Disconnect the battery negative lead.
5Disconnect the wiring plug from the idle
speed control valve at the front of the plenum
chamber.
6Loosen the clamp, and detach the air inlet
hose from the air inlet tubing.
7Unscrew the securing nut, and release the
air inlet tube from the bracket on the engine
compartment front panel.
8Release the air cleaner lid securing clips,
then lift away the air inlet tube, plenum
chamber and air cleaner lid as an assembly
disconnecting the breather hose from the air
inlet tube.
9On models with a catalytic converter,
disconnect the exhaust gas oxygen sensor
wiring plug.
10Unscrew the securing nuts, and
disconnect the exhaust downpipe from the
manifold. Recover the gasket. Support the
exhaust downpipe from underneath the
vehicle (eg with an axle stand) to avoid placing
unnecessary strain on the exhaust system.
11Unscrew the six securing nuts, and lift the
manifold from the cylinder head. Recover the
gasket.
12Refitting is a reversal of removal, bearing
in mind the following points.
13Ensure that all mating faces are clean, and
use a new gasket.
14Tighten the manifold securing nuts and
the downpipe securing nuts progressively to
the specified torque (where given).
1.6 and 1.8 litre (R6A type) CVH
models
Note. A new manifold gasket and downpipe
gaskets must be used on refitting.
15Disconnect the battery negative lead.16Remove the air cleaner and, where fitted,
pull the hot-air pick-up pipe from the exhaust
manifold hot-air shroud.
17On 1.6 litre engines, remove the pulse-air
delivery tubing.
18Remove the securing bolts, and withdraw
the hot-air shroud from the manifold.
19Disconnect the exhaust gas oxygen
sensor wiring plug. Unscrew the securing
nuts, and disconnect the exhaust downpipe
from the manifold. Recover the gasket.
Support the exhaust downpipe from
underneath the vehicle (eg with an axle stand)
to avoid placing unnecessary strain on the
exhaust system.
20Unscrew the securing nuts, and lift the
manifold from the cylinder head. Recover the
gasket.
21Refitting is a reversal of removal, bearing
in mind the following points.
22Ensure that all mating faces are clean, and
renew all gaskets.
23Tighten the manifold securing nuts
progressively to the specified torque, and
similarly tighten the exhaust downpipe
securing nuts.
1Refer to Chapter 4 Part A, Section 27.
2On all models except 2.0 litre SOHC,
flanged joints incorporating gaskets may be
used to join exhaust sections on certain
models. Where applicable, renew the gaskets
on refitting.
3On models fitted with a catalytic converter,
disconnect the battery negative lead and
disconnect the exhaust gas oxygen (HEGO)
sensor wiring plug before removing the
downpipe.
37Exhaust system - inspection,
removal and refitting
36Exhaust manifold - removal
and refitting
35Exhaust gas oxygen (HEGO)
sensor (2.0 litre DOHC/1.6 &
1.8 litre (R6A type) CVH) -
removal and refitting
Fuel and exhaust systems - fuel injection 4B•15
4B
35.5 Sliding the heat shield from the
exhaust gas oxygen sensor34.7 Carbon canister-purge solenoid
location (arrowed) - 1.6/1.8 litre (R6A) CVH